


On Monday, I shared with you a pattern for cross-stitched snowflakes of a folky sort, that can be used to embellish table linens, ornaments, and whatnot for the holiday season.
In that article, we chatted about three ways that you can work cross stitch – or any counted technique, really – on plain weave fabric, but I didn’t clarify the third way you could do it, because I hadn’t finished my little stitchy projects to test it out.
But now I’ve finished them, so here we go!
All three methods involve some sort of something that supplies a grid for the plain weave fabric. Remember, plain weave fabric is any fabric that isn’t an even-weave fabric like the kind you’d normally use for counted work. There’s no grid on plain weave fabric, so you have to supply a grid, if you want decent looking cross stitches.

The first two options I mentioned were waste canvas and soluble canvas.
Waste canvas is a stiffish, open-weave fabric that you stitch over, and then you pull the threads of the canvas out from underneath your stitches.
Soluble canvas by DMC is a plastic sheet with evenly spaced holes in it, and you stitch into those holes.
A Third Option for Cross Stitching on Plain Weave Fabric
The third option is really very simple. It involves another product, and you might even have some on hand. It’s called Sticky Fabri-Solvy, and it’s a printable, stick-on, water-soluble stabilizer. It comes in printer-sized sheets (12 to a package), and it’s very easy to use.
Although I haven’t written an article devoted solely to Fabri-Solvy, I’ve written a tutorial and review about Transfer-eze, which came out before Fabri-Solvy, and which is exactly the same concept.
Mostly, Transfer-Eze and Sticky Fabri-Solvy are used in the hand embroidery world for surface embroidery. They supply an easy way to print a design and get it onto your fabric, to start stitching right away. They do have some drawbacks – and you certainly wouldn’t use them on any kind of embroidery that you couldn’t wash! – but this type of printable, water-soluble stabilizer is terrific for projects on washable household items, like flour sack towels and the like.
So, using Sticky Fabri-Solvy for cross stitch is not really much different from using it for surface embroidery, except that, instead of printing a design, you just print your grid.
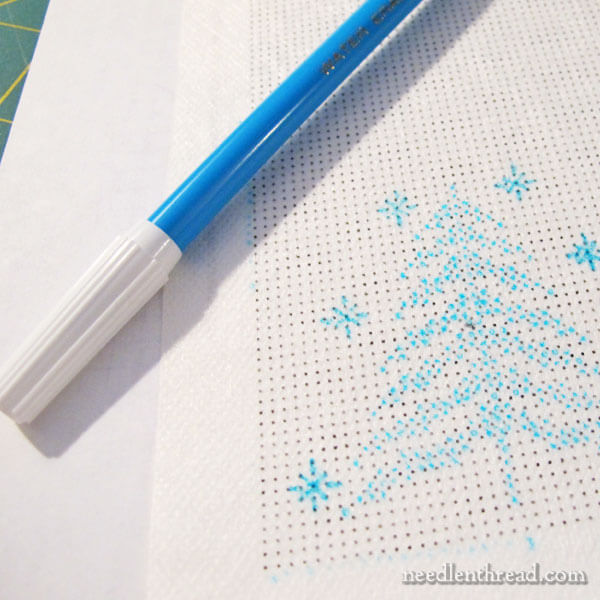
I like to print a dotted grid (I’ve included a PDF printable for this particular dotted grid below), rather than a full-line grid, but you can do either.
Then you just work your cross stitch on the grid, using the dots or the intersections on the grid as your stitch placement guide.
Or, you can do what I did, and use a water-soluble marker (or something similar – don’t use a Sharpie!) to pre-mark the design, so that I didn’t have to refer to a chart while actually stitching.
Pre-marking on the Solvy makes portable stitching super easy. If you’re riding in a car, commuting on a train or bus, flying on an airplane, or sitting in a waiting room somewhere, you don’t need to refer to a chart while you’re stitching.
Make sure that you test before hand to see if the pen you’re using to mark the design onto the Solvy will show, once the Solvy is stuck on your fabric. If you use a light blue pen like this and then stick the Solvy onto a light blue fabric, for example, you won’t be able to see the marks.
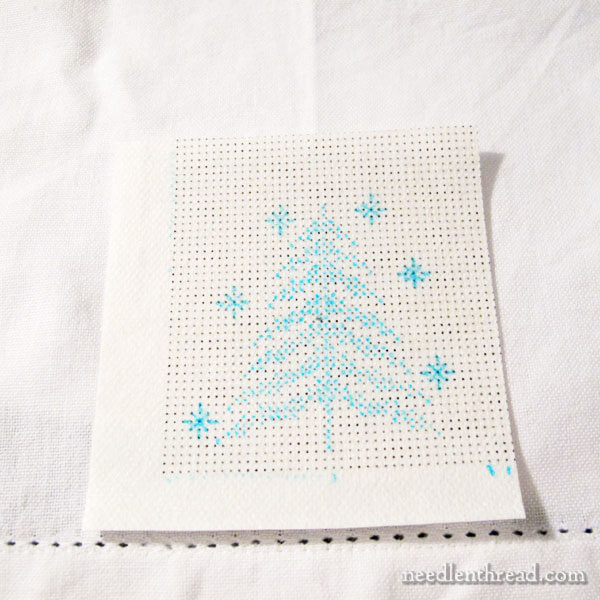
If you decide to pre-mark you design, you can cut around it, leaving a few squares of the grid for a margin (don’t cut right up to where your stitches end, as the Solvy gets messy on the edge if you’re stitching right over the edge).
Then, determine the placement of the design on your fabric, peel away the paper backing, and stick the Solvy into place.
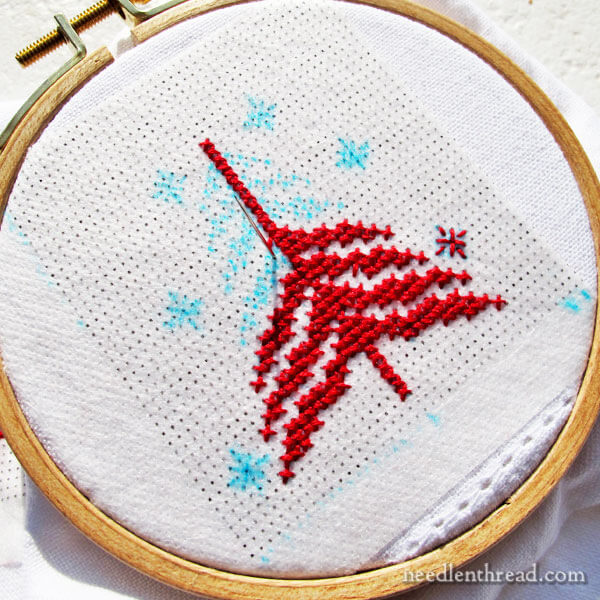
Stitch away!
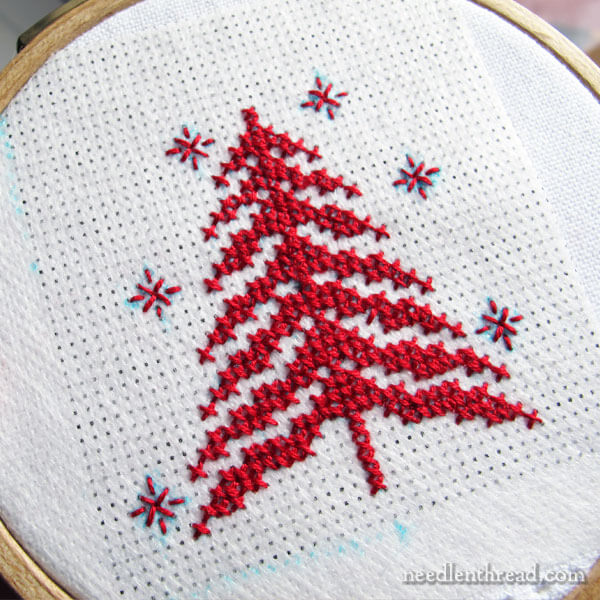
When you’re finished with the stitching, the next part is kind of fun!
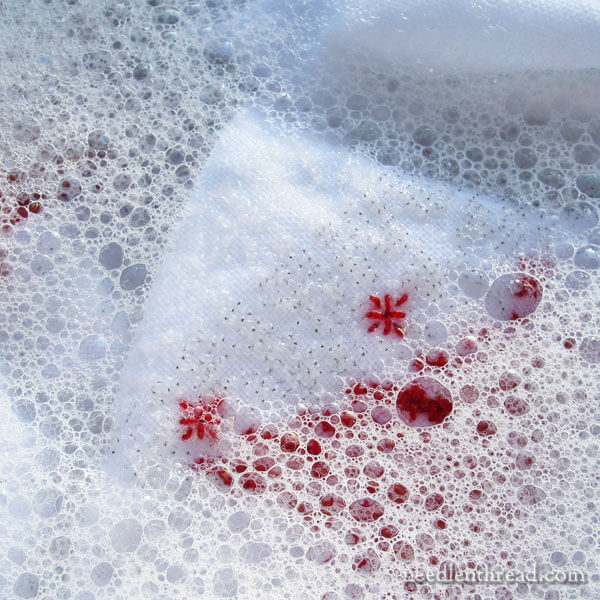
A little warm, soapy water bath for a few minutes, some extra spraying with the nozzle to make sure all the stabilizer and soap are rinsed away, and you’re finished!
The Pros and Cons of Different Methods
There are some pros and cons, in my opinion, to all three methods for working counted cross stitch on plain weave fabric.
Waste Canvas
Pros: It’s easy to see. It provides a similar “tactile” stitching experience to even-weave, since the needle slips right into a pre-determined spot. It can be had in different counts – 8.5 count, 10 count, 14 count, and 18 count, depending on the brand. It’s relatively inexpensive, compared to the water-soluble canvas mentioned below.
Cons: Waste canvas requires an extra step of basting the waste canvas in place. Waste canvas requires extra time and effort for the removal of the waste canvas, since you have to pull out each thread of the canvas individually from underneath the stitches. If you have a complex design, with lots of isolated stitches in it, I’ve found that removing the threads can really disrupt the stitches, even if you’ve pulled them tight. Some types of waste canvas recommend wetting the canvas before pulling the threads, to facilitate pulling them out. My stitches never look as good with waste canvas, but I know some stitchers really love the stuff.
DMC Water-Soluble Canvas
Pros: It’s easy to use, but it’s not always easy to see. Sometimes, especially if you’re working on white fabric, you might need to tilt your hoop to catch the light, so you can see where the holes are in the canvas. It provides a similar “tactile” stitching experience to stitching on even-weave, because there are pre-determined holes that your needle slips into. It allows for very precise stitching. It dissolves away after the stitching, without leaving any gapping between the stitches and the fabric. It works well, and it’s fun to stitch on.
Cons: It requires the extra step of basting the canvas onto the fabric. It works best when the design area and soluble canvas fit within your hoop. Because it is a plastic-like sheet and somewhat stiff, it’s difficult to hoop up if the soluble canvas is larger than your hoop. It is only available in 14 count canvas. It only comes in an 8″ x 8″ sheet, and the $5+ price tag for the one sheet is a bit steep.
Printed Grid on a Sticky Fabri-Solvy
Pros: Of all three methods, this is the least expensive for the amount of grid that you get. You can pick up a 12 sheet package for anywhere from $10-$12 at local quilt shops, sewing stores and the like, or, if you don’t have one available, you can find it for less than $10 through Amazon. You can pre-mark your design onto the Solvy, so that you don’t have to refer to a pattern while you stitch. It’s easy to hoop up, you can apply a hoop over the Solvy easily so that you can work larger designs with smaller hoops (which is great for long borders), and there’s no extra basting involved. It washes right away, quickly, and it doesn’t leave any space between the stitches and the fabric or disrupt the stitches at all. You can choose your stitch count and print a grid for whatever stitch count you want.
Cons: If you like the tactile stitching experience of even-weave fabric, where the needle slips right into the hole, you won’t get that with Sticky Fabri-Solvy. Stitching on this is like working surface embroidery. You have to be precise in the placement of your needle on the dots on the grid. And, while other stitchers say they never experience any stickiness on their needles when they use this stuff, I invariably always experience a slightly sticky residue on my needle when I stitch with this particular stabilizer. It’s not a big deal – I just run my needle into my pincushion now and then to freshen it up – but it is there, and I do feel it.
Printable Grid
If you want to give Sticky Fabri-Solvy a try with a printed grid, here’s a PDF for a 14 count grid that you can use. It will print on 8.5 x 11″ Fabri-Solvy, with a 1/2″ margin all around.
You can then pre-mark your design if you want, using a water-soluble marker or another marking tool (as discussed above). Or you can just stick the dotted Fabri-Solvy on your fabric and follow your design as you stitch.
Print at 100%, if you want an accurate 14 count grid.
14 count printable grid for Fabri-Solvy (PDF)
Creating Your Own Custom Grid
You can create your own printable graph paper online for free here at Incompetech. You can choose different types of graphs, different per-inch increments, and so forth, for any type of graph paper you want.
The cross-grid graph paper will give you just the intersections, and you can play around with the settings, until you get just a dot for the intersection. If you choose x and y lengths of 10 percent, and a cross line weight of 0.5 – 0.7, you’ll end up with dots. Then you can choose the cross spacing (however many intersections you want per inch – 14 for 14 count, 18 for 18 count), and you can also choose the color of the cross (the black works fine – the grey won’t show up well on the Sticky Fabri-Solvy).
What I’m Doing with This Stuff
I’m using these concepts to set up quite a few different cloth napkins, table toppers, and the like. I’m using a slew of mix-and-match folky motifs, which I’ll be sharing with you, for the designs. They all work together, but they aren’t all the same, which I think is a fun approach.
I’ll be working on these over the next several weeks, but especially while convalescing after surgery, which will take place November 18th. So if you don’t hear from me for a while around the 18th, you’ll know why. I’ll be on vacation at the hospital – just kickin’ back, you know!
This type of stitching is perfect for my current situation, and maybe some of you are in a similar situation, where you want something to do with your hands, but not something complicated. This takes very little planning and preparation, few supplies, no complex instructions. But it gives me something to do with my hands, and it will result in some nice Christmas gifts, which I’ll definitely be glad of, come December!
I hope you find these ideas handy! If you have any other ideas, or if you have any questions or suggestions, feel free to leave a comment below!
There another “con” to using a washable method. Some threads bleed onto the background. I found this out by accident and have used it to my advantage in shibori work rather than embroidery.
So if you sample and find your thread bleeds horribly, send it to me, please! 🙂
Diane
Hi, Diane – That’s a good point! With any kind of household linens and the like, it’s important to use thread that doesn’t run. So, with these types of projects, the wash away stabilizers are fine, because, of course, these are projects that would be washed, and the thread would be chosen accordingly. I’m using DMC cotton threads – they wash well.
I wondered about this aspect too, and I see Mary has already observed that DMC threads wash well. No idea if I’ll ever try this myself, but I’ve made a mental note anyway. 🙂
Hi Mary,
As always, this is a very useful article, and one that I will flag for future reference.
I’m really writing to send you my best wishes for a quick recover and hope all goes well with your hospital stay.
Kind regards,
Liz
Thanks a bunch, Liz!
Mary, thanks for this helpful info. i have a question about stabilizing fabric and hope you can find time to advise me. A year ago, i started embroidering an off-the-rack (LONG!) linen table runner that was signed and decorated by everyone celebrating our granddaughter’s official adoption. I expect to have it completed for the anniversary later this month and give it to her. This amazing child is just five years old.
Under the heading of “fools rush in.” I have been working with small hoops and never gave a thought to stabilizing or adding a backing. By the time i found you and learned about such things, there was no turning back. Now I know what i should’ve done. My vision was that it will be used for its original purpose, at least for special celebrations, requiring washability and ironing.
Is there anything you can suggest that would give this very lightweight, heavily stitched piece some additional body and, i hope, longevity? i have access to a skilled sewist if machine stitching is involved.
With many thanks and all good wishes always, especially as you take that journey into surgery and recovery! Bless you!!
Hi, Barbara – Well, if the piece is already finished, it would be difficult to back it with another piece of fabric. But if you have a skilled seamstress available, you might be able to take the whole table runner apart and reassemble it with a piece of fabric behind it, like a nice, sturdy linen. But that won’t change or necessarily help the stitching on the front, if the fabric is very fine or the stitching very dense and tight. The first thing I’d do is finish the embroidery and then block the table runner, to see how the whole piece comes out. Once it’s stretched, blocked, and dry, it might be fine without a backing. Normally, table linens don’t have backings, unless they’re some kind of quilted table runner or something. So I’d finish what you have, first, and then go from there.
What a wonderful keepsake project! Sure hope you can find a solution that stabilizes your runner for posterity. Mary, is there any possibility that Presto Sheer could help? This pre-shrunk 100% cotton iron on stabilizer doesn’t change the hand of the fabric. It was introduced to me in a Sue Spargo class where we used it to stabilize hand dyed silk velvet. I have since used it on 10mm silk habotai & on silk tie fabric (because it is cut on the bias) with good results. Not sure what the long term archival consequences are when an adhesive is involved, but it would surely protect the back of Barbara’s stitching & provide some support. Perhaps you or another reader who has more experience with the product will comment? Wishing you the best on the 18th!
Mary, thanks a bunch. I’ll have the finishing done and the piece blocked next week. Since it is unlined, i may still use your suggestion of adding a sturdy linen backing just to cut down on abrasion directly on the stitches. And then, dear daughter will have to preserve and protect for a few more years!
Dear Mary, Just wanted to say, I wish you a very speedy recovery from your surgery this month. I’m very grateful to you for all the tips, tuition and ideas on embroidery. The You-Tube tutorials are just brilliant, and the resources on your page are wonderful.
All good wishes,
Sue Betts
Thank you, Sue!
Lovely article and instructions, how-tos, and tips as usual Mary. So useful to have this kind of resource.
Best wishes for a swift and care-free recovery!
Thanks, Maureen!
Dear Mary
I, as well as your legions of loyal and grateful readers, will be thinking of you over the coming days and weeks as you have surgery and then “enjoy” your recuperation with some needlework. I have found needlework to be invaluable as a boredom chaser during similar circumstances. An audio book helps as well. I wish you well and a full and complete recovery. Please let us know how you are doing when you can. Until then I will be a bit worried.
Peace, love and prayers
Joan
Thanks so much, Joan! Please don’t worry. The prognosis is actually fairly good and I have confidence in the surgeon. I like her a lot, and she has tons of experience. I’ll just be glad when it’s over! 🙂
Dear Mary
I do hope your surgery is successful and that you will recover quickly and be back with us very soon after surgery. This is a great idea for those times when you need an easy project with little concentration and the sticky fabri-solvy looks like the perfect solution for your Christmas projects. I look forward to seeing all your folky motifs soon. Thanks for sharing these tips with us on crosstitch designs and for the links to the different graph designs. Take Care.
Regards Anita Simmance
Thanks, Anita!
Thank you for all of the info – I’ve always wanted to do napkins and now I find, through you, an easy way to do them.
Praying your surgery goes well.
Blessings, Donna
Hope all goes well – but as a veteran of many surgeries and the recuperation therefrom, make sure you are down to a reasonable dose of pain meds before stitching! I have had very poor results with trying to stitch in the first few days – lots of frogging and one trashed project.
If it involves rehab, please do what the PT says – only way to recover quickly.
Best wishes,
Kathy
I have been using sticky-fabri-solvy for a couple of years now for surface embroidery and I LOVE LOVE LOVE it! My hands are not steady enough to transfer a fairly elaborate design to fabric using any of the other methods you’ve talked about over the years. I’m planning on doing another Tudor Rose, from your Marian Medallion, especially since DMC is discontinuing some of their more luscious colors of floche! Can you believ that Mary? I was so shocked. I’ll be stocking up on the gorgeous deep red that they are discontinuing. Good luck with your surgery and do what the doc says for therapy afterward. it’s not fun but it serves a purpose. Also, if you have access to a swimming pool, water therapy is wonderful. we’ll be thinking about you, so have somebody let us know how it went.
Very best wishes for a speedy recovery, Mary. Will be sending you flowers and grapes via a satellite!
Mary, just want to extend my best wishes for the success of your upcoming surgery and for a speedy recovery!
This might not work for cross stitch, or for a symmetrical border around a square, where it’s important to have the stitches *square,* but you can do counted-thread on non-even-weave fabric, by figuring out how many threads in each direction will make a square. I did this for a wide Holbein-stitch border on a linen apron, for historical costume – my linen worked out to 3×4 threads were square, so I worked the stitches over that. There’s one place where I worked a stitch over 4×4 threads in the first row, and didn’t discover it until I had that row and half the next completed, so I just worked that same stitch over 4×4 threads in every row, to keep the pattern lined up . . . I just figured it was a very historically accurate kind of mistake.
Hi Sandy, Thank you very much for explaining the way you achieved your linen apron. I have a large piece of finely woven red linen cotton and Mary’s project is very tantalising at this time of year. Yours is a very clever solution to working this type of fabric, yet challenging!! But I LOL with the way you rationalised the 4×4 section. With a very small slight of hand, embroiderers can finish tricky work and keep on track with other projects. Yes, we are human after all!!
Hi Mary- This article on graphing has hit the bulls eye!! I have been wondering where to find printable grids for using with non-even weave fabric and here you are with the answer. Thank you so much, you are amazing. Best…Karen
Wishing you a successful surgery and speedy recovery!
What about just using the threads themselves as the grid. Yes, it will elongate your pattern (or make it wider) but that can be quite interesting sometimes. Years ago, before my eyesight got older, I would cross stitch small things on unbleached muslin. Tiny, tiny works but looking at them now they are delightful.
I do this sometimes too! Plenty of designs don’t mind being stretched. If you look at counted work in antique embroideries, such as samplers or peasant costumes, the weave is almost never perfectly even and it does make them more interesting. I do consider to which direction I want the design stretched in. Also, depending on the fabric, sometimes stitching over two by three threads or three by four can make the design fairly even.
Hope your health concerns are soon just a memory.
Mary, our thoughts and prayers are with you, the hospital staff and doctors. We will also be sending up messages for your quick recovery.
I have very good luck printing the pdf grid files onto 15 or 17 pound translucent “paper”, basting that down and after stitching removing the “paper” with a pair of good tweezers. The paper is so thin that it slides out quite easily if I puncture it between the stitch arms with a sharp needle, and cut the far end off close to the completed stitch. The material is really a plastic and paper combination. When I puncture the sheet after stitching, I only go either horizontally or vertically, NOT both.
Dear Mary, I have always loved your website and all the useful info you give so freely.
I wanted to send you lots of good wishes and thoughts for your up and coming operation. Hope all goes well and you are back up and raring to go (but not too soon)
Thinking of you
Joy
The Fabri-Solvy is a great idea! Rather than printing a grid and drawing the design, I think I would just print my chart straight onto the Fabri-Solvy… call me lazy 🙂
Best wishes for your surgery, Mary.
H, Nays – that’s a great idea, if you can manage two things: 1. That your chart prints at the stitch count you want, or that you can adjust the size so that it does. 2. That you can dull the colors or symbols or color blocks or what-have-you on the chart, enough that the color won’t be problematic when you rinse off the interfacing. Sometimes, dark colors in the ink will run onto the fabric. I haven’t had that problem with the very small dots, but I have had the problem when printing a design line that was too heavy, because I forgot to lighten it before printing.
This is such an interesting post, Mary, one that I shall keep for future reference.
But really, I want to wish you well for your surgery on 18th: hope you make a very quick and full recovery
Very best wishes for the 18th, and for a trouble-free recovery afterwards.
Dear Mary, Such a excellent, informative post. Thank you so much. I know that there are many more like me “out there” thinking of you at the moment and wishing you all the very best over the coming weeks. Take care. XO
Best wishes for you recovery. I look forward to your email everyday, so each day when I don’t see it I will remember you are still needing to be on my prayer list.
Huggeroos
Raquelle
Dear Mary, I will be holding you in my heart on the 18th and sending healing and comforting thoughts your way. Love, Mary Frances (You don’t know me, but you have touched my life and made me very happy every time I read your emails! Thanks so very much!)
Dear Mary
All the best for your surgery, I’ve managed to have 4 surgeries in the past 2 years and just temporarily avoided another one, so my thoughts are with you! I took some simple cross stitch to hospital, but didn’t feel like doing it, so good luck!!
Julie in Australia
Thank you for all your very useful advice Mary!
All the best with your surgery and recovery. I do hope it goes well.
Take care Mary, have a speedy recovery!
Thank you for all your tips and designs. Frequently, I have referred fellow stitchers to your web site for help with specific stitches and finishing techniques. All of them have been impressed with the quality of your tutorials.
Sending good thoughts your way for your upcoming procedure and recovery
Dear Mary,
Praying for you.
Hele
Thanks, Helen!
Hi, Mary
I think I must be the only one who doesn’t know this – what do you do on the back of a towel or other item where the back shows? Appliqué a patch over the stitching? Make your stitches extra tidy? Thanks for any help you can give me.
If I lived closer to you, I’d peel you some grapes and fan you with a palm frond to help you recover quickly. Good wishes to you during surgery and recovery. Take care now, Nancy
Thanks, Nancy!
On the back of embroidered household items, the stitches normally show. They’re not usually covered. So it is worthwhile to take extra care to keep things neat, but I wouldn’t stress out over it. The back is the back, and it doesn’t look like the front, and that is normal.
All the very best wishes being sent your way for successful surgery and recovery.
Thanks,Liz!
Hello Mary,
I am wondering if it would work to just print the chart onto the fabri-solvy material rather than the dot grid. It would save the hand marking of the X’s, but you’d have to set your needle at the intersection of the lines rather than at a dot. Would there be too much ink from the printer in the project that might not wash away?
Hi, Beth – yes, that’s just the problem. I can’t adjust the opacity on the chart when I print it, so I need to keep the ink from being “too much” or it doesn’t all wash out – and worse, it gets on the white thread, so the soluble pen works well for that, so far anyway! I’ll keep testing, though, and maybe I’ll come up with a way to keep the integrity of the stitch count on the grid, and yet be able to adjust the opacity of the ink. Something to work on!
Mary, I just read this article and found it extremely informative! You explain simply and concisely, making it easy for everyone to comprehend. Congratulations! I love reading your emails, etc, but wish you were closer in order to be able to visit! Keep up the excellent work and keep planning/thinking ahead!
Thank you, I needed that information.
I’m a long time quilter, appliquer and silk ribbon embroiderer. I found your website through a friend and I so appreciate you and your generosity in sharing allllllllllllllllll this helpful information and links.
You also have a sense of humore which I appreciate.
Quick healing for you and may your family have a wonderful Christmas and the best New Year.
Warmly, Jan
Can you print the design and the grid on Sticky fabri-solve? Does anyone offer downloads to do this? I am asking for my niece who loves cross stitch.
I love your blog and find it a great source of inspiration and information, especially the “how to” videos!
i am in the middle of a project for a friend…putting a dragon design onto a tablecloth…91 x 102 inches..
i have the pattern printed out showing how many stitches per row and stuff….my question is. is there a way that i can just transfer uniform Xs across the entire cloth and then use my pattern for the threads im using. what im looking for is some sort of transfer paper to put Xs on the whole canvas and just work it out….so my Xs and lines are more uniform looking. the pattern is 700 stitches wide and 991 rows lengthwise. any help would be great….callme with any help i dont get to the email much. Thanks. Robyn
This has been very useful, thank you Diane. I am doing a table runner, but started by using soluble canvas, which is great because it provides the holes, but not so great as I have found it puckers easily and you can find yourself sewing squiffy lines if you are not careful. I had to cut the canvas into 4 strips, using 3 on this project, which meant overlapping the ends (not easy!) As I haven’t started on the third strip, and having found your instructions, I have now sent for some sticky fabri solvy which will arrive tomorrow. Can’t wait to try it out in place of the soluble canvas!
Thank you for sharing this information. I hadn’t looked into the Sticky Solvy, very good to know that a graph can be printed on it for cross stitch.