


When I was in high school, I made my first hand-made greeting cards.
On the back of them, I drew a little hairy guy with long fangs, and I wrote under him, “Because I care enough to send the hairy beast.” I’m sure it wasn’t an original idea, but, with my sick sense of humor, I thought it was funny.
You know the Hallmark card slogan? “When you care enough to send the very best”? It’s a great slogan – those are pretty powerful words that have worked well for years in the marketing of greeting cards.
But a long time ago, I realized that I could show that I cared enough to send the very best (or the hairy beast), a different way – and that’s by making my own cards.
If you embroider even just a little bit, your stitching skill is a terrific medium for creating cards that are personal, pretty, festive, and a gift in themselves.
The only real investment you have to make when you want to embroider cards – assuming you have even just a little bit of embroidery stash and some card stock – is the investment of time. And that’s when you demonstrate that you real do care enough to send the very best, because you’re sending a piece of yourself!
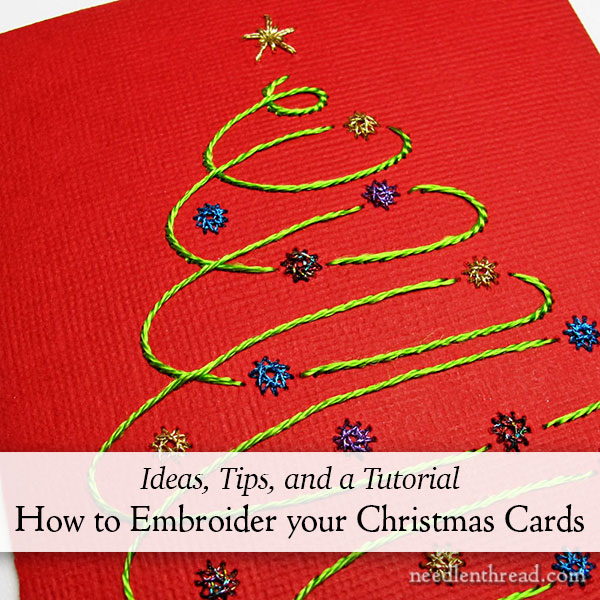
Embroidery on paper has been around for a while. There are All Kinds of Ways you can go about embroidering your own Christmas and greeting cards.
All of them are easy. Some of them are a little different, some more complex than others, but all are easy.
If you’re interested in really adding a personal touch to your greeting cards this Christmas, why not spend a few leisurely weekends between now and then, stitching up some cards? If you have kids, it’s a great activity for them, too!
More Information on Embroidery on Paper
You can find a lot more information about embroidery on paper and stitching your own Christmas cards here on Needle ‘n Thread already, because I’ve touched on the subject off and on over the years. Here are some links you might find helpful for further information:
Embroidery on Paper is Fun – a hand embroidered card with beads (and resources)
Designing your Own Embroidered Cards
A hand embroidered card with ribbon embroidery
Embroidery on Paper – Book Reviews (books with tips and patterns)
A wee bit of stitching on Christmas Cards
A Christmas Card, Embroidered, with Bling
More Christmas Cards, embroidered and assembled, with tips
Embroidery and Paper Cutting: Lacy Name Cards
What About You?
Do you ever embroider your own cards? Or do you think it’s too much of a hassle? Do you have any tips or ideas that you could share with other readers who might be interested in stitching up some Christmas cards this year? Feel free to chime in below with your thoughts!
Think of you every day Mary, hope you are holding up well and that you are still immensely positive. H
Thanks, Hazel! Things are trudging along ok! 🙂
I have been doing embroidery for cards for a long time, but usually with perforated paper. It is easily painted or colored, very stout to support beads and other bits, and inexpensive. It is wonderful for Christmas and birthdays, but even more special for Thank You’s and condolence cards. I’ve never had any problems with them going through the mail, but usually do put ‘please hand cancel’ on the envelope.
No, I have not embroidered cards on paper. I did do a couple very small cross stitch cards, but the stitching was done on Aida cloth, which is then inserted into the card.
I’m not sure why I’ve never done embroidery on paper, for cards or otherwise, I love the results. Maybe it’s the time to prick (and find) a design? Just never think about it far enough ahead of time? It would definitely be a special-person card.
That’s a very nice tutorial at Commonthread
I think one of the reasons I would hesitate to embroider Christmas cards is the (real) fear that the card would most likely be tossed after Christmas.
Dear Mary
What a great idea and really nice personal touch, it really means you care. I have a sister who is into card crafting and makes some lovely cards so adding embroidery to cards would certainly make them special. I’ve looked at the links to your tutorial on embroidery card making and they are great I hadn’t realised there were so many articles on embroidered cards thats great for when I’m ready to try this. Thanks for the links and tutorials on card embroidery they will come in handy for future reference.
Regards Anita Simmance
I embroider cards off and on; it’s sort of relaxing. I like to use relatively simple designs and patterns, but it’s still a great way to add a personal touch! (and a great way to use up extra threads!)
I tried it once and didn’t really like how it turned out. But I think next year I shall try this for my Christmas cards. I love making my own cards. Thanks for all these resources, Mary!
I love the idea. I’ve seen bits and pieces on the topic of stitching on card stock but haven’t seen actual books on the topic. Thanks for sharing some actual book suggestions.
I love to stitch things and make them into cards. But typically I stitch on fabric and then attach to card stock with embellishments to jazz them up a bit. It’s a great way to make up quick projects and then make good use of them.
On topic/off topic here: I wanted to post a photo of one of the cards I made under the heading “Ask and Share.” Seems I never did make an account here, just started posting I guess. But when I wanted to create one with name and a password, it said the function was not available. Did I miss a step or the sharing bit shut down for awhile?
Hi, Irene – the Ask & Share is available to view, but not to post on or anything. I’m phasing it out – although the information will still be there, it won’t be an interactive forum. It creates too heavy a load on my site, it’s too much for me to keep up with regularly, and it was costing me too much for upkeep. I have a different solution coming down the road! If you have a Flickr account or anything like that, you could always post the photo there and post a link here in the comments section. Or if you use pinterest, you could upload the photo and post a link.
Thank you dear Mary for explaining. The picture wasn’t that important. Just an impulse to share. 🙂 I do enjoy card making.
For years, I taught paper embroidery on cards and other crafts. I’ll admit to not reading the instructions at StitchingCards,com because I’ve done needlework since I was 10. Something prompted me to read it and I found the best tip. When you have finished stitching, turn the cardstock to the back and take the backside “bowl” of a spoon and run it over the holes you have pricked to help fill them in. I saw on one of your posts you said you used the wrong size pricking tool. This technique helps hide that. Don’t press too hard (especially if using a shiny cardstock). I can definitely see the difference in cards I made prior to using this tip!
I have enjoyed your daily posts for years, Mary. I do chime in occasionally. And I thought today you deserved a special thank-you for this post. It sure looks like it would be fun and easy–so I may try it. That is what you do best: encourage all you readers to expand their horizons. Thank-you!!
Hello Mary, lovely to hear you. I’m a fanatical hand-sewn card maker! Sometimes using stitched card, but often on one type of fabric or another which I then either put in a ‘window’, or simply stick to the front. Butterflies are my passion! On nights when it’s difficult to sleep, I simply plan more card designs! Your site has given me so many ideas as well. I try to raise a little money for local wildlife with them.
I have embroidered and cross stitched cards on cloth but have tried paper. You make it look simple.
I tried stitching on a card I made one year for husband for Valentine’s Day. It was our custom to make each other something for Valentine’s to serve as the gift and the card – something small. (This stopped when we ran out of ideas – the last thing I made him was a heart with pennies taped to it which said “Make scents to love you”, now we just don’t bother.) What I found was that the card, made on fairly heavy weight cardstock, ripped along the stitching line. I did not make teeny tiny stitches, but did not make huge ones either. This was the last attempt at same.
Also we know that other than each other no one will appreciate the handmade cards. How do we know this? Among other crafts my husband does paper cutting – the German technique of Schernschnitte as well as silhouettes. One year he sat and made all of the cards we sent out by hand – a laborious process. The comments we received back were along the line of “handmade card, huh, too cheap to buy cards?” So we never plan to make them again.
Another great post that took me hither and dither along a delightful path of discovery and inspiration. Mary, you are so cool.
I live in California, which is too far away to drop by with a casserole, or to offer you a ride to the doctor, etc. But you are in my thoughts and in my prayers.
Katrina
Hope you are keeping well Mary. Visiting the site after “finding” it on Mabel Figworthys Fancies.
I have been stitching Christmas and greeting cards for many years, mostly cross stitch, recently some hardanger and now crewel thanks to your inspiring designs and great tutorials. One friend has a special corner where every card I have sent her (15 to date) is displayed at Christmas. On the other hand I occasionally hear the comment ” Oh, you needn’t have if you can’t afford to buy one “.
Mary–so glad you asked a question that I could answer! This is a class that I taught in PA–super fun & easy. The key is the cardstock–80lb. This is NOT the cardstock you get at the local craft store! My card came from Hollo’s Papercraft in Brunswick, OH & was purchased in a pad of large sheets. They cut them to the size I specified & sold me envelopes to match. The card was cut into strips (very little waste) so the finished cards would be tri-fold. With tri-fold, the back side of the stitching is concealed because the fold is secured with double faced tape. With 80lb card, you can also fuse a fabric shape (quilt weight cotton) with Pellon. Fuse first, then stitch. The best stitch to use is backstitch using multiple strands of floss. Pre-prick the pattern (any simple line drawing) with an embroidery needle (stuck in a cork if necessary), then switch to a tapestry needle for the embroidery. Holes should be 1/8″ to 3/16″ apart & tight curves require a smaller space between holes. No knots, just a small tail to start. The tapestry needle enlarges the holes & helps maintain tension on the thread. Use Elmer’s Craft Bond glue stick or tape to secure tails at beginning & end. Phoebe shouldn’t worry–everyone who received one of my cards has kept it! And for Meryl–this was a beginner class & there were no issues with the 80lb card. However, with tri-fold, you could always make a little patch on the back side with tape or a snippit. One of my cards was a fabric stocking outlined in backstitch. The cuff was backstitched & furry thread looped thru to make it fluffy.
Years ago I made all my cards but as my list grew and my time to create grew less I finally gave them up. Now, it seems, I have replaced cards with making ornaments.
I embroider all my cards and have done so for years. I absolutely love it.
Please feel free to visit my blog and see some of my work.
http://mypapercat.blogspot.co.za/
Do you sell the design with the swirly tree? I want to do cards for Christmas.
Susan
No, I sure don’t. I can’t remember off hand where I found that particular design. It could have been a book; it could have been a purchased pattern. Sorry! :-/