


A Fabulous Friday all around! Today, I’ll show you some progress on Late Harvest, discuss some woes and triumphs, offer some tips that you might find helpful in your own embroidery pursuits, and beat myself over the head for some deliberate oversights.
For those of you just joining in here on Needle ‘n Thread, one of my latest Pleasure Projects – one of those projects I’m working through just for the fun of it – is Late Harvest, designed by Hazel Blompkamp and featured in her book Crewel Intensions, which I reviewed in depth here.
And Late Harvest IS fun! Even though I run into many self-induced snags along the way, it’s rather exhilarating to work my way out of them and to make up my mind how to attack similar situations later on.
It’s a particularly fun project, too, because there’s enough variety in it that you don’t get bored doing the same thing over and over again.
At the same time, there’s enough similarity among many of the elements that you really have the opportunity to improve on certain skills. I figure there’s always room for improvement in every path of life, including my embroidery. Anything that makes me better, I like! Even if the experience can be kind of grueling at the time!
So, here’s a recap on my latest jaunt with Late Harvest.
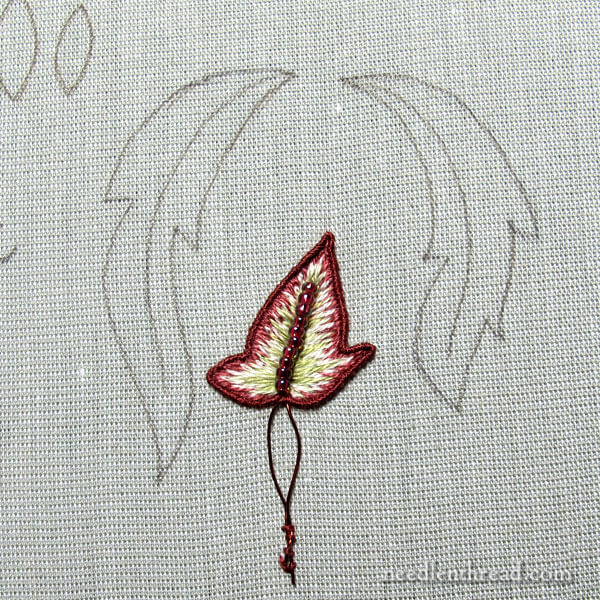
When last we visited this project, I was working on this teeny tiny stumpwork leaf. You can read about it here, if you haven’t seen the development of that little leaf. Remember, it fits underneath the top knuckle of my index finger (there’s a picture on the previous article), so it really is a little leaf.
Once the wire outline was completely stitched, I tacked down the ends of the wires to keep future threads from snagging on them. Some folks use tape to hold the ends down, by I find a group of tacking stitches works great and eliminates an accumulation of tape across the embroidery fabric. At the end, I’ll just snip the tacking stitches and free up the wires. Works for me. Do it whatever way works for you!
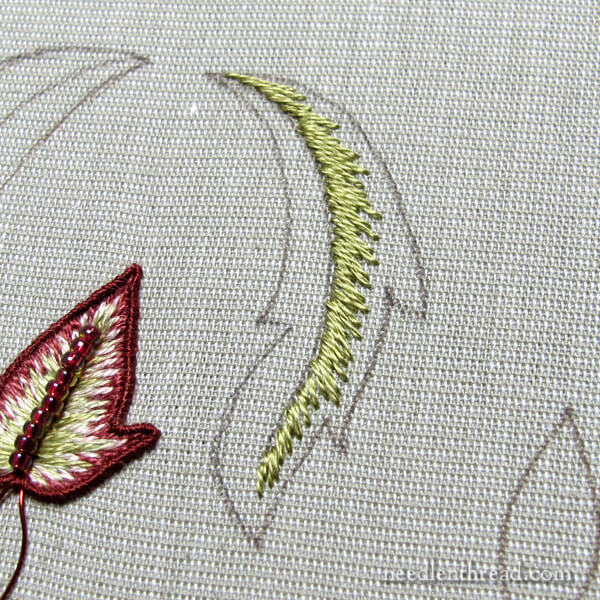
On the elongated leaves on the side, since they are so similar, I decided to work one following Hazel’s approach to long and short stitch and one following my approach.
We’ve discussed the two approaches in past articles on this project in particular. Hazel likes to work long and short stitch from inside the element out towards the outline. I like to work long and short stitch from the outline of the element to the inside.
I want to stress here, again, that either way will work on this project. On certain types of long and short stitch, on certain types of designs, the direction may very well change the outcome (for example, realistic needle painted animals and birds).
The key to getting the most pleasure out of this type of project, though, where the direction doesn’t really matter, is to do it the way you are most comfortable. The results will not be that different or that noticeable if you work from the opposite direction.
That being said, even though I’m more comfortable stitching from the opposite direction, I like to give different approaches a chance and I like to try different things with my needle and thread.
So I put myself through the torture of stitching this particular leaf backwards. As you can see in the photo above, I began the long and short stitch at the center vein and worked out towards the edges of the leaf. I learned a lot along the way!
The first thing I noticed – and this isn’t unusual, no matter what direction you’re going with the long and short stitch – is that the right side of the center section was much easier to stitch than the left. I had a hard time getting and keeping a good angle on the left side of the leaf.
Would I have had the same experience, stitching from the outside of the leaf to the inside? Yes. But in situations like that, I normally will turn my frame 180 degrees so that the leaf is upside down, to get the angle in and get going with the leaf. It helps.
On this one, turning the frame didn’t really help, and I think it made it more difficult, even!
I felt totally discombobulated, stitching the left side of this leaf!
Another mistake: It was at this point that I said to myself quite sternly, You really need to get the magnifier out. So I reached up to my lamp and increased the amount of light, ignoring my better advice. I came to regret that later.
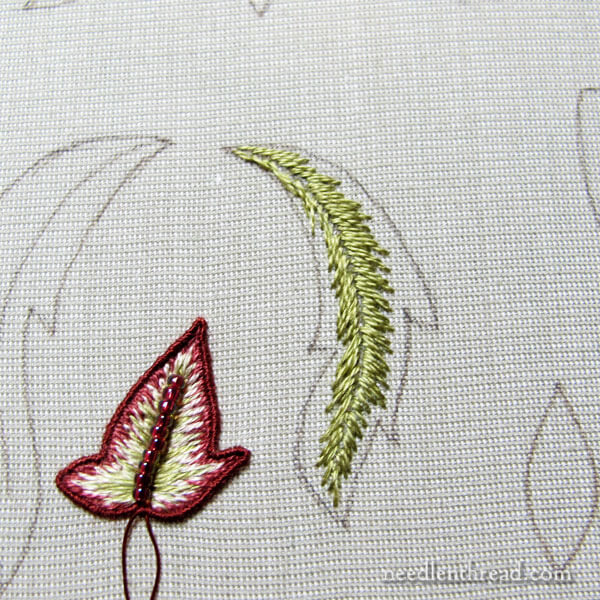
The second layer of green went in ok, but I was starting to worry here, because there are four shades in this narrow leaf. The last color is the burgundy, and I was afraid that it might be very tight in there once I got to the burgundy.
While I was working with the lighter green, the diligent side of me said once more, “Get out the magnifier!”
And the lazy side of me just kept going.
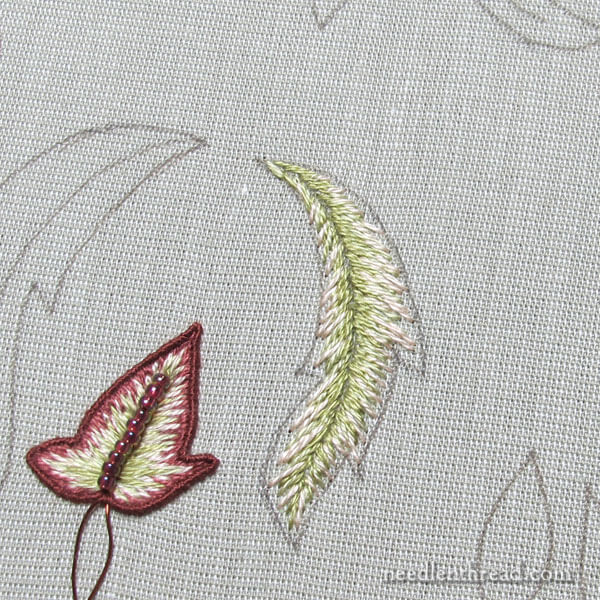
The third layer of color is in. This is a straw color, and it ended up taking over the lighter green almost completely.
When you’re working with shade levels that are very similar, it’s easy to lose a layer of color in long and short stitch. This is why a magnifier helps tremendously! You can see better, to ensure that you don’t completely swamp the previous similar shade. (Did I get out the magnifier yet? Oh no.)
You can also be a little more sparse in your stitching, on subsequent layers of color that are similar in shade to your previous layers. For example, you don’t have to fill in a whole solid row of the shade. You can space out your stitches more, giving both shades the opportunity to be seen.
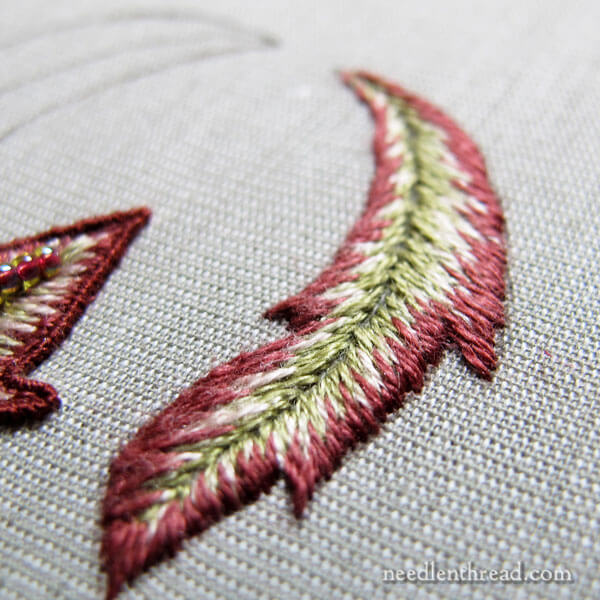
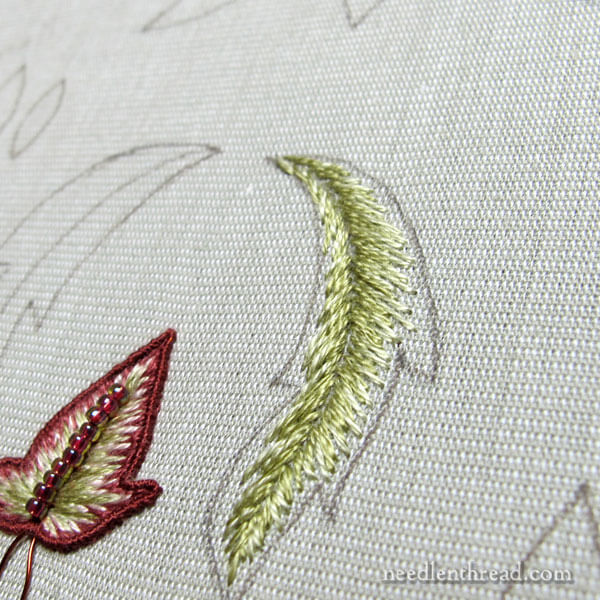
Finally, the burgundy outer layer. Lots of contrast here, which is what makes the leaf so striking!
I went very deep into the other layers with the burgundy, and ended up with a rather heavier edge than required. At first, I liked this, but then I remembered the beads.

The line of beads down the center is pretty heavy and covers a lot of the center. So my leaf ended up a little thick on the burgundy, especially once the wires were worked.
Stitching time on this leaf from start to finish: 3 hours.
Three Lessons Learned
1. It took a while to make this decision absolutely, but I don’t need to put myself through the grief of working backwards anymore. I gave it a good shot, but I’ll be doing the rest of the long and short stitch on this project in my normal order of work, from the outside edge to the center. Remember, if it doesn’t make a difference to you, it won’t make that much of a difference in the outcome, either, so stitch in whichever direction you’re most comfortable in.
2. I found it easier, quicker, and neater, overcasting the wire on the first little leaf. On the little leaf, I worked the leaf in the conventional way, with a split stitch outline first and the long and short stitch worked over the outline. (You can see the order of stitching in the article about the little leaf). That split stitch outline gave me a nice comfortable edge to snug the wire up against and to overcast into the very edge of the leaf.
3. Always, and I mean always, do what it takes to reduce eye strain when you’re stitching – and do it immediately, when you first notice you need to do something. Increase your light, add magnification, take a break, whatever. In my case, with this leaf, I needed the magnifier and I knew it. The next day, I couldn’t stitch at all. My eyes were sore and strained and headachy. A good lesson learned. And trust me, this is one you want to learn vicariously, not through trial and error! Just take my word for it – your eyes are precious, and especially if you’re getting to the age where they aren’t working quite as well as they used to, you need to be extra careful! I’ve been using this magnifier and lighting combo for years and I love it. I’m getting ready to invest in a different magnifier / light combo, to use inside my house. I’ll be reviewing the new one soon and comparing the two.
So, that was my recent leafy adventures with Late Harvest. Once I get the third leaf in this group finished, I’ll move back to the main embroidery frame and switch to some different elements for the sake of variety. I might even start adding some of those luscious golden grapes, just for the fun of it!
Coming Up on Needle ‘n Thread
I’m planning on some light stitching this weekend, some of it using the free pattern I told you about yesterday. I’ll share my results and a bead tutorial with you soon.
I also have a special treat for you next week, with a guest post featuring some fantastically beautiful stumpwork and some great tips on designing your own pieces.
I hope you a terrific weekend and I’ll see you next week!
Dear Mary
I agree about the magnifier I use it all the time as I can’t see my stitching without a light/magnifier. Your leaf is lovely I like the contrast of the green and burgundy. I look forward to your progress especially viewing the luscious green grapes wonderful. I can’t wait for you to start the reproduction sampler. The guest stumpwork sounds really interesting looking forward to that. Thanks for sharing your tips on the L&S stitch and for sharing your lessons on the project. I do hope you have a great weekend.
Regards Anita Simmance
Thank you so much. Have a great weekend.
On Mary, you have no idea how amusing and encouraging it is to read about your fallibility and to realise that I am not the only one who doesn’t promptly do the sensible thing e.g. get the magnifier!
Lovely! I am watching this series closely as I’m hoping to do Late Harvest myself sometime. I decided that I wanted to do A Sherry for Jack, the smaller project in the book, first, to get the feel of things. I haven’t done much crewel work at all. I’ve been collecting the threads for it and it’s been giving me fits. The metallic threads are out of production, the special dentelles I’d have to order (and two of THEM are out too)…I’ve decided to do my best with what I can get, and try needleweaving with plain embroidery thread in hopes that it will work….
Both your leaves look magnificent to me! I am so grateful to you for your review of the light magnifier; I bought one that looks identical (different brandname in Oz but I’m sure it’s the same lamp) and now I can’t stitch without it. Since I was getting to the stage of not being able to stitch at all, that’s fine by me!
I enjoyed the discussion of the different orders of work for the stitch – something I hadn’t really given much thought to before. I have yet to try l&s stitch with any element of success, so these tips will come in handy.
I think you have one of the best web sites in existence and that you are EXTREMELY talented. I have been receiving your newsletters for a few years! I just wanted you to know that you are very appreciated and thank you for the things you do!! Have a WONDERFUL day!
🙂 Thanks, Marie!!