


After setting up Modern Crewel, the embroidery project we looked at here last week, it was hard to tear myself away from it!
You know how that is, don’t you? You have every intention of “just doing a little bit right now to get started” … and then, next thing you know, you’re engrossed, and that little bit turns into a lotta bit.

Funny thing is, today I was going to write to you about Time Management and embroidery projects. You can see how well I managed my time on preparing that one! Golly. What a week!
So I got hooked into Modern Crewel, and found myself moving forward on the stem or trunk of the main element, which is a pomegranate.
This part of the project is worked in raised stem stitch. You can find my how-to video for raised stem stitch here, and a step-by-step photo tutorial for it here. It’s a nice variation on stem stitch, and it gives quite a bit of lift and texture to an embroidered element.
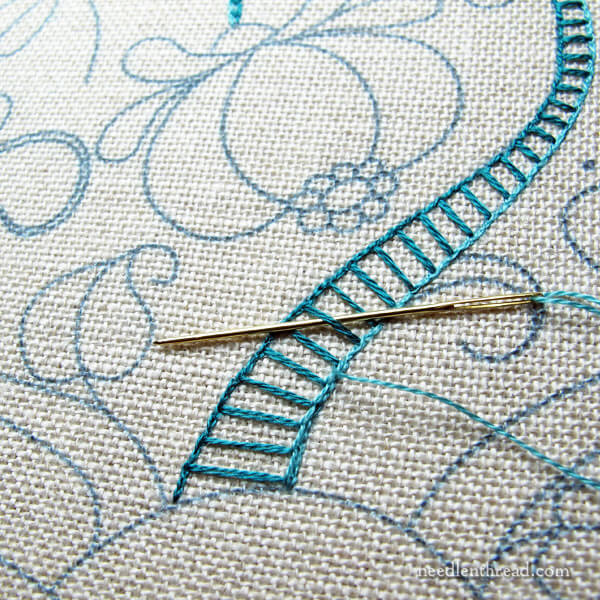
One tip that might come in handy when working this stitch is to use a tapestry needle instead of a regular embroidery or crewel needle when working the stem stitch over the foundation stitches.
A tapestry needle with its blunt tip is a better choice of needle in this instance, because the tip won’t snag on the previous stitches as you pass under them. A crewel needle (with a sharp point) is more likely to snag those stitches.
If you’re working the same project, then, and you haven’t gotten to the trunk yet, consider a #28 or #26 tapestry needle for this part of the embroidery. It really does make a difference!
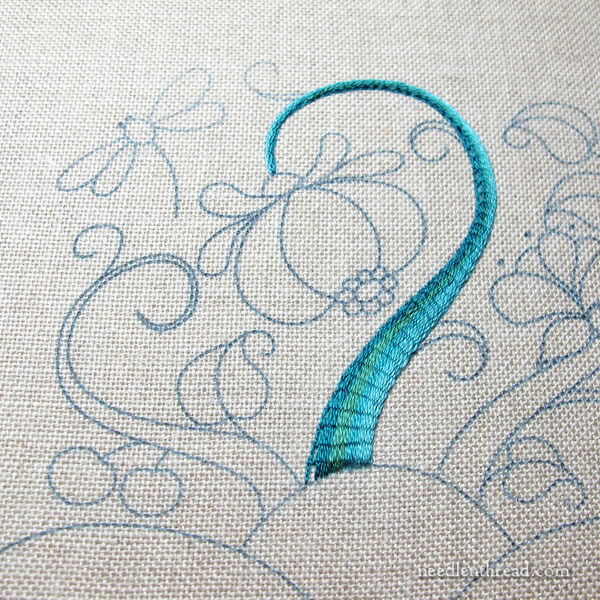
Here’s my stem practically finished. I didn’t work out the distribution of the different colors in the stem as well as I would have liked, but I think it’s ok. I’m certainly not taking it out!
On the other two stems, though, I have a different approach in mind that will help create a more subtle change of shades across the stem. At each shade change, I’ll do a little alternating in the colors.
For example, imagine you’re working color A. When it’s time to change to color B, I’ll work one row of stem stitch in color B, one more in color A, and then move back to color B for the duration of color B.
I think this will make the color changes less stripey. We’ll see!
Instead of moving onto the next two stems, though, I’ve plunged straight into the pomegranate. It’s my favorite element in the piece, and I couldn’t wait to get to it!
So that’s where I am on this project.
And guess what? I started two more projects this week. Which is one of the reasons I need to write to you about Time Management! Maybe it’ll serve as a reminder…!
One of the new projects is intense and will probably take a year or more to finish. The other is just downright embroidery crafting fun! I’ll show ’em to you when the time is right!
Needle ‘n Thread, Ahead and Behind
Don’t forget A Stitcher’s Christmas Give-Away #3 – it ends Friday! Five winners will receive a full kit and magazine from Inspirations!
On Friday, you won’t want to miss A Stitcher’s Christmas #4, trust me! I’m super-jealous of this one! It features something every needleworker loves – Really Good Scissors!
And I really do have an article on Time Management and Embroidery Projects in the works. I’ll even share with you a horrendous photo of one of the greatest inhibitors of good time management. And I’ll show you how I organize my current projects.
Is your week is going along smashingly so far? I hope so! We’re expecting our first snow in Kansas today – a whole dusting to an inch. Woohoo! We take what we can get! It promises to be an indoor cold and blustery day, too, so here’s to a lot of progress, a little bit at a time!
Happy Wednesday!
Dear Mary
I like the variagated colours that you used for the stem stitch it’s lovely and the stem stitch is lovely. The tip on using a tapastry needle for the raised stem stitch is a really good idea. I’m looking forward to seeing you other projects and the time management post which will be helpful and I really can’t wait for the give-away scissors, I love scissors. Thanks for sharing your new project with us and for the tips and techniques on the raised stem stitch very helpful.
Regards Anita Simmance
Wow! That is beautiful. I can’t wait to see how the rest of your work will look when you are finish. Thank you for the tutorial. I might have to give this a try, after I finish a Wizard of Oz quilt.
I’ve been reading about Bayeux Stitch recently, so when this photo popped up, that was the first thing that sprang to mind: “hey! She’s using Bayeux in that project!” Obviously, not.
But to the eye, the finished area stitching looks similar. Now I can see how you could use one or the other – or maybe mix them – to get the color change effect you want. Bayeux if you’re shading going forward; Raised Stem if you’re shading side-to-side. Hmm! 😎
Another enjoyable read Mary. Thank you. Altho, I am looking forward to that time management article. LOL.
I have a question for you which is giving me “fits”… I have to wash my hands so often (ingrained from mom). I have dogs, I work alot with food, I clean, I paint, etc. So I am always washing my hands “because I may have touched something dirty”. Well, in the winter that leaves my hands especially ragged and rough and I will be stitching along and can’t tell you how many times I’ve snagged my thread (on the back, where I can’t see it) with my finger, my thumb, etc. and the skin is so rough it just latches on and unthreads my needle. I do it constantly. Arrrggghhh… Do you have this problem at all? How do you deal with it. Is there a good, ungreasy product to put on hands when stitching that works? I have one I got that is in a little flat green container, got it at Home Depot, for carpenters I think or some such. It works well, you barely put any on, but I worry that it may be not good for the threads. I need HELP!!! in a big way. Thanks for any thing you can tell me for this!
Have a wonderful wintery day of stitching! Hugs from Arkansas.
Hi, Carol – there’s a lotion called Stitcher’s Lotion that works pretty well. Some people also use “udder cream” or something to that effect. It’s sold in white tubs with black cow spots on it. I’ve not used it, so I can’t say for sure whether I like it or not, but I’ve heard from some folks who do. I wrote an article a while back about using an olive oil and sugar scrub in your hands when they’re really rough. You wouldn’t stitch right after using it, but you can do it in the morning and evening, just to get some of the roughness under control. Pretty much, I just lather up with lotion in the morning and the evening. Lately I’ve been using a lotion by Burt’s Bees that does a pretty good job. But yes, I have the same problem in the winter….I find that keeping well hydrated and using lotion morning and night keeps the dry skin manageable. Hope that helps!
Hi thete. Mary’s suggestion on Udder Cream is good; I wanted to add that if you can get hold of artisan soap (not the transparent glycerin type), the all-natural kind, I found my use of body butter literally dropped 60% – I never had body butter expire before 🙂
I make my own now and will never look back. It might not solve your problem but will almost definitely reduce it.
Well, I’m still “stuck” then. I do the lotion thing, the “lots of water” thing, etc. I have tried the Udder Cream. It is ok, but nothing real special. The best thing I have found is something in a green tin called Udder Balm. It used to be fairly cheap until the stars and big money folks discovered it. LOL. But it works the very best I’ve ever found. Only problem is, I found I need to use it overnight, wear gloves of some kind (I found the stretchy little ones you can get for $1 are most comfortable for me anyway). It is sort of “vaseline-y” but with medication and really does help alot, but you can’t use it during the day, unless you have servants and can be waited on. Well, then you probably won’t need it. LOL. My problem is by the time I can find time to do stitching (generally afternoon) my hands have been washed to the point of “rough and ready”. Oh, my. Well, I guess I will just have to continue on and grumble alot. Thanks so much Mary. We’re all in this together. 😀
Hi, Carol – another option, then, that absorbs well during the day and has a bit of that medication feel to it (I think it has camphor in it) is Yu-be cream. It works great! But I find it pricy, so I don’t use it anymore. But it really does help, and it would be my go-to stuff if it weren’t quite so expensive. You couldn’t use it right before stitching, but you could definitely use it at night (without gloves, even) and in the morning. It heals chapped hands really well.
Hi mary, inspired by your posts I’ve sent for the kit….hoping my stem will look as lovely as yours! Only downside is it’s going to take a while to get from Australia to here in the UK …..so don’t stitch too quick so I can catch up!
Merry Christmas! Helen
If you don’t happen to have a tapestry needle of the right size to hand, the cheater’s option is to put the eye, not the point, of your crewel needle under the supporting stitches to prevent them getting snagged. It’s not a perfect solution, but it’s better than stitching with the pointed end first.
Mary I usually just read your wonderful newsletter and this is the first time I have been to your new web site. There is a funny heading of 6 lines of writing that start with Warning as if the proper header has a fault or something. Just wondered if you knew. Merry Christmas to you.
I like the stripes! I think they give the trunk a strength and energy that’s appropriate for the design and colour choice. That said, if you had blended the colours I would probably have liked it just as much.
Hi Mary,
Your trunk is just right, I don’t think it is to stripy, looks good. I can’t wait for your time management blog. I hope to learn something from it. Seems like my sewing machine is always piled up with projects to do, then I’ll start another. I always like to try something new. Your Modern Crewel is going to be amazing. I love the colors and design.
Happy Busy fingers
Louann P
Hi Mary, I think the alternating colours is a great idea and I look forward to the tesults!
I am also really looking forward to the time mgt post. It’s sometimes hard to manage enthusiasm for new shinies when there are wips lined up 🙂 I find that often about 70% through I get a “never-gonna-finish” blues type mood, although I’m better at shutting it down now.
Thank you for your hard work and enthusiasm!
StelliesTessa in Jhn
I receive such inspiration from watching your projects progress. Your stitching is so amazing and your color choices are wonderful. Thank you for mentoring those of us who admire your work!
oh, it is so lovely to look at your work on these pieces!
in gassho
kaethejean
Thank you, it is lovely to see different ways of working, the stem looks wonderful and I will certainly try this method on my next piece. Thanks again.
What count linen are you using on this piece? The even count would help to keep your stitches even. Is it the same count as you used in your videos?
Hi, Amy – Thanks for your question! In surface embroidery, even-weave linen is not really a necessary part of the design layout. So, even if you use even weave, the way the design is transferred or the situation of an element on the fabric may make it difficult or not practical to try to count off the spacing. I’m not sure that this particular fabric is even weave – it’s definitely linen, but not necessarily an even weave. Still, if it works out that the design is situated in a way that you can estimate spacing using the weave of the fabric, it’s a good way to go. I do that now and then, if it works out. But it doesn’t always work out!
Wonderful article love you colours thank you
Hi Mary, could you let me know which threads you’re using for this. Turquoise is my favourite colour and this is gorgeous. Many thanks, for every post, always so interesting, funny AND informative.
Hi, Lin – thanks for your question! This is a design by Susan Porter, featured in Inspirations Magazine issue #90, where they list all the materials used. You can find information on the design and where to find it, in this article: https://needlenthread.wpengine.com/2016/12/something-bright-into-the-mix.html
espectacular.me encanta
Love the project. I wish I could send you the 70 degree weather from Ill.