


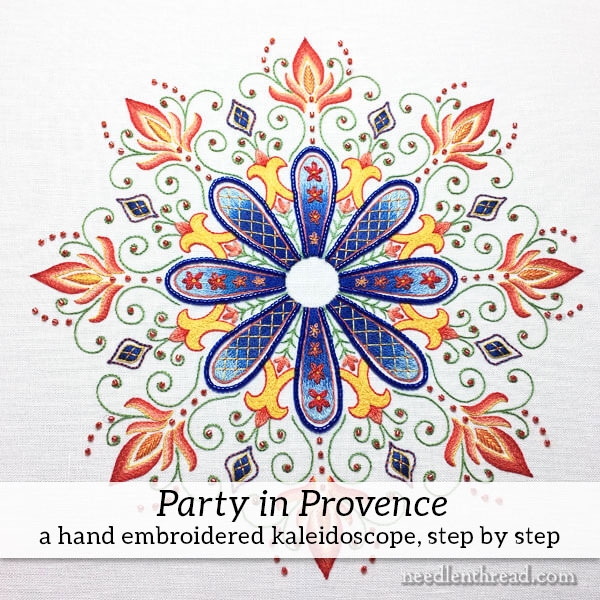
To kick off the New Year with a rather grand – and fun! – embroidery project, let’s travel step-by-step together through Party in Provence, a colorful embroidered kaleidoscope project reminiscent of the sunny region of Provence, and perfect for kicking the Winter Blues!
Today, I’m just going to introduce you to the project in a little more detail, tell you what you can expect from it, and for those who want to stitch along, I’ll list the supplies I used so that you can line them up if you want to use the same colors, threads, materials, stitches and whatnot.
If you’re not planning on stitching Party in Provence yourself, don’t worry! We’ll be covering plenty of embroidery tips and techniques that you can apply to your own needlework projects. So you won’t get bored (I hope!), and you might pick up some handy bits for your own stitching endeavors.
I also encourage you to tell a friend about the project! Maybe you can drum up some buddies who want to stitch Party in Provence, too! It’s always fun to work through projects together!
The Design
The design for Party in Provence can be found in Favorite Kaleidoscopes, so if you want to stitch along on the same design, you’ll need a copy of that.
Materials
You can substitute any of the materials below – fabric, threads, beads. I’m going to outline how I’ve worked the project, but you’re welcome to do what you want.
If you make substitutions, though, keep in mind that the version you see here is embroidered almost entirely with one strand of DMC cotton floss.
If you decide to substitute threads, any weight or size difference in threads will affect the outcome of the project. That said, again – feel free to experiment!!
Fabric
For my version of the design, I used Alba Maxima linen, backed with white quilter’s cotton. If you’re working the design at the size it prints from the e-book, you’ll want a 14″ x 14″ piece of ground fabric and backing fabric.
You can find Alba Maxima available through Needle in a Haystack online, if you don’t have a local needlework shop that carries it. In Canada, it’s available through Traditional Stitches. In Australia, Yvette Stanton carries Weddigan 925 linen, which is essentially the same type of linen.
Because Alba Maxima is a medium weight linen, it’s not absolutely essential to back it with cotton, but the extra stability does help, especially in areas that are beaded or densely stitched (like the blue petals) and just in case you tend to carry threads across the back of the fabric. The extra layer of white cotton will ensure no carried threads show through!
You can substitute any closely woven, high count linen, or even silk, cotton, or other fabric of your choice. If the fabric is lightweight or fairly light, I recommend backing it with cotton.
I usually use a cotton muslin called “Southern Belle” for my backing fabric. It’s essentially a very nice white muslin with no speckles or anything in it. You can pick it up through Needle in a Haystack if you’re ordering through there. That said, any good quilter’s cotton will do, so if you have a fabric store close by and you’ve already got your ground fabric, you can pick up any decent cotton to use as a backing fabric.
Threads
All the threads in this project are DMC stranded cotton. I used the following colors:
Red / corals (dark to light): 349, 350, 351, 352, 353
Blues (dark to light): 796, 797, 798, 809, 800
Yellow: 725 (or 743 if you don’t have 725)
Green: 988
Beads
Mill Hill Magnifcas #10060
Myuki Delicas 11//0 Transparent Sapphire (DB707) – you can also substitute DB063 (silver-lined sapphire)
You can purchase beads through many different online outlets. Depending on the quantity I’m ordering, or who has what, or who has a sale, I order from Artbeads, Caravan Beads, Fire Mountain Gems, and, for Mill Hill, any of the numerous needlework shops online that carry them. Garibaldi Needle Work also carries delicas in a variety of colors. They have the silver-lined sapphire here.
Tools & Miscellany
Design Transfer
Sublime Stitching’s fine-tipped iron-on transfer pen (you can find it here) – this is helpful for transferring complex designs like the kaleidoscopes. I prefer the blue pen. Practice with it first. The key is to get as fine a line as possible with the transfer, because it won’t wash out. You’ll need to cover the lines completely.
Alternately, you can trace the design with a light pad or light box if you have one, using a mechanical pencil. I like to spray starch my linen before transferring with a pencil. It helps release the pencil residue afterwards, if necessary.
You can also use a Sakura Micron pen (size 1 is good – or 005, although it tends to be a bit snaggy because it’s such a fine tipped pen). Black, brown, or sepia works. If you use this to trace, keep in mind it is permanent. When I use these pens, I trace carefully, and then I iron the fabric again, to help fix the ink, just in case. Sakura does not guarantee that their pens are permanent on fabric. As always, test if you’re unsure of what you’re doing!
Frame or Hoop
You’ll definitely want a frame or hoop to work the embroidery. I used an 11″ x 11″ Evertite stretcher bar frame on mine. You can read about Evertite frames here. You can find them online through Needle in a Haystack.
If you use a hoop, you’ll want about a 10″ hoop, which I think is a bit large to work with for most hand embroidery projects. The whole designs must fit inside the hoop, due to the beads. I prefer Hardwicke Manor hoops, and for this size piece, on medium weight fabric backed with cotton, I’d go for the 5/8″ thick hoop. You can find Hardwicke Manor hoops at Needle in a Haystack, too. Binding the inner ring of the hoop with cotton twill tape help maintain tension and protect your fabric.
All that said, I prefer stretcher bars when working on this type of design, since it will be on the frame for a little while, and you don’t have to worry about removing the hoop and then putting it back and getting your tension right and so forth.
Needles
I used a #7 and a #9 crewel needle for the whole piece. You can get away with just the #9 for most of it, or just the #7, but there are a couple places where I used two strands of cotton floss. I prefer a #7 when working with two strands of floss in the needle. It helps keep the thread from wearing and from getting as twisty or cranky. But the #7 might seem large when working with just one strand. You’ll need the #9 for the beads. So just get both – or a combo pack of size 3-9 crewel needles.
You’ll probably want several needles to work the project, since there are multiple color changes in small areas. You can avoid unthreading and re-threading your needle when you switch thread colors if you have several of the same size on hand.
Miscellany
A magnetic needle minder is nice to have when switching between different colors of threads.
Embroidery scissors are a must – small and sharp!
And you might line up a pair tweezers as well, just in case you have to pick any areas out. Scotch tape comes in handy, too, if there’s any un-stitching. It is useful for picking up stray thread fuzz.
What to Expect
We’ll launch into the first stage of the project in the next week or so. I’ll create an index of the articles for this project under “Tips & Techniques” in the main heading on the website, so that you have access to them when you need them.
If you subscribe to my newsletter (you can subscribe here), the articles arrive in your email inbox, where you can save the ones you want to save, delete the ones you want to delete, and print any of them easily. The newsletter comes 3-4 times a week right now. If you’re following a particular project, it’s an easy way to keep track!
And, as always, if you have questions as we work through the project, you can use the comment section below each article to ask your questions. This way, we can all help each other learn as we journey through the project.
And, on that note, if you have any questions, comments, or suggestions, feel free to chime in below!
How marvellous of you to share your expertise with us! And how exciting! And how terrifying! I have embroidered most of my life, but only know the basic stitches – will this be beyond me?
Nope! We’ll work through the whole thing step by step. The most “difficult” stitch is the long and short stitch, but it’s not really difficult at all. Y9u can ask questions along the way, too, and we’ll all help you out!
See? I have a question already! You recommend an Evertite stretcher bar frame in the 11 x 11″ size, but I don’t see exactly those terms on the Needle in a Haystack website. Can you be more specific? I’ve only ever used a hoop.
Wait! I found them – they’re not under Embroidery–Hoops and Frames. You need to search for Evertite. Thanks!
Hi, Marsha – they’re here: http://www.needlestack.com/WebStore/Accessories/StretcherBars.html Scroll down to Evertite frames. For the 11” Square, you’d need two pairs of 11” bars. However…. if you don’t want to make that kind of investments, regular stretcher bars can do the job. So can a 10” hoop!
you can put the size in and it will figure out what size you need or call them directly, they can help you over the phone
I can’t wait to get started! I already have linen, light cotton, and all but 2 of the DMC floss colors. In 2 weeks I’ll be able to buy “Favorite Kaleidoscopes”, a frame and the beads. I’m excited – these colors are so perfect for my room!
I am thinking I’d like to try this design on a garment. I love the look of embellished clothing. I could use a medium weight cotton shirt but would really like to try it on a fine gauge knit sweater. What are your thoughts? What extra steps would I need to do if I decided to try it on a fabric that has some stretch?
Hi, LuAnne – I’ve only embroidered on knit a few times, and never on a fine gauge knit sweater. I do know you don’t want to overstretch your knit, and it’s helpful to have some kind of stabilizer to keep things situated. The density of some of the stitches on this could be problematic. You might have an easier time if you substitute stitches – maybe line stitches instead of the heavier filling of the long and short stitch. That said, you can always experiment! (I say that a lot!) I do know that some folks have had success using sulky’s sticky fabri-solvy (or transfer-eze) as a “front” stabilizer for stitching on knits, and I’ve used it on baby onesies before, pretty successfully. It solves the problem of the stabilizer and the design transfer. I don’t know how well it would work on a sweater. Definitely something to experiment with. I probably wouldn’t start out with your most expensive sweater. I’d be the type who’d find a similar knit at a thrift store for cheap, to test ideas first. And then once I was sure the idea would work, then I’d tackle a more expensive garment. If you do it, I’d love to know how it turns out, and what you learn along the way! That would make a really good guest post! 🙂
Mary, I am returning to embroidery. Is this project a little too advanced for a beginner? I am going to follow the posts about this project and taking notes about supplies, transfer suggestion, etc.
Colleen
Hi, Colleen – it really just depends on your determination level! There’s nothing super complicated in the project, but it might involve some techniques you aren’t familiar with. I’ll be linking to tutorials, though, to help get folks through the stitches, etc., they might not know, and I’ll provide tips along the way, to help everyone reach a successful finish. Often, newbies aren’t too familiar with working with a single strand of floss at a time, and that might prove problematic, especially if you don’t have good lighting (or magnification, if necessary). But if you’re familiar with working with a single strand of floss at a time, the rest is just following stitch directions! You can always follow along with the project and see if it’s something you think you can tackle, and then start it up later on. The articles will be here for reference. Another thing, too, is that you can substitute techniques. Where I’ve filled an area, for example, you might just want to outline it. You might choose to use two strands of thread instead of one on the line stitches, things like this. You can simplify the pattern a myriad of ways! Anyway, I hope you try it, but if not, I hope you at least enjoy watching the development and that it gives you courage to experiment!
THANK YOU! the link to the Sublime page for the transfer pen was fantastic. Lacking a method to iron on has kept me from tackling the past projects as I don’t have a light box or transfer materials.
Hello Mary,
I adore your site. I have learned so much and plan to start the Tulip Festival project. I just ordered my first Soie d’Alger, the Harwicke Manor sit-upon stand and Alba Maxima from Needle in a Haystack. I received an email that the Alba Maxima is currently out of stock, but they expect to have some soon. This will be my first time using silk and a hoop that is not hand-held. ( I have been using Harwicke Manor hoops and love them.) I also just completed the Allison Cole Goldwork Honeybee kit. Goldwork was another first. I want to design a bee skep with 3 honeybees over it ( my family crest) as a companion piece for it. Thank you so much for all you do to help others learn about embroidery.
Mary – This is absolutely beautiful! This would be the first online project I’ve participated in, and I’m thinking it might be good to start a bit smaller. If I just want to do the blue flower, can you tell me about how large it would be, etc?
I just recently found your website and have been reading daily, and enjoying watching your video tutorials. I have currently working on a crazy quilt, but think this would be a great addition to my stitcher you education. Thanks so much!
Hi, Eddi – not quite sure of the dimensions of just the center flower off the top of my head, but probably around 4”, perhaps 5. Always a good idea to start small! But you might find, once you’re successful with the inside flower, that you might want to conquer the whole thing!
This looks lovely. I’m so behind on my projects (anyone else know how that feels) but I’ll enjoy following along!!
Enjoy your posts so much. They inspire. Happy New Year!
Very gorgeous design! Mary, do you have any project/kit that is suitable for a young pre-teen? My granddaughter has skills, but not in the same areas as me (she knits, I crochet – she embroiders, I sew). Please consider it- Thanks!
Hi, Laura – well, a couple of my nieces (9 and under) have worked on some of the Christmas trees, using backstitch and whipped backstitch, and they came out pretty cute. This is an area I will probably explore pretty soon, if I can get local classes with kids up and running this year.
Hey Mary,
I have all my supplies ready, so happy to start this embroidery.
It’s my first time to participate in a follow along.
Have a great day.
Louise
Dear Mary, Thank you so much – What a wonderful way to start the New Year – I have been busting to go to this particular Party!
Yééééééé Mary, I am so excited to get started! I have the fabric and the threads but I will have to order the beads. Would you please let me know the size of pack I will need?
Have a great week!
Hi, Ginette – you don’t need a whole huge amount of either bead. For the coral colored beads from Mill Hill, the regular package size is plenty. For the blue beads, a small package is fine – I don’t really know how many grams, but you don’t need a huge amount.
Yippe, Hooray and WOOT WOOT!!! I’m so very excited to get started on this. I just ran down to my local needle shop and picked up everything they had that I will need. Have to order a few things but that’s ok. This piece makes my heart sing!
I’m going to give this a try. Just ordered the Kaleidoscopes book and will start checking my thread stash to make sure I have everything. Love your blog, Mary, and the videos you post are the best instructions I’ve seen to date. Here’s to a New Year and new projects!
Hello, I would love to follow you on this project. Does it cost anything to follow along?
Hi, Rhonda – not at all!
Hi Mary,
I am looking forward to seeing this progress. Unfortunately I have too many other projects on at present to have a go, but maybe in the future. I do have one question, I would like some fill in that centre ring of white as it draws my eye immediately, I’m thinking maybe a diamond, or cross hatch, I don’t want to fill it too much but just enough to take the glariness away, any suggestions, please?
Thanks for doing this for us, I am really looking forward to seeing what everyone is doing. Where will everyone be posting pictures on Facebook?
Cheers Judy
SSE Queensland
Australia
Hi Mary
In your newsletter “Party in Province” you mentioned the fabric you used: which is Alba Maxima Linen and it can be ordered from “Needle In A Haystack” I’m not sure but is that fabric a Legacy Embroidery Linen as I don’t see anything called Alba Maxima Linen…and what color to order?
Sorry I’m not sure I understand their site!
Patti
Hi, Patti – here’s a direct link to the search result: http://search.cartserver.com/search/search.cgi?cartid=s-2841&category=fabric&bool=AND&keywords=Alba+maxima&go=GO%21 Alba Maxima is white.
Hi Mary,
I am so excited to see you are going to share with us your journey stitching “Party in Provence”. I love the colors you chose so I will stick with that. I am going to order the supplies I need from Needle in a Haystack (they are great). You do beautiful stitching and the way you explain what you are doing is easy to follow. I am so looking forward to doing this pattern.
Thank you for sharing,
Dianne
Hi Mary, I have one question please? I am fairly new and have been told to back my embroideries with whisperweft, its a soft iron on interfacing, will this be ok or do I need more structure ie cotton fabric?? When using the cotton fabric how do you adhere the linen to it, do you stitch them together or use spray glue etc?? Thank you for your help.
Hi, Guida – with a cotton backing fabric, you just mount both pieces on the hoop or frame at the same time, making sure that both are “square” (not on the bias), and tensioned equally. You can baste them together if you’d feel more confident, but I find that basting outside the hoop and then hooping, you often end up with slight buckles in the backing fabric.
With hand embroidery, I rarely if ever suggest iron-on interfacing. It’s a pain to stitch through and not necessary. Plus, over time, sometimes those iron-on glues can get a little brittle, or they can separate in spots and make the ground fabric look bubbled. It’s just not worth it, since it really isn’t necessary.
Hope that helps!
Oh, oh, I’ve been waiting for this embroider-along. Being in Canada and living in a small town I’m only really able to order everything online. I have managed to find almost everything so far. The only thing I don’t know, is how many skeins for each colour of DMC thread?
Looking forward to starting this although I will be behind by the time all the supplies arrive here!
Thanks for your help with so many things. Right now I’m stitching a Sockeye salmon on a tea towel for a wedding shower in a week. It’s been wonderful to refer to your stitching tutorials whenever I needed them. The best ones I’ve been able to find on line. From one educator, to another, Happy New Year.
Barb
Hi, Barb – I’d probably order 2 of the 351 and the yellow, just in case, as I ran really close on those. The rest, one skein.
Hello, Mary…
Please, what is the size bead for – Mill Hill Magnifica #10060?
They say they’re 12/0, so I’ve not been able to find an exact substitute among Miyuki or TOHO.
Thank you, Mary.
I found the beads at two different online shops…
123stitch
https://www.123stitch.com/item/Mill-Hill-Sheer-Coral-Red-Magnifica-Beads-Size-120-225mm/10060
Mill Hill 10060 Sheer Coral Red Magnifica Beads – Size 12/0
$4.78 $4.29 + $2.99 shipping within the U.S.
Mill Hill Magnifica Size 12/0 #10060
Fusion Beads
http://www.fusionbeads.com/Size-11-Transparent-Sapphire-Delica-Beads-DB0707
Miyuki Delicas 11/0 Transparent Sapphire (DB707) $2.25
Miyuki Delicas 11/0 Transparent Sapphire (DB707)
Hello, Mary…
Will we be using one skein each, so a total of 12 skeins? Or, will some colors require multiple skeins of the same color?
The only colors I ran really close on were the yellow and 351. To be safe, I’d probably invest in 2 skeins of 351 and maybe the yellow. I ended up taking out a bit of the yellow, though, which is probably why I ran so close on it.
Hi Mary- and a Happy New Year to you! may it bring to you Health, fun, success, happiness and also patience and energy – all in one: your best year ever!
The new project is really lovely- so colorful and – as you say: full of summer sun. I would really love to do it also as a year-long, every-day a bit-project. but… yesterday I stumbled across my absolute favorite crinoline dress with muchmuch embroidery, and I’m nearly up to dare this venture- I need a very special dress for my birthday-party in summer (it will be a 1865-garden-party) and could/would also be an absolute absorbing undertaking… so I must stand away from other, also inspiring and interesting projects – (it is my problem, easily to jump into such things, and often into too many, so I want to be careful this time…) have fun with it,and I’ll watch how it is going along…(and perhaps show my own work)
How exciting! Thanks for sharing lessons on “how to” do this wonderful project! I am ready!!!!
I’m in! I’m hoping a stitch-along will give me a chance to broaden my skills a bit and provide some motivation to get all the way through.
If I’m brand spanking new should I attempt this? I wanted to pick up a new hobby for the new year
Hi, Amber – You might attempt a modified version of it, if you don’t feel confident with some of the filling stitches, for example. You could do the outlines without filling. But if you’re a determined beginner, there’s no harm in giving it a go! I’d set up a separate small hoop and some scrap fabric to practice techniques as you go, before moving them onto your main fabric. A “doodle cloth” like this is a good way to get the movement of a stitch or technique down before tackling them on the actual design. Hope that helps!
Very Exciting. I have to admit this will be using up bits and bobs of threads already waiting around for something to do. I have an old denim skirt I’m going to embroider it onto directly. A little larger than the book size. I’ve printed it at 110%. And will be using mostly very old Anchor cotton threads. A friend gave me a box of threads her mother had. I don’t know the age of her mum, but she herself is on the down side of 60, so the colour numbers don’t match any card. But the images you post are high resolution, so it should be pretty easy to match up something. Thanks, Mary.
I have not used a “backer”. Is this added to the linen and two layers of fabric are stitched at the same time? Is the backer added when all stitching has been completed?Thank you!
Backing fabric is placed behind the ground fabric, in the hoop or on the frame at the same time, and you stitch through both. Like I said, it isn’t essential if you’re using at least a medium weight linen or other ground fabric, but I always find that it gives a nicer finish, especially when working with densely stitched areas.
What count is the linen fabric? I will have to order on line and want to make sure I get the right fabric. Thanks
Hi, Laurie – well, Alba Maxima is a 40 count linen, but it’s got a very close weave, so it has a full, smooth surface. In surface embroidery, you don’t really have to give too much concern to the thread count in a fabric. What you’re really looking for is a fabric that has a nice surface and a weave that fills the fabric without leaving lots of open holes and spaces between the threads. Not every 40 count linen would make a great ground fabric – it really depends on the manufacturer and the weave. Hope that helps!
So eager to get the party rolling – I have everything ready to go…
Ok, I’m gathering all my supplies and ready for this party to start!!
This looks like a lovely, but challenging and intricate pattern. As a novice stitcher, I am wondering how many hours you anticipate a project like this would take?
I’d say it’s about a 25 hour or so project. The “longest” part of the project is the long and short stitch filling and the stem stitch filling on the outer tips. But they don’t take all that long. And even though you might think “Oh my gosh, there are so many repeats” – the repeats are great for practice!
You can also change your stitch choices, too. Where I’ve filled, you might just outline, for example. Or you might do a trellis over the area, without any stitching underneath it (on the petals). You can always switch up the stitch choices!
Hi Mary,
I relented and decided to stitch this project along with you instead of waiting. Unfortunately I will not be able to start with you because Needle in a Haystack won’t be able to supply me until February (I decided to order all my supplies from them because I could not find a source of Magnifica Beads in New Zealand). They are out of the fabric and several of the threads … I could, perhaps, attribute that to you and the great popularity of your projects, etc.
Oh well, here’s hoping I’ll be able to catch up when my supplies arrive. I’m so looking forward to it!
I thought embroidery was supposed to be taken out of the hoop or qsnap after each stitching session to prevent damage to the fabric. How do you do this when fabric is mounted on stretcher bars? Or does it really not matter?
Thanks
Hi, Joan – the difference between and hoop or q-snaps is that the fabric is gripped in the thing and where it is gripped – which could end up showing in the finish can leave marks if left too long, from collected dust or the strain on the fabric – whereas with a frame, the outer edge of the fabric is tacked or laced, and that edge wouldn’t show in the finishing. Hope that helps!
I have very little embroidery experience. I am going to try to do this with you. I have purchased the pattern but, Needle in a Haystack has the Alba Maxima linen on back order and it won’t be in until Feb. Is there another option? And where can I find it? I have never purchased linen and don’t know what to I should buy.
Thank you for allowing me to join you in this endeavor.
Graziano linen from French Needle would work. You could also go with the linen cambric from Haystack, but it is a very light linen and would definitely require white muslin (cotton) behind it.
I am going to join you! This is going to be so much fun. This is my first time following along with a community. I am thrilled you are giving us this opportunity! Thank you! Thank you!
I am going to do it on a dish towel. It will be a company towel (aka “don’t touch just look”) for years. Ha! But it will look so pretty in the kitchen.
I will drop the beads and replace them with stitches. I might have to up the number of threads on the outline stitches….will just have to see.
I have all the supplies and I’m ready to begin. I haven’t embroidered much (a little here and there) lately (in the last 40 years), and I too, am terrified. But I’m going to look at it this way. I have an amazing teacher and Mary, I look forward to learning from you. It’s going to be a fabulous Project Party.
Do you baste the linen & lining together??
I don’t. I just mount them both in the hoop or on the frame at the same time. I make sure both fabrics are tensioned equally (check the back of the cotton behind the linen, to make sure it isn’t rippled or wavy) and start stitching! You should make sure the “grain” of the two fabrics is aligned – that is, the warp and weft threads are running in the same direction. You don’t want the cotton behind the linen to be on the bias (diagonal), otherwise you’re more likely to get puckering. You can read about backing embroidery fabric with another fabric here: https://needlenthread.wpengine.com/2016/07/all-about-lining-embroidery-ground-fabric.html and you can read about fabric grain here: https://needlenthread.wpengine.com/2012/01/cutting-linen-on-the-grain.html
Hi Mary,
What size is the actual ‘Party in Provence” pattern, that you are embroidering. When I print out my pattern it looks small: 7 inches X 7 inches. Is this the correct size?
Ruth
Hi, Ruth – it should be about 7.5″ x 7.5″ – so not too far off. If you choose “no scaling” when you print (or 100%) it should print at the same size I used. It looks a little larger in the photos, because they’re photos, and they’re often a little closer up so you can see details.
Hi Mary,
I know I’m late to the party in commenting but I’ve only just gone fabric shopping tonight. Eek!
Understanding that Alba Maxima linen is sold out, and that a “high count linen” will be fine…can you help me with what constitutes high count linen?
My local needlework shop didn’t have any white linen at all, so I went to Joann and found some suit linen that’s 30 count. I see the Alba Max is 40 count…and I’m a new embroiderer (die hard cross stitcher branching out). I’m okay using this 30 count for something else if it won’t work out, but I don’t want to start Party in Provence and then realize halfway through it that I made a mistake in linen choice. LOL.
I do have some white calico to back it with. Is 30 count okay or should I keep searching?
So anxious to start this! 🙂 Thank you for such a beautiful design.
Hi, Dianne – I’ve done surface work on 32 count and on 30 count, with cotton backing fabric, but it really depends on the weave of the linen. The backing fabric will definitely help hold your stitches, though, so I’m guessing it would work just fine! You could always test a little piece, with the cotton behind it – maybe a few stem stitch lines, or a little bit of long and short stitch, to see how they work?
Thanks Mary! I’ll do that. 🙂 Such a beautiful project. Thank you again!
I just ordered “Party in Provence” and can’t wait to get started. I have many pieces of linen that I have collected over the years and would like to embroidery on some on them. Is there a way to tell approx. what the thread count is or should I just use a piece that I feel comfortable using.
Can’t wait to get started and thank you so much for what you do to help us learn all there is to learn about embroidery and bring back the memories I had when I was a little girl watching our mom.
Hi, Betty – You should use one you like and feel comfortable using. It should have a close weave (no noticeable spaces between warp and weft threads), so that it will support the surface embroidery stitches. Hope that helps!
Thank you for posting all the wonderful photos and info on embroide
ry. I am an old crazy quilter…
I’m new to this site and not sure how it works. I love the Kalediscopes and would like to purchase what I need.
I’m not sure how to get something into my cart.
Helen
Hi, Helen – The only kaleidoscope thing that I sell on Needle ‘n Thread is my pattern book called Favorite Kaleidscopes: A Design Book for Hand Embroidery & Other Crafts. That’s where you’ll find the design for Party in Provence, plus many other fun-to-stitch kaleidoscopes. The e-book is in my shop, which is in the main menu, but here’s a direct link if you’re looking for it: https://shop.needlenthread.com/product/favorite-kaleidoscopes-a-design-book-for-hand-embroidery It’s an e-book, so after making your purchase, you’ll get an automatically generated email with a download link in it, in your email inbox. Click the link to download, and save the PDF to your computer. You can then print whatever designs you want to use, as you want to use them. If you want to stitch the project as I did it, you can use the articles (they’re free) here on Needle ‘n Thread and follow along with the project. You’ll find the article index for this project – and several other kaleidoscopes – here: https://needlenthread.wpengine.com/2018/02/embroidered-kaleidoscopes-an-index-of-step-by-step-projects.html Hope that helps!
Hello, I understand that Alba Maxima/Weddigen is difficult or impossible to find, and very expensive ($50-100/yd). To find an alternative, what do I look for? Bright white, medium weight linen? Is it 40 count or is Alba Maxima/Weddigen a dense uneven weave?
It’s a dense, almost-even weave. It’s “approximately” 40 thread count, but the threads fill the weave.
I am brand new to embroidery although I’ve done other types of sewing for years. I’m trying to understand “medium weight linen.” I asked before and you said about 40 count, but in trying to order linen I’m reading about ounces. Some sites call 5 ounce linen “light weight” and others call it “medium”–should the linen be more than 7 ounces to be considered medium weight?
Also, you used the term “high count linen”–what is considered high count? (What is the cut-off point for high count?)
Thanks!
Well, linen is labeled and sold differently depending on uses. It sounds to me like you’re looking at either linen for clothing or linen for upholstery. In some cases, depending on what you’re planning to do, it doesn’t matter, but if you’re looking for linen for embroidery, you should probably be looking at needlework shops, where the terminology is relevant to the needleworker and where the linen that is sold is selected (or sometimes even woven) specifically for embroidery or needlework. A lot of the online linen sources that might come up on Google aren’t selling the kind of linen that makes a great ground for embroidery. It might be good for making bath towels, casual clothes, or reenactment clothing, but it’s not necessarily that good for fine embroidery (again, depending on what you’re trying to do). In one answer, I can’t really recap everything that’s useful to know about fabric, but if you want to read through posts here on Needle ‘n Thread that deal with linen, then this category will pull up most of them: https://needlenthread.wpengine.com/tag/linen
Good day Mary,
”Because Alba Maxima is a medium weight linen, it’s not absolutely essential to back it with cotton,” was a quote from your text. Do you have a tutorial on how to back a material, the do’s and don’ts. Do the two different materials need to be stitched together before setting them in the embroidery loop?
Thank you for your response. I follow your work and will shortly start on one of your kaléidoscope.
Carole from Canada
Hi, Carole – here’s an article that might help: https://needlenthread.wpengine.com/2016/07/all-about-lining-embroidery-ground-fabric.html