


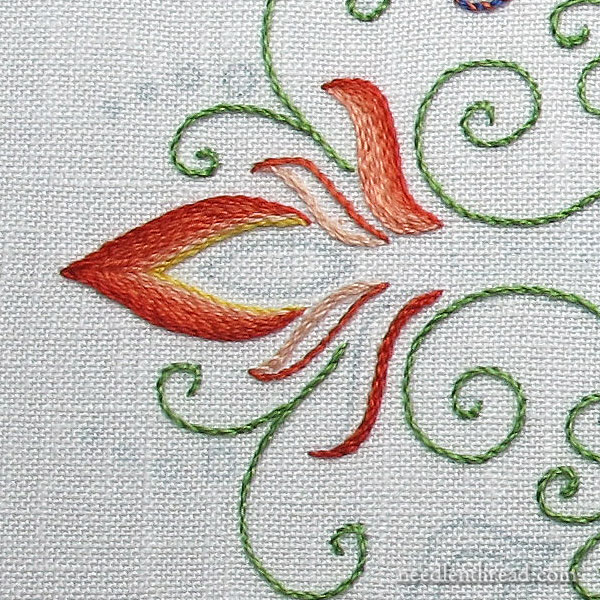
The last time we visited Party in Provence, this embroidered kaleidoscope that I’m covering in a step-by-step series, we concentrated on stitching all the little green swirls on the kaleidoscope.
The swirls are the structure that tie the outer elements on the design to the bold central pattern. Once they’re done, it’s time to add more color to the outside edge of the kaleidoscope.
So, today, we’re going to concentrate on adding the main components of the outside edge – they’re the fiery bits that add flare to the outer part of the design.
There’s a reason I chose the color scheme I did for this outer edge, and we’ll talk about that below, too!

The part of the design we’re looking at here are these bursts of yellow, corals, and reds on the outside of the kaleidoscope. When this gradation of color from red to coral to a little touch of yellow comes together, the overall impression when you step back to look at the kaleidoscope, finished, is a somewhat orangey burst on the outer edge.
I wanted the idea of sunshine to permeate this design, and so the bursts of fiery color on the outside edge are supposed to be a kind of radiation of that inside band of bright yellow. I don’t know if it worked out that way, but that was the idea behind the color choices!
There are only two embroidery stitches at work here – the stem stitch (which you should be an expert at by now!) and the fishbone stitch.
You can find a video tutorial for the stem stitch here and a video tutorial for the fishbone stitch here.
Another article that might come in handy when working this section is this one on Stem Stitch Filling Tips.
Order of Work
It doesn’t really matter if you work the center upright leaf-shaped element first, or the surrounding swashes. I think it’s easier to do the surrounding parts first, and then the leaf, but that’s up to you!
We’ll look at the leaf first and get it out of the way, since it’s the least complicated part of this area.
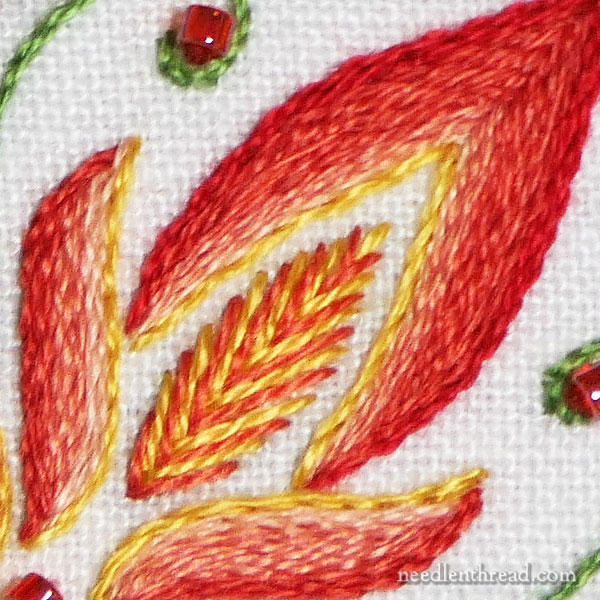
For the fishbone stitch leaf, thread up two needles.
In the first needle, thread up one strand of yellow (725) and in the second needle, thread up one strand of dark coral (350).
Begin the fishbone stitch at the top point of the leaf with a central straight stitch in yellow, and then, working down the leaf shape in the normal progress of fishbone stitch, alternate between the yellow and coral until the shape is filled.
Stem Stitch Filling
The stem stitch filled elements surrounding the leaf shape are filled in a certain pattern of color, detailed in the diagram below:
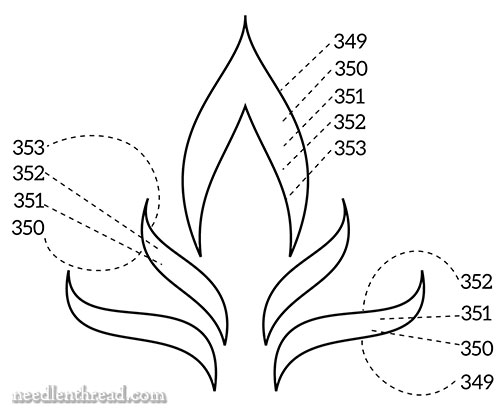
Starting with the lower side swash, it is shaded from the base upwards starting at the darkest red (349), but not all the way to the lightest coral.
The second side swash up is shaded from the base in the darkest coral (350) up to the lightest coral.
This helps create the dark-to-light rising of color in that area.
There’s a small line of yellow stitched at the top of each side swash, too, and inside the base of the top shape, but this tiny yellow line should be stitched after finishing all the other filling.
Starting out the outside design lines of each element, work a row of stem stitch in the color indicated in the diagram above. This defines your boundaries and the shape.
In the darkest shade at the base of each swash, work two lines of the darkest shade. At the top of the swash, you’ll have at least two lines of the lightest shade.
In the middle, as you fill, you might have one, two, or three lines of the different shades of coral. It really depends on your stitch tension and how close you stitch your stem stitch lines.
What you’re shooting for is that gradation of shades upwards.
For the topper on the whole design element – the shape that fits around the leaf – you’re doing the same thing: work the outer line of the element in stem stitch in red (349) and the inside line of the element in the lightest coral (353). Then, working in rows to fill the shape, change from shade to shade to produce that gradual change of color.
On the topper, I worked more of the dark shades than the light shades, as you can see in the close-up photos in this article. The lightest shade of coral – 353 – on the inside of the topper is only one stem stitch line.
When you’re finished with the red and corals, take one strand of yellow, and stem stitch just along the edge of the inside of the topper and the top of each side swash.
The yellow brings that whole element to fiery life!

Looking for More?
If you want to see this project develop from the beginning, you’ll find all the articles for Party in Provence listed in the Embroidered Kaleidoscope Projects index here on Needle ‘n Thread.
The design for Party in Provence and the other kaleidoscopes detailed in step-by-stem instructions here on the website can be found in my pattern e-book, Favorite Kaleidoscopes, where you’ll find over 30 designs for fun embroidered kaleidoscopes.
If you’re following along with this project and you have any questions or comments – or even if you’re not following along! – feel free to join in the conversation below!
Hi Mary,
If you are doing an area all the same color, would you start each new row at the beginning or would you turn the work around and do an outline stitch with the floss over instead of under?
Thanks,
Jane
Hi, Jane – You sure can! As long as you don’t forget to keep the working thread above the needle instead of below it. If you end up stitching an outline stitch instead of the stem stitch in that area, it can really throw off the smoothness of the filling. So if you have a problem remembering to change the needle / thread relationship on the return journey, then I think it would be better just to run the thread under the stitches on the back, back to the starting point. They’re really small elements, so it’s not going to take up a lot of thread. But if you’re confident in the forwards and backwards directions for stem stitch, then yes, just do the return journey with the thread above the needle! It’s a time saver!
Success! The outdoor sky is thickly overcast, but there is sun blazing joyfully from my screen and filling my stitchy little heart! I do plan to get to this, as I think it would thrill not only me in the embroidery of it, but my sweet daughter-in-law in the giving of it. Thanks, Mary.
Linda
🙂 Yes! Sunshine! Yay!!
Hi Mary, I’ve made nice progress in my kaleidoscope, just a few swirls and flowers left, and now … the carbon paper pre-drawing has faded! X( I’m trying to trace it once again with a 1.0 copic multiliner, partly freehand, but it won’t be a perfect or even nice work anymore (aside from all my mistakes and imprecisions), I’m afraid … why, let’s call it one more piece for practicing. (I should have waited for the dressmaker’s carbon paper, and used the good linen with cotton backing, and the DMC thread, and traced the pre-drawing with ink at once, and … live and learn, yeah.)
I admire your perfect stitching!!!
Angela from the Ore Mountains
Not 1.0, but 0.1, of course! (the copic pen) 😉
Oh, gosh – that’s too bad, Angela! I’d probably use a very light mechanical pencil in those cases. Much easier to cover than ink…! But hopefully it will come out satisfactory!! It’s always good to have a practice piece, right?
Too late – the ink was already on it, and it was a mistake indeed. But thank you for the tip, Mary, gonna remember it for future mishaps!
Just wanted to let the needlework world know, that I finished and uploaded my website “Adventures of an Embroidery Apprentice”. It’s kinda log of my journey, and there’s a story with photos of my version of Mary’s Christmas trees (“A Christmas Story”), and there’s Party in Provence, too, of course, and much more and still more to come. I would really enjoy you all dropping by from time to time! 🙂
Hi, Angela – for some reason, your url when you add it to the comment form gets flagged as spam. So I have to keep unfiltering it. Maybe now that your website is published, it won’t do that. We shall see!
um – strange… Yes, it’s published. I don’t know about the pitfalls of the spam flagging, so I can’t imagine why, but it’s definitely a clean link.
Oh – could it be that it gets flagged because I have a couple of links to commercial websites on my homepage? I’m no affiliate in no way, just put it in for information purposes as a (more or less) satisfied customer. I even put a corresponding note into the Site Notice. If so, I shall remove these links, however!
Just hello to all. After the longest, coldest, grayest Winter I’ve ever
Experienced in Houston Tx…….
I can also say The sun came out for a little bit today.
Whew, I needed that.
I would love to see the back !
Yay! I’m completely ready to get back to this project.
thank you for the very clear instructions. This is my first “big” embroidery project and I am loving it