


Good morning, and Happy Tuesday! I’m back home and settled into a flurry of work, thanks to the kids’ local embroidery classes that started yesterday.
It’s going to be a rather hairy week – the first round of classes for each class level takes a bit of preparation and time, and really cuts into the normal day! By next week, Anna (she’s my kindergarten-teaching-embroiderer-niece) will be taking the helm for all the classes, which means I can just melt away.
But during this week, as the kids are introduced to embroidery for the first time, she needs an extra set of hands in the class. So that’s where my time will be concentrated through Friday.
Time and embroidery are a funny thing. When you’re on the Total Enjoyment side of embroidery, when you’re not working against any deadlines and you don’t have to finish things quickly, the amount of time it takes to hand embroider something doesn’t really figure into a project choice. You pick a project because you like it, and you relish the amount of time you get to work on it. It’s like savoring a really good book – you don’t necessarily want it to end!
But when you need to do more, meet deadlines, and keep moving ahead with new and exciting things, the time it takes to hand embroider figures into a lot of decision-making!
Take, for example, this piece…
I absolutely love embroidering these voided monograms, as you’ve probably figured out by now. You can see a voided M monogram in process here, that I was working on last month.
I also worked on this E, above, to test a different design layout and document some stitch techniques.
Our initial plan (no pun intended!) was to use the voided monogram as the main project for the older youth embroidery classes this month (14 and 15 year olds).
As I worked through the E and as Anna worked through an M, we both kept track of the time it took us to fill the voided areas of the design.
As much fun as I was having, filling and filling and filling some more, it quickly became evident that time would be an important consideration for this particular type of project.
Even though the stitches are quite simple – the most complex stitches on our voided monograms are woven wheels and ribbed spider web stitches – it takes a lot of time to fill a space completely, even a space as small as a 3.5″ circle with a 2″ fat letter taking up a good bit of that circle!
You’d think that’s a small space. And you’d think it would fill pretty quickly, right?
Now, hand embroidery is not really meant to be fast. It’s done by hand, after all. If we want really fast (relatively speaking), then machine embroidery is the way to go. But we’re not into this whole thing of needlework for fast, are we?
However, as I closed in on the eight hour mark, I realized that this little baby would not be an ideal project for beginners, even if the stitches are all fairly simple.
Why? Because most beginners need to see finished results relatively quickly, so that they can have that satisfaction that moves them on to wanting more.
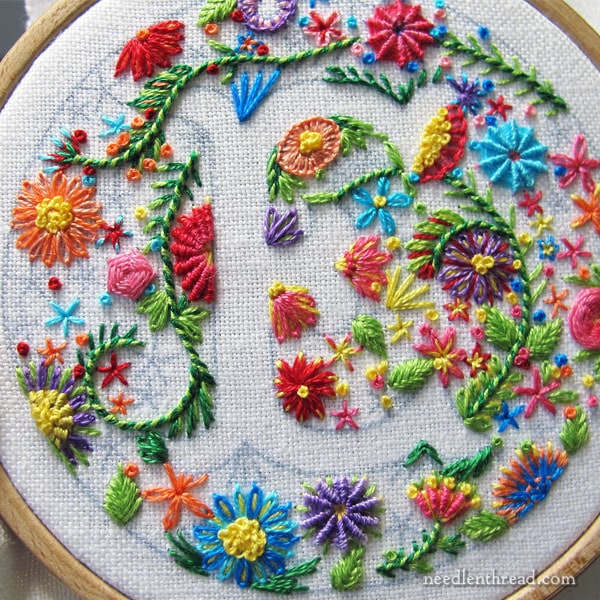
Getting to here at about 7.5 hours, I decided that these particular monograms will work better down the road, as “advanced beginner” or intermediate projects for the youth who want to continue pursuing embroidery after they’ve gone through the first classes.
Making an executive decision last month before we started kitting projects for the classes, we put away my pet project, and altered the project line-up.
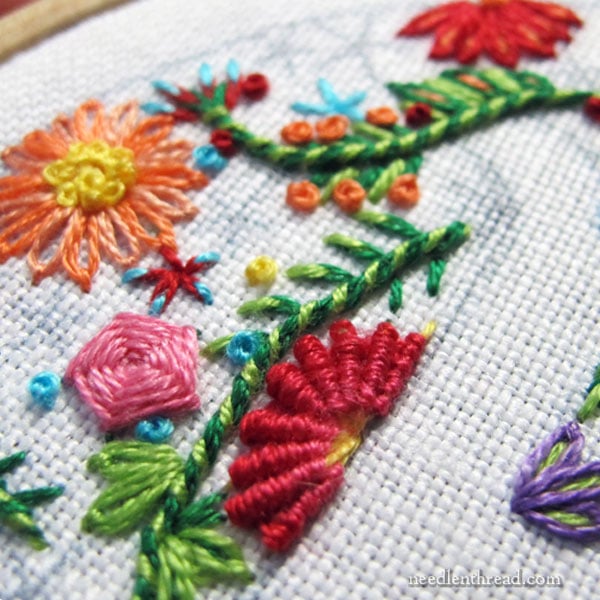
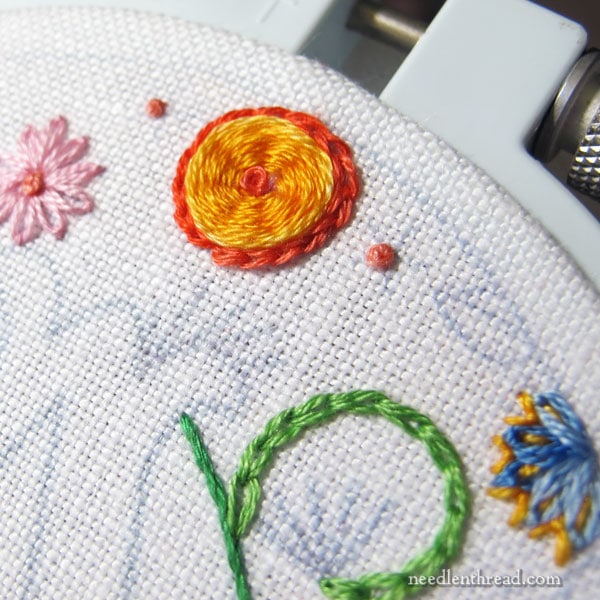
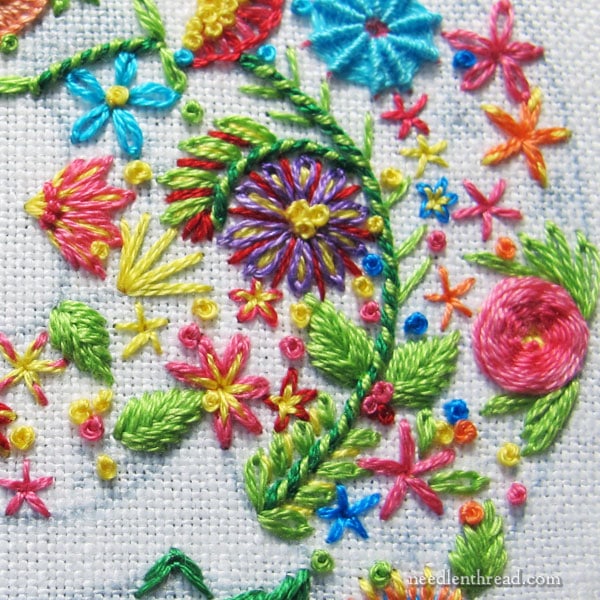
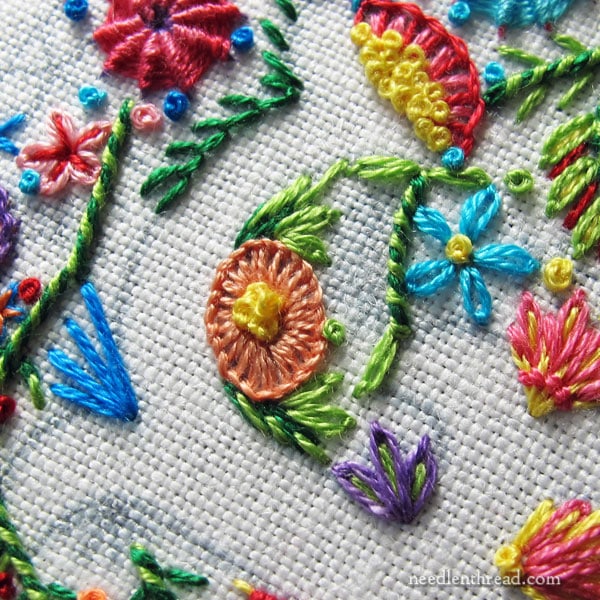
It works out well. Anna won’t feel as stressed about moving the older kids too quickly through the basics and their first simple project (this simple and sweet little monogram) in order to get onto their main project (which is this floral corner design on a flour sack towel).
The kids won’t be overwhelmed with a much more time consuming project.
And I won’t have to be on hand as much in the later classes to help them conquer more complex stitches, placement decisions, and the like, which will free up my time to prepare more things for you!
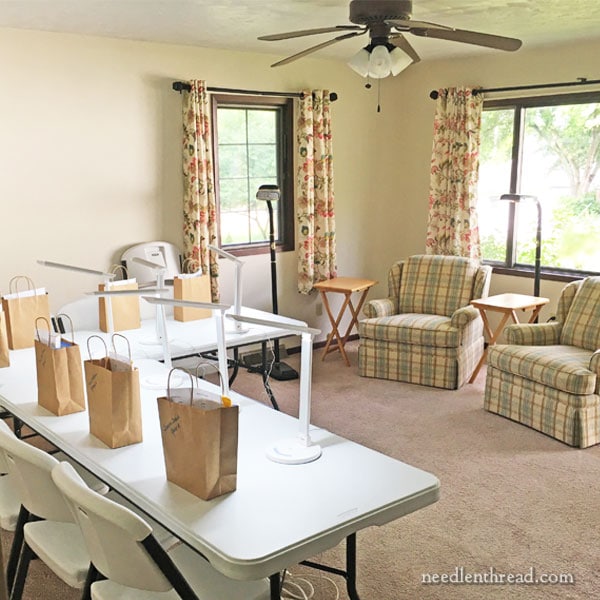
This is our little classroom set-up on the first day, ready for the kids to arrive. All their supplies are kitted into separate plastic zipper bags inside the larger handled bags, which has their names on them. That way, they can hopefully keep all their supplies clean and in one place.
Since they’ll be taking their embroidery home to work on between classes, we’re hoping they return with the same supplies all neat and tidy in one bag. Fingers crossed!
The two tables are set up in an L shape to give room in the center for instruction, but also with plenty of walk around space to help individually, too. It works out well so far.
Eventually, I’d like to have some technology in there. I’d like a small flat screen on the wall, so I can demonstrate stitches in real time with an overhead camera so the whole class can see them at once, from their seats. I’d also be able to record those sessions for you, too. But for now, I’m doing what I can with the budget I have.
The lights, incidentally, are the lights currently in the first spot on my Amazon recommendations page, here. They’re LED (so they don’t give off a lot of heat and they last a long time); they’re dual color temperature (you can choose varying degrees from warm to bright white light); they’re dimmable across a wide range of dimmability; and on their brighter and bright white settings they work well as an affordable embroidery task light for table top use. They also have a slim profile, so they don’t get in the way, and the head is adjustable, so the user can tilt it and turn it as needed. Checking in at under $30 a light, you can’t really beat it. They’re maybe not as “hefty” as other task lights (they’re quite light in weight), but they are a good, affordable alternative when looking for a task light on a tight budget.
So, I’m off to prepare for the next round coming in this morning! In my in-between moments, I have a little goldwork to catch up on and a couple other projects to document for you.
I hope your week’s going well! Feel free to chime in below with any questions, comments or suggestions below, if you want.
This post includes an Amazon affiliate link, which means Needle ‘n Thread receives a small kickback for any purchases on Amazon made through the link, at no extra cost to you. Every little bit helps – thank you!
Thank you for pointing out that embroidery is not meant to be something you rush. You pick your project because you love it so give it the attention and detail needed. I know that the new embroidery machines are all the rage, but the satisfaction and calm that come from working on a piece with my hands is so rewarding.
Totally agree, Betty!
I love looking at all the different flowers in your original project for the kids. I’ve gotten lots of great ideas from it. But I think you’re right to change it up for something they can get done more quickly. When learning something new we all like to see immediate results and success. Love your blog!
So true, Ellen! I was even getting discouraged at the amount of time it was taking to finish the E monogram. I do love working those voided pieces, but I was really feeling the Time Crunch! That said, I have a completely different voided project in mind that I’m dying to start. Oh dear. Here I go again!
I think your workspace looks great! Comfortable and neat. What fun for you. Congrats on the new space!
Thanks, Ruth! It’s working out well so far!
Hello Mary.
Welcome back hope you had a nice time. I love your idea of giving kids classes. They will love them I am sure of it.
I really like your new space for teaching. Don’t worry you will get everything you need for sure.
Thank you so much for the beautiful articles you left us to read last week. And last but not least, that amazing embroidery model. I can’t wait to get started but I need to finish a quilt for a little girl first.
Have a great day and looking forward for more news with the kids classes.
Louise
Beautiful project.
I love the monogram project you have designed for the girls! I only wish I had had an opportunity to learn how to correctly do embroidery like that as a girl! My work would not be as “awkward” as it is now had that been the case!
Thank you for all you provide for all of us now! I look forward always to your emails!
Dear Mary
I do like the room a really cheery, bright homely comfortable room you have set up for the embroidery class and a great idea to have all the supplies in the bags with individual names, I’m sure the children will love the classes and I look forward to the progress on these classes. Your voided E monogram is lovely and I really like the simple stitches you have chosen for the project. I look forward to the future projects for have for us. Thanks for sharing with us your workspace for the children and for the E voided monogram and for the links.
Regards Anita Simmance
I’m curious as to how you pick a pattern when filling in the surrounding area on the first project (monogram) you canceled because of time constraints. I love this idea but have no idea how to implement the background.
Hi, Susan – I actually worked out a basic background design for each letter, which took quite a bit of time. I will most likely make those available here on the website in the near future.
I started a voided monogram, and sheesh, 8 hours later it’s still not done. So I agree, with your assessment.
Also, many have asked you for a travel lamp that you can take to classes that don’t allow plug-ins. I bought a Number-One with a Pisen charger. It works really well. The Pisen keeps the lamp charged for about 8 hours and recharges very quickly when it runs out of power. The lamp has led and magnification. It clamps pretty well to table. It doesn’t clamp well to a stitching hoop, as it’s too heavy, but will clamp to my floor stand. It doesn’t clamp to a lifetime plastic table, but will clamp to any surface less than an inch and one half.
I can’t wait to see your goldwork. Your studio looks great and well done on a budget!
Happy stitching.
Mary,
Your classroom looks so inviting.
I’m impressed that you consider the smallest detail to ensure the kids’experience is fun and educational.
Best wishes
Ruth from Kansas City
Dear Mary,
It looks fab – I wish I could be one of those children on the course. You’re going to have such fun!
Best
Kate
Hi Mary,
Whenever I teach embroidery to children, I usually start them off with small decorative patches on felt, cut into shapes with pinking scissors. They learn the basic stitches on fairly small motifs that can be finished in an hour or two and taken home to show parents (instant gratification !) I then show them how they can use these patches to sew onto their jeans or school bags or how to back them and add a brooch back, so they can pin it on to anything they like. As for the shapes, floral embellished hearts are always popular with girls, but the felt can be cut into circles, squares, rectangles or ovals, depending on what they want to use them for. Most children usually want to make more than one of these, and more advanced stitches can be introduced as they progress from florals to animals, nautical motifs or just about anything. When they have learned a good range of stitches and they are enjoying the process, I then introduce some pieces that will take a little longer.
Regards,
Melanie
Nice to have you back, Mary. Hope your time away provided all you were looking for.
And I agree with Ruth. The setup for your class looks great!
When will you be having adult retreat ?? Very envious of those lucky students!!
Thank you for this wonderful post Mary! I am in the process of preparing four one-day workshops for my teaching trip to China. As I will have no idea about the level of experience the students will have (but it will likely range from absolute beginner to intermediate), I am trying to keep it simple. If I see someone breezing through, I can easily suggest some more complicated stitches. However, I find it really hard to design quick, yet appealing projects (especially as things need to be traditional as well). It is so much easier to come up with something really ‘wow’ when you plan larger. On the other hand, it is a rather nice design-challenge for me!
Perhaps the kids in you area are different than those here in California. But, when I was teaching embroidery for kids at the local library, I started by showing them how to do each individual embroidery stitches. Once they knew how, then we moved on to a design. I found this way their attention span and interest was greater than beginning with a project, which they found complicated and were not to willing to follow.
We spend the first half of the class learning a few Stitches and practicing them on their Sampler fabric, then the second half of the class working their new stitches on their project.
A lot of work you have put into this.
Good luck, Mary and Anna.
I am really impressed with the inviting space you have created for your classsroom & students! I’m also impressed with the time & creativity you & your niece have contributed to this effort from the thought & care in selecting materials, creating fun projects for the various levels of students & the the thought & care with which you have organized everything. These classes look like they will be so much fun! Lucky kids!!
I really enjoy reading your adventures! And I’m really intrigued by your wanting to teach the young folks. It seems that so much of handwork is going the way of the wind! I was in a local heirloom sewing shop not too long ago, and was having a hard time finding materials and supplies for French Hand Sewing. I commented to the clerk about this and she said the younger folks aren’t interested in learning the hand skills any longer. They buy the expensive machines now to do the work formally done by hand. How sad! But you can’t carry that big machine around to embroider!
I tat, as well as embroider, cross stitch, knit, needlepoint, etc and find it harder and harder to find some supplies locally. Thank goodness for technology that many items can be purchased online.
I would love to see the children’s embroidery attempt. I understand the privacy issues, but would love to see, if nothing else, their beautiful, tiny hands interpreting a stitch!
A month ago, I was waiting on my husband who was in a church committee meeting. Two young pre school and school age girls had come with their mother. I brought my embroidery to make use of the time. The girls were fascinated with what I was doing and wanted to “sew”. So, I stopped my embroidery, went to a cross stitched part of the pattern and showed them how to do an “x”. The younger one wasn’t ready to learn, but the older one was. Before we left, the oldest was making a heart out of “x’s” and did not want to leave when Mom said “come on”! The younger one was indifferent. The next day, I went out and bought them a pot holder loom they could both do together and could foster their creative side. Both are “cowgirls” on a cattle farm.
We just never know how much an impact we can have teaching the young skills that may save some of these dying arts. Thanks for caring and I would love to see their hands making those beautiful stitches!
It’s true we don’t know the impact we have on youngsters around us.
A few years ago, I had the good fortune to see the woman who taught me to sew and bake when I was in 4H. She was very elderly and almost completely blind. As I introduced my hubby, I patted his belly as proof that I still make her peanut butter cookies, and told her I still have that very first apron I made. She re-iterated your point that you don’t know, and her husband had tears in his eyes that now, at least in one case, she knew. She passed away a few years later, and I am still grateful that I had the opportunity to thank her.
I got sidetracked on my previous comment.
As a child, I had to teach myself to embroider. I had no sweet grandmother to teach me; they lived too far away. My mother was a crocheter, a handwork I loathe to this day. So, teach myself, I did!
We always had gingham lying around the house. And gingham can teach more than just chicken scratch embroidery. It can help you to learn “distance” in making a stitch, like how long to make the petals on the Daisy stitch or how long to make that running stitch or back stitch or stem stitch. After a 3 month summer break from school, I had a large sampler of stitches made on that gingham piece. I wish I still had it!
Love the recommended table lamp. Can you recommend a floor lamp?
It looks very nice in your new space. I would like to be in your class!
Your classroom looks fabulous. What a joy to work in. Good luck.
Recently taught a small group of young girl scouts. I had plans for a felt bookmark with 5 simple stitches. It turned out more to be more of a class of teaching them to thread a needle and put a knot in the end of the thread. My kit included the felt, a sharp needle sized for pearl cotton, etc. I had also included several sequins and beads. One of the gals discovered that the needle could go thru the bead. Success! They had more fun sewing the sequin with the bead on the felt bookmark. Take your victories where you find them.
My next attempt will be twisted cord in one color and two colors.
Mary, well done it looks a very nice calm sewing room.
I was delighted to hear that your niece will be the heir apparent. Anna will have her expert Aunt to assist her with information.
I do hope that Anna will really enjoy her teaching and the students enjoy themselves.
That has certainly made my day.
Congratulations Anna, only good times for you.
Well done Mary, hoping only the best.
MM
Loved this article! I must agree that your end choice for the students will be less daunting to the children. And yet they will love their finished project as it’s personalized!
I have a question, which of your ebooks has the “ Voided Monograms”
Once again, I love your work , your web page and your newsletters!
Blessings,
Robin Farley
Hi, Robin – the letters for the voided monograms are in my ebook, Favorite Monograms, but they’re just the letter shapes – no background pattern. I’m hoping to put together a collection with backgrounds, too, for voided letters in the next few weeks.
Love, love, *love* the classroom!
Hi Mary , this is a wonderful thing to be doing ! I have taught little ones to embroider over very simple shapes and pictures hand drawn on to fabric …and they all love it….some of my little ones had never been allowed to use scissors..but with supervision they all soon learned .
Have fun ! love Debbie
Mary
I’d love to be a fly on the wall!!
Judy
Your classroom is so inviting. The students are lucky to have such a wonderful setting for learning embroidery.
Thanks, Lisa! We still have a bit to do in it (like getting some embroidery up on the walls, and getting the overhead light fixed!), but so far, it’s been a delightful space.
Mary, your timing couldn’t be better! I was sitting down to work on a hemstitching project that is taking forever! Yes, our handwork takes time, but it is a joy. Godspeed on your classes.
The thing that struck me about your table layout for your students is that, with the L shape tables, the kids can see and engage with _one another_ as well as their teachers. I envy them!
I also want to say that your reminder about embroidery not being something to hurry through made me look at my current project with new affection. I fear I was starting to get that “will this ever be finished” feeling. Then I read this article and when I looked at it this afternoon, I saw it with new eyes.
Love the idea of overhead camera. Although I teach art, not stitching, I’ve often thought these workshops should be like cooking shows, with some way to really see what’s going on . . . ..
Just a remark from the back of the classroom.
SK
I applaud your efforts to involve children in creating needlework. I would have been thrilled when I was a child with the designs you are planning for the class. The bright colors and the variety of stitches are perfect. Thank you for all you do for the needlework community!
Beautiful peaceful place for embroidery, Mary. No suggestions — looks perfect to me. Maybe some very quiet non-distracting music in the background? Congratulations to you on your long-awaited dream.
Love the Class Room set-up.