


Last week, I mentioned I was cold, so I set up a springy embroidery project that would help warm the cockles of my heart – or at least, would dissipate some of the winter gloom that has settled over Kansas.
To keep the blood flowing, I decided to continue with this particularly cheery project this weekend during my bouts of embroidery.
As I was traipsing through the stylized flower line with needle and thread, trying to bring the flowers to some kind of life, my mind automatically categorized the things I like about it … and the things I don’t.
Because a hoop is an integral part of this project, I also contemplated a common question about embroidery hoops that occasionally shows up in my inbox. I’ll address it below while sharing all my Profound Musings on this project.
Before I started stitching this design, I didn’t plan out what stitches would go where, or even what stitches I would use. I knew I wanted to use a few different line stitches for the stems and leaves. But the flowers would have to develop when I got to them.
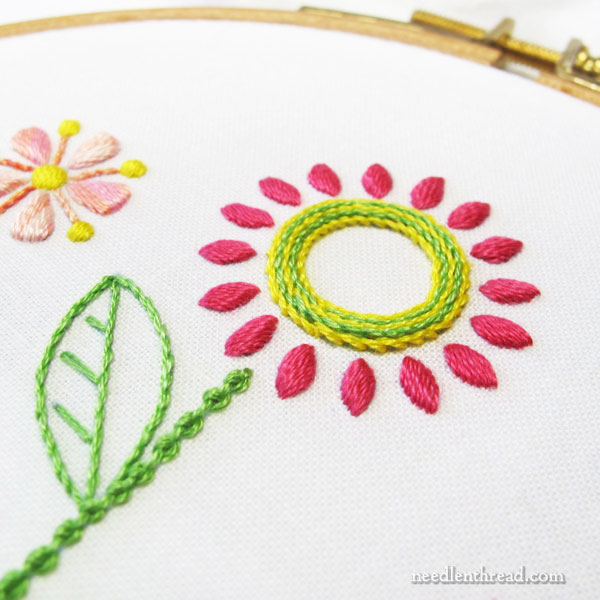
The flower above shows up three times (at different heights) in the (very) stylized garden. It occurred to me that padded satin stitch for the tiny petals might not be the best choice, if you’re in a hurry to stitch a design.
But I couldn’t help it. I thought this flower needed the lift, the shine, the structure that a nice “seed” of padded satin stitch would give those tiny petals.
And they are, by far, my favorite part of this whole design! They look like chocolate-covered, candy-coated sunflower seeds. I want to eat them!

These flowers are not exceptionally original. They’re part of the floral corner design I used last summer when teaching embroidery classes locally. (The floral corners will be coming out soon on Needle ‘n Thread, for those who have asked!)
I liked those flowers last summer, and I still like them.
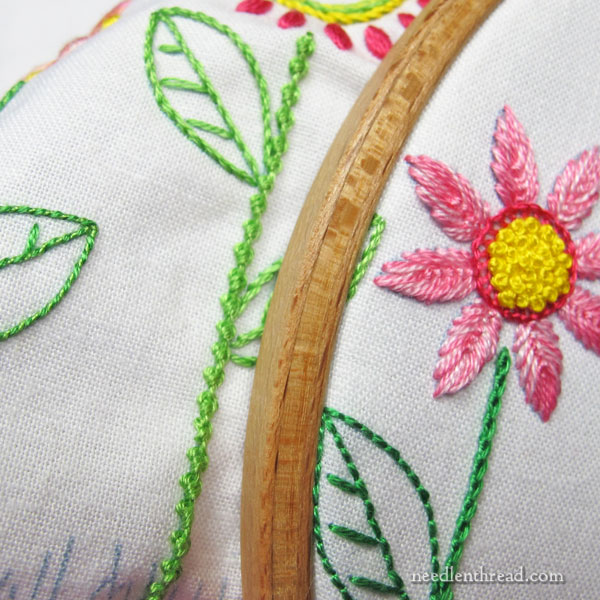
The stems of all the flowers are stitched with different kinds of line stitches, so even though I’m using the same three shades of green, the stitches add variety, texture, and interest.
And the variety makes the design seem somewhat sampler-ish.
So, the flowers and the stems are fun! I’m happy enough with them and I don’t envision making too many changes to the design, based on them.
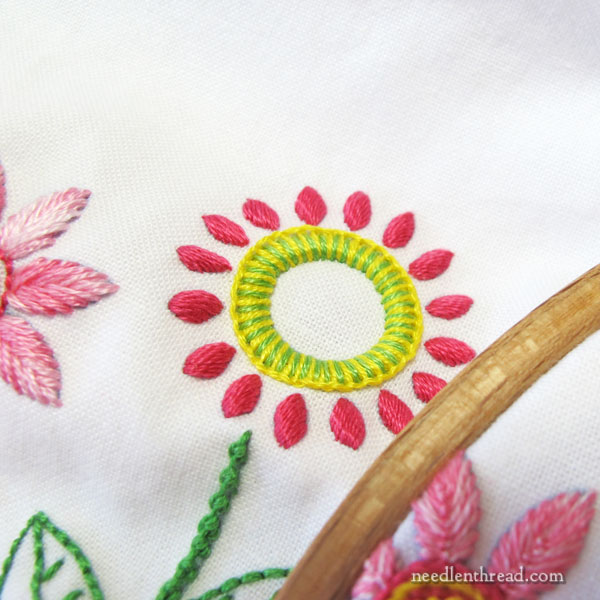
Here’s another one of the chocolate covered sunflower seed flowers.
Because there are three in the design, I’m varying the center treatment, but keeping the petals the same.
Looking at that particular shot brings to mind a question about hoops.
Embroidery Hoop Tips
I’m often asked what to do when a design doesn’t fit entirely within the ring of an embroidery hoop.
The answer is quite simple: unless you’re doing a technique that won’t allow it (like bead embroidery, stumpwork, or goldwork), you simply move the hoop over your embroidery and clamp it on again. It’s ok if there’s embroidery in between the rings.
It’s true that it will get somewhat crushed, but when you release the hoop and block or iron your needlework – or launder the piece, if it’s for household use – the stitches will revitalize just fine.
One way to minimize the stress on the embroidery is to remove your hoop at the end of each stitching session. This allows the fabric and fibers to relax. It also helps minimize the dirt or dust that can collect along the ring of the hoop.
Additionally, binding your embroidery hoop (if you’re using a wooden hoop – it doesn’t work well with plastic hoops that have the lip on the inner ring) will help add some additional protection to your fabric and fibers by adding a wee bit of padding. You can see how to bind an embroidery hoop in this tutorial.
When I’m working on a design like this that has a lot of textured stitches and French knots, I make an effort to situate the hoop so that the textured stitches aren’t between the rings. However, if there’s no other choice about placement – if some bumpy stitches are bound to get stuck between the hoop rings no matter what – then I just don’t worry about it.
The upshot: I’ve never had any embroidery ruined by using a hoop, even when moving it around over other stitching.
Getting back to likes and dislikes…
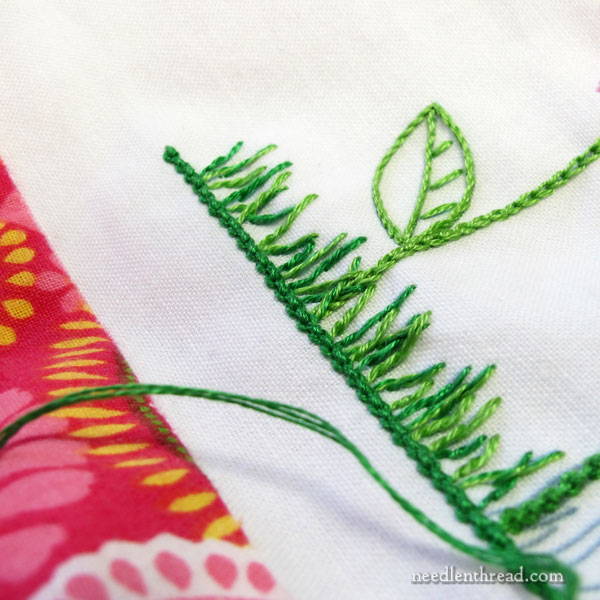
This is the grass line. It’s a little discombobulated right now, because it is not in the hoop and it’s been handled a bit. But you get the idea.
I don’t like the grass line right now. Maybe it will grow on me (heh heh) when the piece is finished and pressed. We’ll see!
The grass is worked in single self-couched stitches (cloister stitch, klosterstitch, convent stitch, Romanian couching – call it what you will), because the straight stitches on their own are a bit too long. Over time, if left long, they could result in loose stitches or they could get caught on things.
I could have stem stitched each blade of grass using one strand of cotton (and it probably would have looked a little better!), but it would take so much longer to do.
So I self-couched each blade of grass. This results in a heavier, less airy grassy line, but that’s not really what bothers me. I think what bothers me is that the grass takes away from the clean lines of the whole piece – I’m thinking it would look better with nothing at the base of the flowers.
I’m not going to take the grass out on this particular piece. I’ll finish it as transferred. I have two more examples to work up with this design, though, so I might work it without the grass in the subsequent examples.
We’ll see, once it’s cleaned up and pressed.
So that was my weekend stitching! Cheery and bright!
I’ve finished the leafy tree, too, which I will share with you shortly.
Hope your week is off to a magnificent start!
Re binding embroidery hoops….. did a free online course with the UK Royal School of Needlework. Imagine my surprise when I discovered they recommend covering BOTH hoops for your work!!!!!
Yes, I’ve written about binding both rings. I don’t necessarily do both, though – I’ve found it really doesn’t make much difference with smaller, quick projects, and I think there’s a better approach when working larger, more time consuming projects in a hoop. When working on something a little more intensive while using a hoop, I prefer to layer a piece of “scrap” cotton over my ground fabric when hooping up, and then cutting the scrap fabric away in the center to reveal the work area. This way, I have a protected area of fabric where my hands hold the hoop and would normally come into contact with the ground fabric. It’s much more effective than binding the outer ring as far as cleanliness goes, and it accomplishes the other hoop-binding benefits as well.
I am just returning to embroidery & this posting answered some of my questions. Thank you. I do have another: what stitch did you use for the stems of the flowers? They are so pretty & different.
Hi, Angelia – Thanks! I’m glad you like the stems! I used a variety of stitches on the stems, including chain, stem, Palestrina, Portuguese knotted stem, coral… I think there’s another one in there, but I can’t remember off the top of my head, and my embroidery isn’t right in front of me. :-/ But it’s a variety, which is what makes the project so fun.
I *like* the grass line! It looks like spring! If it were my project, I might stitch some bunny ears peeking up out of it…
LOL! I have a tendency to want bunnies on everything Spring, for some reason, too! 🙂
Dear Mary
You have worked hard this weekend the project is looking lovely especially all the different stitches you have used it looks so pretty, I especially like the centre yellow and green third photo down what stitch did you use. I like the grass it’s unusual and the stitches sit well on the project. Altogether a lovely design and the colour threads you have used also blend well together. Thanks for the tips on how to use a hoop. Thanks for sharing with us your springy flower project and for the tips and techniques I look forward to your progress on the project.
Regards Anita Simmance
Have you tried using different sized hoops? I have done it, but not nearly as often as you – Mostly I do beaded embroidery for a customer who provides their own design so that limits me too. I thought I’d ask if it’s reasonable or practical to switch loops along the way on a single project!
Hi, Laura – I use different sized hoops if I need to. On this type of embroidery, I don’t really need to. I just shift the hoop!
I also like the grass. I like it all. The tiny contrast of waviness make me see the crispness of the rest of the design.
My vote is “yea” for the grass, as is. I think the structure of the flowers needs the jungle of grass for contrast. It emphasizes those clean lines and bright colors. Also, the heavy line “underlining ” the grass is like sod, with the new growth reaching for the sun 🙂 LOVE IT ALL… WELCOME SPRING!
Along with pictures of the flowers and stems, please tell us the stitch(es) used. I think I know some of them, but I’m not sure, and appearances can be deceiving!
Being new at this, I really appreciate you doing something simple and describing the process.
Hi, Holly – I’ll be releasing this pattern with a stitch guide here on the website in the not-too-distant future, with all the details of stitches and instructions for them. I’m planning on using this pattern for local kids’ summer classes this year – or at least a variation of it.
I was taught to stitch using a hoop and always use a hoop. When I first learned to stitch embroidery hoops did not have screws – they were basically two wooden hoops which fit tightly into each other. The one I still have from then has some sort of (mostly gone now) crushable fabric set into the side of the inner ring which faces the outer ring and would crush as a method of keeping the hoops tight together. I was taught to ALWAYS remove the piece from the ring after a stitching session to keep the hoop from making an impression in the fabric – very hard to iron out those impressions. I have always moved the hoop around to do different sections of the pieces.
I use for stitching, when not demonstrating period embroidery, older plastic hoops which have a screw but do not have a ridge – I find the ridge a problem when moving the hoop to different places and do not like it.
When demonstrating period embroidery at events I cannot use a plastic hoop. Technically I should not use a hoop with a screw either, but I use good quality wooden hoops at events with my local unit. If we go to an event with our national group I have to either use one of my mid 20th century hoops (I have acquired some additional ones by various methods since I started doing reenacting) or use one of the ones I use at local events with a tube of fabric hiding the screw. Before I understood how to wrap the inner hoop to tighten the hoops, I used small pieces of white felt inserted between the hoops at several points to tighten them. Most techinically I should have hoops with much wider wood (about an inch tall instead of the perhaps quarter inch of modern hoops) and my husband keeps promising to make them for me. The outer “hoop” was often a leather belt and he will probably have to do that when it makes it. The hoops in period were either permanently on a floor stand or a table stand. We have seen several in historic houses of both types and were lucky enough that in one house when we kept going back and looking into the room at the table hoop, with husband trying to take photos, the docent invited us into the room to take a closer look. (Hoops came into use with Tambour work at the start of the 18th century and continued over to other embroidery. Before that all was done on a frame with permanent legs.)
Thank you for a very timely post 🙂
Love this project. Like you I am cold. Looking out the window yesterday I had to shut the curtain as the snow was blowing horizontal to the ground and the wind felt like it wanted to tip the whole house over, I expected to end up in OZ or Kansas or perhaps even Buffalo I’m near Lake Erie in PA. But your designs does make it feel warmer and I love seeing the piece of fabric that I’m not sure if it is sewn on to extend the fabric to be able to hoop it or for color guidance, not that you ever seem to need any! Think warm thoughts.
I am so happy I found your newsletter and website! I love your spring flowers. I look forward to ordering them when you put them together!
I want to try some pillow cases. I grew up with beautiful embroidered pillowcases from both my grandmothers. I’ve saved some of the embroidery even though the pillowcases worn out!
Hi, I love your flowers!! I always love flower patterns!! Any chance you have patterns with these flowers that are available. If so, where can I find them? Thank you so much for your lovely writing about embroidery projects. I love to read it. Thanks Jane Heal
Hi, Jane – I’m just releasing (today) some ready-to-stitch towels with this flower line pre-transferred on one of the towels in the set. Look for the latest post on the home page of at needlenthread.com!