Sometimes, beginner embroiderers jump into embroidery with enthusiastic gusto, leaping into projects that might seem too advanced. This can sometimes lead to frustration, feelings of inadequacy, or even quitting altogether.
I’ve always believed that, if enthusiastic and determined enough, you can tackle a more advanced project from the very beginning of your creative journey – as long as you tackle it through an accessible route.
And that is the approach that I’m pretty much taking with the ecclesiastical project that I first mentioned here.
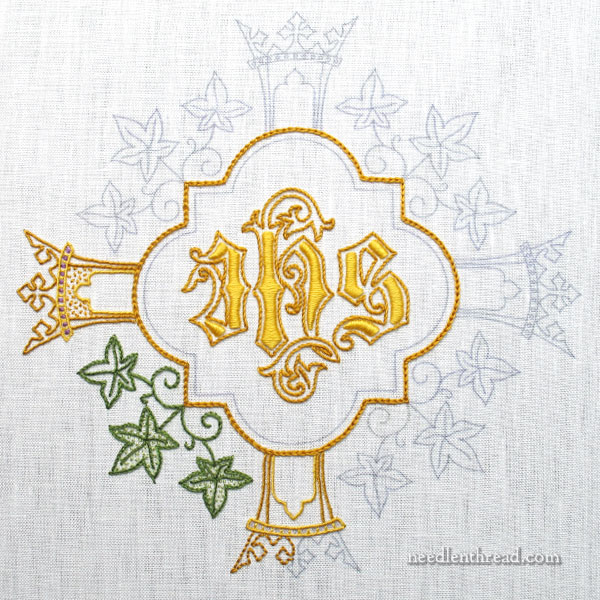
Today, I’ll show you how far along my sample project is, and tell you how to make a seemingly advanced-looking project accessible for the beginningest of beginners.

Except for the padded satin stitch in the photo above, I’ve taken a super-simple approach to embroidering this communion pall (which is not to be confused with a funeral pall – a completely different textile used in church funeral services).
The ladies who asked me to teach them to embroider a pall don’t necessarily know how to embroider, but they do know they want to make an embroidered pall.
Knowing that I’d be working with beginners in embroidery, I chose simple stitches for this particular class sample to demonstrate that you can achieve good results on what looks like an “advanced” embroidery project without having to first build “advanced” skills.
The exception is the padded satin stitch. I consider padded satin stitch, executed well, to be an advanced embroidery skill. It is learnable for beginners, but it takes a lot of practice to achieve consistent results. By the time a beginner has practiced enough to achieve a good satin stitch, the beginner is no longer a beginner!

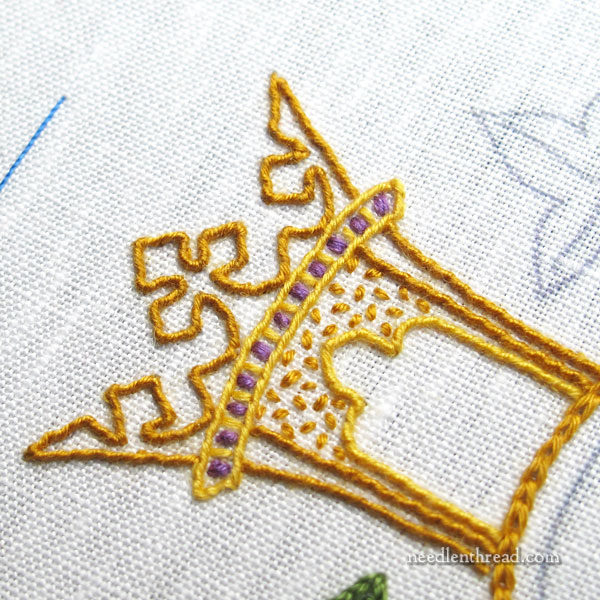
The design elements on this are pretty finely detailed. For the side arms of the cross and crowns, I used the simple backstitch and I whipped it.
In an “advanced” version of this design, if I were going for the same type of look, I would probably choose an overcast satin stitch (or “overcasting”), where you satin stitch over another thread (it can be a very fine weight) to achieve a delicate and smooth line. But again, that’s an advanced skill that takes some serious practice.
Backstitch, however, is one of the most basic embroidery stitches, and among the first that many new stitchers learn.
To achieve a consistent result with backstitch, the beginner really only has to practice a few points:
1. The movement of the backstitch (how to construct the stitch);
2. Consistency in stitch length;
3. Consistency in whipping the stitch from the same direction throughout the design.
These are three concepts that are simple to grasp and easy to practice. They can be practiced on a doodle cloth or something similar, until the desired results are achieved. For most beginners, the desired results are easy to achieve and they’ve mastered the stitch in a short amount of time.
In addition to the backstitch, I used a scattered seed stitch as a filling. These are simple small, randomly placed, tiny straight stitches. The points to master with the seed stitch, again, are pretty simple:
1. Consistency in stitch length;
2. Random placing and changing of direction;
3. Consistency in spacing.
The actual stitch itself really takes no mastery. It is simply up at one spot, down at the other. But to make seed stitches more or less consistent in length and to space them consistently while keeping their direction and placement seem random takes some practice.
But it only takes some practice, and there’s nothing complicated to remember about the stitch itself.
And that’s what makes seed stitch a good beginner stitch for a light and scattered filling that can add not only color, but texture, to a project.

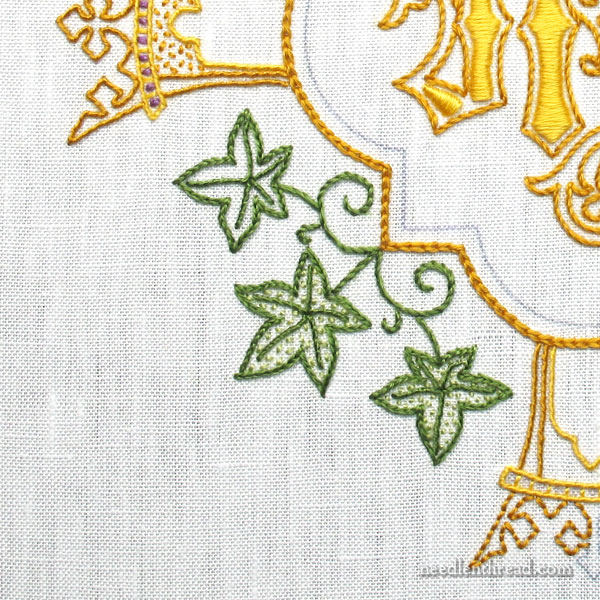
On these leaves and stems, I’ve employed four basic stitches:
Stem stitch, split stitch, whipped backstitch (the veins in the leaves) and seed stitch.
All of these stitches are basic. They take only a few points to concentrate on to master them – and those points are all pretty much the same:
1. The movement of the stitch
2. The consistency of length
3. Any spacing issues (if spacing is an important consideration).
They are all simple stitches based on the straight stitch, and they are all reasonably part of a suitable beginner repertoire of stitches.
If this entire design were embroidered in those four stitches only, it can come out looking fantastic. And there’s no reason why a beginner might not achieve perfectly suitable results, embroidering what looks like a complex design, using very basic stitches.
So, essentially, for these projects, I’m doing taking what might look like “advanced” embroidery projects and making them accessible to the absolute beginner, simply by concentrating on the mastery of the most basic embroidery stitches.
And anyone can do it!
The upshot: Don’t get bogged down by the classifications of projects into categories like beginner, intermediate, and advanced. If you find a project that you like, that you want to make, and you think it is beyond your skill level, simplify the approach. Make it accessible for you and meet it at your level. Find basic techniques that are easy to master that will work on your project, master those basics, and your results will be beautiful.
If you’re a beginner, and you’re looking for more beginner embroidery tips, check out my previous article, 8 Embroidery Tips for Beginners.
The Goldwork Masterclass
For readers in the US who want to order Alison Cole’s Goldwork Masterclass book that I reviewed here, I have some limited new stock in.
You can find the book available here in my shop. If you order today before 2:00 pm Central Time, they will ship out priority mail (included in the price) on this afternoon’s truck!
Enjoy the weekend!


Haha! You’re getting colorful!
Darn! I missed the Allison Cole book again! Is there any way we can pre-pay for it and have it sent when it is available? Or get on a waiting list to be notified when it is available? I got a wonderful Bee Skeep kit from Katherine Diuguid after waiting for a year for her to make more & would LOVE to use the book to help with that. I waited almost 2 years for my wonderful Millenium frame & it was worth every minute. Soo… I am patient.
Hi, Vikki – if you email me at mary(at)needlenthread(dot)com and request to be put on the advanced notice list, you’ll get an email well before it’s announced on the website, so you can purchase the book. I should have new stock coming in at the end of this week, and I would let you know once they’re available.
Dear Mary
This is a beautiful ecclesiastical design and I think the stitches and thread colours you have chosen are lovely. All the stitches you have chosen are very simple and can be achieved for the beginner except the satin stitch even now I have difficulty sometimes in achieving a consistency with satin stitch line especially when it’s a curved line. I can see that this will be lovely when it is finished and I’m sure the ladies who you are teaching will love it and feel a great achievement when they have completed the pall. I wish I was joining the class with the other ladies that would be wonderful. Thank you for sharing the progress of the pall cross and for the advice on how to achieve the stitches, I look forward to the progress on this. I hope you have a great weekend, how is your mum I do hope she is recovering, take care.
Regards Anita Simmance
Beautiful work and a labor of love!
I’m new to your website and your work, but already very inspired. God bless!
Hi Mary, this is a lovely communion pall. Was it all worked in floche?
Thanks! Yes, it is. Here’s the finish: https://needlenthread.wpengine.com/2020/10/embroidered-communion-pall-finished.html