


I’ve been trying to tie up loose ends lately, finishing up smaller embroidery projects here and there. There’s something rather satisfactory about being able to put a completely finished project away – to tidy up the work table, to put threads in their place, and all that!
This piece of ecclesiastical embroidery that I showed you earlier is finished, so it’s ready to pack up.
I’ll show you the finish, talk a bit about trimming, blocking, and so forth, and then we’ll chat about (literally) putting it away and how I go about doing that.
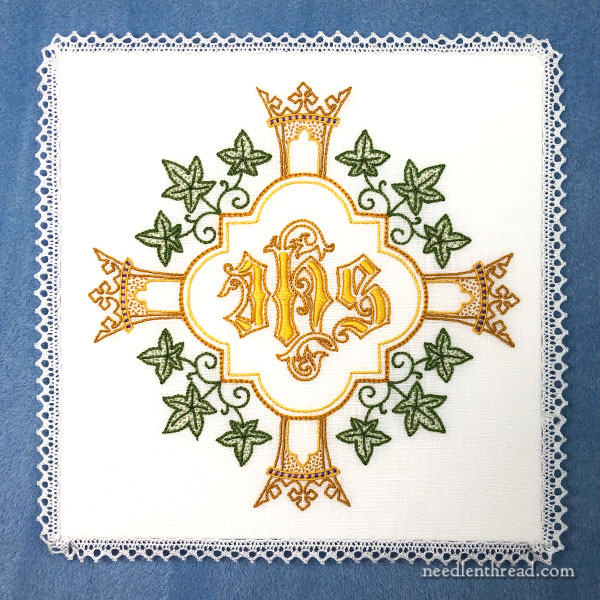
This is the finished pall.
In previous articles on this project, I’ve explained what a pall is, so we’ll skip those details, and I’ll link to the previous articles at the end in case you’re just joining in and you want to read further.
I regret that I didn’t photograph it under better lighting conditions, so I will do that before I wrap it up and put it away.
For me, I could embroider palls until the cows come home (I have no cows) or until my fingers fall off, and I’d enjoy every minute of it. The part I don’t like is finishing. I’m just not a great finisher of things like this! But it has to be done, so when it’s time, I set aside a few hours when I won’t be disturbed, and I put all my efforts and concentration into it, and just get it over with!
For the structure of a pall, you can look at this earlier article I wrote ages ago.
Essentially, it’s just a folded piece of linen (folded on the short side to make a square and machine-sewn up two sides) into which is slipped a stiff insert, and then the third side (opposite the fold) is hand-sewn closed.
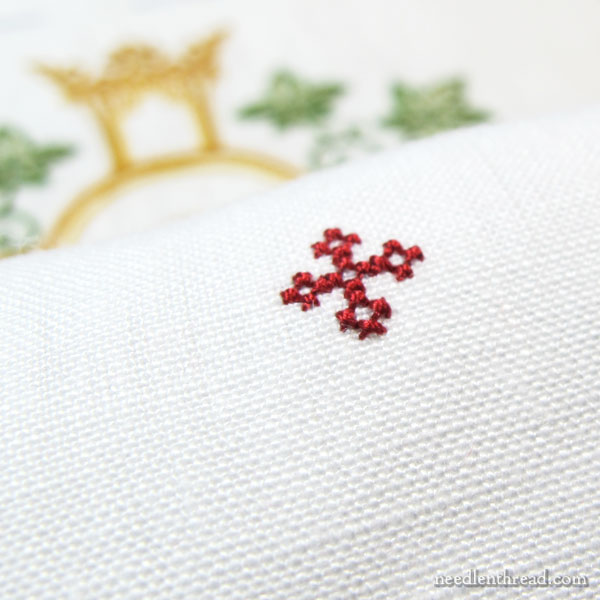
Before sewing up the pall, the back needs a tiny red cross embroidered onto it. I use this layout for the cross.
Even though the fabric is not even-weave, it comes out fine. I usually just eyeball the spacing and size for the cross stitches, if the plain weave linen is “too” plain weave.
On this particular pall, I had to stitch this red cross three times.
The first time I stitched it, I stitched it on the wrong side of the fabric, so that, when the pall was sewn up, the back of the stitches on the cross would have been showing to the outside.
So I picked the tiny thing out with tweezers and dabbed the area with tape to remove any red thread residue and proceeded to stitch the cross the second time.
The second time, I did Exactly the Same Thing! I couldn’t believe it! So out it came. Same procedure. And the third time, I got it right.
Gee whiz.
I used red silk for the cross – specifically, Soie Gobelin.
Adding the Lace Edging
Once the cross is embroidered on, I damp stretched and blocked the whole piece and then sewed it up.
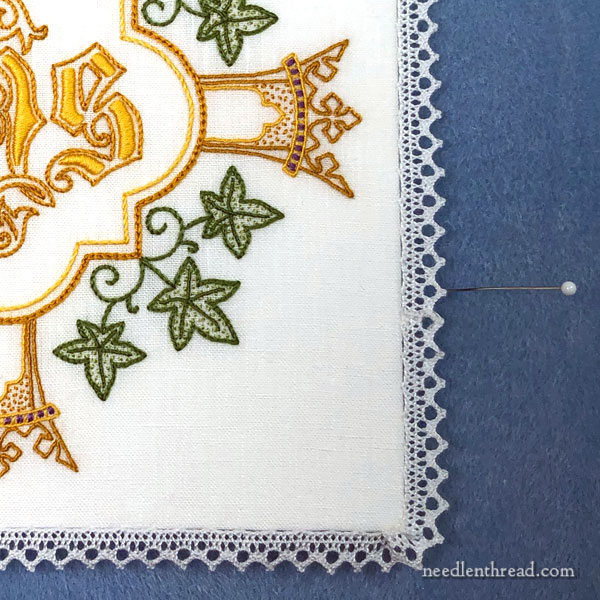
Once the construction is complete and the pall is sewn closed, if you want, you can sew on some trim. I like to put a tiny, fine lace around the edge.
Wait. No.
Let me put it correctly:
I like to see a tiny, fine lace around the edge of a pall. I don’t actually like to put it there myself. That’s the part of finishing I don’t like. It has to do with the fact that the lace is sewn on after the construction is complete. It requires sewing the lace invisibly and very carefully onto the pall, with that stiff insert in there. And it’s just awkward.
And, of course, you have to join the lace up somewhere, when it comes around and meets its beginning.
Some day, I’m going to create a needle lace edging that is a complete square and requires no sewn-up join, and then sew it onto a pall. Now, that would be a nice challenge!
In any case, this is a very fine white cotton lace from France. It’s about 1/4″ deep. I sew the lace on the very edge of the top of the pall, by passing the needle and thread under the fabric and bringing it up from behind the lace, catching the lace, and entering the fabric again and moving forward to the next place I’ll catch the lace. I try to keep the tacking stitches as evenly spaced as possible.
On the corners, with this particular type of lace, I work a couple tiny pleats in the lace to get it to smoothly round the corner without causing the lace to fold downwards.
Normally, I use a fine curved beading needle for sewing the lace on.
As it happens, I broke my last fine curved needle half way through the finish on this. It’s much more difficult with a straight needle!

There’s my lace join.
I overlapped the lace so that the design on both ends matched and the ends could lie on top of each other. Then, I used a very diluted archival PVA glue and the tiniest paint brush, and carefully dabbed the very ends of the cuts. I then sewed over the cuts and secured them together with a very fine white sewing thread.
I think it worked out to a fairly good join, so I’m not unhappy with it.
It’s just such a pain in the neck to do, and it always causes me excessive worry as I work towards the area where the join has to happen.
Why don’t I join on a corner? I used to, but then I realized that one corner always looked off. I think it’s better to join on a straight edge, and to try to manipulate the join so that it is as discreet as possible.
Packing it Away
When I have a finished pall that wasn’t made for someone specific, I store it away until needed.
To store the pall, I wrap it in archival tissue paper. This is acid free, PH neutral, lignin free, unbuffered tissue paper. I use two sheets and carefully wrap it so that the lace is not crushed. The pall then goes into the equivalent of a kind of handkerchief box, about 6.75″ square and half an inch deep. The box itself is not archival (because I can’t afford to have custom archival boxes made), so I make sure the tissue paper is. I don’t want the pall yellowing if it ends up being stored very long. In fact, they’re never stored very long, but one never knows…
And that is my pall-making adventure! I plan to set up another pall shortly, because I need to have three or so on hand over the next year.
Shortly, we’ll chat about my efforts to clean up this heavily yellowed pall and I’ll show you the final results on that.
Here are the previous articles on this project:
Introduction to the Project – information on palls in general and first stitches
Progress on the Pall – with some stitching information and tips
If you want to read more about palls, these links might be of interest:
Ecclesiastical Embroidery: Pall Design (grapes, IHS pall design)
Finishing Work on Hand Embroidered Pall – the small red cross
Simple Stitches for Beautiful Results on a Whitework Pall
Adding Texture with Seed Stitch on a whitework pall
Whitening Yellowed Linens – cleaning a heavily used pall and bringing it back to a natural white – first efforts
Beautiful. I would love to see a video of the ‘attaching’ process for the lace edge. Do you use the same technique for attaching cording? I am always unhappy with that part of my finishing.
Morning Mary
Here’s a storage suggestion for long term storage. I can’t afford archival boxes either so what I do is buy old well washed towels from the second hand store and cut two pieces that will snugly fit in the box. Zig-zag the edges (or use a serger if you have one). Lay one piece of towel in the bottom, the embroidered tissue wrapped piece on top then cover with the other piece of towel. This toweling can be washed as necessary to remove any acid it may have absorbed during storage and so further protect your treasured work.
What a good idea!
Dear Mary
The finished Pall looks lovely and I love the lace and the golden threads you have used in the design and such simple stitches as well. This will really stand out when it is hung up for viewing in a Church. I made a Pall once and the finishing was the most difficult getting the stiff lining to line up with the pattern of the Pall was really difficult and I had to stitch on a piece of dark purple linen and attach it to the main purple velvet cloth, it was very difficult so I completely understand that finishing is a very difficult. Thanks for sharing with us the completed Pall and for the instructions on how to sew on lace edging.
Regards Anita Simmance
Lovely, Mary! Every element is just perfect. Having said that, boy am I with you on repeating the very mistake one just corrected! AAARRRRGGGGHHHHHH! Truly the bane of both sewing and embroidering! What, oh what, are the brainicles doing when these things happen? SMH!
But your efforts paid off!
Linda
Mary, your lace join on the pall is lovely. But I have a thought on those joins that might make them even more “invisible”. Because of the way we read, our eyes are trained to look from top left to bottom right (and without our even thinking about it). Thus, if you put your join on the bottom right of the pall, it might become even more “invisible” to the eye enjoying your embroidery as that is the last place people look and most just glance at that spot. Just a thought. I so love seeing what you do.
True! Normally, I would make the join at the lower left, though, just because the pall is usually handled on the right side, so it would get less wear on the left. I actually thought I had started the lace on the lower left side, just above the corner, for some reason, and by the time I realized I was not where I thought I was, I was too lazy to take it out. Actually, I was too frustrated to take it out!!!
I’m curious – do you get commissions to do the ecclesiastical embroideries? Or do you make them up and post them for sale? You mentioned you don’t have them long.
Also, your join looks great! That is such a good idea for items that won’t get washed. I do clothing, so trims get more overlap, those same tiny stitches, and less glue, but the idea is the same. And you’re right about the corners, never overlap there. It just *always* shows!
I rarely do them as commissions. Usually, I just give them as gifts. There are just certain things you can’t put a price on!
Oh! and I have totally done the ‘same mistake twice’ thing. Except for me it is sleeves. I’ve put the left sleeve in the right armhole (buttoned cuff sure looks wrong then!) taken the darned thing out, and put it right straight back in all wrong again. SO maddening. Ugh.
Looks gorgeous, and that lace join is really invisible!
But I get that it could be a fiddly pain to work it so invisibly. This is why I crochet a fine thread-lace border in the round right onto the edge of things such as handkerchiefs that need a continuous closed border!
In case anyone wants the technique: Start whipstitching a fine cord onto the finished fabric edge, and start your initial round of single crochet over the cord. Continue the whipstitching-and-crocheting process bit by bit around the edge: doing them both a bit at a time ensures that the cord will lie smoothly along the edge with the crochet stitches on it, as opposed to stitching the cord all around and then trying to squeeze the crochet stitches between it and the fabric.
Abut-join the cord ends when you get all the way around and oversew them together to prevent fraying, but don’t worry too much about making an invisible join, the crochet stitches will hide it. Then continue with the subsequent rounds of your lace edging as desired.
Of course, in this way you would have to block the finished lace right on the item, since it’s attached as it’s made. But it shouldn’t be too difficult to dampen the edge of the lace and stretch and pin it without affecting the fabric itself.
Then whenever you have to remove the lace, you just cut the whipstitches holding the cord to the fabric, and voila! you have a perfectly finished square of lace that exactly fits your item when you have to sew it back on! Also allows complete control of the color, pattern, motifs, and depth of the lace edging.
Or you could just sew on a beautiful strip of pre-made lace and carefully join it as Mary did. That works too.
There is a technique to join lace ends, taht are strong and really invisible. I don’t actually explain the technique but you can see the result here http://sophiedentelles.canalblog.com/archives/2008/12/29/11900204.html
How did your student’s come out?
The workshop ended, and, to my knowledge, they haven’t finished them yet. Like most workshops, we covered everything they needed to know, but we didn’t have enough time for them to finish the entire project.
Wow! Gorgeous and perfect!
I hope it is for a special priest-nephew! 🙂
There are traditional shawl patterns which make the border all in one, if I’m remembering correctly and then join the ‘frame’ to the main panels. So maybe you could knit/crochet one!
[Wouldn’t it work to catch the lace in the seams? I suppose not or you’d do it ….]
Terminology is such a fascinating thing.
Embroidery History is one of my passions. Right now, I’m talking pre-1650 or pre,1700. I know that as a chalice cover or chalice veil. The cover for the Host is a corporal or corporeal.
A pall covers a coffin or casket. The Fishmonger’s Pall was borrowed by the V&A for their Opus Anglicanum exhibit. You can read about it here. http://www.zenzietinker.co.uk/opus-anglicanum/
Given the funeral connotations, it is very easy for me to see the shift. We generally don’t use elaborate palls any more … other than Military Coffins. But both the chalice and the host are tangible symbols of the death of Christ. And the V&A has several lovery corporals as well as burses.
Do you sell your chalice palls? I would like to buy one for a priest friend provided I can afford it. Please let me know what one would cost. Thank you so much.
God bless you.
Sr. Mary Leonora fsp
Hello, Sister, Thanks for note! No, I’m afraid I don’t sell palls. I make them for gifts or on commission (but not lately!), but I don’t make them as stock to sell. But thank you for asking!
Greetings! I know I found the right person to ask this question. But first, the pall is beautiful! I hope you found a good home for it. Questions:
How do you keep the turned, hand-sewn edge from bunching at the corners? Also, how much Seam allowance for the sides? Do you use plastic or cardboard for the insert? If you use plastic, where have you found the perfect thickness and have you found a place that will cut it the exact size you want?
I hope you still monitor your site. The bunching at the corners is driving me nut.
Merry Christmas!
Hi, Jane – the pall is folded and just sewn up the sides, and I clip the inside corner of the seam, so that it isn’t too thick. My seam allowance is less than 1/2″ but not quite as narrow as 1/4″. I don’t get any bunches on the corners. When I hand sew the lace around the edge, I ease it around the corner, so it does slightly “ruffle” the lace, but I find that’s a better look, compared to a corner of lace folded on a 90-degree angle. I don’t use plastic / acrylic for the inside of the pall. I use mounting board or artists’ board or even mat board. It may not hold up as long as plastic, but it can easily be replaced. I cut it myself. I don’t like acrylic, and most of the priests I know who order palls or who receive them as gifts do not like acrylic. It is too heavy and too thick, and over time, it takes a real toll on the fabric.
Hope that helps!