


As we move into the weekend, I thought it might be fun to explore some stitch variations. Maybe these will get some ideas flowing for some weekend stitching experiments!
Stitch Fun! is a series of embroidery stitch tutorials here on Needle ‘n Thread, where we explore combinations, composites, and variations of embroidery stitches. There’s a hefty list of photo tutorials in the series, if you want to check it out here.
Today’s tutorial is the result of working on the instructions for these Mini Sampler Stockings I showed you last week, that go with my Christmas ornament kits that will be out in about a week.
Some of the stitch explorations didn’t make the cut, simply because I didn’t end up using them on the models for the e-book. Even so, I’ve included lots of stitches and ideas for variations in the instructions, so that you can explore and experiment to your heart’s content. It’s a great way to end up with a finished ornament or two that are uniquely you!
In the meantime, this is a fun way to play around with fly stitch and beads…
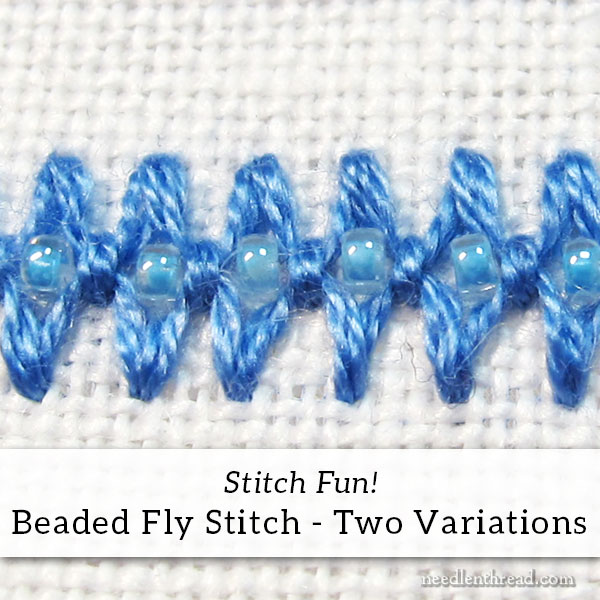
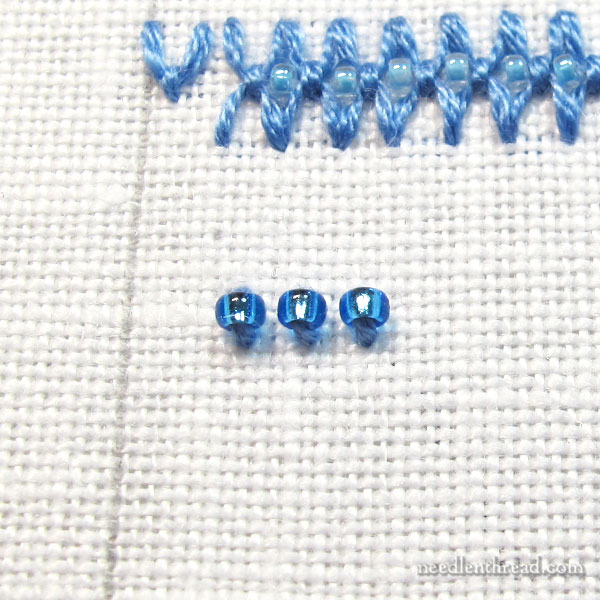
For the first variation here, I’m stitching on linen using three strands (from the six) of DMC stranded cotton floss in a #7 crewel needle, 15/0 seed beads, 6 lb Fireline for sewing on the beads (I explain about in this article) with a #10 crewel needle.
If you play around with this combination, I encourage you to experiment with contrasting colors or shades of beads, compared to whatever color floss you use. I was trying to be subtle with this particular line of stitching, but I think it might be a little too subtle. I’d like those beads to be a bit more visible.
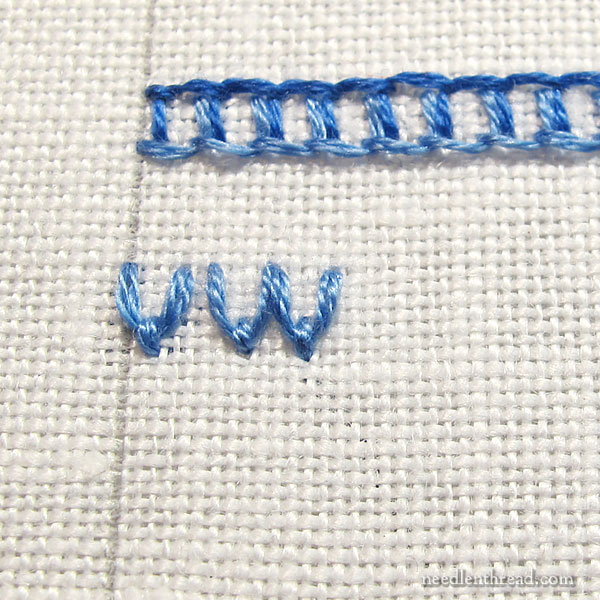
I started out by playing with the fly stitch worked horizontally. There’s a space after the first one, because I was just playing. That’s how these things develop.
If you are not sure how to work the fly stitch horizontally, you’ll find my video tutorial for the horizontal fly stitch here.
Work as many horizontal fly stitches as you want to in the first row of this combination. In this case, I started with just the two, but if you’re doing a whole band, stitch the first row of horizontal fly stitches all the way across the band.
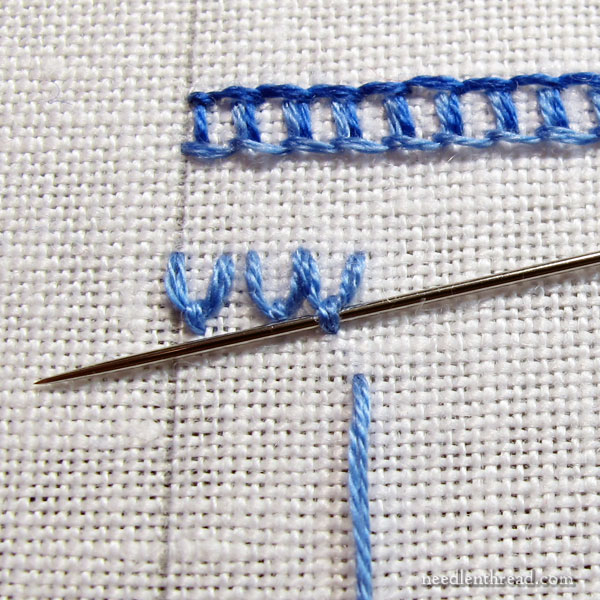
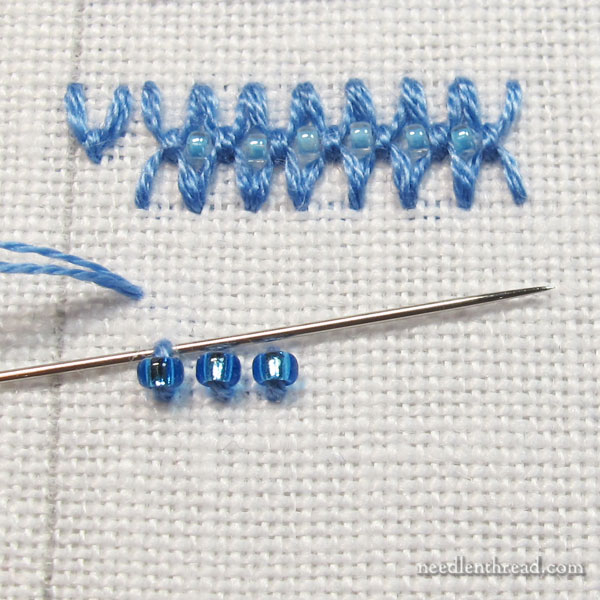
Then, create the second half of the band by returning below the first row of fly stitches, using the anchor stitches from the first row as your anchor stitches in the return row, which mirrors the first row.
To do this, just slide your needle under the anchor stitches from the first row to hold your thread in the shape of the fly stitch.
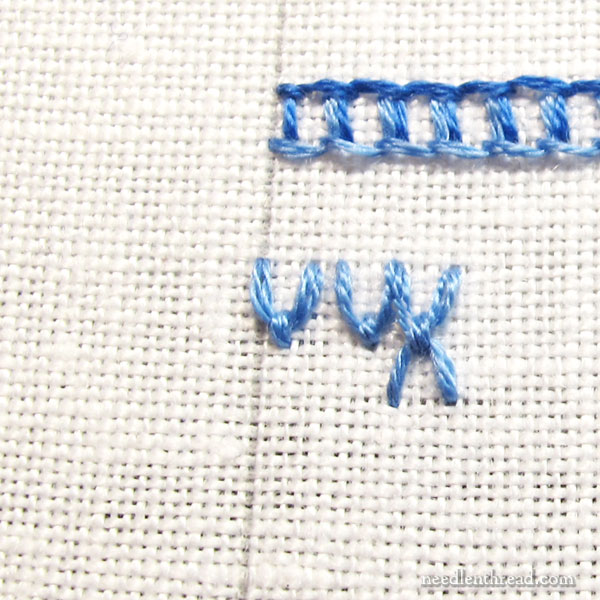
You’ll end up with little X’s that look like they have a couched center. They’re kinda cute!

The only catch on that return row is that you’ll pass under the anchor stitch going in the opposite direction on every other stitch.
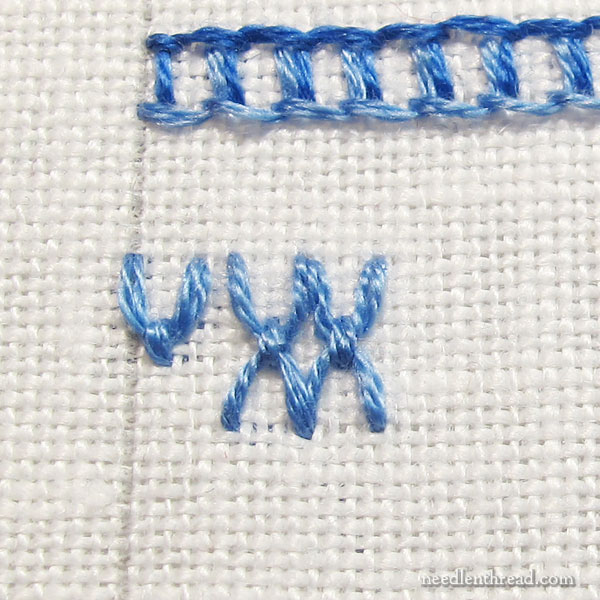
Two X’s.
I should invent a beer.
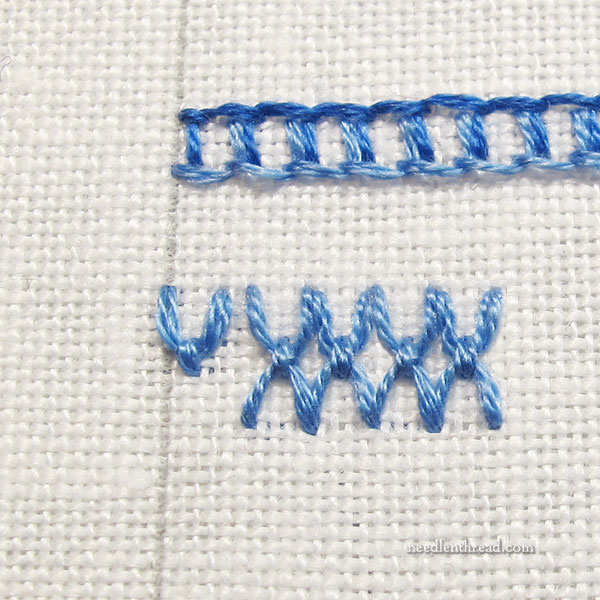
Again, your band of stitching can be as long as you want it to be, but for the sake of efficiency, I recommend doing the whole top portion first, and then the bottom portion of the band on a return pass.
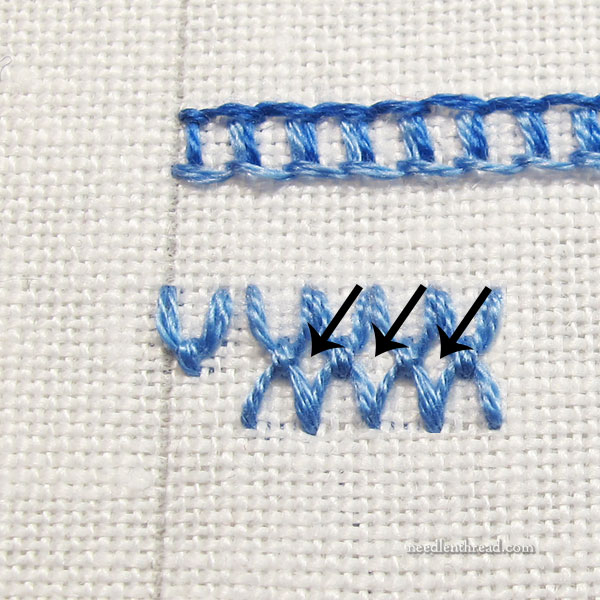
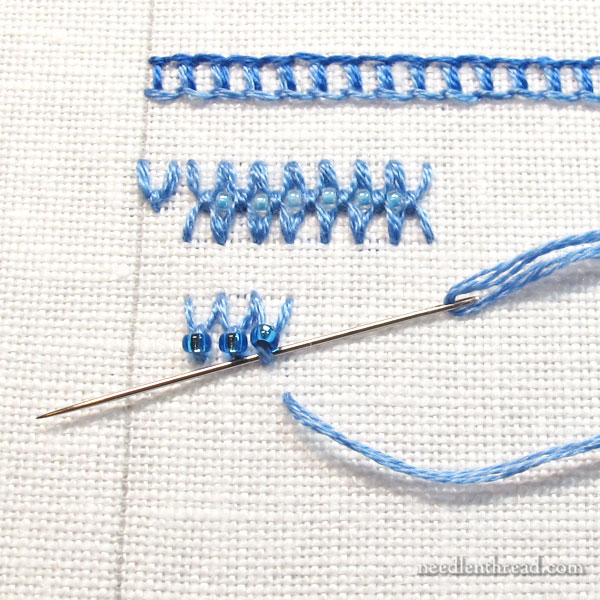
I got to looking at those X’s, and the spaces between them popped out at me.
They said, “Fill us.”
I said, “Beads.”
And we all agreed.
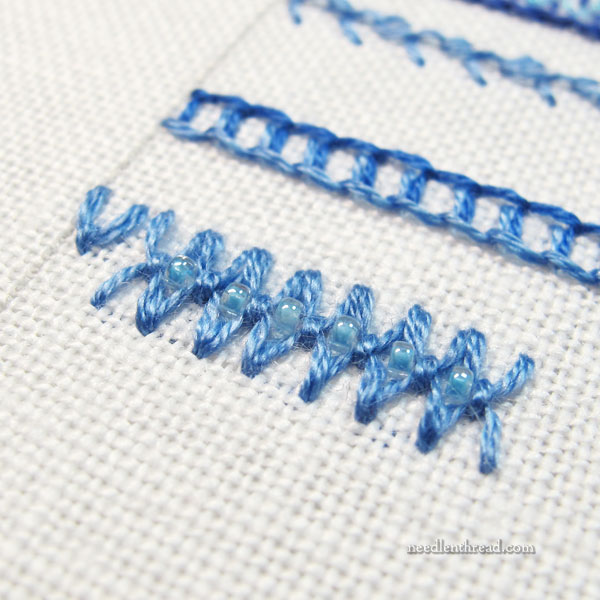
So I switched to a #10 crewel needle, threaded up a short length of 6 lb Fireline, and sewed in some 15/0 seed beads, vertically, in the spaces.
And that lead me to other experiments.
Just for the fun of it, then, here’s another one for you.
Beading the Anchor
With this next variation, I started with the anchor stitches. This is more of a reversed fly stitch, I suppose – and with some variation in spacing, it can be called something completely different, but we’ll talk about that down the road!
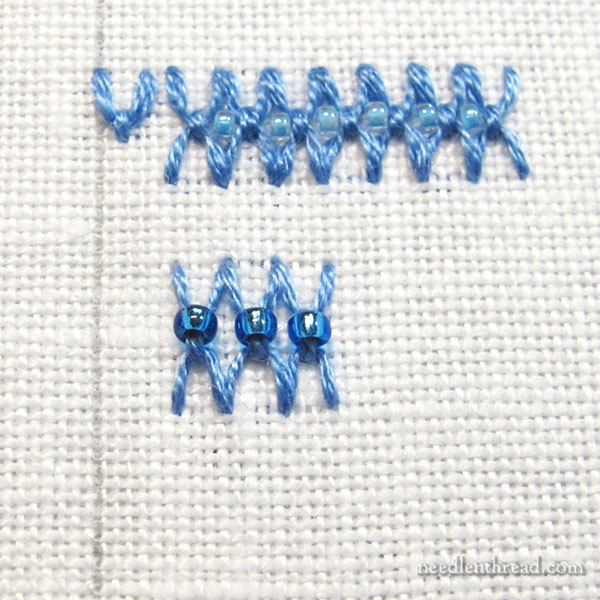
Using three strands of DMC floss (from the six) and 11/0 seed beads, I sewed down some anchor stitches equally spaced.
It’s important that the anchor stitches (the actually embroidery thread of the anchor stitches) are vertical, which ends up orienting the beads horizontally.
Then, I stitched the flying part of the fly stitches, by running the needle and thread under the anchor stitches.

The caveat: to make it work, every other stitch has to pass under its anchor from the opposite direction.
After passing across the top of the anchor stitches and beads, come back along the base, working the fly stitch into the lower side of the anchor stitches below the bead.
Ta-dum! I like this band – and there’s So Much More we can do with it!
But alas, we will have to save that for another day! (Now we have something to look forward to together!)
Incidentally, you can work this on plain weave fabric, too, and even on slight curves on plain weave. You would just have to map out your spacing a little bit, or draw parallel removable lines to stitch between.
I hope you enjoy this little tutorial and that you give these decorative bands a try. They’d make a nice border, a nice addition to a band sampler, or just a fun stitch to play with for any old reason!
If you’re looking for more embroidery stitch instruction, you’ll find my collection of stitch videos available here and you’ll find the rest of the Stitch Fun! series here.
Coming Up on Needle ‘n Thread!
On Monday, I’ll let you know exactly when you can expect my Mini Sampler Stockings embroidery kits to launch and the accompanying project e-book. I’ll also share a couple sneak peeks of some other Christmas projects that have been in the works here on the studio.
I’m planning to have a little Thanksgiving Day game and puzzle for you, so look for that next week, too!
And I’ll also be launching my yearly Stitcher’s Christmas give-away series shortly after Thanksgiving, highlighting several delectable and beautiful needlework-related prizes. Thread packs, tools, books, kits, accessories – all from needlework businesses who have generously jumped on board and want to give back to the needlework world. So get ready for that! It’s a lot of fun!
Hope you have a fabulous weekend!
I hope you include another puzzle in your Christmas series! I enjoyed it immensely last year!
I’ll definitely have one on Thanksgiving – probably one on Christmas, too! 🙂
A sweet lady recommended your site to me some time ago, and while my skills have far to go, and time to practice remains “socially distant”, your tutorials and newsletters are an inspiration and refreshing respite from the other noise around us.
Thank you for the incredible amount of thought and work you put into them, and the wealth of information and creativity you so freely share.
J’ai adoré ce petit cours !!!!
Merci beaucoup. J’attends avec impatience la suite……
Dear Mary
What a lovely way to create the fly stitch with beads which I love and it’s great that you are adding this to the Christmas stockings. I like the way you can approach the stitch in different ways it’s a very pretty way to use fly stitch and a great idea to use different colour threads and beads it would make it really interesting and it’s good you can use the stitch on plain weave fabric as well. I’m looking forward to the sampler stocking and Christmas give-away series in the following weeks. Thank you so much for sharing this lovely stitch fun series on the fly stitch and for the tutorial and photos.
Regards Anita Simmance