


Time to move along with our embroidered strawberries adventure!
Just to start, I made some corrections on the color list in the first article in the series. I corrected a typo on a DMC color (it should be 3705 in the pinks) and changed one of the House of Embroidery colors (it should be 4C, not “U”).
Last time we met on this project, we talked about blending thread colors in the needle and we stitched a very simple little strawberry.
Today, we’re going to fill one of the larger, plumper strawberries and crown it with some dimensional leafy bits for the sepals.
Let’s move on, shall we?
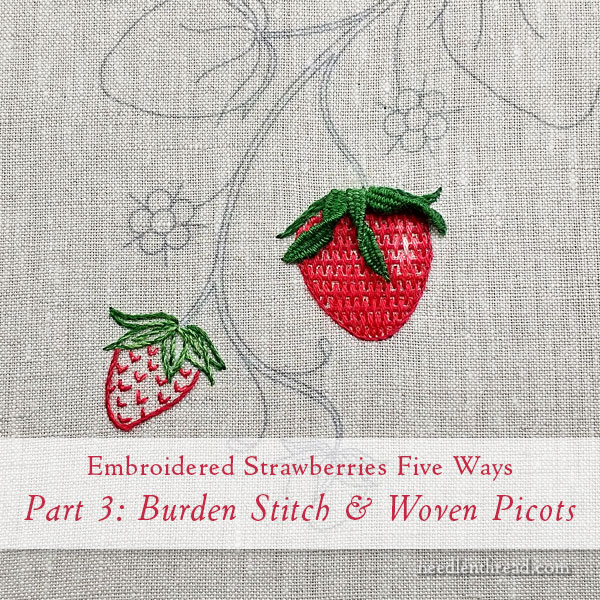
Today’s strawberry is the first plump, large strawberry on the right side of the design, going from bottom to top. We’re going to stitch the strawberry in burden stitch and use woven picots for the sepals.
For threads, in stranded cotton, I used a very light pink (just one stitch!), a medium pink, a couple reds, and some greens in what we will call dark, medium, and medium-light.
I also used a #8 red perle cotton.
If you’re following along, choose your colors from among those you’ve collected for the project. If everything is tied down to specific color numbers, then it limits your flexibility, especially if you’re working from your own stash.
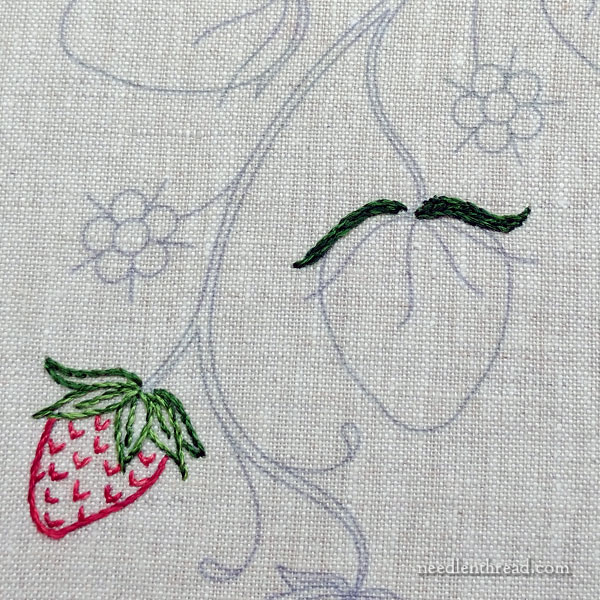
Start by filling these two back sepals with stem stitch, using two strands of darker green.
Outline the sepals first and then fill the inside with as many rows of stem stitch as required to fill the spaces. It will only take a row or two – they are tiny spaces.
Switch to a #8 perle cotton. If you don’t have a #8 perle cotton, use three strands of stranded cotton.
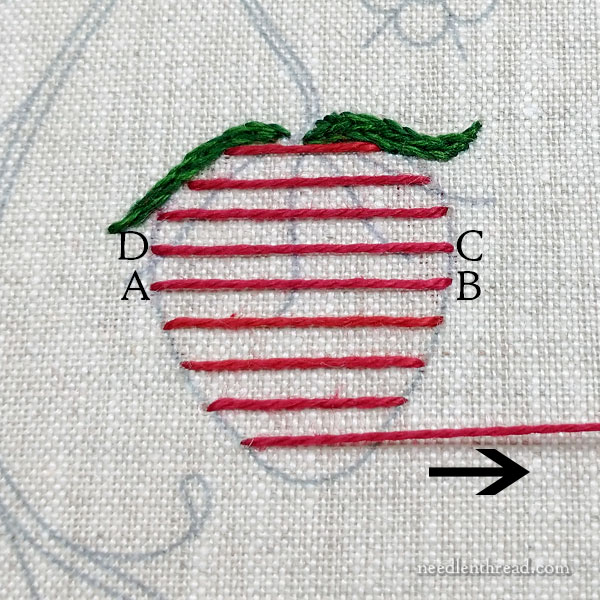
Work long parallel stitches across the body of the strawberry, as shown above. Start in the center and move upwards to the top, and then go to below center and move downwards to the tip of the strawberry. This helps distribute the lines more evenly.
To stitch these lines, follow the sequence in the photo above. Come up at A, take the thread across to B and take your needle and thread to the back, then come to the front of the fabric at C, just above B, and take the thread across to D to go down into the fabric. Follow this type of sequence, stepping to the next stitch by following the outline of the strawberry, rather than carrying a long stitch across the back.
To keep your lines parallel, it helps to draw the working thread across the strawberry, keeping tension on it and crossing over the design line on the opposite side, where you plan for the stitch to end. Manipulate the working thread under tension, so that it lies parallel to the thread above or below it (as indicated by the arrow and the tensioned working thread in the photo above).
This will give you a clear entry point into the fabric, to end the stitch. You’ll enter the fabric right behind where the working thread crossed over the design line while it was parallel to the adjacent stitch.
These stitches should be about 1/8″ apart.
Burden stitch is a filling that involves working parallel lines of long foundation stitches, over which small straight stitches are worked perpendicular to the foundation stitches.
Each row of stitches is off-set with the row above and below, so that the stitches fit between each other.
Normally, you’d work burden stitch straight across one row, then the next row, then the next row, always staggering the placement of stitches, so that they fit between those worked on the previous row.
By spacing the stitches differently, you can achieve shaded effects. The farther apart they are, the lighter the stitched area. The closer they are, the darker the stitched area.
You can also change the color of your stitches to achieve a sense of shading, and you can even change the color of your foundation stitches if you want, working them in graduated shades.
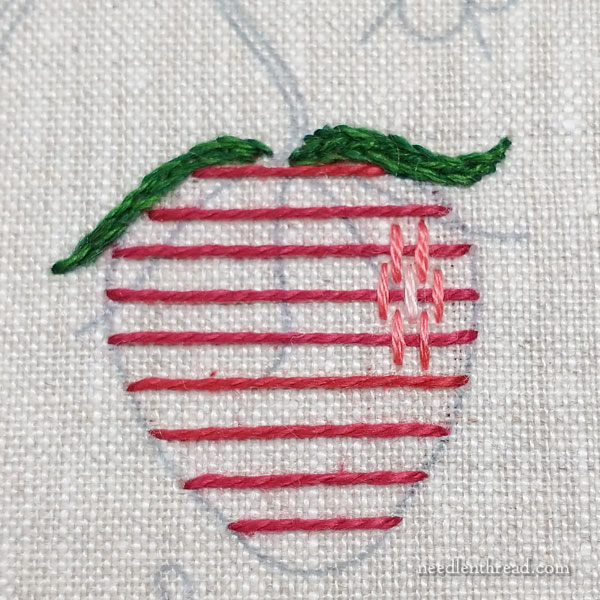
Here, instead of starting out in rows, we started with the spot on the strawberry where there might be a little highlight, and then we built the rest of the burden stitch filling around this area.
For this strawberry, I thought the highlight would be on the right upper side, where the berry looks plumpest.
Using two strands of very light pink in the needle, begin with one stitch for the center of wherever you want your highlight.
Work the stitch from just below foundation stitch above the one you’re covering, over the foundation stitch you’re covering, and into the fabric just above the foundation stitch right below the one you just covered.
Basically, you’re working a long couching stitch that fills the space between the foundation stitches above and below the one you’re covering.
Then, work medium pink couching stitches, one on each side of the light pink stitch, spacing them equally, so that the stitches on the row above and the row below will fit between them.
(Refer to the photo above!)
Then, work the medium pink stitches in the row above, off set between those on the center row, and then work the medium pink stitches on the row below, off-setting them as well.
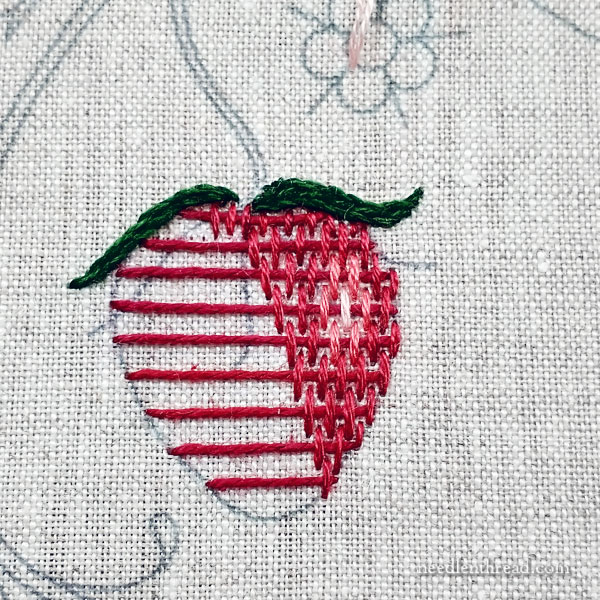
Switch to red. You can combine reds in the needle if you want to, or just use two strands of a good, solid, strawberry red! Continue to fill around the highlight.
If you want to continue “shading,” you might combine two colors in the needle (lighter and darker red) and fill the strawberry similarly to the shape of the filled area in the photo above.
The sample is just one color of red. A sense of shading is achieved more by spacing – you’ll see that below.
The key to burden stitch is to keep your couching stitches the same length, always perpendicular to the foundation thread and parallel to each other, and, if you’re using more than one strand of thread, to make sure that the stitches lie flat and smooth and don’t twist on each other.
You may need to use a laying tool (or a larger tapestry needle if you don’t have a laying tool) to achieve this. You can learn how to use a laying tool in this video.
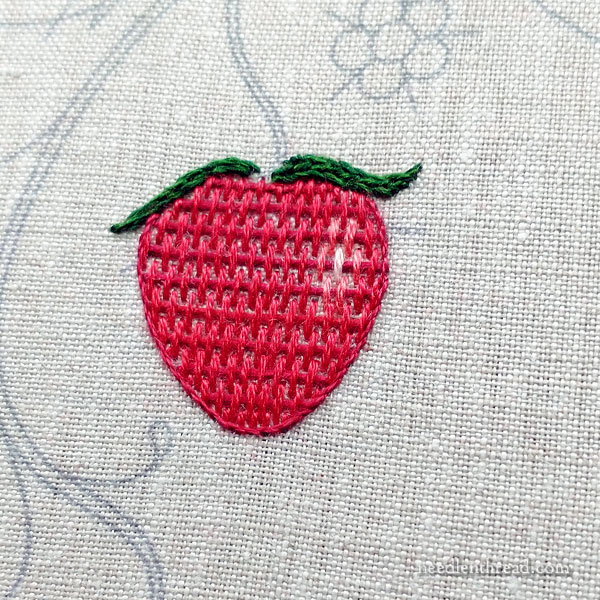
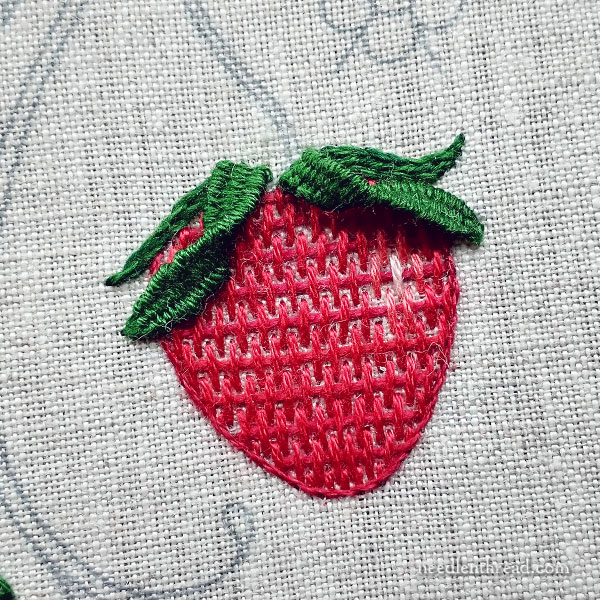
Here’s the filled strawberry. Notice that the stitches are slightly closer at the base of the strawberry, and at the top of the strawberry and anywhere the strawberry looks a little darker.
Notice that the strawberry looks lighter in the center (where it’s plumper), where the stitches are a little farther apart.
This is a good way to achieve a shaded effect without actually having to change the color of the threads.
When you’re finished with the burden stitch filling, stem stitch around the outsides of the strawberry along the design line, using one strand of the most predominant red you used.
The front sepals on the strawberry are woven picots. You can find a video tutorial for woven picots here.
Use two strands of green (medium) in the needle for the side-most front sepals, and a strand of medium and medium light for the center front sepal. Make sure that your thread is cut rather long – at least 18″ for each woven picot, just to make sure you don’t run out of thread mid-picot!
I like to use a tapestry needle for woven picots, to avoid snagging the sharp needle on the thread.
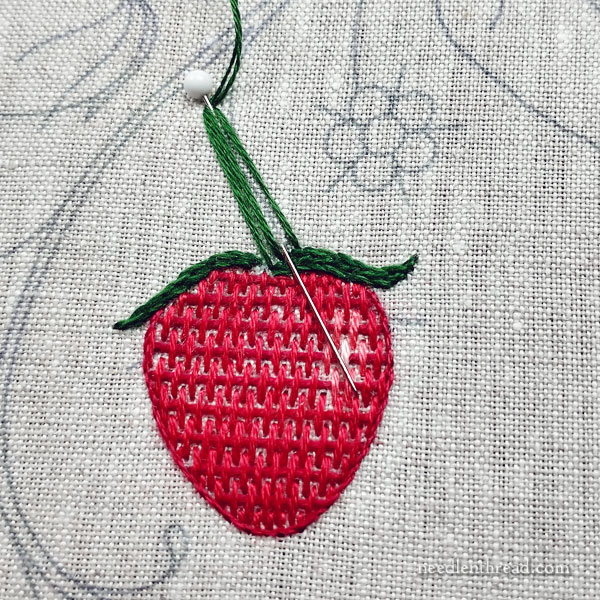
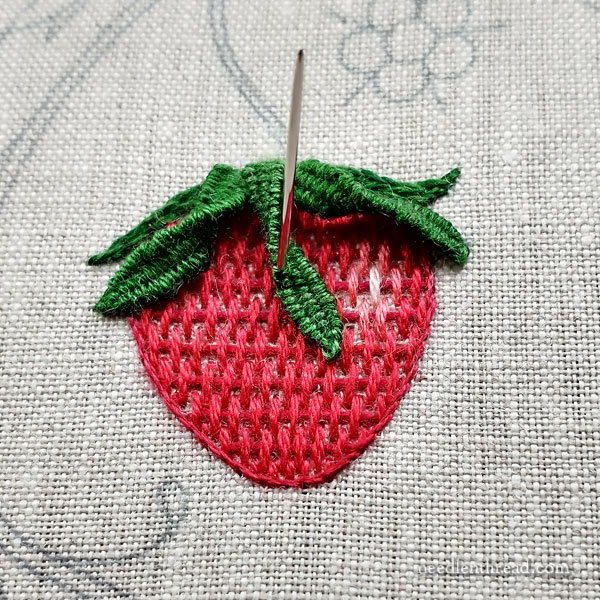
Make the woven picots rather narrow at the base and somewhat long – you want them to be about half the length of the strawberry.
Work them “upside down” compared to the strawberry – anchoring the pin to hold them above the strawberry, as shown in the photo above.
Don’t end the thread for the picot until you have anchored it onto the strawberry.
After finishing the picot, pull it down over the strawberry and off to the side, twisting it as shown in the photo above, and then use the working thread to stitch a tiny anchor stitch into the side of the picot and into the strawberry, to hold the picot in place.
Don’t cover up the highlight spot on the strawberry! You want to show that off!
Work the second picot on the other side of center in the same manner and fold it down, twist it, and anchor it with a little stitch into the strawberry.
At this point, your strawberry will look like Alfalfa from Little Rascals.
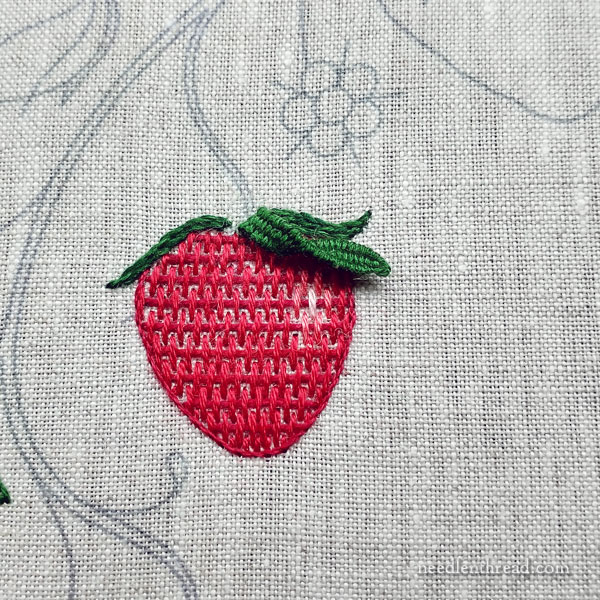
For the center front sepal, use a strand of medium and a strand of medium-light in the needle, to create a slightly lighter sepal for the front center.
After finishing the woven picot for the center sepal, fold it down over the strawberry, give it a twist, and tack the side onto the strawberry with a tiny stitch, as shown above.

And that is strawberry #2 in The Great Stitched-Strawberry Adventure of 2021!
For previous installments in this series, check out these articles, in chronological order:
Part 1: Strawberries Five Ways: Materials & Pattern
Part 2: Strawberry #1
Coming Up!
On Saturday, I’m going to be doing some “clean up” posts on the blog here, creating an index for these tutorials so that you can easily find them.
On Monday, some Tool Talk!
If you’re a member on my Patreon page, you’ll find the downloadable PDF for this strawberry and the next one later today. We’re going to work ahead on the project, so look for it there!
I loved this strawberry!
Mary , You are the best!!!!
Thanks
Dear Mary
A lovely strawberry and beautifully stitched. I have not heard of the Burden stitch before but it’s a lovely stitch and really looks good on the strawberry. The picot stitch is perfect for the leaf and sits lovely on the top of the strawberry. I do like this series of 5 different ways to stitch I’m learning a lot from the tutorials. Thank you for sharing with us the second strawberry and for the tutorial on the Burden and picot stitches.
Regards Anita Simmance
Love the 5 ways tutorials but it is difficult to find them easily. I did subscribe but no longer seem to get notice of your e-mails.
Brenda Beer
Hi, Brenda – I made an index for them, which is listed under “Tips & Techniques” in the main menu of the website. If you are subscribed to the newsletter and it suddenly isn’t showing up, chances are, your email service provider has changed some server settings. It is either being blocked or being filtered to spam. Check your spam filter, and if it’s there, mark it as “not spam.”
Oh, Mary! That’s jaw-dropping!! So sweet. Your usual excellently clear guidance. I can do this!
Glad you like it! 🙂
That (stitches closer together) is the idea behind Or Nué
Right.
Really love the burden stitch strawberry. It really looks strawberry-like and the different methods of shading are fascinating. Thank you.
Glad you like it! 🙂
These small designs are perfect for my ongoing seasonal kitchen towel collection. The strawberries would be nice for display in May or June as that’s when they are available in abundance around here from independent growers at roadside stands…the most delicious strawberries you can imagine. Do you have a recommendation for a source for white towels suitable for embroidery designs like this? The ones you use for your pre-printed designs are lovely and nicer than the ones I’ve been able to find locally. Do you ever sell them just plain or care to share an online source?
I love the textures of the burden stitching and picots for this strawberry. It’s really effective!
I have been waiting to feel ready to stitch again to tackle a project I dearly want to.
I have my favorite pair of shoes, with a woven top, developing a hole at the toe. It just feels like the exact right place to put a couple tiny strawberries!
If I can manage it, WHEN I can manage it, I will share a photo on the FB site.
Here’s hoping!
I’ve just discovered an interesting fact about Burden stitch. It is named after Elizabeth (Bessie) Burden, sister-in-law to William Morris, and aunt of May Morris, the designer/embroidery artist.
I am currently researching May Morris and came cross her Aunt’s work. Apparently Elizabeth Burden reinvigourated interest in this medieval stitch (which she used in her exquisite work) and taught it at the Royal School of Needlework. They eventually renamed it the Burden stitch, to recognise her contribution. It was originally named Tapestry stitch and was used extensively to fill embroidery figures in medieval embroideries.
Thanks for your wonderful site!
Thanks for this, May! What great information to share – I appreciate it!
wow, this is absolutely marvelous!! i was searching for tutorials on how to sew strawberries and this is the most detailed one ive ever seen, thank you for sharing it, very pretty!! 🙂