


Last week, we began our exploration into embroidered daisies, using the design & materials list that you’ll find in the first article in this series, here.
Today, we’ll start stitching!
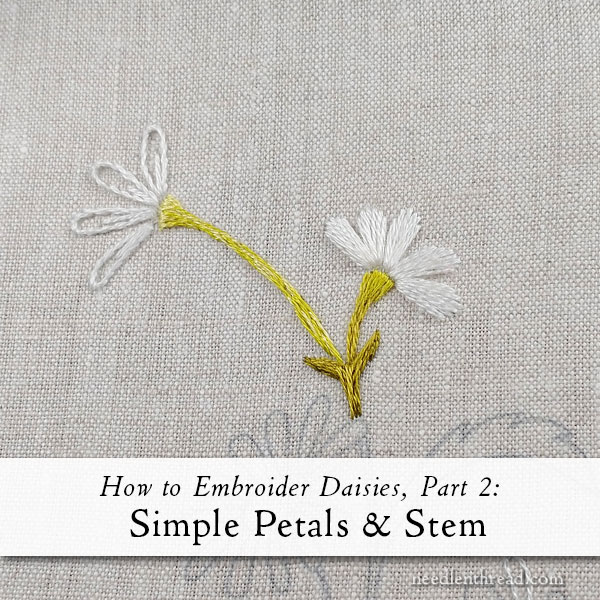
We’re going to dispatch the first two daisies – they are very simple – and a little bit of the stem.
As we progress with this project, you’ll find all the articles for this series of tutorials on daisies listed in this index, so if you’re just joining at some point and you want to see what we’ve already done, check in there. Links to each tutorial in the series will be added as the project develops. You’ll also find other tutorials in this collection of How to Embroider (Blank) available in the same index.
As usual, members over on Patreon will find today’s tutorial (along with all the previous tutorials) available later today, as a downloadable PDF.
Ready?
For today’s tutorial, you’ll need a white (DMC 3865 on the sample) and some greens (DMC 165, 166, 733, 731 on the sample).
I’ll be referring to the greens as light, medium, and so forth, to avoid any kind of confusion for those who are working with your own colors from your stash or what-have-you.
I’ll also refer you to tutorials elsewhere here on Needle ‘n Thread, in case you need help with particular stitches.
Read First, then Stitch!
Big Tip: Whenever you embark upon a new project that’s not your own and you’re following someone else’s instructions, it is really imperative that you read through the instructions completely before you start stitching.
Reading instructions all the way through before you begin a project will help you understand where you’re going, it will open up opportunities for areas that you might want to adjust and do differently, and it will help you avoid pitfalls.
(It will also answer anticipated questions that are already addressed further on in the instructions – and this will save you and the designer a lot of time! Smiley Face. Wink. Wink.)
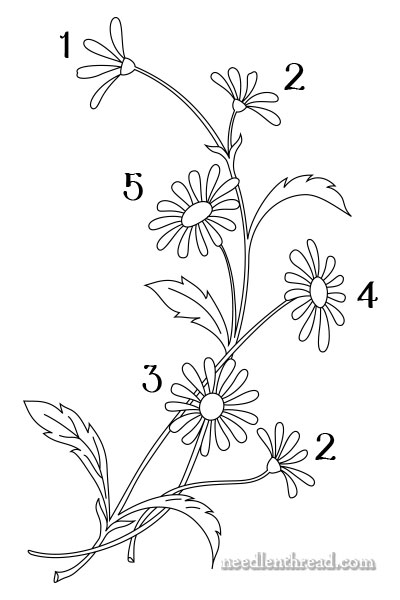
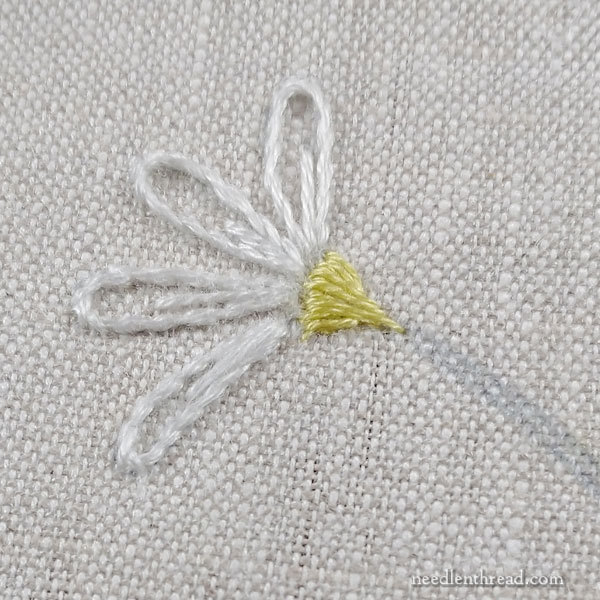
We’re looking at daisies 1 & 2 at the top of the design.
You’ll notice there’s another 2 on the lower right of the design. We’re not doing that one yet, because I’m going to show you, down the road, a few different choices that came into play and were subsequently discarded. We’ll talk about the why’s and wherefore’s behind stitch selections on that one.
So, for today, we’re looking at 1 & 2 at the top of the design, plus the attached stems.
If you’ve followed along with the wheat and the strawberries tutorials from earlier in this series, you know we’re starting Super Simple, and so, without further ado, here are the instructions on Daisy #1:
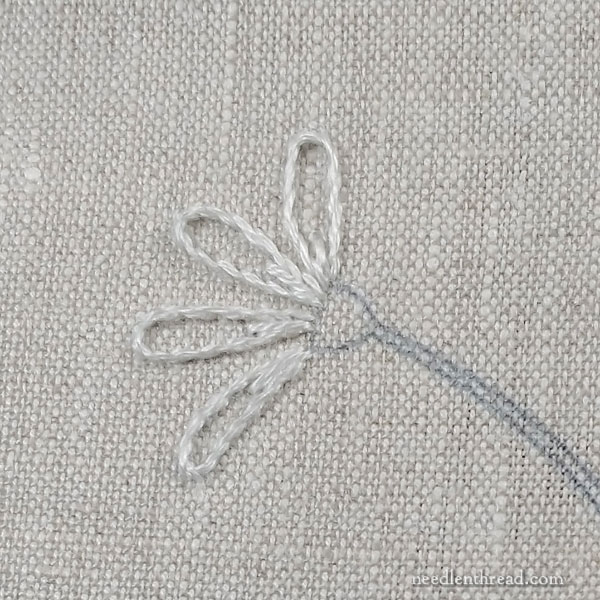
Stem stitch the outlines of the petals in white, using two strands of floss. If you wish (and we did), stem stitch a short vein up the center base of each petal, to give a little more depth to the petal. This vein might only be two stitches in length.
You can find a video tutorial for stem stitch here.
You can also find 12 Tips for a Better Stem Stitch here, if you struggle with stem stitch. It’s worth reading through those!
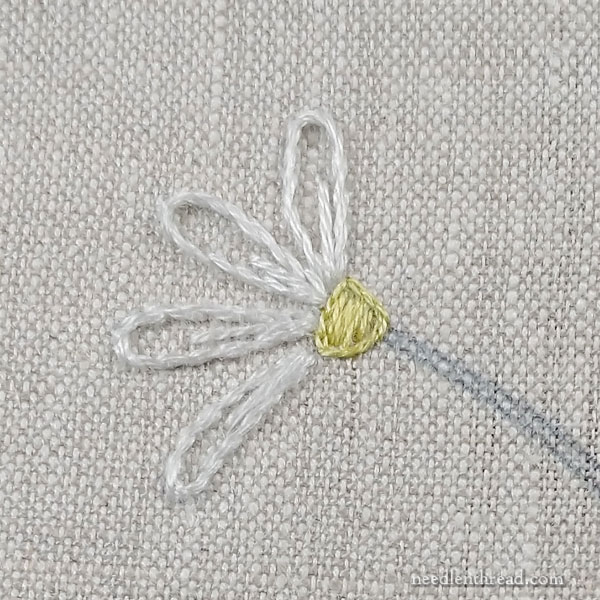
Using one strand of floss and one of the lighter greens, split stitch around the “bowl” shape below the daisy petals and fill the shape with horizontal straight stitches for padding. You don’t have to split stitch the whole circle there – you can just split stitch up a tiny bit of the stem, below the base of the petals, and down a tiny bit of stem.
This is going to give you a little bulbous “lift” right below the petals, at the stop of the stem.
The stems are all worked in a very loosely interpreted, rather sketchy long & short stitch – which, essentially, is really just long split stitches worked to fill the stem in such a way that the split stitches are staggered, so that where the individual stitches begin and end don’t line up next to each other.
Work across the stem in “rows” – that is, working the long & short stitch side by side. You might only get three stitches across the stem, horizontally – and in some cases, maybe only two! But do your best to stagger the length of the stitches so that they blend together well.
Begin at the top of the stem below the petals, by coming up in the stem area and taking the needle & thread down over the split stitch padding just below the petals. That “bowl” will be covered by more of a satin stitch.
Then, move down the stem, coming UP into each previously stitched “row” and splitting the stitches. This helps the long & short stitch blend together well.

If you want to blend your greens together, or perhaps add a little shading on one side of the stem or the other, then thread up another needle with the other shade of green you want to use, and just switch back and forth between shades of green as you work down the stem, depending on which shade you want to use.
The stems and leaves on this project are all worked with one strand of floss in the needle.
Tip: If you feel intimidated by long & short stitch, if it just isn’t your thing or you don’t want to “conquer” it right now, there are other options for filling the stems. You can work lines of long split stitch or lines of stem stitch, for example, working the lines right next to each other, to fill the stems.
Just remember that the stems will seem to “fatten” as you fill them, so it’s best to work all the stems using one strand of floss if you want a more delicate finish.
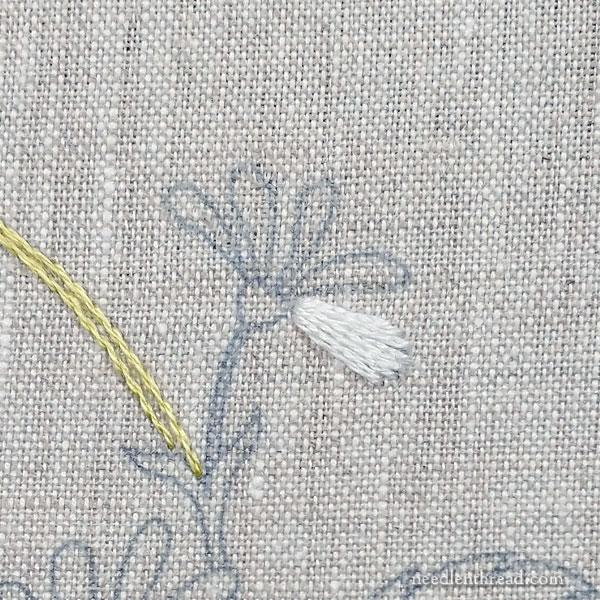
For Daisy #2, using two strands of white, work long, fanned straight stitches following the general shape of each petal, and covering the petal.
Start in the middle of the petal out at the end of the petal, bringing the needle and thread to the front of the fabric and taking them to the back at the base of the petal towards the stem.
Make certain as you stitch these long straight stitches that the two strands of floss don’t twist over each other. You might use a laying tool (here’s how to use a laying tool) or a large tapestry if you don’t have a laying tool, to help keep the strands of floss smooth and parallel.
Fan the stitches out a little bit, but be careful not to let them build up and overlap at the base.
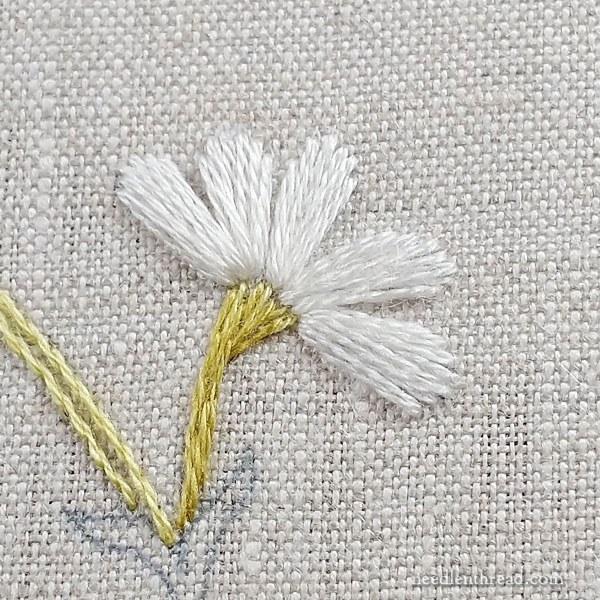
After finishing the petals, work the stem in the same manner as the stem on Daisy #1.
The outlined stem that you see to the left here came out shortly after this area was stitched, just in case you’re wondering what that is! Originally, we had thought about stem stitch filling on all the stems, but the long & short stitch opens up better possibilities for sketchy shading and it keeps the stems a little more delicate and the stitching less compact.
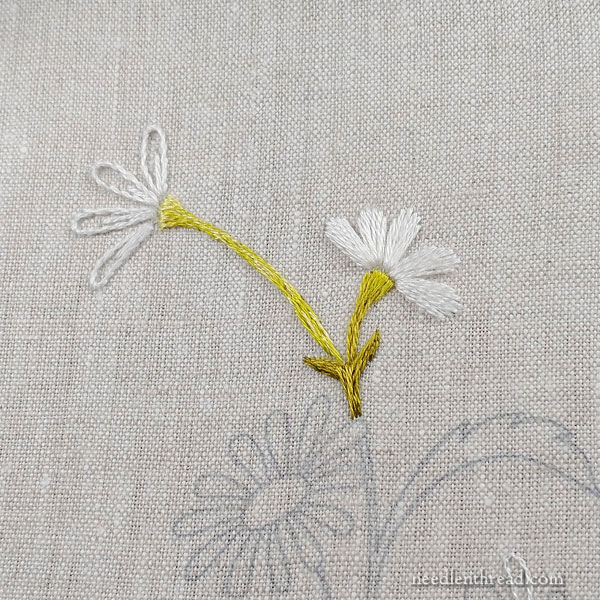
When you finish the second daisy and stem, switch to a slightly darker green and work the lower section where the two stems are joined, using long and short stitch and following the “flow” of the direction of the little leaves and the stem.
These areas are so small that it won’t take many stitches to fill them.
If you want the two tiny leaves to have a little more “lift,” you can split stitch the outline and then work the long and short stitch over them. But it is a very small space, so it’s not really necessary to do so.
And that, my friends, are the first two daisies – both very simple and quick to work. The stem will take a little more time, but once you get the hang of the long & short stitch on the stems in this project, it’ll fly by! There’s not that much stem to fill in, after all!
Remember, you can find the Index for these How To Embroidery (Blank) projects here, and if you’re a member on Patreon, keep an eye out later today for the downloadable PDF for this lesson!
Dear Mary
Great tutorial on the daisies and I can see I will learn a great deal from this series. I have problems with the stem stitch going from right to left, I always seem to get it wrong and have to start again and try to go left to right, which is easier. It’s to do with the placement of the needle and thread, which I find confusing. Thank you for sharing with us another delightful tutorial on the daisies and for the instructions, which are always good. I’m looking forward to the progress on the daisies and learning about more stitch placements.
Regards Anita Simmance
I like the petals on the right-hand one but are those really greens? The stems and leaves don’t look at all green on my display. The stems look a dullish yellow and the leaves combine yellow and brown. Of course, computer displays are notorious for colour distortion, but I’d never have guessed these were greens.
Not that I don’t believe you, of course. It’s just jarring to realise how different they must look in reality.
que simple pero hermoso trabajo
gracias Mary
I am very thankful that I found your blog. It is going to keep me busy and happy for all the days ahead !