


A couple weeks ago, I sneak-peeked the colors for the next embroidery project in the How to Embroider (Blank) tutorials and asked you to guess what we’d be stitching.
Many of you chimed in with irises and other flowers, some chimed in with fruit, and, in fact, it’s grapes!
This is definitely a project we will feel our way feel our way through together, slowly. It’s going to be a little more complicated and challenging than the projects so far. But it’ll be fun, and, taken slowly, it’s definitely manageable.
Unlike the previous tutorials, we’re not ahead on this one on my end of things. By the time I started writing out the wheat tutorials and then the strawberry tutorials, for example, we were halfway through the embroidery on those projects. We had set color lists. We knew exactly what stitches were coming up next. We had trouble-shooted (trouble shot?) our way through a couple ideas.
By the time I wrote the daisies, the project was finished.
(You can find all of these projects listed here in the How to Embroider (Blank) series index.)
But it’s not all fun and stitching in the studio – and we can’t focused on this series alone, because I have other projects that must get done. So we aren’t too far ahead on the grapes.
In fact, we’re not ahead at all, really!
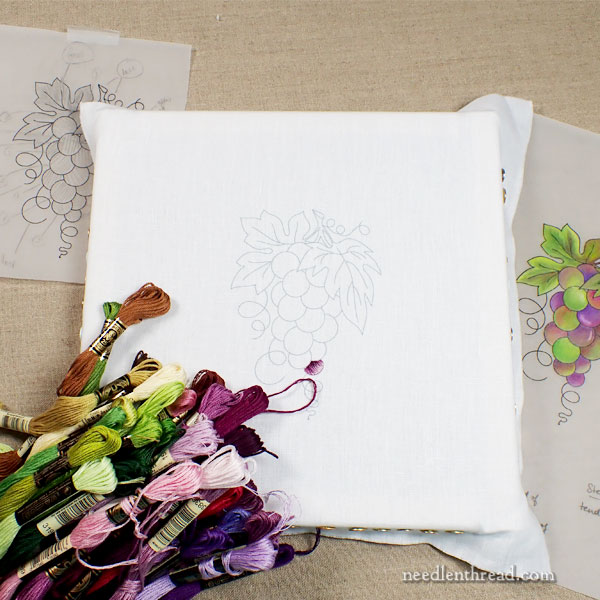
I’ve got the design finished (but untested); I’ve transferred it to two pieces of fabric – one for me, one for Anna, so that we can try different approaches; we’ve pulled temporary color palettes; and we’ve set up the projects on embroidery frames.
We’ve only put a few tentative stitches in, discussing ideas for approaching the design in ways that are instructional and accessible, and that yield satisfaction results.

Before we really delved into the stitching, so we could see where we’re going and how we might get there, we printed out the finished line drawing of the design on several pieces of craft vellum (a semi-transparent paper) to play with color and stitching ideas.
Using the vellum, we can layer over different renditions of the design, whether colored or black and white or simply plain line drawings.
This helped us establish a color guide and a stitch guide that might make sense, that can guide both of us in a similar direction. I keep saying “might” because ideas evolve and morph a bit when you’re actually stitching!
So, on the paper above, I’ve got notes on stitch direction and on order of stitching, based on the assumption that I’ll be working the design as a needlepainting project, in long and short stitch primarily.
On the other version, Anna will be testing some other approaches to stitching grapes, so that her version will probably end up a conglomeration of approaches to demonstrate other ideas. Hopefully, we’ll have a similar color layout so that the designs look related.
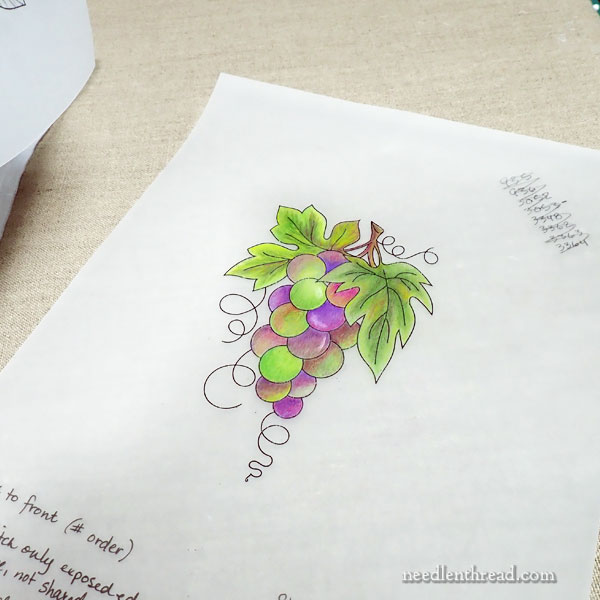
I like to use Prismacolors to work out color on a design. Prismacolors are wonderful colored pencils that allow for blending layers of color. If my thoughts are leaning towards shading, they’re a great way to lay out some color ideas.
Normally, I don’t like doing this color part on the printed craft vellum. Usually, the color bits (when there are color bits) materialize when I’m first doodling a design, in a sketch book or similar. But for this, I really wanted to be able to take some copious notes and do a few idea overlays with the vellum.
Will the embroidery end up looking like the colored version above? Nope, not likely. But it’s a starting point!
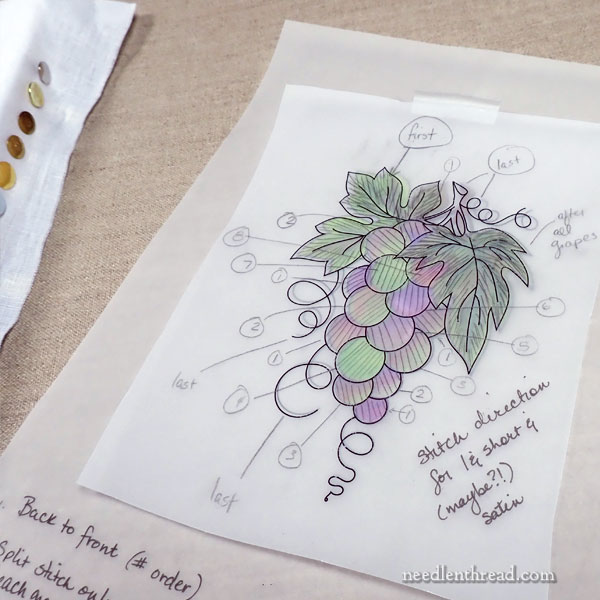
You can see more clearly in the photo above that the top layer is the design printed on craft vellum, trimmed, and then taped over the colored version. I took notes on both layers, concentrating on colors on the first layer, and on stitch direction and order of stitching on the second.
I find that this approach helps when contemplating shading with lots of color, especially with a more complex design that has many individual elements in it.
All the numbers scattered all over the page act as a reminder to work back to front. Anything numbered 1, for example, should be stitched before any of the surrounding elements that might overlap it.
So that’s the beginning process on this project.
Project Timing
This project will develop slowly. I’ll try to get something out each week on it, but we’ll just have to see how it goes.
We’ve been rather swamped with other stitching (for projects we need to do to be able to pay the bills!) and with other non-stitching work, like preparing kits, cutting gargantuan amounts of fabric, and so forth. Lots of good things coming up for you!
As usual, as this project comes together into specific tutorials that will be published here, those tutorials will also be available to download as PDFs for members on Patreon, where PDFs for all the previous projects in the series (wheat, strawberries, daisies) are available already.
A Note on Prismacolors
Prismacolors come in many different sized collections. I started with a small set ages ago, and expanded over time as I grew to appreciate them more.
They have a nice 72-color set bundled with an sharpener available on Amazon – it’s listed on my Amazon Recommendations page under tools & accessories. It’s a pretty good price.
If you like to design your own pieces, a good set of colored pencils will be your friend, and these are among the easiest to use for shaded coloring.
And while I also use watercolor pencils, watercolor paints, and so forth, I turn Prismacolors most frequently, because they are such an easy medium to control.
This article contains an affiliate link to my Amazon Recommendations page, which means that purchased made through that link result in a small commission for Needle ‘n Thread at no extra expense to you. Thanks!
Grapes are going to be lovely.
Just an FYSA. My Hobby Lobby told me that the company has discontinued its 40 percent coupon discount program. I checked and it is no longer on the app.
Yes, I just heard the same from a number of readers! Very disappointing! The higher-priced branded art supplies don’t go on sale too frequently. 🙁
I noticed the lack of 40% off one item coupon in the last couple of paper ad inserts, replaced with 20% off all regular price items. It *might* work out better if you need multiple items, but yeah – if all you want is the one item that rarely goes on sale, it stinks. Then again, there are days I’d forgo all the coupon stuff if they’d price items better, or hire more people that can answer questions, find items, and get you checked out.
Thanks for sharing information about your design process! Looking forward to this next project on the series!
I think it’s so interesting to see all the steps of developing and testing out new projects! This one looks great, can’t wait to see more 🙂
Your grape drawings are very lovely! so graceful. And the colors (like everything you do) are stunning! I must admit a fondness for purple shades, green shades and purple & green together.
I’ve periodically thought about trying out color combinations for stitching and have loved doing a bit of coloring in the past – but wondered if I would be able to translate the Prismacolor colors into thread colors (not the best at seeing these things!). Do you know any DMC equivalent lists?
Thanks for sharing your beauty,
laura
I don’t know of any prismacolor / DMC equivalents. Strange thing about colored pencils is that you never really know their true color until you lay some pencil down on the paper. The actual sticks – the pencils themselves – aren’t always the best indicator of their color.
Evening Mary – I don’t know if it was deliberate or not but this is actually a good post and part 1 of the grapes. I know you’ve covered the subject before but seeing how a design is developed is part of a learning curve. Is there a difference between vellum and tracing paper? I haven’t been in an art store in donkeys years and all my watercolors have long since dried up and I’ll have to peel the tube off them. Bound to be a messy job don’t you think.
Thanks for this interesting and information packed article, happy stitching – Brenda
Thanks, Brenda!
Tracing paper is a bit thinner. I can run the craft vellum easily through my printer, so that I can print multiple copies of the design for this type of toying around.
I really enjoyed reading about your design process. I found the use of the vellum very interesting. In my quilting and wool applique world, I can use tracing paper the same way. Taping it over a base design that does not change was, to me, illuminating. I also like your approach to coloring the design. Thanks for sharing.
Dear Mary
Another exciting project on how to and learn different tips and techniques, I really like these series I learn such a lot of different ways to stitch. The grapes will be a great project as there are a lot to get through and the leaves seem to bigger then the other projects on this series. I’m really looking forward to the progress on the grapes. Thank you for sharing with us your new project and for the ways you prepare a project and for the photos. Look forward to you starting this project.
Regards Anita Simmance
OH GOSH I can not wait for the grapes.. so excited.. hugs
Looks very interesting, though I don’t think I’ve ever seen a bunch or grapes _quite_ that colourful! Not necessarily a bad thing – I just tend to think of needlepainting as aiming at something like realism shading-wise.
Re. the pencils: do you mean the set with the sharpner or do you list a second set which includes an eraser?
Several reviews of the pencils on your list claim they aren’t genuine. Hard to tell with Amazon reviews – Marketplace has become something of a Wild West (at least if the US version is like the UK one) – but people might want to be a little careful.
Interesting, but I recently purchased that set from that very listing and they were genuine and in great condition. The sharpener works great, too.
Oh wow! I am so sorry you’ve never experienced ripening grapes on the vine – especially a variety like pinot, which is one of my personal favorites as far as color goes. You really have to get out and catch them at the vineyard at the right time of year. They are glorious – colorful and really, really beautiful. I hope some day you can enjoy seeing some. Maybe try Google in the meantime – I would imagine you could just google “ripening grapes” and come up with some fabulous examples.
Sharpener – I caught that and fixed it already, thanks.
Woo Hoo coming Wednesday, can not wait, i love these grapes.. hugs
Hi Mary, Hope you are having a lovely trip with your nieces. I am once again inspired by you! I have pinned several pics and I love the grapes and all the advice about the books – I wish you would write one and show all your beautiful pieces and wonderful advice! I have been quilting and trying to catch up on some things. Also on my health. Covid was not a good friend! It kept me down for several weeks and I still am having some issues. So I have put your wonderful news to the side where I can get to it a little later and try to do your wonderful pieces! Just wanted to say “thank you” once again. Wish you were next door to me – ha! Thank you, thank you, thank you!
Sincerely,
Linda