


Good morning and a Happy Monday all around!
Today, we’re going to pick on the Embroidered Grapes series and move along on five more grapes in the bunch. These grapes will be quick to stitch!
When we last visited the grapes, the first three at the base of the bunch were embroidered with fillings. Four of the next five are all simply outlined, to demonstrate two points:
1. you don’t always have to fill a design when you embroider; and
2. if you choose to outline instead of fill, you can use very simple outline stitches, and you can mix things up a bit to add variety.
Sometimes, when we outline embroidery designs, we tend to stick with one stitch and solid colors. But by opting for different line stitches and by mixing colors, you can add visual interest to simple outlined embroidery.
We’re also going to look at the seed stitch for lighter filling.
Now, it may seem really weird that we’re combining a variety of approaches – and almost opposing approaches – in the same embroidery design. This is definitely a less-coherent way to go about embroidering a single design, no doubt!
But remember that the whole purpose of this series on How to Embroider (Blank) is to introduce the stitcher to many possibilities for embroidering the same things. So, in the wheat tutorial, we looked at how to embroider wheat five different ways. And the same with the strawberries series. And the same with the daisy series.
With the grapes, admittedly, it’s even less coherent, because on a bunch of grapes, the design elements are packed close together. But if you think of this as a sampler, then you get the idea!
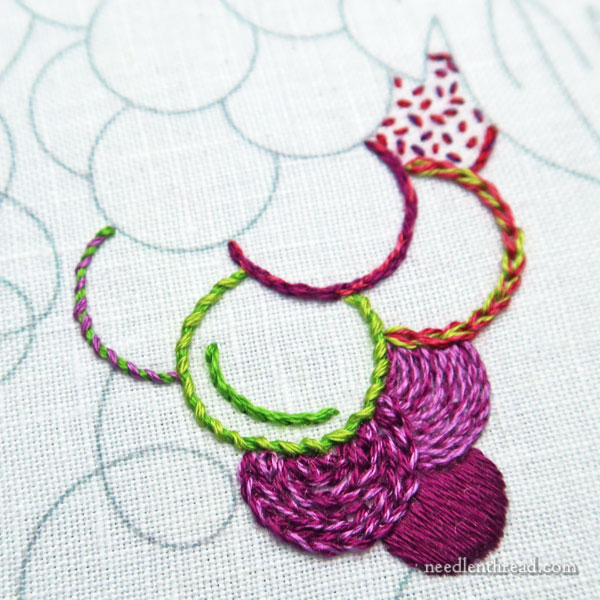
We’re stitching grapes 4, 5, 6, 7, and 8 in this diagram:
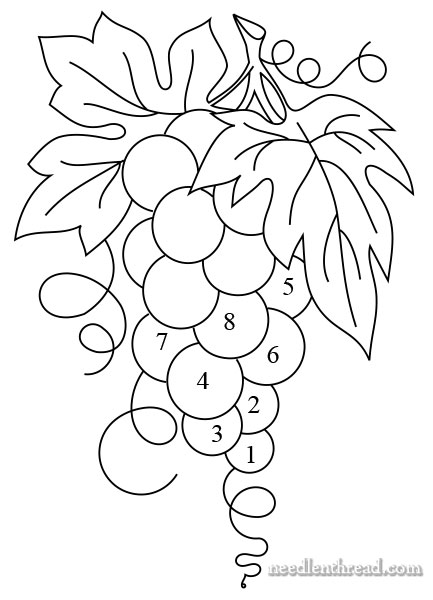
I’ve numbered the grapes loosely in the order that might be easiest to stitch, although there’s a lot of leeway here! When we were working up the sample, the stitching order went a bit amuck because we changed tactics a few times.
The idea behind a specific order of stitching is that it’s normally easier and makes more sense to stitch the farthest-back elements first, and then to stitch the overlapping elements, moving to the front-most elements last.
On that principle, grape 7 should be embroidered before grape 4.
So here’s grape 7:
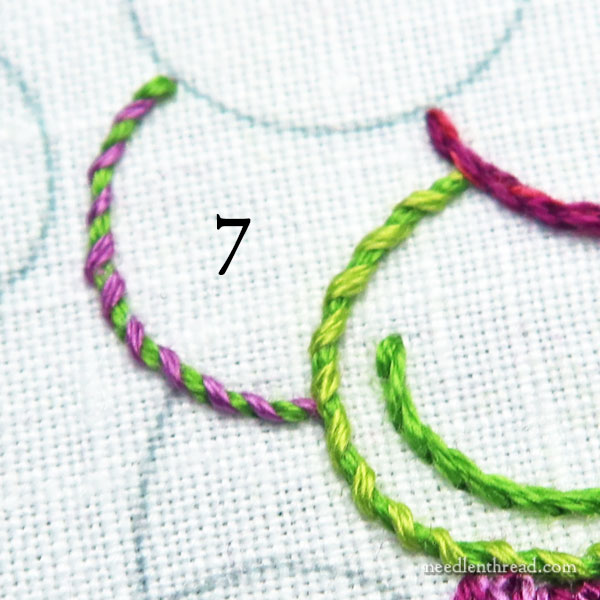
Very simple! Grape 7 is whipped backstitch, with the backstitch foundation worked with two strands of DMC 907, whipped with three strands of DMC 33.
The combination of the green and purple help to pull in the multi-colored approach on the original grape bunch, which I presented as a ripening bunch of grapes, rather than a solidly purple, red, or green bunch.
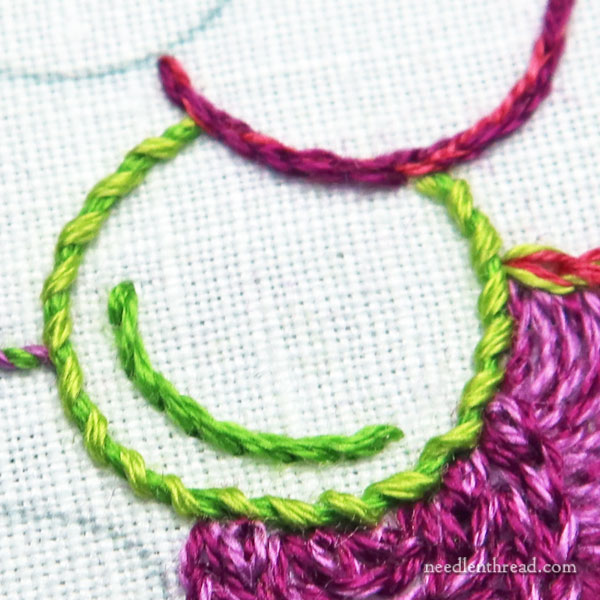
Now we’ll look at grape 4!
Again, whipped backstitch, this time in all greens, with three strands of 906 for the backstitch, which is whipped with three strands of 907.
Notice the little “scoop” at the base of the grape.
If you were to embroider this entire bunch of grapes with outline stitches, you could add these little accent “scoops” on each grape. It’s a stylized way of adding a highlight to the grape, and it would allow for a bit more color on the whole bunch, instead of empty circles.
The highlight here is embroidered in stem stitch with two strands of 906.
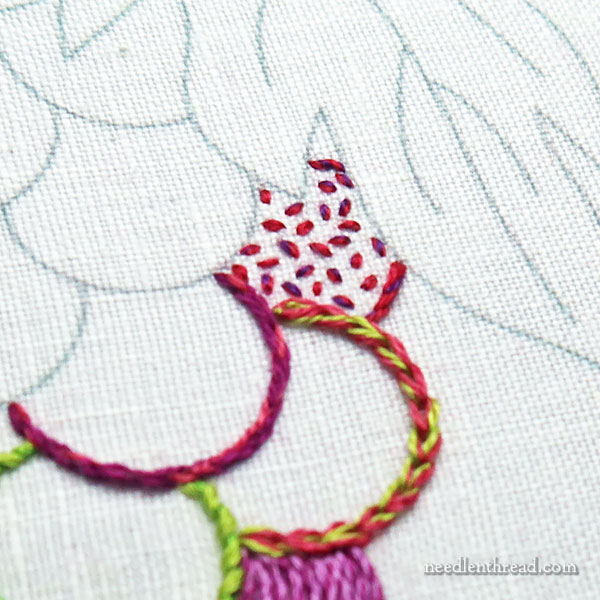
Grape 5 is tucked under the leaf at the top of this photo. It originally was a simple stem stitch outline, with a strand of 326 and a strand of 550 in the needle at once.
But, because it’s tucked under the leaf, it made sense to add a bit more color to it for the sake of the finished bunch. Otherwise, that particular grape gets lost. We decided it was a good place to demonstrate seed stitch as a filling.
The seed stitch is worked in three strands of floss: two strands of DMC 326 and one strand of DMC 550 in the needle at the same time. I have a (very old) video for seed stitch here, if you’re interested in looking at it.
Seed stitches are simply randomly placed tiny straight stitches. Here are three points to keep in mind, to achieve a consistent seed stitch filling:
1. be consistent in the size of each small stitch;
2. be consistent in the spacing between the stitches (for the most part – there are exceptions!); and
3. make sure the direction of each stitch seems random. For example, don’t want to line up several stitches all exactly parallel to each other, while all the other stitches around them are pointing in different directions. The parallel stitches would draw the eye and stand out.
You can sometimes use seed stitching like stippling in art, where the stitches are closer together where you want heavier color and more widely spaced where you want lighter color. I explain this process in this article.
If you want to fill your grapes with seed stitch, you could always try a stippling approach in order to add a bit of depth and shading to the grapes. Just an idea. Not sure I’d do it, but it could be fun, if you like seed stitch…
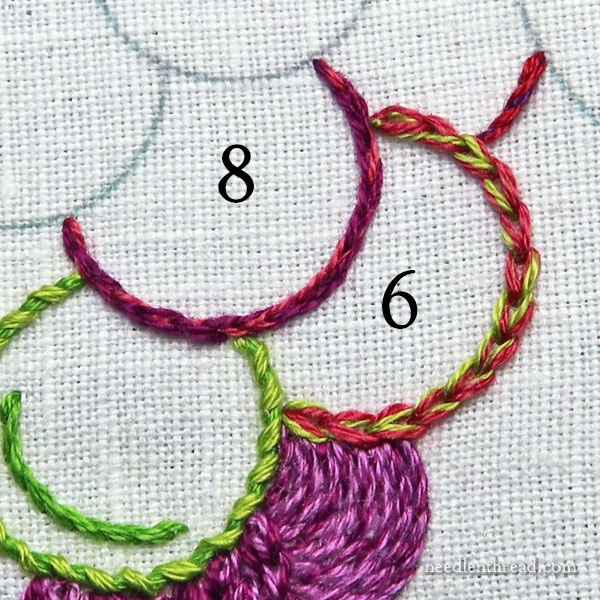
Grape 6 is chain stitch, worked with three strands of floss: two of DMC 3350 blended with one of DMC 907.
Grape 8 is not chain stitch, even though it looks like chain stitch! It’s split stitch.
Split stitch is often worked with just one strand of whatever thread you’re using, but in this case, we blended three threads together (two strands of DMC 35 and one strand of DMC 3350) and used all three for the split stitch.
The effect is similar to the chain stitch, but tighter. The loops are not as rounded, and the outer part of the chain hugs the inner part of the next chain a little more closely.
I thought it was interesting to line up the chain stitch and the split stitch, both worked in three strands. Of course, the split stitch will still look much finer, because you only have the division of the split of three threads on both sides of each new chain. With chain stitch, you have a full three strands on both sides of each new chain.
Think of it as the difference between a 2-lane state highway with a turning lane in the middle vs. a 6-lane divided interstate. One’s obviously much wider than the other.
More to Come!
Next time we visit the grapes, we’ll look at a combination of approaches – some fillings, some outlines. It’s going to be a wild bunch of grapes by the time we’re finished with them!
You can find the previous tutorials for this series – including the pattern and materials – in the How to Embroider (Blank) collection index here. You’ll also find the wheat, strawberries, and daisies available in the same index.
Members on Patreon will have access to the PDF download and printable of today’s tutorial later today, so if you’re a member on my Patreon page, keep an eye out for it!
Wednesday, we’re going to have a little chat about scissors, because scissors are wondrous things.
Have a wonderful Monday!
Dear Mary
The above tutorial on the grapes is very instructional and good advice to stitch the furthest back elements first. I like the different approaches you have taken in outlining the grapes and a great way to introduce us to various ways of outline stitching, seed stitch is an interesting stitch to use for outlining. Thank you for sharing with us your tips and techniques for the various stitches on outlining. I do like and enjoy the different ways of using stitches to create such lovely embroidery.
Regards Anita Simmance