


Let’s truck along with some grape embroidery today, shall we?
We’re almost finished embroidering the grapes in this project, which is part of a series of tutorials you can find in the How to Embroider (Blank) Index here.
Members on Patreon will find today’s tutorial posted as a downloadable PDF on my Patreon page here shortly. It may not go up today – more information on that below.
The grape bunch we are embroidering features a sampler of techniques that you could use to embroider grapes. You probably wouldn’t combine all these techniques into one coherent design (if you wanted it to be coherent!), but the point here is to give you many options for embroidering grapes. You pick the options you like!
Today, we’re going to look at grapes 9, 10, 11, and 12 in the bunch. We’ll be exploring two new filling options and a new outlining option.
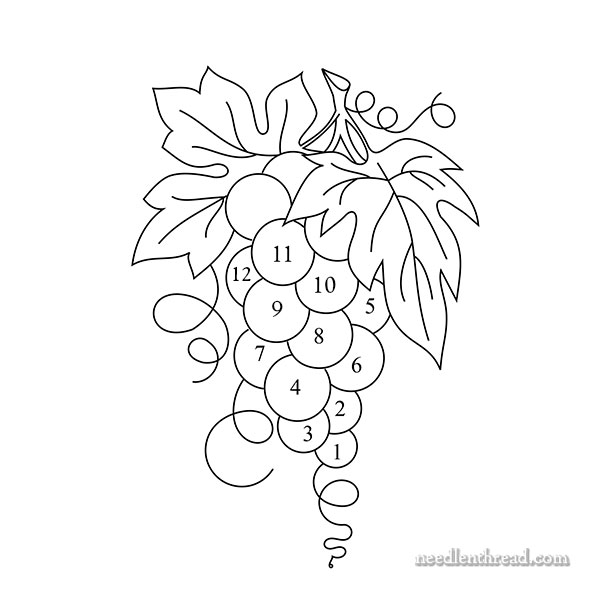
When you get to this sequence of four grapes, you may want to stitch grape 12 first, since it’s tucked behind there on the side. Following the principle of working the farthest back elements in a design first, and then the foremost elements, it would make sense.
We ended up changing ideas on that grape, so it ended up last on this sample. Grape 12 is simply a whipped backstitch, with 3 strands of DMC 550 as the backstitch foundation, whipped with two strands of DMC 210.
You can find instructions for whipped backstitch here.
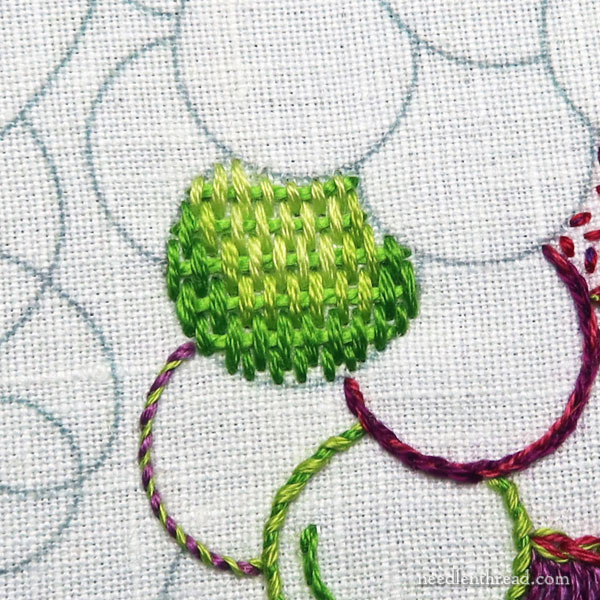
For grape 9, we’re turning to a structured filling, one that is very formal, in a sense.
If you followed along with the embroidered strawberries tutorial, you’ll remember this installment, where we used the burden stitch to fill the strawberry.
We’re doing the same thing with this grape.
Although the design itself is rather free and easy – the grapes are not formally stylized – I think a burden stitch filling would work to fill the whole bunch, as long as you incorporate a little variety in the colors and shading (to keep the grapes separate and distinct from each other), and as long as the layout of the foundation threads and the couching stitches are consistently oriented from grape to grape.
I think, in fact, this would important with any structured, somewhat “geometric” filling (lattice fillings, for example). If your foundation stitches (and then your subsequent stitches on top of the foundation) are tilting and slanting in different directions all over the place, it would lend too much confusion to a design that’s made up of closely situated individual elements.
But if all the stitches are oriented in the same direction, but the colors and shading are varied, I think the effect could be quite good.
So, if you’re not familiar with the burden stitch, you might take a look at the earlier tutorial on the strawberry.
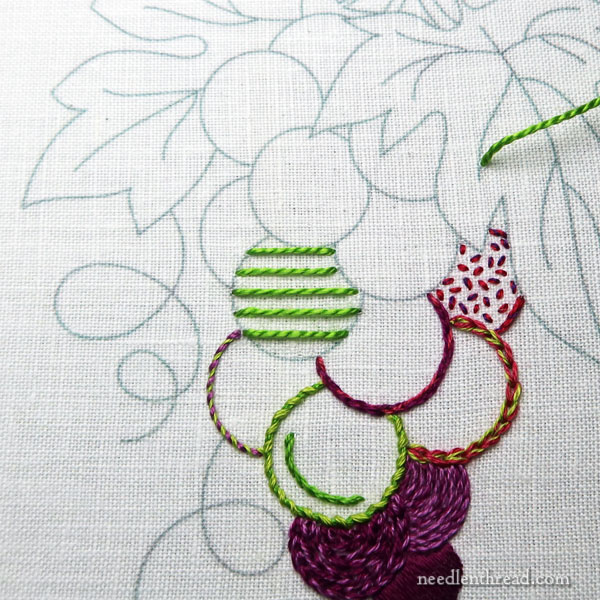
We’re starting here with the foundation stitches worked DMC #5 perle cotton in 906. The grapes are small – they don’t require many foundation stitches.
The encroaching couching stitches over the foundation stitches are worked with three strands of DMC 906, 907, and 16.
The darker green is worked first, from top to bottom, kind of carving out a circular highlight where the lighter greens will add some shading to the grape.
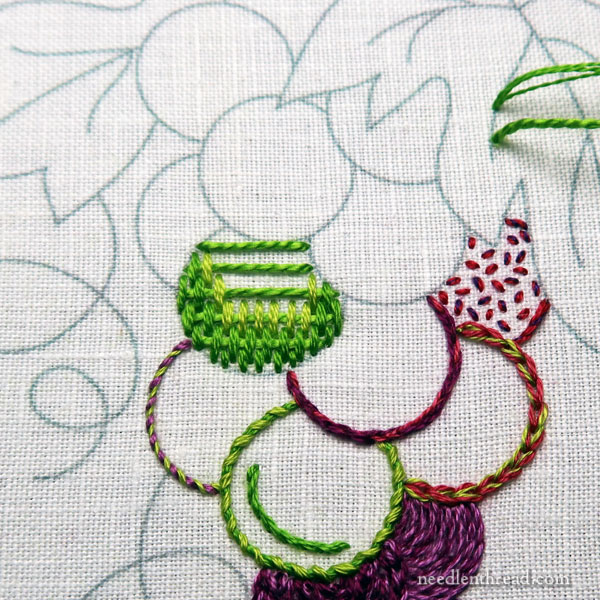
The medium green is worked next, around that circular highlight in the top section of the grape.
The center of the highlight is filled with the lightest green.
You can’t see a huge difference here between the 907 and the 16, but it shows up better in person! If you don’t have three greens that will work, at least use two, so that the grape doesn’t look too flat.
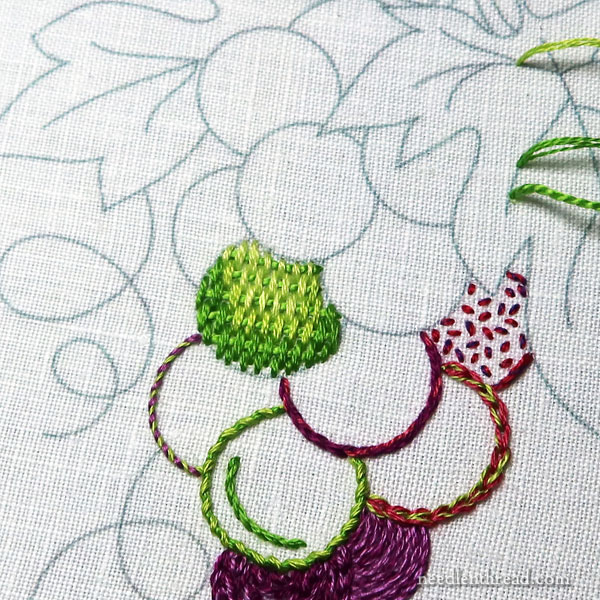
You could also reverse the placement of the highlight and put it towards the base of the grape, so that there’s some shading underneath the overlapping grapes.
If I were stitching this whole design in burden stitched grapes, I’d pay more attention to shading underneath the overlapping grapes.
The grape is outlined with one strand in the darkest green using one strand, in stem stitch.
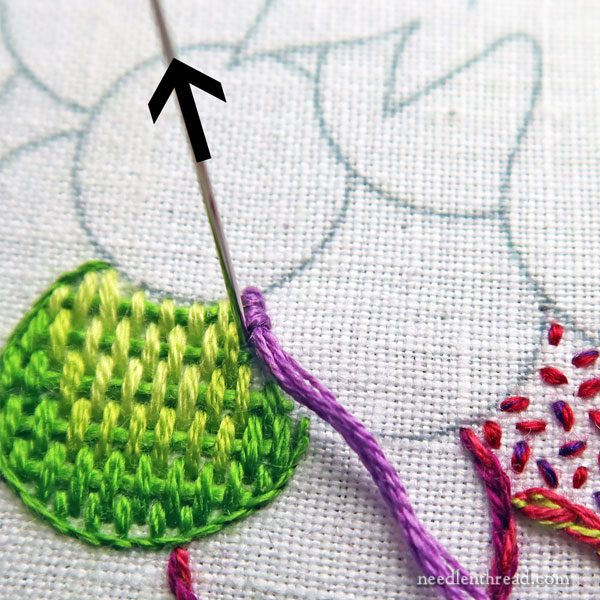
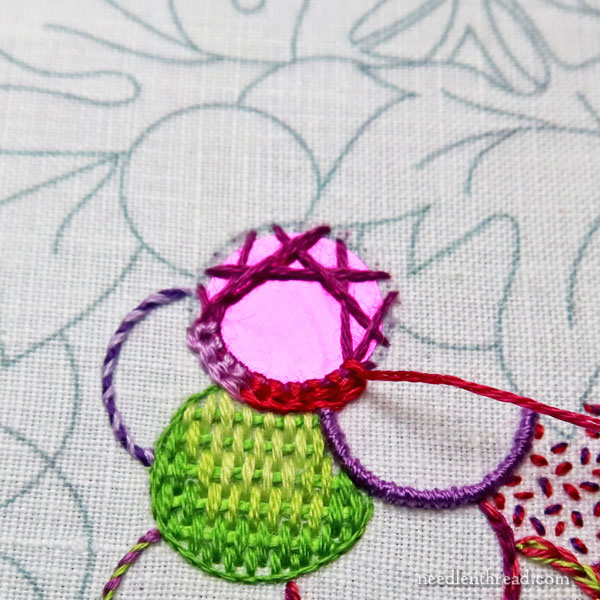
Grape 10 is outlined with DMC 553, using overcast stitch, which is simply satin stitch worked over a thread.
How thick the thread is that you overcast will determine the finished weight of the overcast outline. In this case, we used the full six strands as it’s cut right off the skein for the padding under the overcast.
To achieve a really smooth overcast stitch, use one strand for the satin stitching over the thread. We used two strands, and worked to keep them from twisting over each other too much.
One strand takes a lot longer, and for this exercise, especially if it’s your first time with overcasting, two strands will work fine.
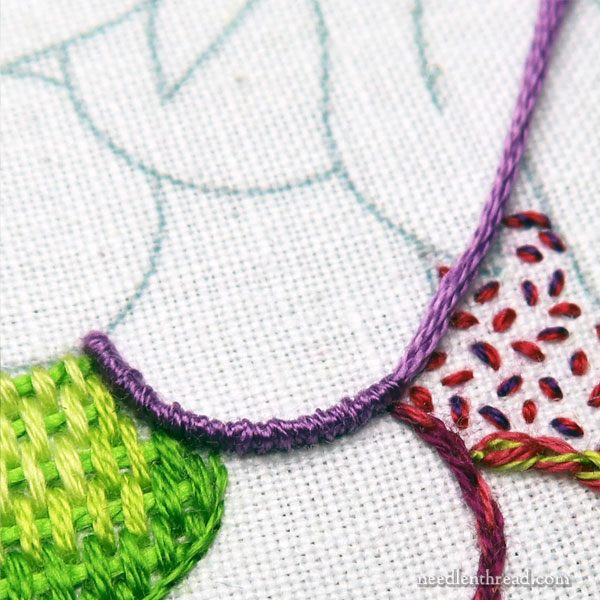
It’s a little rough when viewed close up!
To overcast, first bring your foundation thread up through the fabric where you plan to begin the design line. Then, bring your working thread (in this case, two strands in the needle) up on the design line right next to the foundation thread.
Hold the foundation thread in your non-stitching hand, putting a little tension on it, and satin stitch over the top of it, angling your needle so that it slants down under the foundation thread as you go down, and so that it slants up out from under the foundation thread as you come up in the fabric.

Satin stitch to cover the foundation thread, always going down very close to the design line and coming up just a thread or two away on the other side of the design line. You might just be picking up one or two threads of fabric.
You want to create what looks like a smooth cord sitting on top of the fabric.
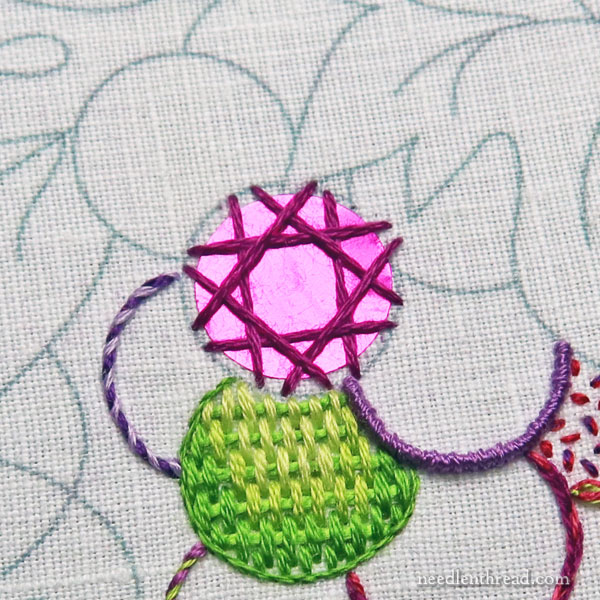
Grape 11 is where the mylar punch that I mentioned in the supply list shows up.
You can use any circular, thin, flat piece of anything here for the shisha grape. Shisha is a technique that involves stitching foundation stitches across the edges of an object and then embellishing those foundation stitches, in order to hold the object onto the fabric.
It is usually done with small cut mirrors or glass or even cut mica chips. The idea is that the item that is held to the fabric is generally reflective.
We used a piece of mylar confetti here, from the inside of a balloon.
I prefer a very thin something-or-other, rather than the thicker, heavier craft glass that is sold for shisha these days. If you can find traditional shisha mirrors (they are very thin) or mica (also thin and rather brittle) or a found object of some sort that is thin and reflective and can be cut into a little less than a 1/2″ circle, that will work!
If you can’t find something of that sort, you can always use a colorful 1/2″ paper punch. I worked shisha over a decorative paper punch on this sample and it looked great!
Note: Shisha would not work well on this whole design. It is better suited to stylized designs, where the individual round grapes are separate from each other, since the stitch works over the edges of the whole object in order to hold it in place. We had to select the only grape in the design that is completely visible and foremost in the bunch to demonstrate this approach.
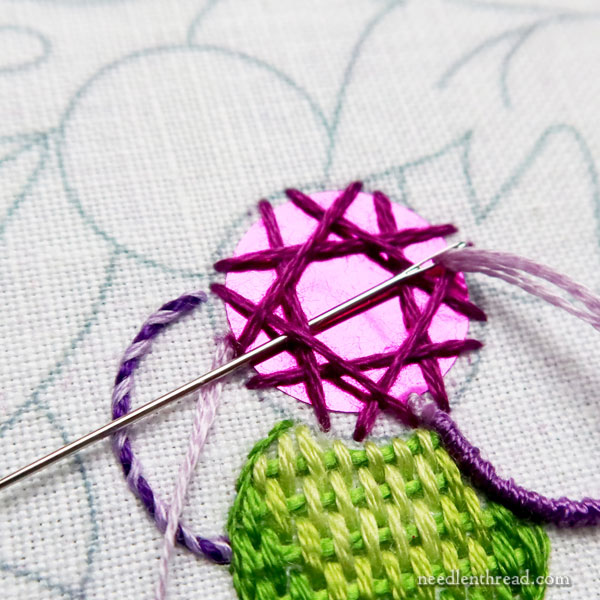
The foundation stitches for the shisha grape are worked in DMC 34, using three strands.
The embroidery of the foundation stitches (the second step of shisha) is worked in 3 strands of DMC 4211, which is part of their Variations collection (it’s a variegated thread).
You will find a step-by-step photo tutorial for shisha here.
I also have a stitch printable (downloadable PDF) that goes deeply into shisha and variations of shisha available here in my shop. It includes a variety of shisha foundations and decorative stitches, plus small projects that make good exercises in the technique.
But if you just want the basics, follow the link above to the step-by-step photo tutorial! It’s an easy and fun technique.
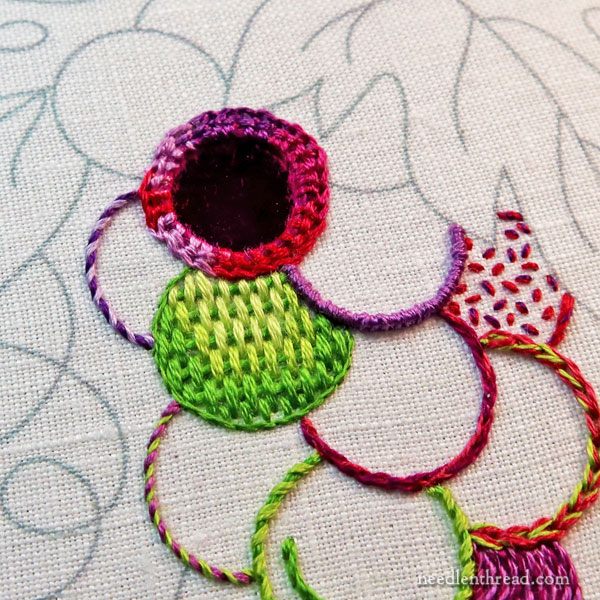
Here you have all four of today’s grapes in the bunch. Only a few more simple ones to go, and then we’ll move on to the leaves, stems, and curlicues.
Looking for More?
You can find all the articles in this series of tutorials here – just scroll down until you come to the listing for the grapes!
You’ll also find step-by-step tutorials for embroidering wheat, strawberries, and daisies in the same index, and we’ll be adding more a little later in the year, too.
As usual, members on Patreon will find a handy-dandy PDF printable of today’s tutorial available on my Patreon page soon.
I’ll try to get that up today, but – wow! – what a Friday this will be. I’ve got a couple zoom meetings today (some exciting things going on in the embroidery world!)… and then…! I have a product development meeting this afternoon, which will probably take the rest of the day. If the latter works out, I’ll have something really exciting to share with you in the not-too-distant future.
So if the PDF doesn’t go up today, it will go up shortly, never fear!
I hope you have a wonderful weekend! See you Monday!
This got me to head over and try shisha for the first time using your tutorial, and now I feel a supreme sense of accomplishment like I leveled up in life, even though the technique is quite simple. However, my actual result looks… uneven is the polite way to put it (around the outside edges–I was pleased with how evenly the center was revealed, not at all off-center as I feared). Some of the chain stitch seems to make bigger loops than other bits of the chain stitch. I am curious if you have any tips to ensure even stitches. If the tip is “practice,” here I go now! Thanks for this wonderful site.
Yes, I do think it’s a matter of practice. 🙂
Dear Mary
Wow Mary this is certainly different styles of embroidery I love it. My favourite is the burden stitch it is such an interesting filling stitch and looks lovely with the variegated green thread. I really like the different stitches you are using on the grapes to show us how to use them. It looks lovely with the different coloured thread and unusual stitching. Thank you for sharing with us the how to embroider in this case the Grapes, I really like it.
Regards Anita Simmance