


Happy Friday!
Today, I’ll chat a bit about what I’ve been up to on the computer, sharing some techy info, especially for those who often and frequently ask about software for creating their own embroidery patterns (or line drawings to use for embroidery patterns).
We’ll also touch a bit on Little Blooms – the upcoming stitch-along here on Needle ‘n Thread – and the kits at the end of the article.
One question I get asked very frequently is how I “make” my embroidery designs.
Specifically, it seems that the question is how I get a design from hand-drawn to something that can be published easily for other people to use. I think the questions mostly come from folks who are contemplating stepping into the world of embroidery designing, or making line drawings that people can transfer and stitch.
A scalable graphic on a computer is called a vector graphic. Vector graphics are created in software programs like Adobe Illustrator and CorelDRAW, both of which are not inexpensive to use. Because I use many of the apps in the Adobe Creative Suite, I sometimes use Adobe Illustrator for vector drawing, but it’s not something I recommend to most people who are just trying to figure the whole thing out.
Instead, I recommend Inkscape, which is open-source software that’s free to use. The developers behind Inkscape are always updating and improving the software – it’s come a long way since I first started using it some 16 years ago.
For beginners, Inkscape is also more user-friendly than Illustrator. I find that I turn to Inkscape way more frequently than I do Illustrator lately. They have a whole new interface and it’s really nice to work on!
Paper to Computer
I start designing on paper, doodling up what I have in mind. Sometimes, if it’s just a line drawing I want, I’ll stop there. Sometimes, though, I might take colored pencils or watercolor pencils or markers and further embellish the drawing, working it out to see if it’s going to make sense in color and concept before I take it over to the computer.
Once I’m satisfied with my doodles, I concentrate just on what I need for an embroidery transfer.
Normally, you don’t need the details in a transfer. You just need the lines of the drawing. This line drawing of a design is referred to as a “cartoon” in art – not a funny-ha-ha cartoon of nostalgic Saturday-morning fame, but rather the full-scale preparatory drawing used for the pattern.
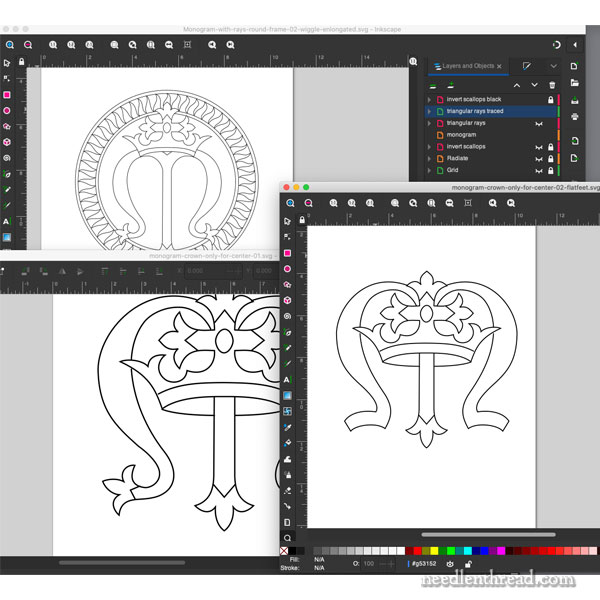
This cartoon is what you draw in Inkscape and similar programs. You can see in the photo at the beginning of this article that I’m working on some ecclesiastical design cartoons. I’m trying to work out exactly what to do on the center of the altar cover that all those goldwork letters are going on!
Design ideas for the central medallion have been jumbling around in my brain ever since we started the project, but they’re only now making their way onto paper and into the computer. (How many days did I saw we have left?!?!)
The nice thing about getting the designs into the computer is that I can start playing with my options, moving pieces around, deleting parts, adding parts, testing this manipulation and that manipulation – all much more quickly than I could with a pencil.
How I Work It
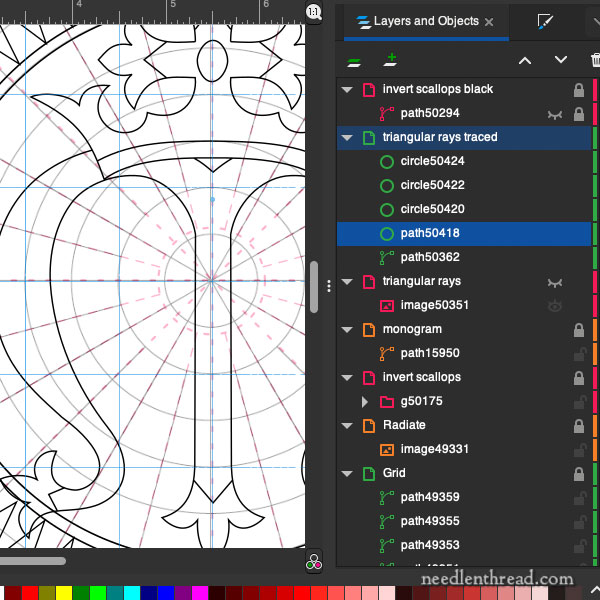
From the drawing, I make a scan and save it as a gif. I size it to a reasonable size and import it into my project in Inkscape. I name the later “original,” and reduce the opacity of the layer to 50% or less.
Then I add a layer above it. I name this layer “Trace 1.” I use the pencil tool and I trace the drawing, using straight lines and dropping nodes as infrequently as possible. This initial trace doesn’t look like the thing, by a long shot!
Then, I zoom in and I manipulate the paths (the lines) to follow the lines of the drawing, using the node handles to make adjustments in the paths, adding new nodes if necessary, until I have a smooth line drawing of the design.
While most programs have auto-trace features, they require so much clean-up, that it’s just easier to trace the design yourself from the start, dropping as few nodes as possible.
If I need to test out different ideas, I add new layers, so that I can turn the layers off and on and see different options in the design. I also use layers to set up any extra guides and layout graphing that I want. Those layers can be turned on when they’re needed and left off when they’re not.
And that’s how I work it. It’s not too complicated, once you get a sense of how to use the basic tools and how to work with layers. There are plenty of free tutorials online to help you, too!
Today, I’ll finish up this design once and for all, so that next week, I can transfer it and we can start stitching on it right away.
Little Blooms News
I’ve heard from quite a few of you out there who have received your Little Blooms embroidery kits already! I’m so happy to hear they’re arriving quickly and safely and that the response to them so far has all been so dang positive. That’s always boost!
Though I can’t speak for other designers, I think releasing a design or a kit out to other people is a double-sided experience. On the one hand, it’s exciting to launch a project and get other like-minded enthusiasts involved with it.
On the other hand, the excitement is sometimes mingled with a little dread or hesitancy. I might like it, but what if you don’t? When you’re designing with the intention of involving other folks in a project, you have to hope you got it right, and that they like it, too!
So I’m glad to hear the positive feedback, and especially that so many of you are delighted with the coordination between the ground fabric, the thread colors, and the lining fabric. Does my wee heart good! Thanks for your notes!
We will have another small batch of kits ready by the end of next week or beginning of the following, so if you’re waiting for one, just keep an eye out!
The stitch-along starts next week, but it’s self-paced. Even if you don’t have a kit when we start, you can still get one and work through the project at your own pace.
If you’re wondering what Little Blooms is all about, you can read the project description and what to expect from the stitch-along here.
Hope you have a great week!
Hi Mary,
Received the kits for the stitch along yesterday. So excited! Love the beautiful fabrics and threads together. The packaging is impeccable!
Thanks, Beth! 🙂
Hi Mary,
Thank you so much for today’s post. I have tried (and failed) with trying to draw designs with various computer graphics programs, as I am always trying to design my own projects and want to be able to revise complicated designs without hand-drawing again and again. I played with Inkscape years ago, but now I will give it another whirl. I often want to start with an actual artifact of some sort, and so I have wasted a lot of time trying to trace designs (which I will then manipulate) on the computer. I did recently realize that it was easier to trace, enlarge and reduce elements as needed, and cut and paste on paper, but I would love to take it to the next level and do the manipulation on the computer. Inkscape, here I come.
So good to read that *you* use computers in your design work! I use my computer in every craft, which most people brush off. I use Corel because I used to use it at work. I have a monthly subscription which isn’t cheaper, but it’s easier to budget.
I got Inkscape to make longer text bits for machine embroidery, which I can put on a USB drive and take to a well-funded library that has a STEM lab with computer embroidery machines, 3-D printers, and all kinds of cool computer/crafter toys.
Twenty-first century embroidery!
Inkscape is great, but the Mac version has always been a little weird and it’s not the most intuitive thing to use. I’d recommend Vectornator as a good free alternative on both the Mac and iPad for those looking for something a little bit easier to use.
Hi, Tim – yeah, you used to have to use Quartz or something along with Inkscape on Mac. The newer version is much slicker and works great on the newer OS. I like it!
Today, I received my Little Blooms kit – it is delight ful
Great packaging – wonderful threads, linen and cotton fabrics – overall a great experience
Thanks, Liz! Glad it arrived safe and sound! 🙂
Thank you Mary!!! I am one of those people who has been creating original designs that live only on graph paper. I’m not technically gifted, but I’m going to learn Inkscape! And the price is right!
How do you and Anna keep your stitch tension even and “chipping” even? I can understand even chips, but doesn’t tension vary among stitchers? I know that a laying tool helps, but can you sometime tell when person 1 stitched one place and person 2 elsewhere?
Tension doesn’t really show up in this type of work the same way as it does in surface embroidery stitches that you can see. These chips are like sewing on small elongated beads. Also, on this type of embroidery, the sparkle and shine is what the eye sees – it would really take a professional taking apart the back of it to see any differences in the way the stitching was done, but even then, on random chip work, it would be hard to tell.
Thank you Mary, for sharing your experience with Inkscape. I have learned how to use Illustrator previously but the subscription price has always been too much to justify my occasional use. It will be interesting to have a play with Inkscape. 🙂