


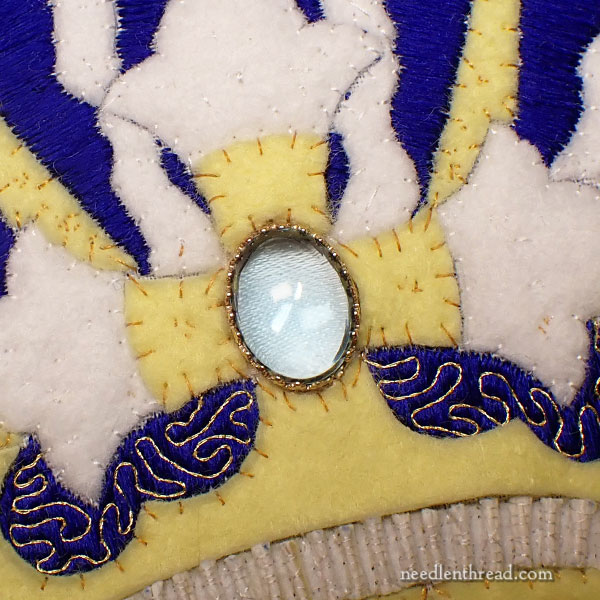
Another topic that generated a lot of questions around the goldwork altar cover project is how I attached the large semi-precious gemstone to the medallion, the central decorative piece on the altar cover.
There are different ways that stones can be attached to goldwork. When considering how to attach a stone, you have to think in terms of size and, especially, of usage. If your piece is going to be framed and rarely if ever handled, you have some wiggle room in how stringent you are with the attachment of the stone(s). But if you’re creating a piece that will be used, moved, folded, and so forth, it’s a good idea to figure out some way to make sure the stone is super duper secure.
Initially, we were looking at a faceted stone for this piece, but two problems presented themselves: 1. a faceted stone of any size is normally very deeply cut on the back – and that was the case with the stones that we had to choose from. Their depth made them problematic. 2. Because of their depth, setting them into any hardware (jeweler’s setting) would increase their weight and their height and make sewing them on and working them into the embroidery difficult and – I thought – rather ungainly. As much as I prefer a faceted stone for its brilliance, if the stone doesn’t have a flat back – or at least a very shallow back – it seems awkward on a textile.
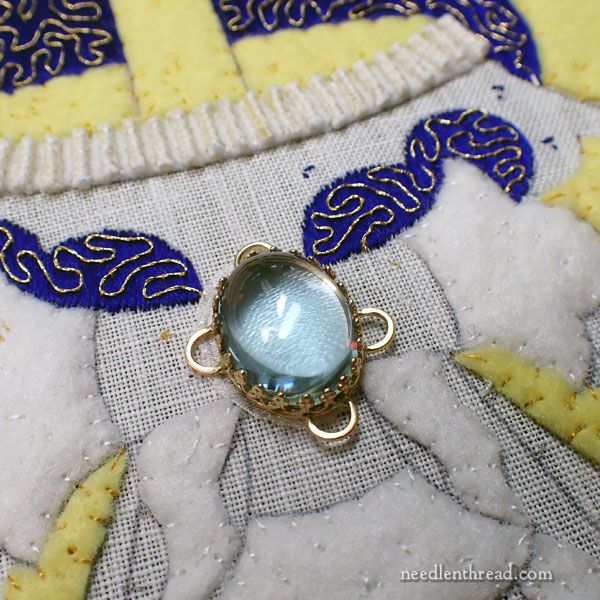
The stone of choice was a blue topaz. The light blue of the topaz would stand out on the background, and it just looked fabulous with gold and silver. When it was evident that the faceted, deep cut topazes would not work as well for our purposes, we went instead with a flat-backed cabochon.
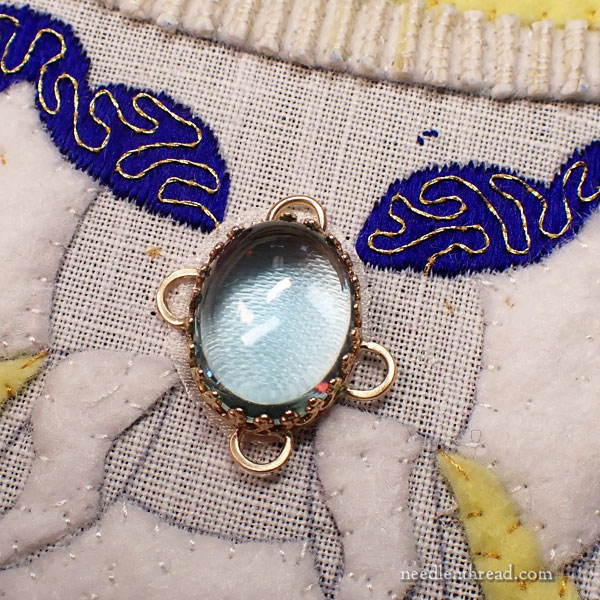
A local artisan set the stone in a 14k gold bezel tray and then soldered four gold half-loops that he hammered as flat as he could onto the sides of the tray. The only criteria was that the loops would fit inside the four design areas of the cross and crown. So even though the placement of the loops seems a little off here, the placement actually worked out really well.
When you look at the stone up close, you can see that it has all the qualities of a very strong magnifier.
(The red little blip in the reflection on the lower right side in the photo above, incidentally, is me. I was wearing a red shirt!)
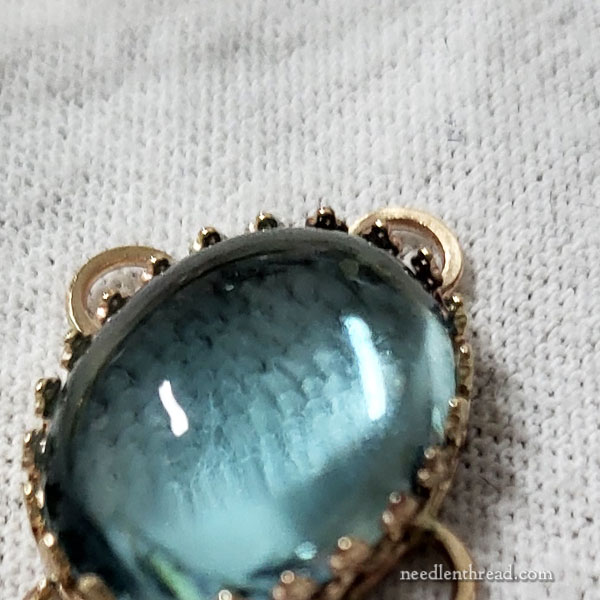
Not the best photo in the world, but when I first got my hands on the stone, I set it down on a piece of soft cotton toweling fabric. You can see the magnified texture of the cotton behind the stone.
This magnification could be problematic, depending on the ground fabric.
Since we were using linen as a ground fabric, the weave of the white linen behind the stone would have been magnified so much that it would have presented an unwanted texture to the finished look.
To eliminate that problem, I cut out and appliquéd a small oval of silk to the area where the stone would be attached to the design.
The smooth silk worked quite well behind the stone and it added more of a reflective quality, too.
I fixed the stone into place by sewing it on, using a heavily waxed heavy silk thread. I sewed through the loops with a generous number of firm stitches.
Then I stitched on the rest of the foundation felt for the grown and cross over the loops.
It is a little tricky to sew, when you’re avoiding solid metal. I had to place and adjust stitches based on where those loops were, but it worked.
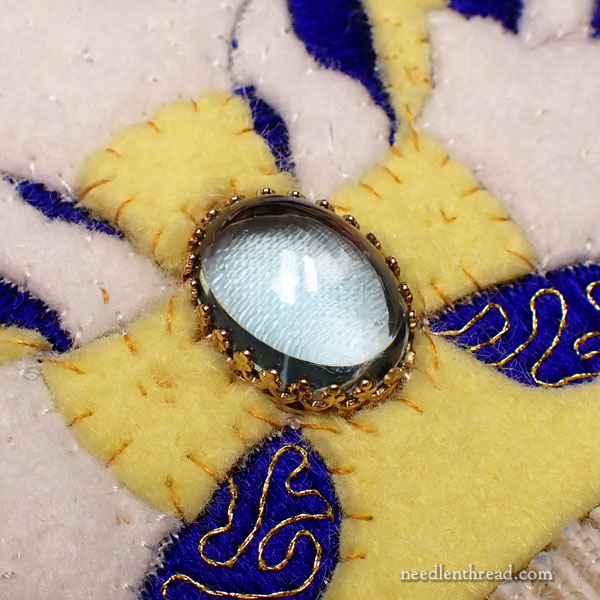
This stone has remarkable clarity – it is really beautiful! Before sewing the stone in place, I polished the back of it carefully to make sure there were no prints on it and no bits of fuzz, thread, wax, or anything else.
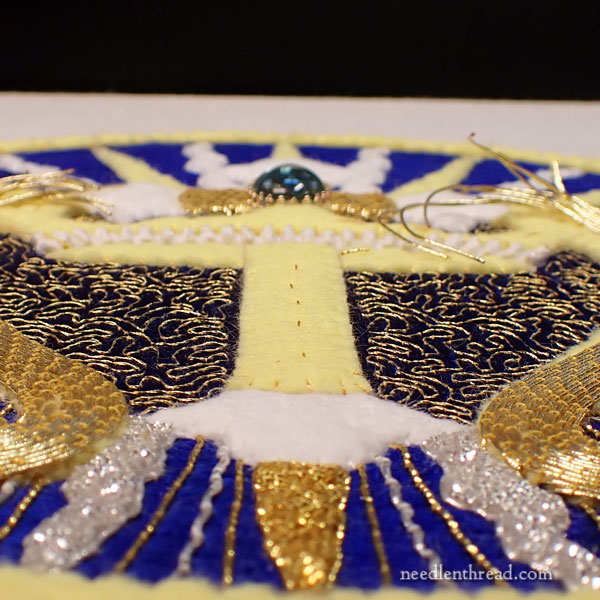
You can see that, compared to the surrounding embroidery, the dome of the stone sits rather high.
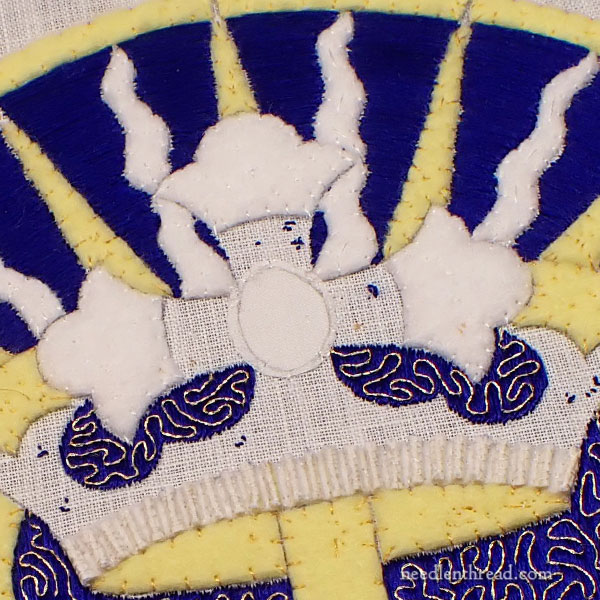
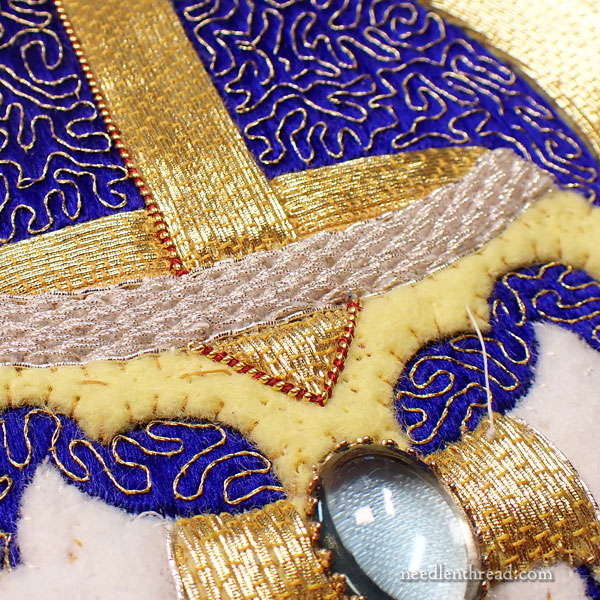
In this type of needlework on this type of project, the order of work is important.
I needed to get the stone sewn on so that I could get the foundation on so that I could stitch the passing thread on this part of the cross. The chip work had to be last, but I couldn’t do the chip work on the crown and cross or on the rays around it until I had finished this passing thread area.
This was positively the worst part of the project to stitch. It was a fiddly space and I was working against those gold loops sewn under the felt.
But sewing around those loops wasn’t as bad as I thought it would be. It really is just a matter of manipulating where you put the needle.
When I snapped the photo above, there was still a bit of clean-up work to do on that area, but I was happy just to have the gold down at that point.
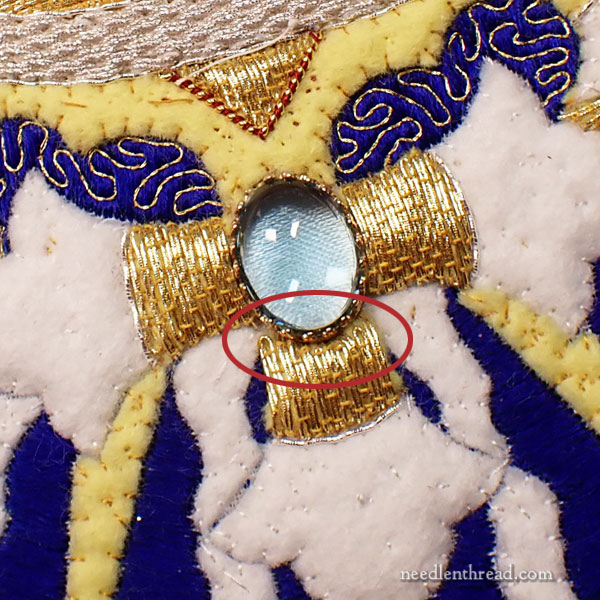
I knew I couldn’t have any plunged ends next to the stone. The only place this mattered, due to the direction of the goldwork passing thread, was in the area circled above. So, to make sure I wasn’t plunging in that area, I folded the goldwork threads and couched the fold near the stone.
I would have done a continuous folding method on this whole area, so that I only had to plunge once or twice, but it was just way too fiddly, so I plunged the ends of the folded threads where the gold felt foundation met the white foundation. And it did get messy in there – but it improved once the outlining was all finished.
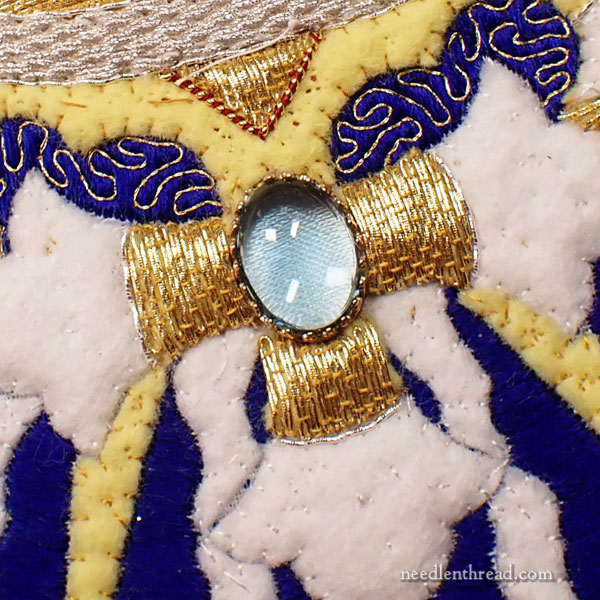
The last part on the crown was this area of felt in the design, which was all chip work. The chip work was easy to work here, despite the hard gold loop under the felt. It really didn’t cause any problem at all, so I was glad of that.
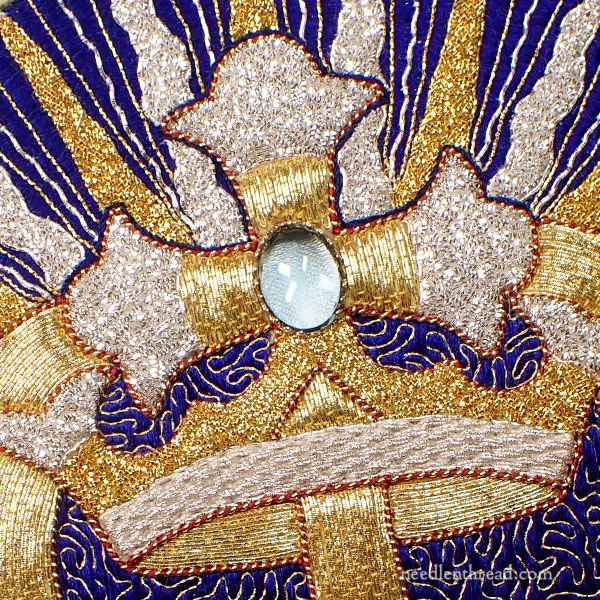
The chip work took a wee bit of time! That was a lot of little cuts of bright check purl! But I think the effect was worth it. So sparkly!
So that’s how I sewed on the gemstone. It worked pretty well and it wasn’t as terrible to sew over those gold loops as I thought it was going to be. I really was a little nervous that it wouldn’t work well, but it’s an approach I would definitely use again. The stone is secure and you can’t tell there are loops underneath all the foundation padding and the gold threads. Win-win.
If I come across any further tips to share with you on this project as I filter through my photos, I’ll definitely let you know!
If you’d like to read the backstory on this project, you’ll find all the articles about it listed here in the Goldwork Altar Cover Index.
It’s beautiful, Mary!
What a clever method of attaching the stone! And it came out so well, too!
This is such a beautiful project that you’ve worked so diligently, and you’ve said it won’t last forever. But I’m wondering what its expected lifetime is. 20 years? 50 years? 100?
Gosh, I’d be happy with 20!
Thank you for taking the time to discuss these ‘little’ things in the project, now that it is complete. While I have loved seeing the stitching progress, these are the things I am always most curious about. This type project is not anything I would want/need to attempt. I still end up wondering, a lot(!), about the little details.
Thank you for giving us the details on this part of the process. I’ve been intrigued by the use of the topaz ever since you first mentioned it. My husband and I are jewelers; he facets gems and I make cabochons. The first photo you shared of the stone was a little hard to decipher whether it was a cab or faceted, but I thought it surely had to be cabbed because of all the difficulties you mentioned with the faceted stones. It is truly a magnificent stone, with the uniform color and clarity. Thank you, thank you, thank you for taking the time to clean and polish the back properly! Too often, people forget about the backs of the stones. One of the biggest disappointments we ever saw was the Hope Diamond on display at the Smithsonian. It was proudly displayed in its very own specially lighted, revolving display case, and it was filthy. Fibers were caught in the setting and there were fingerprints and dust on it. Two minutes with a good polishing cloth was all it needed to be spectacular, but no one bothered to do it justice. Your attention to detail is wonderful!
Gosh! How could they not police the Hope diamond??!?!?!? Thanks, Joyce! 🙂
Such a gorgeous project, but it had to be a bit nerve-wrecking at the end with the deadline looming. I just purchased the Goldwork Masterclass by Alison Cole and hope to maybe give it a try. I have had a question in my mind about goldwork tho (and am hoping I am not sorry I purchased such an expensive book!)- I am not fond of goldwork once tarnished. I do know not to touch the metal threads as much as possible (thinking of using gloves to work with it). But is there any threads you can purchase that won’t tarnish? How long does it take to tarnish? I’ve seen goldwork on clothing (fancy royal garments) and it must have been stunning, but tarnished it looks “tired”… Any help? Thanks Mary. Happy Memorial day. And good luck on the move “home”. 😀
Yes, there are some non-tarnishing goldwork threads out there. Also, frame behind museum glass and seal the back of the frame. I’ve got a couple goldwork pieces that are framed that way, that are 10-15 years old and they still look brand new. Don’t hang in the sunlight!