


For those of you in the States, I hope you were able to enjoy a good three-day weekend! It’s hard to believe September is upon us and trucking forward so quickly. Labor Day in my mind always marks the end of summer, because school always started up again after Labor Day when I was a kid.
I took advantage of the three-day weekend to set up and get started on a new test project. In my downtime – evenings, weekends, when I can grab some stitching time – I’ve been test stitching on some different pieces of linen.
The design that I’m stitching right now is the holly & evergreen design that’s on this ready-to-stitch towel set. I reduced the size of the design and filled out the edges a little more, making it suitable for the corners of a small but lovely linen table cloth.
The linen the table cloth is made from – it’s a pre-finished blank – is gloriously beautiful stuff. I swear, there are few things that make my heart sing quite like beautiful linen does! Good linen is always such a pleasure to stitch on.
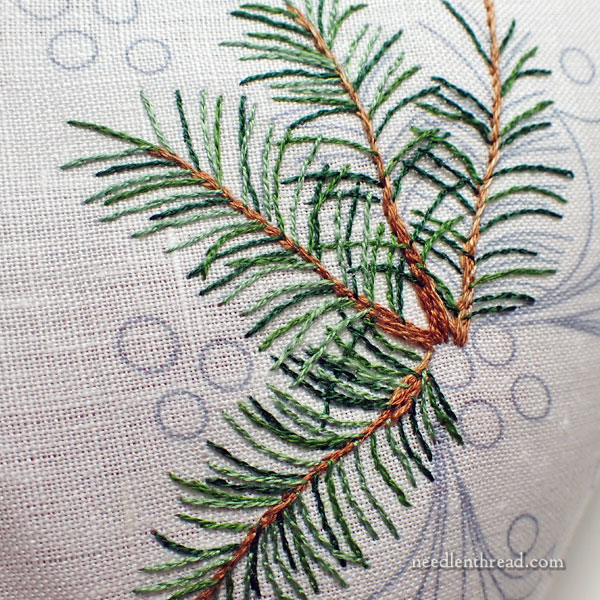
This is a close-up of the evergreen part of the design, which I’m stitching in three colors of DMC using one strand at a time, in split stitch. Because they’re evergreen needles, I wanted to keep the lines very fine, but at the same time a little sketchy, and I find split stitch always works pretty well for that.
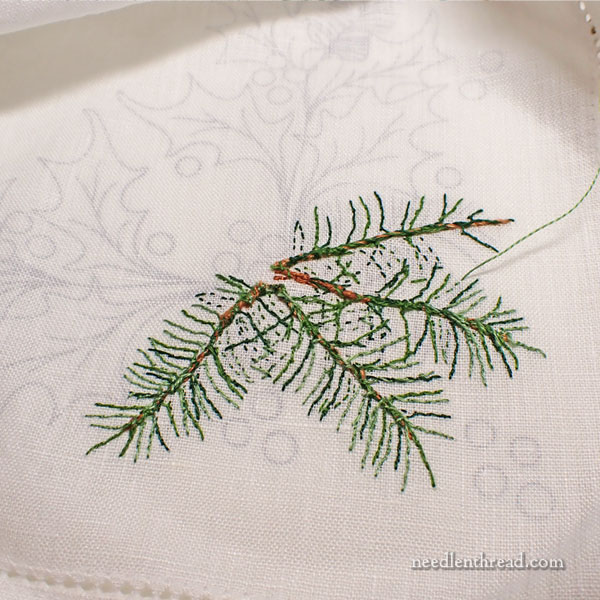
Design elements like this pose a problem when you’re embroidering something that has an exposed back.
Now, you can go all out and really concentrate on the back of the work as much as you concentrate on the front, to achieve a much neater result than the back I’m getting ready to show you.
But for me, there’s a give and take here. I want the back neat enough, but I don’t want the project to be stressful or fiddly, and I don’t want to spend a Huge amount of time on it.
I tend to fall in the middle when it comes to considering the back of the work. I want the back neat, but I’m not going to get obsessive about it, and I’m not going to put the time in that’s required to achieve a back that’s practically as neat as the front.
I use the embroidered paths of the design to help me travel threads on the back (to move from one part of the design to another) and to give me a place to end threads.
You can see that the stems on the back suffer from the thread build-up where the greens wrap around the backs of the brown stitches.
I don’t mind this. If someone turns the work over and sees it, sure, it doesn’t look as neat as the front. But it doesn’t look awful, either.
When embroidering the pine needles, I stitch from the stem outwards, and then I turn the work over and pass under the backs of the stitches I just made, to take me back to the stem, so that I can travel to the next needle I want to stitch in the same color.
As long as my threads on the back of the work are traveling exactly along the stitched lines, they won’t show through to the front of the work. You won’t see, through the front, the shadow of a thread crossing an empty space of linen.
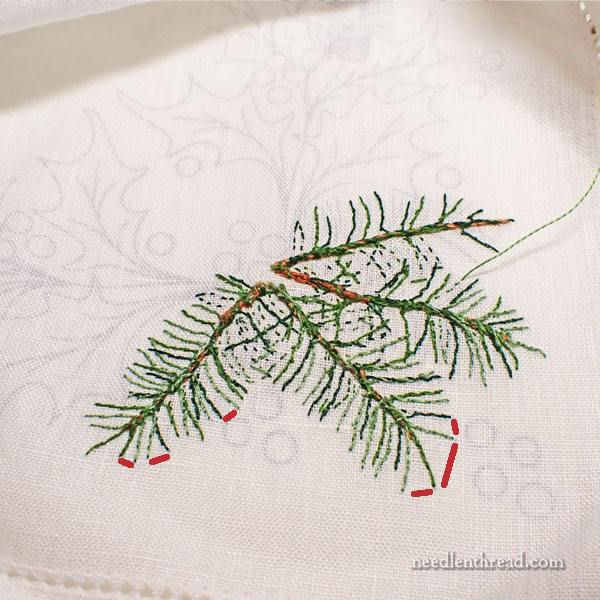
If I got to the outer end of an evergreen needle and jumped to the neighboring evergreen needle to stitch it back towards the stem, I would end up with shadows of thread that would show through on the front of the work. For example, the red lines above illustrate where the thread would have to jump to the neighboring pine needle. This would result in a shadow from the thread as it is carried over to the next needle.
You definitely don’t want that! It would result not only in a messier looking back, but even worse, in a messy looking front.
You’d also end up with small lengths of unsecured threads passing here and there on the back of the work – threads that can snag or pull accidentally.
And that’s not good, either.
So, when you travel your thread on the back of a piece of embroidery, one way to keep things neat is to travel the thread along already-embroidered paths, passing under the backs of the previously worked stitches.
Another point that goes a long way to keeping the back of your work neat: be conscious of your thread as you stitch! If it suddenly seems to be shorter than it should be, or if your stitch on the front is not tensioning the way you expect it to, take a look at the back of the work to make sure that a knot hasn’t formed in your thread. Slip knots and other knots are easy to remove if you catch them right away, but not so easy to take care of if you don’t notice them until later. They can also form unsightly bulges and they can get caught up in other threads.
(You can find an article here on removing and repairing a slip knot after you’ve stitched away from it, if you want more information on dealing with these bothersome things!)
Coming Up!
We’ll be working on Sweet Marguerite again soon, doing the decorative hemstitch and finishing that project up.
I’ll show you this finished holly & evergreen linen eventually – I hope it is not a project that lingers too long! And then I’ll tell you a bit about the linen blank.
I’m going to be adding some fun little fiber project kits to the online shop soon. We’re hosting some local workshops on felting for kids and adults this autumn and early winter, and we plan to have some pop-up retail events at local community Christmas markets this year, too. So we’ve brought in some really nice needle felting kits for these. I’ll tell you more about them a little later, but if you haven’t tried needle felting, these kits are a great way to give it a try! Personally, I love needle felting. I find it mesmerizing and oh-so-satisfying. And I love using the resulting sculptures in different ways. They make excellent pin cushions, for example, and they’re easy to turn into Christmas ornaments. More on this topic a little later!
And that, my friends, is all for today! Hope you’re having a wonderful week!
Just beautiful, Mary! Would you mind giving your source for this beautiful tablecloth blank? I am frequently disappointed when I find pre-finished blanks and to have you rate it as “gloriously beautiful stuff” is high praise indeed! Thanks in advance.
🙂 Yes! I will have more news on that coming soon!
Hi,
New colors of floche! Good!
Do you know if we can buy a color card for floche?
Thank you.
Well, I heard from the distributor yesterday and – boohoo – the ad they sent out was for a re-stock of floche. It was titled “New Colors” and had a color list on it, but they apologized for wording it wrong. At the end of the ad, it said “back in stock” but I didn’t associate that with the “New Colors” at the heading of the ad. Alas, there are no new colors. They simply meant that they had floche back in stock. I’ll adjust the article and eliminate that bit of utterly fake news. 🙁
I only stitch cross stich with a few other basic stitches. What kind of needle would be best for me to use. I would be grateful for your thoughts.
A tapestry needle. The size depends on the number of strands and the count of your fabric.