


I’m dropping in very quickly this morning to let you know that I made some corrections on yesterday’s article introducing the Christmas Wreath stitch-along, specifically concerning the ground fabric for the wreath ornament.
You need a 5″- 6″ square (or rectangle) piece of fabric to embroider the ornament on. If you are not using the kit, I recommend a 6″ square to give you more hoop room, if you’re using a 4″ hoop.
If you have purchased the Materials Kit for Twelve Wreaths, you have a 6″ x 15″ piece of natural colored linen in there. You can do two things with it. The first method below is preferred, especially if you want a little more hoop room with your fabric.
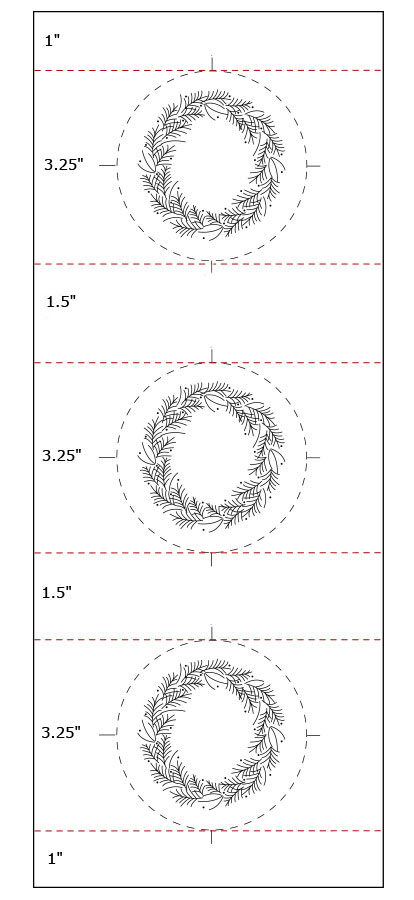
Transfer three ornament designs on the whole piece of linen, using the layout guide above. You’ll leave about 1″ at the top and bottom of the fabric and 1.5″ between each design’s dashed outline. This will give you the most hoop room and a 3/4″ finishing allowance around the ornament.
Alternately, you can divide the fabric into thirds, which will give you a 6″ x 5″ piece of fabric for each ornament. The fabric will just fit in a 4″ hoop, with only a tiny bit of overhang on two sides. It’s enough to hold the fabric, but it’s not a lot of fabric. I stitched a couple of the ornaments this way, as you will see in some of the demonstration photos coming up, so it does work. It just doesn’t give you as much hoop room.
I have since corrected yesterday’s article and added a link to this article with the fabric layout in it.
I’m afraid the weekend messed me up. I had yesterday’s post pre-written, but I was supposed to go back and edit the fabric cutting information using my project notes and adding this layout diagram. I didn’t have a chance to do it before Thanksgiving, and somehow, I lost track of the plan over the holiday weekend. I set the post up for auto-publishing, and it was out yesterday before I realized I hadn’t adjusted the fabric information and added the diagram.
If you have not cut your fabric, you’re fine – you can use the layout above. If you’re doing multiple ornaments, it is much more efficient and a whole lot quicker to transfer three at a time, stitch them all, and then do the finish work.
If you have cut your fabric, you’re still fine. A 4″ hoop will just fit, albeit a bit tight. If you prefer more hoop room, you can “extend” the cut fabric using the method in this article.
Now we’ll get back to our regularly scheduled program. Feel free to drop me a line if you have any questions!
Leave A Comment