


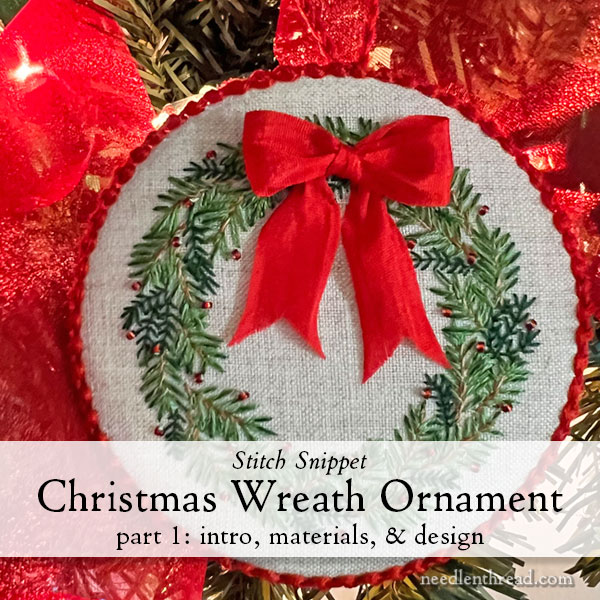
Here we are, about a month before Christmas, with just enough time to squeeze in one more Stitch Snippet before the end of the year!
We’re going to create a little embroidered wreath ornament from my latest project PDF, Twelve Wreaths for Christmas, which is available here.
If you’ve already purchased the PDF, you have the basics for this wreath – plus a whole lot of other wreath designs just waiting for your needle and thread. Here on the blog, we’ll go into a little more detail on certain aspects of the project.
The wreath that we’re going to work through together is the traditional evergreen wreath with the red silk ribbon bow, Wreath #1 in the e-book.
All the materials (except the DMC floss) for this project are included in the Twelve Wreaths Materials Kit available here, along with enough materials to make five other wreaths of your choice from the Twelve Wreaths project PDF, if you want to. The kit is almost sold out at this point – it was released the weekend before Thanksgiving – and it won’t be restocked this year.
Today, we are going to go over some basic introductory information, materials, and the design, so that you can prepare yourself for the project. In the next installment, we will cover tips and techniques for starting the project and the embroidery. Then, we will add beads and the bow. And finally, we will assemble and finish the ornament.
What to Expect with the Stitch-Along
Over the next 2.5 weeks, we will create this entire ornament together, but you are not obliged to follow along with the time line. You can work at your own pace and come back to the instructions here on the website as you need to.
Because I’ll be going into more detail for troubleshooting and the like, I’ll compile all the information from the stitch-along into PDFs that are easy to download, save, and print, and I’ll be posting in the Needle ‘n Thread Community on Patreon, for members over there. Even if you have the Twelve Wreaths project PDF already, the extras in the Snippet PDFs will still come in handy. The first PDF will be published after we start the stitching.
Additionally, I’ll post at least one video for members at the “Dedicated Stitcher” and above levels. The video focuses on part of the finishing, since that’s the most complicated part of the project.
Stitching Supplies & Other Materials
First, we’ll need to talk about supplies, so you can start gathering!
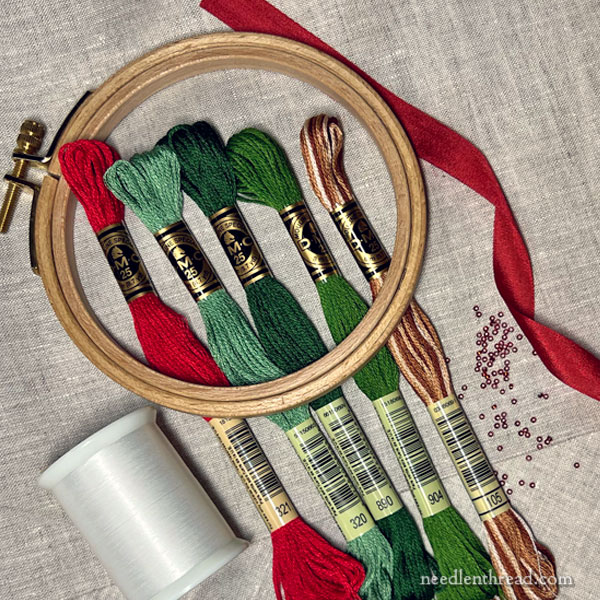
For the embroidery part of the ornament, you will need the following supplies:
Ground Fabric: I used a high thread count, relatively light plain-weave linen in a natural color called “Manuscript Vellum” here in the States. You can find it at locally owned small needlework shops that carry embroidery linens from Access Commodities.
It’s also one of the linens available in my Natural Linen Fabric Sampler pack, if you have that fabric pack and you haven’t used it yet. It’s also part of the materials kit for the Twelve Wreaths – there’s enough of it to create a total of three ornaments in the kit. If you are outside North America, it is the same as Graziano’s 6262 linen in melange.
How Much Fabric & Layout
Update: For one ornament, if you are using a 4″ hoop, you will need about a 5″ – 6″ square piece. If you’re using a 4″ hoop and you want plenty of hoop room, go for a 6″ square.
If you are working from the Materials Kit, you have a strip of the linen in there. It is 15″ long.
The best way to have the most hoop room on this piece is to transfer three ornament designs at a time, leaving about an inch at the top and bottom of the fabric and 1.5″ between the dashed outline on each design. Stitch all three designs and cut them apart when it’s time to finish.
Alternately, you can divide the strip in thirds, giving you a 6 x 5″ piece. The 5″ cut will just fit the 4″ hoop with only a tiny overhang.
In this follow up blog post, you will find a layout diagram for the fabric in the kit, with more tips.
Substitutions
If you don’t have access to this particular linen, look for a light-to-medium weight natural colored linen with a close enough weave to support surface embroidery. If you plan to trace the design, you’ll want the linen to be transparent enough when there is light behind it, to see the design for tracing. So a heavy linen is not ideal. It also won’t finish as easily.
Threads: DMC stranded cotton in the following colors: 890 (dark green), 904 (medium green), 320 (light green), 105 (variegated brown), and 321 for the finishing.
Beads: Miyuki 15/0 rocailles (round seed beads), silver-lined garnet. The color number is 0011. If you can’t find this particular bead, you can substitute any rich, sparkly red 15/0 seed bead.
Bead Thread: Miyuki nylon beading thread in white. You can also use one strand of embroidery floss in a color that matches the bead, if you don’t want to invest in beading thread. I find that this beading thread is ideal with surface embroidery. It’s not highly visible, it can be carried across the back of the work without being visible through the front, and it handles any common size of bead.
Silk Ribbon: 1/2″ wide silk ribbon in Christmas red. You can purchase this from anyone who sells silk ribbon, or you can substitute other ribbon.
Remember when you make substitutions that the final project may look considerably different, but don’t let this deter you from substituting!
To finish the embroidery into an ornament, you will need red wool felt or a wool felt blend (acrylic craft felt is not quite sturdy enough for a nice finish), some low-loft batting, and DMC 321 mentioned above. You will also need a piece of white mat board to cut out a circle for the foundation of the ornament.
For tools, you will need a hoop (a 4″ hoop works perfectly), needles (embroidery or crewel in size 7, 8 or 9; short beading needle #10), scissors (use something other than your good embroidery scissors to cut the beading thread).
We’ll cover other basic supplies when we get to the finishing – like glue, pins, clips, and so forth.
The Embroidery Design
The detailed design for the wreath looks like this:
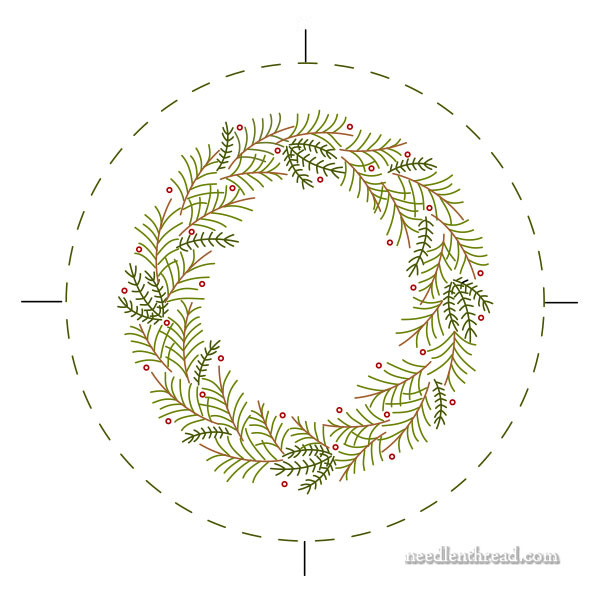
Because that’s a lot of details in a small space, I suggest transferring only the lines you’ll actually need, included in this minimal design:
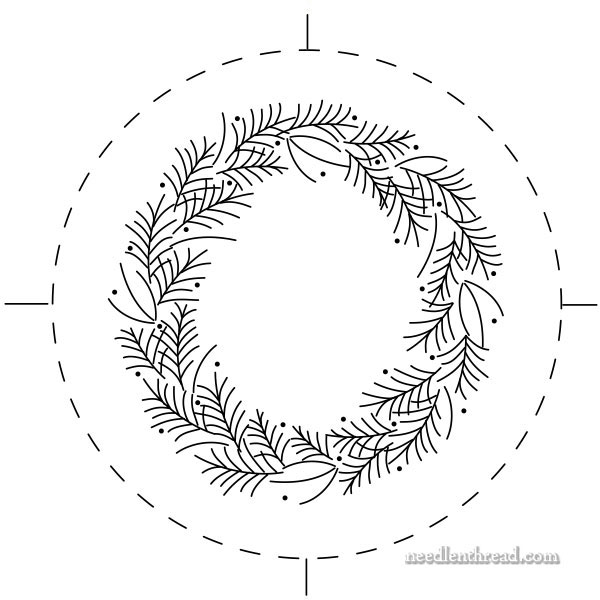
Both designs are available here as a PDF that you can save to your computer and print:
Traditional Christmas Wreath with a Bow – PDF download
Transferring the Design
First, make sure that your fabric is ironed smooth and flat. You don’t need to wash it or shrink it or anything – just make sure it’s ironed well.
Then, use your favorite method of transferring to get the design onto the ground fabric.
You can trace (I recommend using a light box and the minimal design), you can use a printable and water soluble stabilizer (like Fabri-Solvy by Sulky), you can use this prick and pen method that we used in an early Stitch Snippet, you can use a fine-tipped iron-on transfer pen like this one reviewed here, or any other transfer method that you are comfortable with.
I recommend transferring the outer dashed line of the design as well, because this will help you center the embroidery during the finishing process. There’s no need to transfer a solid line – make it a light dotted or dashed line.
When you transfer, transfer only the details you need! With this wreath, do not transfer the tiny evergreen needles! (This is explained in the design PDF linked to above.) You don’t even have to transfer the larger evergreen needles if you don’t want to. You could get away with just transferring all the stem lines and then referring to the line drawing of the pattern while you stitch.
Coming Up Next!
With the design transferred and your supplies gathered, we’re ready to stitch, so our next installment will concentrate on the embroidery!
Available Now!
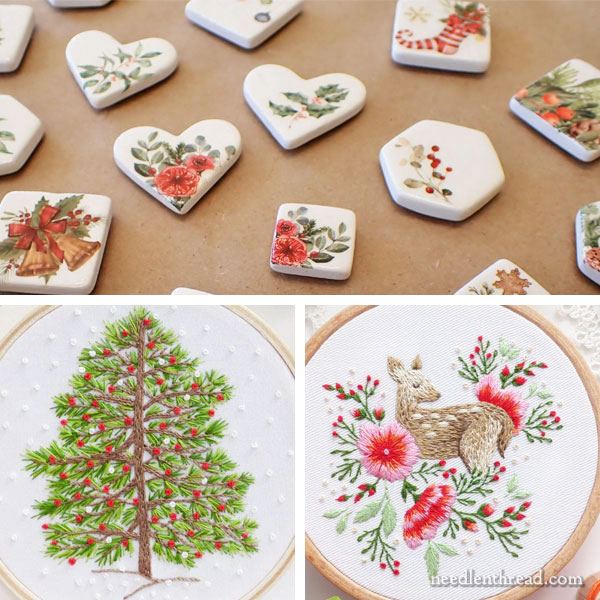
We finished a nice new batch of Christmas (and non-Christmas) needle minders over Thanksgiving weekend, so those are available in the shop now. They’d make great stocking stuffers for your stitching friends and family members! Or for you!
I also restocked Tulip needles recently. Every type and size that we carry is in stock right now! Yay!
And I’ve restocked all the 4″ Christmas kits in this embroidery kit collection, just in time to use for gift-giving for the crafty people in your life!
All of these 4″ kits with a holiday or winter theme can easily be made into tree ornaments, like we did with the Christmas Tree kit last year. There’s a new kit in that collection, too – a baby deer Christmas design. It’s so sweet!
Can the red stitched edging pattern be found anywhere else or is it specific to these wreaths? I really like how it looks and wanted to see if I could master the technique. TIA.. PattiK
We’ll be covering it eventually as we work through the wreath project.
I am in total amazement at the detail you provide and the time it must take to be so thorough.
These are amazing projects and would make wonderful small gifts for a a large family.
Thank you for your time,energy and expertise. You are awesome.♥️