Welcome to the first installment of The Christmas Mitten stitch-along!
Today, we’ll cover the materials I used in this project, I’ll supply you with a printable pattern sheet, and we’ll talk about the set-up of the project.
If you have not yet purchased a kit for The Christmas Mitten, you’ll find a full materials kit for this project available here. The advantage of the kit is that you’ll have everything to create the ornament, without having to hunt down supplies from multiple sources.
If you’re a member of the Needle ‘n Thread Community Patreon, this first installment will be rolled into a PDF that will include the information below, plus all the stitching of the design.
I’ll post that PDF before the second installment is posted here on the website (so, before Friday of this week). It covers everything except the finishing of the project. In the meantime, the information below will get you started.
Getting Started & Following the Stitch-Along
As we get started, I encourage you to think of participating in a stitch-along like this much the same way as you would approach a new recipe that you plan to cook. When you plan to cook a new recipe, you general read through it pretty carefully first, and you’ll need to do the same thing as we progress through this project together.
Read each installment carefully first. Sometimes, you might read through the lesson more than once. This just gives you a good idea where you’re headed, and it helps forestall complications that can arise if you don’t prepare by reading thoroughly first.
Then, gather your supplies. It’s called mais en place in cooking – putting everything in place. The principle is that, if you gather all that you need ahead of time, you’ll avoid the frustration of hastily trying to find the things you need right when you need them.
So – read and gather! Good principles for undertaking any project!
Materials, Equipment, Supplies
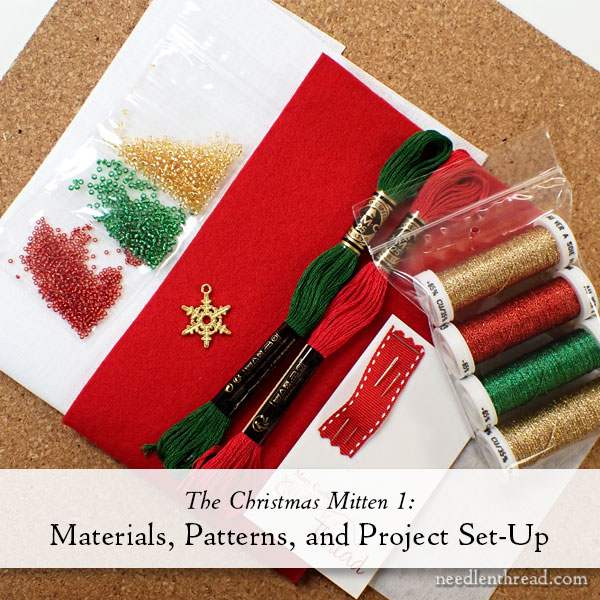
This is the supply and equipment list for the first part of this project, which covers all the embroidery:
- “Eiderdown” linen – 8″ x 8″ – this is a white 38 count embroidery linen with a close weave.
- DCM floss in 986 & 321
- Au Ver a Soie Metallics #4: 0003, 0008, 0002
- Au Ver a Soie Metallics #8: 0002
- Miyuki seed beads 15/0: 0011
- Miyuki seed beads 11/0: 0016, 0003
- sewing thread
- tissue paper
- 5″ hoop
- embroidery scissors
- needles (#7 and #10 embroidery)
When we get to finishing, you will need:
- Red wool felt (at least 9″ x 4″)
- Interfacing (Pellon 40 sew-in)
- Snowflake charm
- Sewing thread
- Scissors
- Sewing pins
- Wonder clips or similar (optional, but nice to have when doing finish work)
Project Patterns
The project requires three different patterns, one for the ground fabric where you’ll do the embroidery, and two for the felt used for finishing.
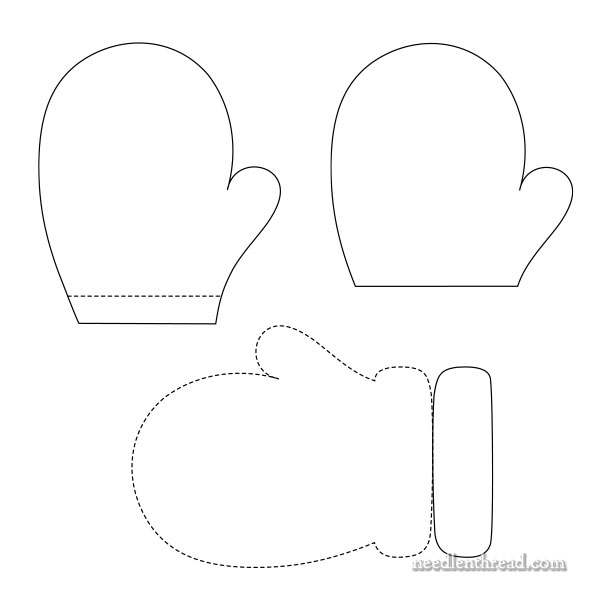
The different pieces for the project look like those in the photo above. We’ll only be using one of those to transfer the design for the embroidery part on the linen.
You’ll find the PDF for the patterns just below. When you print, make sure your printer is printing at 100% or “actual size.” The main embroidery pattern (“A” on the pattern sheet) will print just shy of 4″ high. If it prints at 4″ high, that’s fine. You don’t want it to print any smaller than 3 7/8″.
The Christmas Mitten Pattern Page – CORRECTED! (PDF)
Please download / save the PDF first and then print from the PDF that you’ve saved on your computer or device.
Setting Up the Project for Stitching
You do not need to pre-wash the linen, but you may wish to iron it to remove any creases from folding.
I’m going to explain to you how we transferred the design outline for the mitten. If you have a favorite method you’d rather use, use it.
I’ll also explain a shortcut that you can take, but with caution. You don’t want a visible design line when you finish your mitten, and that’s why I used the method described below.
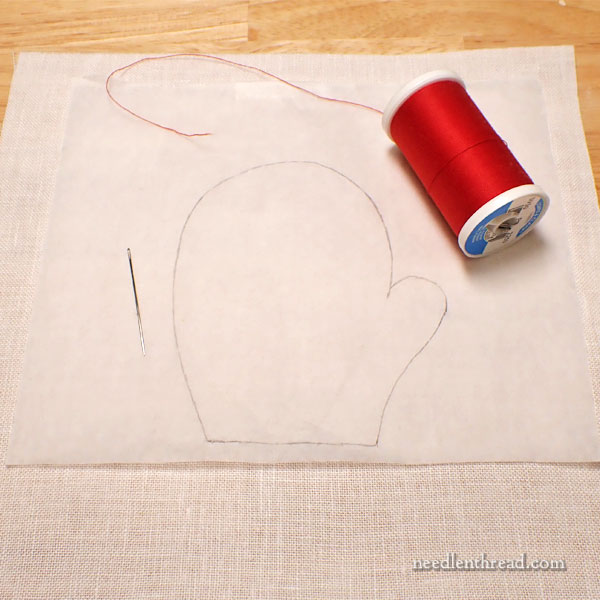
Gather your supplies: fabric, needle, sewing thread, and a piece of tissue paper.
Start by tracing pattern A onto a piece of tissue paper, tracing the solid outline. I just use regular gift-weight white tissue paper.
Center the traced mitten over your fabric and align the straight edge of the mitten with the grain (weave) of the fabric. This will determine the straightness of the embroidered lines on the project, so take care with this step!
Thread your needle with the sewing thread and knot the end of the thread.
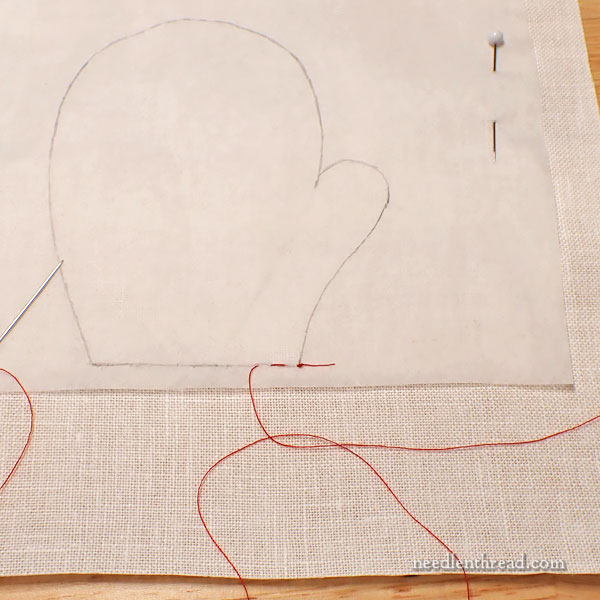
Very carefully baste over the straight edge of the mitten drawn on the tissue paper. As you baste (which is just working a running stitch), make sure that you are following along the line of the linen weave.
When you pass into the tissue paper on the front, look at the back of the fabric, to see that you’re emerging along the weave of the linen, basically stitching in the ditch between two linen threads that make up the weave of the fabric.
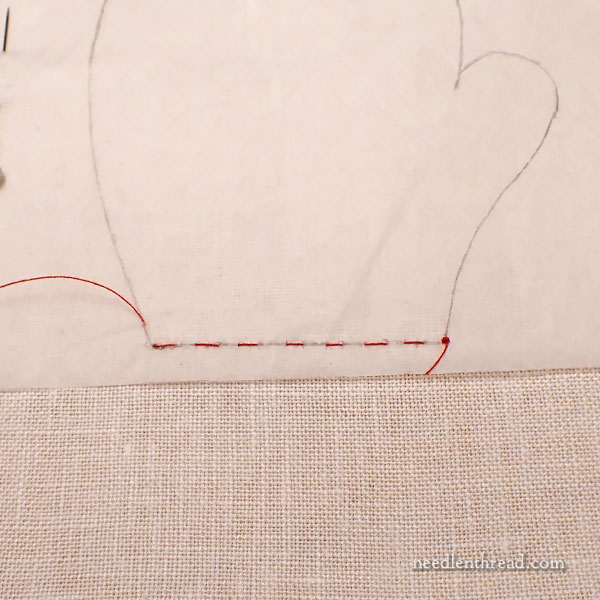
It’s important that this straight edge is stitched with care. The rest of the mitten doesn’t matter as much – you won’t be following the weave of the linen – but this straight edge matters!
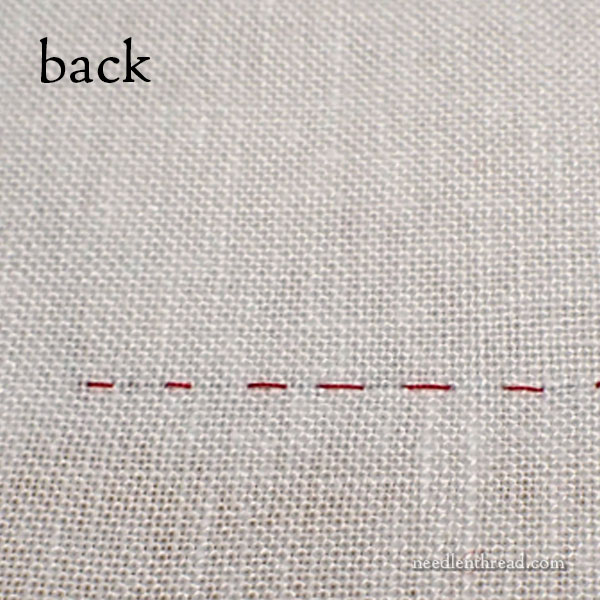
When I turn the fabric over to the back, you can see that the running stitches on the back are following exactly along the weave of the fabric.
That’s what you want!
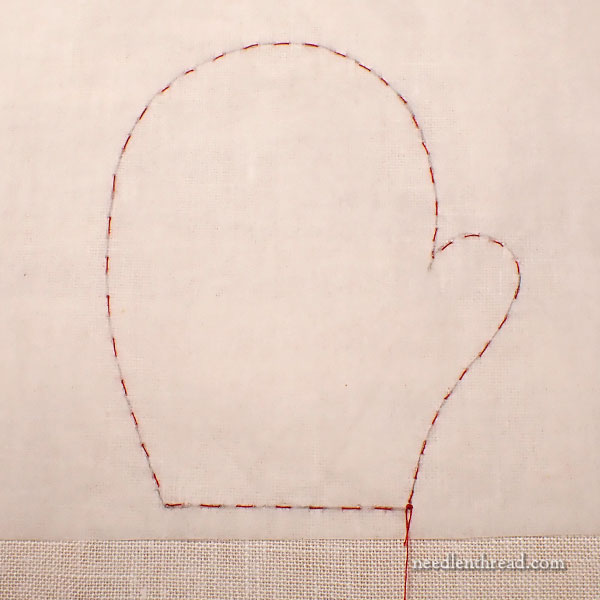
Once the straight edge is basted, continue around the rest of the mitten until you come back to your starting point.
Your basting stitches (running stitches) should be small enough to take the curves gracefully, but not so small that they create tight stitches that would be difficult to remove.
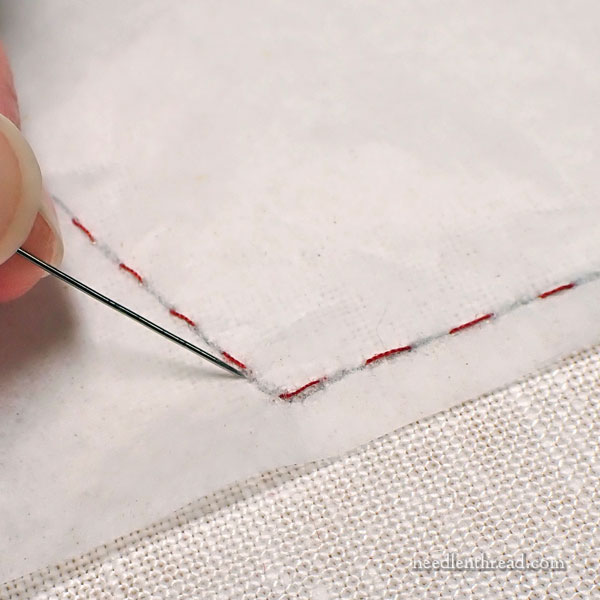
When you’ve finished basting all around, end the thread with some holding stitches or a knot on the back, whatever works better for you. This thread is going to be removed (or you might not need to, if it doesn’t show at the end), so you don’t have to worry much about it – you just don’t want it to pull out or shift on you.
Then, take the tip of your needle and run it around the shape, pulling it gently over the design line so that it “cuts” the tissue paper.
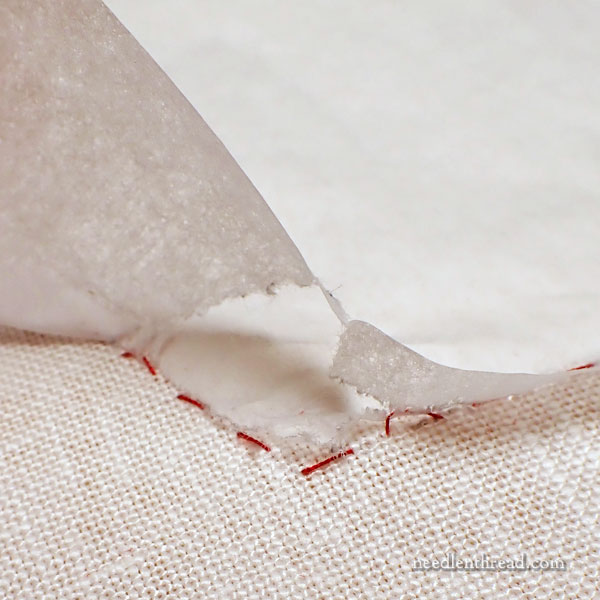
Very gently, pull the tissue paper away from your basting stitches all around the mitten. If necessary, use tweezers to grab any extra bits of tissue paper.
Remove all the tissue, leaving the basted outline of the mitten.
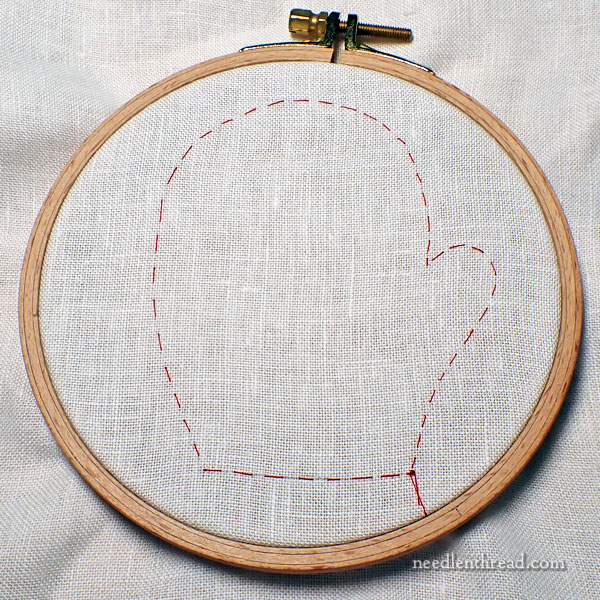
Mount your embroidery fabric in your hoop, centering the mitten in the hoop.
You’re now ready to start stitching!
Quicker Alternative Transfer – with Caution
You can transfer the project more quickly using a pencil (I’d recommend a .05mm mechanical pencil), but I’d use this method with caution. When you finish the mitten, it looks better if there are no transfer lines visible, and sometimes, it’s difficult to achieve that on a shape like this.
But if you would rather speed things up and use a pencil, then do it this way:
Cut out the mitten shape (A) from regular printer paper, following along the solid lines. Center the cut-out on your fabric, lining up the straight edge with the weave, and then carefully trace the cut-out with your pencil. On the straight edge, make sure the pencil follows the weave by drawing in the ditch between two threads of the linen.
This will give you an adequate outline for the project, but you won’t have the opportunity to wash any lines out, so it’s up to you whether or not you want to take this approach!
Project Lesson Organization
Very soon, I’ll set up a project index for the Christmas Mitten under “Tips & Techniques” in the main menu on Needle ‘n Thread. Once that is available, I’ll add all the lessons to that project index so that you can easily find each lesson.
Coming Up Next
In our next installment, we’ll begin the embroidery on The Christmas Mitten.
Also coming up, I’ll be sharing all the juicy details of our First Ever (in person!) Christmas Open House and retail event here at Needle ‘n Thread!
We’ll have lots of lovely door prizes that we’re giving away over the two weekends to our in-person guests, and I’ll tell you all about those.
Some of these beautiful gifts will roll into some pre-Christmas give-aways here on the website, too. I don’t want you to miss all the fun! And as much as I’d love to meet each and every one of you in person, I’m pretty sure that’s not going to happen. *Sigh*
I’ll also update you on the new front of our building – the new windows and door went in this past weekend! Woohoo!!
And more… I’ll even show you why I asked you about needles the other day.
And yes, I’ll even update you on some stitching!
I hope your week is off to a great start!


I’d be grateful for some printing help – this is my first time printing a pdf pattern from your site. I set the paper size at 8.5×11, and the scale at 100%. But I think this pattern is scaled for a piece of paper bigger than 8.5×11, or for printing on multiple sheets, and I’m not quite sure how to make that work! When I printed using the correct settings, mitten A is fully on the sheet and is correctly just shy of 4″. But mittens B and C are only partially on the printed page (B cut off on right side, C’s bottom half cut off). Any tips for getting B & C printed are much appreciated!
Hi, Mandi – I posted a corrected version of the PDF. The first one was printing wonky for everyone. The link to the mitten pattern in the post above is to the corrected version now, but just in case you need the direct link, this is it: https://www.needlenthread.com/wp-content/uploads/2024/11/The-Christmas-Mitten-Pattern-CORRECTED.pdf The name of the file has “CORRECTED” in it.
That should work without a problem! Just choose “actual size” when you print.
Quick update: I tried printing on an 11×17 sheet, and it looks like that got everything on the same page at the right scale!
I’m confused. The first email I got had a correct printing of the mitten pattern. When I clicked on the link above, it printed the mitten pattern with the top cut off.
Anyway, I have the print with the whole mitten patterns showing from the first email, so I guess I’m OK, just confused that it printed out with the top cut off on this link shown above.
This is the first time I’ve done one of your kits, and it’s lovely. I’m just hoping I’m not missing something. Also, it would be nice to have had the dimensions of the finished ornament listed before we ordered. Just an idea for next time. Thanks for creating this darling ornament. I’m looking forward to stitching it.
Hi, Peggy – this is the correct link to the PDF: https://www.needlenthread.com/wp-content/uploads/2024/11/The-Christmas-Mitten-Pattern-CORRECTED.pdf – the title says “Corrected,” so as long as that’s the one you have, you should be fine. If you measure your printed version and pattern “A” (which is the pattern for the linen) comes out to just under 4″ high (just around 3 7/8), then you’re fine. If it comes out 4″ high, you’re still fine! Much larger, and it won’t fit as well in a 5″ hoop, but it’ll still work. If you smaller, then it won’t hold a gift card. So test print the corrected version – it will give you the right sizes if you choose “actual size” or “100%” in your printer settings.
Love the post. So easy to follow. Thank you.
Hi Mary.
Many thanks for taking the time to design this beautiful SAL for us to join in with. I don’t have any 38 count but do have some 36 count which if not 100% linen has some linen content. However, it has some fold marks from being stored which I have not been able to remove. Just wondering if you have any tips up your sleeve?
I’d probably soak it a little in warm water with a teaspoon of white vinegar in the water. Then rinse it thoroughly, lay it flat on a towel, press out the excess water with your hands and a towel, and then smooth it out and let it dry most of the way. While it’s still slightly damp, iron it. Assuming it’s linen or cotton, you can iron it on hot – just keep the iron moving. If it’s a blend with something else in it, though, you’ll have to adjust the temperature of the iron accordingly.
Mary, I am ready to start the mitten project, and have a couple of questions. First. I do not have linen, but have some Aida cloth which I plan to use. Would you suspect ny problems I might encounter using this cloth/ I think I will try it on a 16 count. I’m trying to accomodate both my poor vision, and my mobility limitations. I made a small ornament using 16, and it was doable for me. Secondly, should I change the size of the pattern with my other change? I apologize for requesting this extra assistance, but I am anxious to try making these stitches, and see this as my project going forward into our new year. Thank you for your generosity. If I was ever to get to your part of the world, I would love to visit your space. Lynn
Hi, Lynn, I think it is doable. I wouldn’t change the size of the pattern – you’ll just have to gauge how far apart your lines should be stitched, and how much to depend on the “grid” for spacing your stitches.