


How about a variation on a theme? Instead of Stitch Fun!, let’s go with Stitch Fail!
I love the Stitch Fun! series here on Needle ‘n Thread, because I love exploring stitches. But sometimes, what I envision with a stitch or a combination of stitches doesn’t always materialize the way I envision it.
That’s part of the fun of playing with stitches – you can end up with some very exciting results, some happy discoveries, some satisfactory conclusions.
Or you can end up with a Stitch Fail – and, you know, that’s not always a bad thing!
That’s pretty much what today’s tutorial is all about. I’ll tell you about my original intention with this stitch experiment, talk about what actually happened and why, discuss ways you could use the flop anyway, and mull over alternatives to what I was vaguely trying to achieve.
In this Stitch Fun! tutorial from last week, we looked at a combination of the buttonhole eyelet with a lacy buttonhole border growing out from it.
So, what I visualized with this variation was a gathered, ruffly bunch. Something perhaps a little loose and floppy. Something that would make an interesting accent in a stylized garden, or that could serve as, say, some kind of underwater coral growth – something like that.
I intended to bead the outer edge of the original lacy buttonhole wheel eyelet, and then loosely gather the whole stitched element together, to create something sort of …. fluffy-beady-lacy-clumpy-ruffly.
Get it?
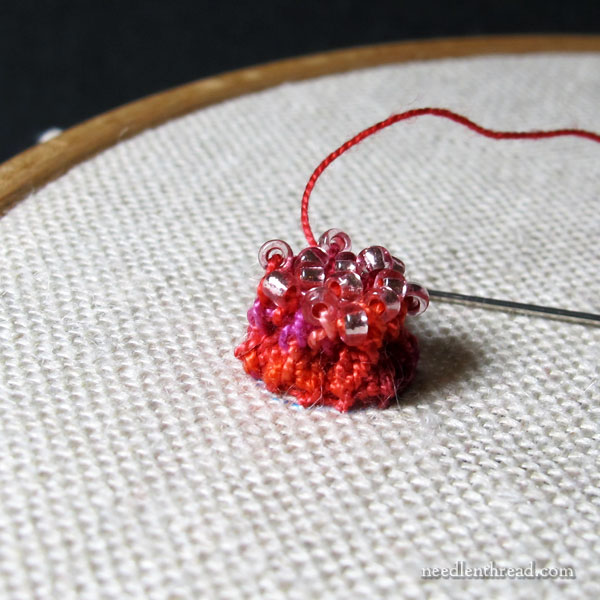
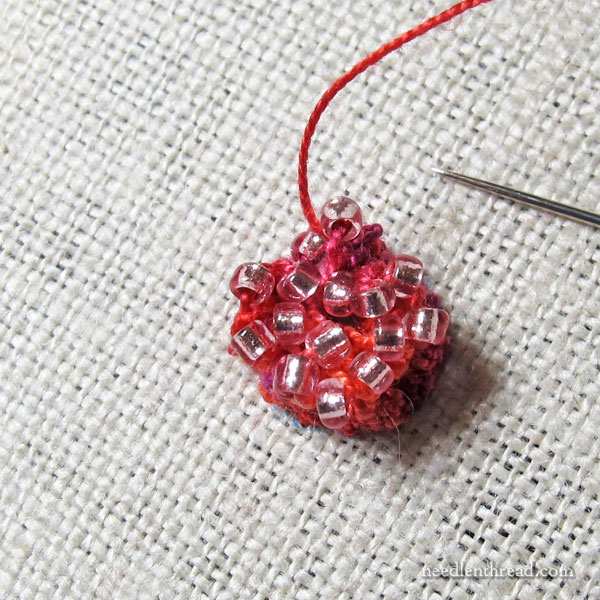
Instead, I ended up with the tight little cluster of something, topped with beads, that you see above.
Is it entirely a fail?
Not entirely, because I could see using the resulting beaded clump as a textured accent in some kind of encrusted embroidery piece. I could see it used as a small, dew-dotted garden element in a three-dimensional knot garden. So there are possibilities for it.
But it still needs work to get to what I was envisioning. I know where I went wrong, and further experiments may get me to the desired result.
In last week’s tutorial, I began with a buttonhole wheel eyelet.
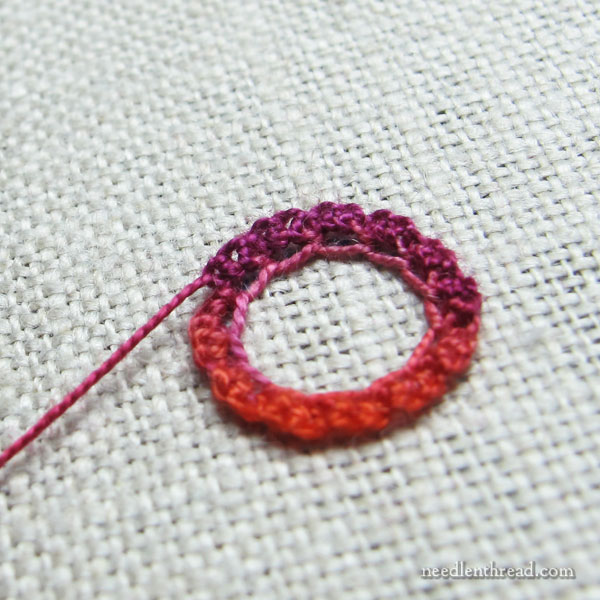
For this experiment, the foundation is simply a chain stitch circle. You can pretty much do the same stuff on a chain stitch that you can do on the edge of a buttonhole stitch, and using the chain stitch eliminated the spokes in the center, which aren’t necessary for what I was imagining.
You’ll find a step-by-step tutorial for how to create a perfect chain stitch circle with an invisible join here, in case you’re wondering how to work a chain stitch circle.
Working on the outside half of each chain stitch loop, I worked three buttonhole stitches all the way around the circle. This is exactly the same concept as this scalloped buttonholed chain stitch combination, which makes a very pretty stitch all on its own.
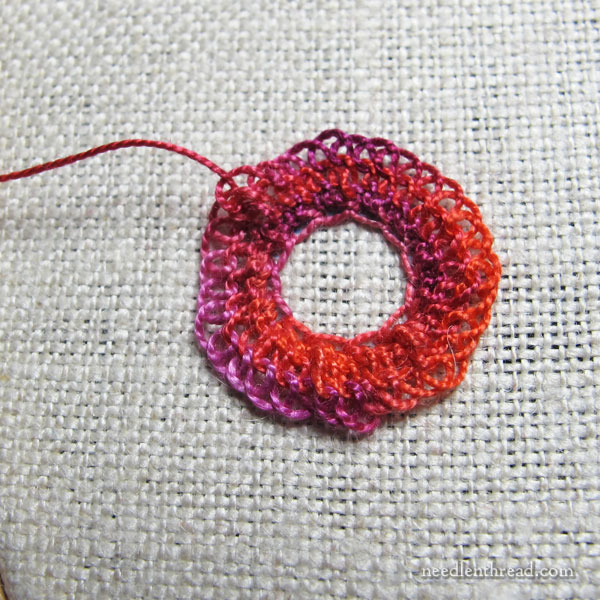
Into the tighter first round of buttonhole stitches, I worked two very loose rounds, buttonholing loose loops in each of the three tight buttonholes on each chain stitch.
This is the same procedure for the lacy round in last week’s tutorial.
The stitches on this ended up quite ruffly, which was ok!
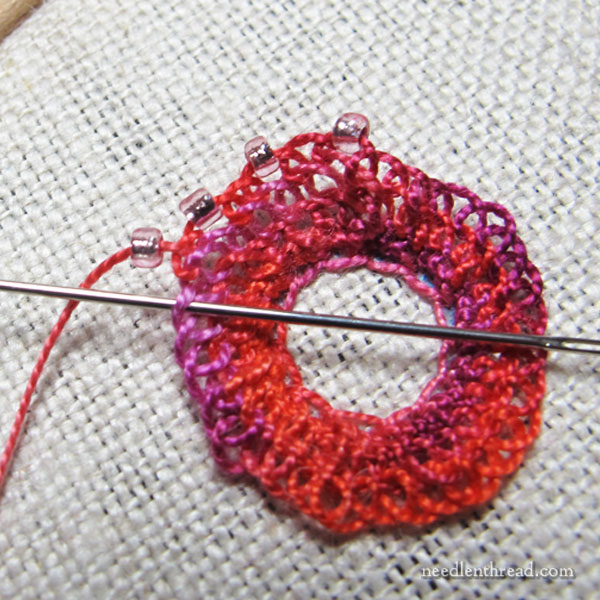
Then, I worked my way around the outer edge of loose buttonhole stitches. I added a bead onto every other buttonhole stitch around that outer edge, working the buttonhole stitches on this round a little tighter than on the previous rounds.
Now, about the beads. These are just light pink seed beads that I picked up in bulk at a craft store some thousands of years ago. And they’re not all that great. They’re inconsistent in size and shape.
I’m using #12 perle cotton here, with a size 7 crewel needle, so the beads must be at least a size 8/0 – perhaps even larger. They’re certainly not small like 11/0 beads or tiny, like 15/0 beads. In any case, the container wasn’t marked with a size. That’s how generic they are! But hey – they worked fine for my purposes here!
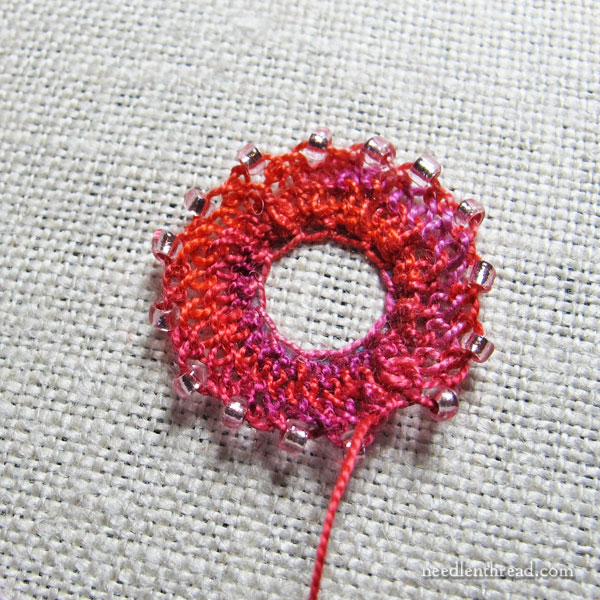
At this point, I’ve made it all the way around the outside edge.
I like it just like this! With better beads, perhaps even a finer thread, and beads that fit that particular thread much better, this could be a fun addition to a textured, beaded sampler. Why not?
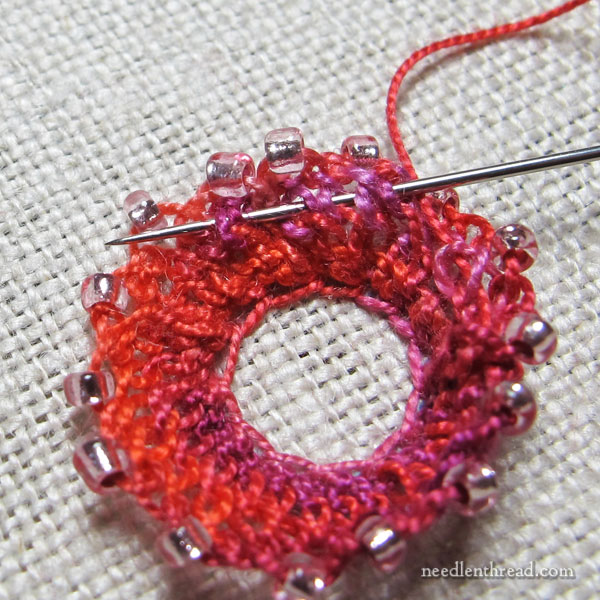
Now, it’s time to gather the whole thing together!
To do this, I ran the needle and thread around the element, picking up every other buttonhole whole stitch intersection between the last round of loose, loopy buttonholes and the beaded round.
My intention was simply to cinch the whole thing together. Why not?
So I did!
And it all tightened up into a little beaded clump.
And while I’m sure there are all kinds of ways to use beaded clumps, this isn’t exactly what I intended.
I wanted a little more “bursting outwards” of the beaded edge. Imagine a cinched sack that has a deep edge, so it ruffles outward a bit when cinched. That’s kind of what I had in mind.
Two adjustments might help produce this: working a couple more layers of the loose and loopy buttonhole stitches (which would require using a very, very long thread) and cinching the whole thing closer to the foundation stitches.
And then, as I mulled and mused and contemplated, my mind floated to the beaded drizzle stitch.
If you want a clumpy cluster of looser, more exuberant beaded ends on stitches – something that’s sort of floppy and wild – try the beaded drizzle stitch. You can achieve a clustery, curly, ruffly effect by working a group of long drizzle stitches topped with beads. It’s a fun approach, and I think it’s more akin to what I was imagining, anyway.
And that was my Stitch Fail! for the week. Totally useless? Maybe. Maybe not! I’ll leave it to you to decide!
What do you reckon? Feel free to join in the conversation below!
Mary, such a fun stitch! I love any stitch that looks lacy. Do you have a special place you order your beads from?
When I first saw the photo, my mind’s eye saw a lovely shimmering cluster of salmon eggs, all brightly colored. Along with that I could envision an underwater scene: the brilliant egg cluster on a hook and line with a silvery steelhead or chinook salmon dashing in to gulp it down. Well, what can I say? I live in the NW and we do enjoy our fishing. 🙂
That was great inspiration in Stitch Fail as I worked the buttonhole eyelet with buttonhole border and it failed. Rather than cutting it out I tried to revive it but was not very successful but decided to leave it in as it had taken so long to embroider. Can’t wait to tweak it further with beads and gathering. Thank you.
A learning experience is never a fail!
My goodness I don’t know how I missed the beaded drizzle stitch. So sweet! Mary I love your beaded clump and it would be wonderful in place of a button to secure a small shoulder bag or clutch! I think I will give it a try. Thank you and blessings!
This looked lovely until you gathered it up. I think you would probably achieve the look you’re aiming for by cinching closer to the foundation as you suggested, you would then get a beaded frill around the edge like an old fashioned sweetie bag, and you could experiment with adding more buttonhole layers. Wouldn’t it make a beautiful sea anemone stitched that way ?
Mary,
When I read this it took me back to a crazy quilt class I had with “Gloria McKinnon” of “Anne’s Glory Box” ….she uses beaded flowers to enhance her work and I loved learning a new technique…a beaded flower was made with a lacy edge and a beaded center…I saw yours and immediately thought of these flowers and how you could do what you did but put more beads on each section to make them into individual loops around then pull it together. It should fall open like you would want it to. (the extra bead weight would help) I like the idea of the wagon wheel it intrigues me to see what you will do with it and the drizzle stitch. Thanks for sharing !
Hello… I think the beaded clump is pretty, but I like the open circle better. I wonder what kind of needle you use for adding beads to your embroidery? I have been using wide-eye beading needles, but they are very thin and they get bent often, and I have to replace them frequently. I am embroidering on felt. There are often appliques on my felt designs, so I am stitching through several layers of felt. Is there a good sturdy wide-eye beading needle you can recommend? Thanks.
I think I know the look you were trying to achieve. I often like to do thread crochet with either a 12 or 8 perle coton. You first load up some beads on the thread, then crochet in a circle increasing each round (more than you normally would increase) and you get a lovely, ripply, hyerbolic shape into which you can add beads on your last row. I would then sew the motif onto the needlework linen or canvas.
Haha! What FUN! I work Brazilian dimensional embroidery and often suffer from Stitch Fail when I’m exploring new stitches. Sometimes I see it going downhill, but can’t seem to stop, like somehow it will magically come together, then it ends up in a heap at the finish. Too funny!
I do like your stitch before you cinched it up.
Good morning, love your blog, I was thinking if you added more chain stitch rounds , I would double the amount, then start your gathering at the half way/middle mark then you would have more of an overhang of stitches leaving less of a clump. Thanks, Colleen
Happy St Patty’s Day.
I had real fun with the lacy edge stitch last week. I did circles with the rim up or down, half circles, a half circle that I created a net over a bead, and also used a straight version that I used to cover a piece of piping. I’ll definitely be doing more sampling with this idea!
I love the drizzle stitch for flower centers, and bringing in a bit of the Brazilian Embroidery into my needlework. Thanks for making my days brighter even when I don’t have time to stitch.
Thanks for this post on adding beads to embroidery. I am making a fabric covered box with embroidered violets on top. Beads will add a lovely sparkle here and there. Any suggestions on how to add beads to a floral pattern?
Hi Mary! I think you may be on to something, but I think you need to add another row or two of outer loops, making the circle larger, adding your beads on the outer rim as before. Then draw the center in; that may give you the effect you were looking for. I think the idea was sound, you just need a few more rows to make the circle larger before pulling the center in! Great idea!
I do a lot of bead embroidery on RR Crazy Quilting, however, I do not use regular embroidery threads for it because I find it bunches up my flower designs. Each seed bead is attached individually to obtain the desired design. I use 4 lb. 110 yd clear fishing line, from Walmart. I’ve lost all those photos when my computer was hacked, sorry I cannot provide them.
well, maybe not TOTALLY useless..makes me think of covered buttons, otherwise i am not too sure if i would use it as is….i like the starting wheel and maybe adding a satin stitch center, and beads in the spaces of the wheel….and woven picots for petals….bead the tip of each petal??are you wanting the stitches/layers to stand up like a daffodil trumpet?
I love the fail! I’m going to make one for a flower center instead of a cluster of French Knots. You never fail unless you refuse to try and as long as you learn from your fail. Thanks for sharing.
I saw your first picture and read the first part and thought, “Mary Corbett fail? Nahhhhh!!” Though I admit the – uh – clump – of thread/beads did look a little…. well, like I had done it and not you.
And then I read about Drizzle Stitch!! HA! You have redeemed yourself! I had never heard of that stitch, so thank you. I may actually be able to use it on my current project (which I’ve not had time for in 2 weeks and I’m going into withdrawl) so i will have to play around with it. THANK YOU once again. Even from your ‘failures’ I learn something new.
Thank you so much for documenting your How It Went Wrongs. I learn something every time, AND I feel less of a twit for my own Fails! ^_^
Your blog & writing are amazing. Thank you for everything that goes into it.
Hi Mary, how about leaving the beaded button hole thingy before you gathered into a tight blob and do various shades of yellow french knots in the centre and hay presto you have a flower.
I think it might have worked better if you had picked up thread from between the beads. From the pic it looks like you have picked up thread under the beads, if you moved the need along a bit so the pick up is the opposite of what you did I think when you drew it up all the beads would have been on the outside. Where you have the thread on the back it should be on the front and VV. Do you know what I mean? Just a thought, I haven’t tried it.
I instantly thought of something under the sea with tentacles coming out of the sand. I love it actually. I can see it in a fairy garden motif as well. The forest, outer space, the list goes on!!
I love the lacy stitch with the outer row of beads. The lacy stitch is truly exquisite,
Sometimes a fail can be frustrating, but then againc sometimes it can be fun. Either way it’s always worth a try.
I do think cinching lower down would help. To get the ruffly coral/frilly lettuce effect in knitting, one increases (makes two stitches) in every stitch across each row so that the number of stitches, and therefore the length of each row, grows exponentially. You could try buttonholing vertically for a couple of rows and then buttonhole two (or even three?) times per stitch in every row to make the ruffled edge.
Hi, Mary! Happy St. Patrick’s Day! Anyway, thanks for this “fail” that, to me, is a win! I love to make couture garments and I immediately saw the lacier, pre-gathered version flattened and used as a buttonhole for a round, jeweled button on a Chanel-type bouclé jacket. This could also be used for edging the pockets, etc. I love incorporating embroidery in virtually every design. Thanks, again!
My thought would be to repeat the circle some way inside the current circle, and then again, with one bigger srone in the middle. I can visualise it but don’t know how to do.
Try it again with dagger shaped beads – I think it would be smashing.
LOL! 🙂 I may just have to do that – although it sounds painful!!!
How about gathering stitches on the underside or outside of the stitches. Then gently pull the stitch together.