


Drawn thread embroidery involves removing threads from the ground fabric (drawing them out – hence the name) and stitching around the remaining threads in an endless variety of decorative ways to create a kind of lace-like effect. Drawn thread is not necessarily categorized as soley whitework, but it is typically seen in whitework, and many types of whitework involve drawn thread techniques. I started my whitework sampler very simply, then, by drawing out threads…
A little information on this whitework sampler: it isn’t a “planned” sampler. I have some ideas in my head concerning where I want to go with it, but there’s no grid or design I’m going by. My point is to work out various whitework techniques and photograph them along the way. Different types of whitework techniques may seem rather daunting, but I want to wipe away that idea and hopefully pique people’s interest in trying out new embroidery techniques.
For the sampler, I’m using a 32-count Belfast linen in a natural color, cut 18″ x 20″, and mounted on an Evertite stretcher bar frame.
Concerning the count of the linen, for newbies to certain techniques, it might be best to start with a lower count, such as 28 or even lower. For most of these techniques, Aida fabric (commonly used for counted cross stitch) is not really a choice. Linen is the fabric of choice for most whitework, though there are some decent linen blends or cotton that can also be used.
For threads, I have a line-up of quite a variety of white threads in various types and sizes: coton a broder, perle cotton, cordonnet, cebelia, floche, some silk (soie 100/3, soie perlee, soie gobelin, soie d’alger), Mountmellick threads, and regular stranded white DMC cotton… and I’ve probably forgotten some. Seems like a mish-mashy sort of mix, and it is! You don’t need this variety to undertake any of these techniques! Some perle cotton #8 and #12, along with white floss, will serve fine for starters.
For tools, I’ve got my tiny Dovo scissors (they’re 3.5 inches, by the way, for those of you who asked), tweezers, a tiny crochet hook (#12 – I find this handy when withdrawing threads), a needle threader, and several sizes of tapestry needles.
Drawn Thread Work – Reweaving the Edge
The first step in this sampler is to work with some drawn thread techniques, so I began by withdrawing some threads and re-weaving the withdrawn threads back into the fabric so that I would have a clean edge. This process is a bit more complicated than other ways of finishing the edge of drawn thread work, but I figured I’d at least do it once to show you.
To make the whole drawn thread process easier, think ahead. To keep it simple, I started with an even number of vertical threads to work over, since I’ll be bunching my threads either in groups of two or four. So I wanted my first drawn thread strip to be over an even number of vertical threads divisible by 4. I picked 80.
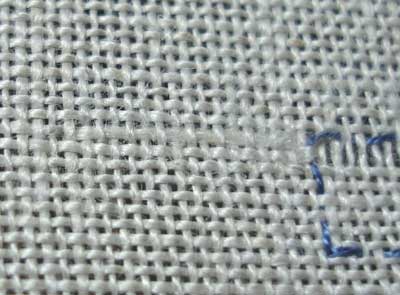
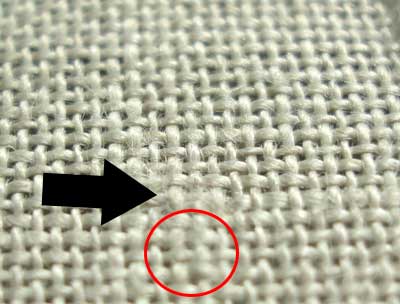
I basted in blue around a strip on my fabric that was 80 threads wide and 8 threads high – or 2.5 inches long and a quarter inch high.
Basting should never be underestimated in drawn thread work – it can save you from accidentally cutting threads that will take you ten forevers to repair. So do baste!
Once my first strip was basted, I starting cutting and drawing out threads. Here we go:
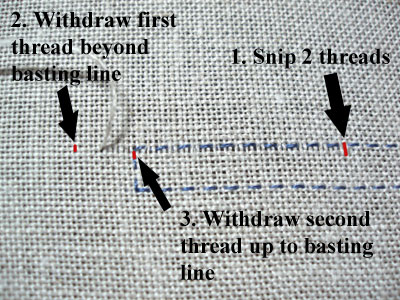
First, snip the top two horizontal threads inside your drawn thread area, at about the half-way point in the strip. I’m going to re-weave the second thread into the holes left by the first beyond the edge of the basting, so it’s easiest to work with a pair of threads at a time, rather than to cut all the horizontal threads at once.
Second, withdraw your first thread to about an inch past your basting line.
Third, withdraw the second thread up to the basting line.

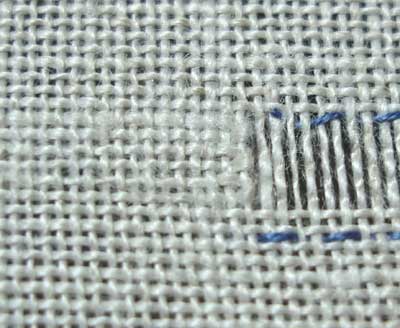
Then… move over to the other side of your drawn thread area, and do the same thing there!
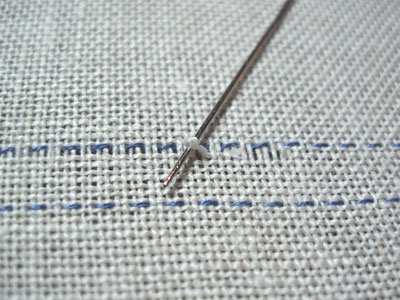
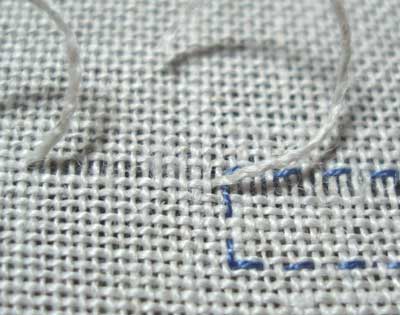
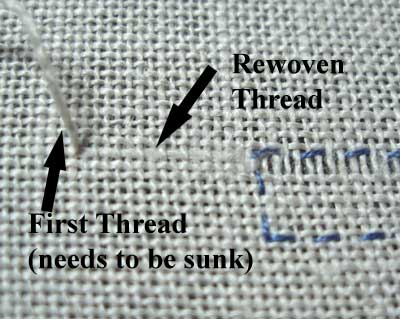
Securing and Finishing Rewoven Threads
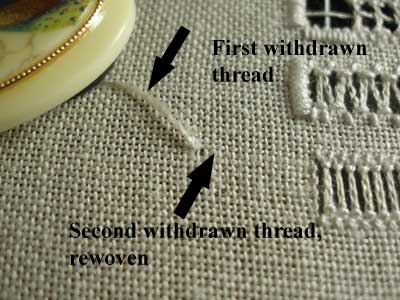
Methods of re-weaving drawn threads vary from book to book. For example, in the old Reader’s Digest Complete Guide to Needlework (I have the 1979 edition that I picked up at a used book sale many years ago, and I love it!), they show every thread rewoven (not every other thread as I showed you above). This creates a rather crammed, tight look on the edge of the drawn thread area. I prefer re-weaving every other thread because of this. In Beginner’s Guide to Drawn Thread Embroidery
by Patricia Bage, the author demonstrates the every-other-thread method. But in neither book do they go into detail about how to secure your threads after re-weaving. They basically just say “trim the threads on the back.”
Well, I do secure my threads, in a way, before trimming them on the back. This is what I do.
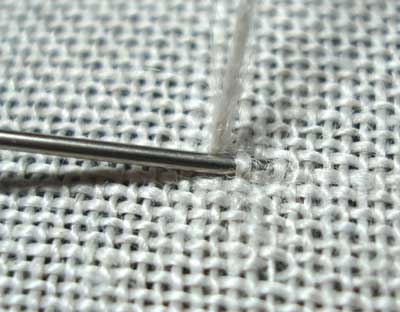
…. And that’s how you secure and finish the threads on the back.
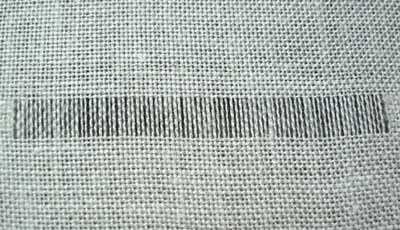
Withdrawing and re-weaving threads in this manner to get ready for the fun part (decorative stitching and bunching of the remaining threads) is, admittedly, somewhat tedious. But it is the only way to provide a finished fabric edge on your drawn thread work. I’ll show you other ways of securing the edges later, but they involve a patch of stitching on the edge, whereas this technique gives you a clean edge that matches the rest of the fabric.
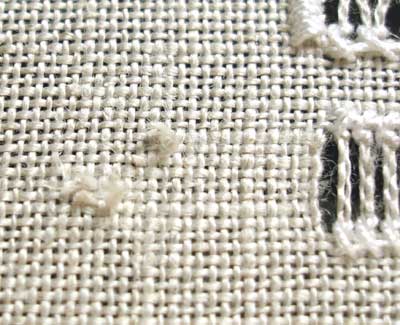
So, after the first venture in drawing out threads and getting into this project, I’ve noticed a couple things: 1. Natural colored linen – it’s a bit darker than a golden wheaty color – doesn’t photograph well, either. I should have picked something darker, like the oatmeal color of my monogrammed towels; 2. an 18 x 20 piece of linen might be a bit too adventurous, if I’m really planning on filling the whole thing up….!
Actually, I’m having fun so far – I’ve managed to stitch a few areas of drawn thread work, which I’ll share with you (along with how-to’s) in upcoming days!
Thank you for this! I have recently made my first attempt at withdrawn thread work (following instructions from an old book on needleweaving)and your instructions on weaving in the ends are very helpful. Can I ask though – when the first thread goes through to the back is it just taken down or woven under the second thread?
Thanks for this post, Mary! I love this kind of work – i name it pulled threads!!!
Sometime ago I tried to explain to my readers how I do the linen towels and I were soooo in trouble in translation to English. I learn to make this reading magazines and trying and trying but I think I always make lots of wrong things…
One thing I couldn’t understand : what happens to the first thread after being taken to the back you don’t have any more an empty path.
Thanks again, Mary
xo méri
This type of work (all whitework embroidery I like so much, thank you very much for sharing Mary.
The explanations of your work are clear, I will follow you!
The last year I saw your monogrammed towels;and
I tried to do..so..I understood that I have much to learn, LOL!
Hugs
Maria del Valle
Thanks all, for the comments!
Ah – good point on the last thread – I’ll write something up on that and take some photos….
MC
Thanks, Mary!
When I do this technique, I pull the first thread completely out to beyond my stitching area, then reweave the second thread completely in it`s place. This only works if the band to be worked is the width of the sampler. The thread I am reweaving also gets very fuzzy sometimes. In your method, what do you do with the first thread after you sink it?
Hi, MJ –
I picked out one of the threads today and took pictures of how I end it. I’ll edit this tomorrow and add the photos. Once the threads are sunk and secure, though, I just trim the backs.
Thank-you Mary! Yes, you really do have readers…your blog is amazing!
That is brilliant, very clear and helpful. Thanks again for taking the time to help your grateful readers.
Thank you very very much, Mary!
x
méri
Mary, thanks very much for this tutorial. That gives such a nice polished look for the fabric edge. I’d always wished mine looked better.
Elizabeth
thank you Mary, for your explanation for what I see, how to hold it as similar to bamboo sugeta when repairing a wicker basket, that is, which is the thread that holds 2 to 1, now has not tried to ask horizontal a pinhead?
regards
Thank you for such a clear description of this work. This will be a first for me and I’m looking forward to starting.
Just curious– could I use “Hardunger Fabric” for this type of embroidery? {Pulled Thread?}
Dragonfire
I have an antique piece of drawn thread embroidery It is beautiful but sections of it are broken. Any way to replace these areas? The thread count is really high and looks like I could drive myself crazy trying to add threads back but it is all I can think of to do. I have never done this type of work but am familiar with the technique.
Ah, Sara! That sounds like a toughy. I take it you’re talking about the threads that remain in the actual drawn thread part of the design? The only thing I could suggest would be to re-weave some of the same sized threads back into the piece from behind, then bring them up into the drawn thread area into the parts of the design where they are missing. With a high thread count fabric, this could be really difficult, but with patience, it could be done. You could anchor the new threads into the stitching on the back of the piece, right around where they are needed, place them in the design where the broken threads are, then anchor them again in the back of the stitching. That would probably work, too. The trick is finding the same sized thread. Is there a hem on the piece? I guess you could take out the hem on one side and remove some threads to use for the replacement, and then hem the piece up again. That would give you the same exact threads to use.
I wish you luck!! Let me know how you get on!
~MC
Hi Mary,
My gosh! Wow! You are so talented, not only at your needlework, but with your explanations as well. Tonight I was glancing through my Better Homes and Gardens Guide to NEedlework and I saw some drawn threadwork there. I thought to myself, that it was really amazing looking but probably way too complicated for me to try without taking me fifty million years to try to understand and figure everything out. After looking at just this lesson, so far, I already feel like I understand and will keep reading your lessons. I will definitely give this a try, maybe even on my nameplate that I am currently working on! After testing on another piece of fabric first. I think it would really add extra interest to the piece and even go with the flow of the look that I am trying to achieve!!!
Thank you again so much for your dedication to bringing great techniques to all of us. It is definitely appreciated!!!
Respectfully,
Mindi Hammerstone
Am totally interested in learning how to do drawn work so found your site quite helpful. My question comes re re-weaving thread #1. After re-weaving thread #2 in thread #1’s place, you take thread #1 to the back and weave it toward the basted outline? It would be woven in the same pattern as thread #2. With no knot or vertical thread to wrap around, what would stop thread #1 from coming out?
I want a book that has all drawn thread.from easy to hard
Thank you! I’ve been searching for about 4 hours regarding this type of needle work and finally (what took me so long) found your page… very clear, very thorough. You are bookmarked and followed!
I have just discovered drawn thread work and have been having some fun with a sampler. My problem with this technique for drawing the threads is that you don’t have anywhere to secure your stitching threads. For example, if you do coral knots, you start in the centre of the drawn section. I’ve been using a waste knot to start with. Originally I intended to take that down and run it througb the back of the hem stitches, but I’ve found that the thread is visible from the front, so it looks messy.
Are there any rules about that do you know? I’ve been wondering if it would be okay to just do some back stitches along the edge. The perle thread is almost the same colour as the fabric, so it would be hardly noticeable.
I can see why people do the satin or blanket stitch edging, as it does solve that problem! But it woukd be nice to know if there was a ‘right’ way to do it.
Dear and Wonderful Mary,
I have been working on some drawn thread work started some time ago in a class. Had no idea (nor instructions) on how to do do an ‘internal selvedge’ to secure threads that had been drawn out and were ‘waving in the breeze’ . Searched and searched for an answer…then finally, and of course, I found this explanation you posted in 2009. Should have searched your website first! Now I can go ahead and tidy up my wee project by following your detailed instructions. So my very grateful thanks are winging their way to you. Take care of yourself. Regards.
Hi. Has anyone used this method for weaving in ends on a garment? I’ve been hemstitching on shirts and aprons, but I’d like to do something bigger. Will this weaving in stand up to laundering?
Thank you much for this article and photos. I was able to follow it all, and then able to stitch the diamond hemstitch. Very well described. I am working on a sample which doesn’t have such clear and detailed instructions as yours.
Since this was an old article, I’m not sure you will see this, but I am hoping! I have re-woven the edges like this many times, but I don’t like just closely trimming the threads on the back. I am always afraid that they will eventually pull out, even though this is for a framed piece and is unlikely to ever be disturbed and the trimmed threads will be on the back side of the piece (back side of the mount board). Is it really stable that way? Should I put a drop of Fray-Check on them? Or is that a bad idea?
I’m not a huge fan of Fray Check on something that you plan to last for a while! It can discolor over time and get brittle. Usually, if I am worried about the end coming undone, I’ll do some extra weaving and tucking! Normally, if a piece is laundered, the fibers are going to start really gripping together a bit more, so I think it is ok!
Hiya would it be possible to do a video of the above technique one day? I’m a complete novice and the thought of cutting threads terrifies me!!
My grandma did this and taught me some when I was little that I’ve since forgotten. Wanted to pick it up again. Thank you for these incredibly well written instructions. Regarding fastening the re-woven threads, and sources not mentioning how to do it, it triggered a childhood memory that that grandma’s patterns either covered much of the fabric or were close to the edge, in such ways that the re-weave thread reached all the way to the edge and the other one got completely removed, so there was no need to fasten. Perhaps this was a common way to do it. Or perhaps it was just my grandma being practical. She was extremely diligent about fastening so I can easily see her bending over backwards to design patterns that would let her do such “perfect and near invisible” fastenings. I miss her so much. Can’t wait for my materials to come in the mail so I can do some “näversöm” as we call it in Swedish in her memory. Perhaps even trick my young kids into trying it too.
Dear Mary,
Your tutorial on reweaving the edges of drawn thread is very clear. I am encouraged to try my hand at this skill and have an excellent reference should I come unstuck. Many thanks, Vyvyan
Thanks so much for this explanation, really helpful!