


Still continuing with the whitework techniques sampler, I’m messing around a little more with drawn thread embroidery. It’s kind of fun to experiment with the different stitches, and although I’m not 100% pleased with the location of this next little bit of drawn thread work, I still think it’s coming out ok. Today, I want to show you how to do the diamond stitch, which can be used in pulled thread work or drawn thread work.
When used in drawn thread work, the diamond stitch serves to bunch together some of the vertical threads. This is how I’m using it in the motif I’m working on now, anyway. In pulled thread work, you would simply pull the threads together to leave little holes in the fabric. It’s the same concept, but you aren’t working without horizontal threads. Hmmm….. that would be better explained in photos, methinks!
But here, I’m working with drawn threads, so please allow me to demonstrate the diamond stitch with drawn thread.
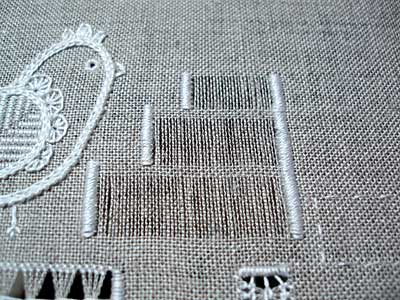
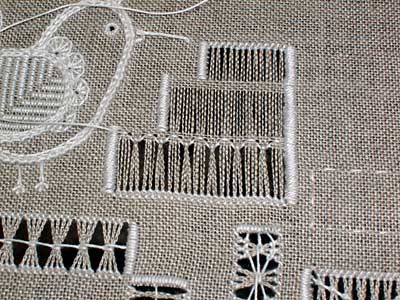
First, here’s the area I’m working on. It’s a three-tiered section of drawn threads, and in between each section of drawn threads, I’ve left four horizontal threads intact. I’m still working in multiples of four here. I’m working the diamond stitch at the top of the lower section, over the area where I left four horizontal threads.

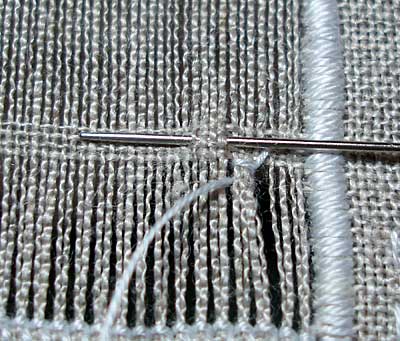
The working thread is anchored on the back, by running it under the satin stitches that secure the edge of the drawn thread area. After you’ve anchored your thread, you want to position your emerging point two threads up in the four thread area, and count in four vertical threads. Basically, you’re stitching over four vertical threads on the half-way line in the four-thread area.
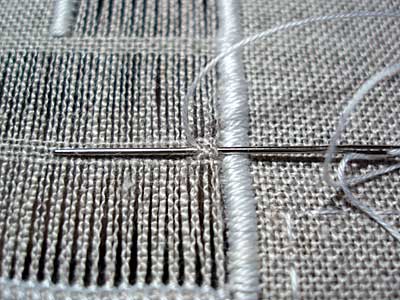
Next, take your needle down four threads to the right, along the same line, and back up through the first hole from which you emerged. Basically, you’re wrapping the working thread around four vertical fabric threads along the same line. Pull the working thread through and pull firmly to tighten the stitch.
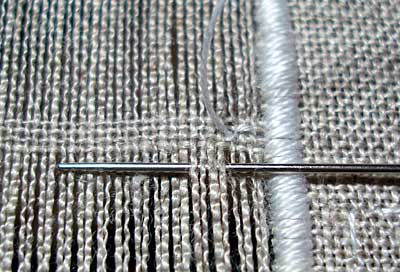
Now, take your needle down, directly under the point you just emerged, in the drawn thread area, and up again four threads later.
Then, take your needle back around the group of four threads, and emerge again to the left of the fourth thread. Here again, you’re basically just wrapping your working thread around that group of four threads.
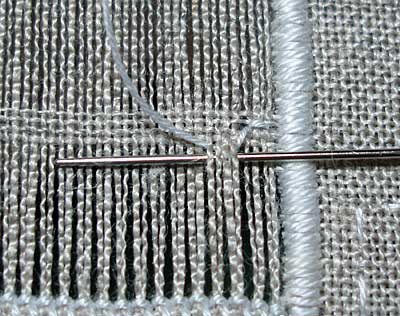
Moving straight up from the point you just emerged, following the vertical threads (so you’re just above them again, in the four-thread area), take your needle down along the same line as the first stitch in the four thread area, and bring it up again four threads later. Now, you’re just going to repeat the stitches.
Pull your working thread through, wrap it back around the four threads, and pull the stitch tight.
Continue working down the line in this manner, until you have completed the bottom of the diamond design.
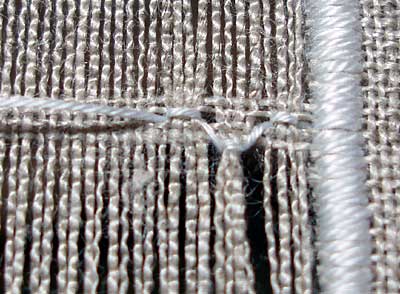
Now, it’s just a matter of reversing the direction of the stitch and returning along the line, to form the top of the diamonds. Instead of going down into the drawn thread area, you’re just going up into it. The stitches in the four-thread area are all in the same holes (so that there are two stitches over the same four threads on the return journey). Pull tight whenever you’re working the middle stitches, so that you get a nice little pulled effect with little holes in the middle of that four-thread area. This will increase the lacy look of the finished area.
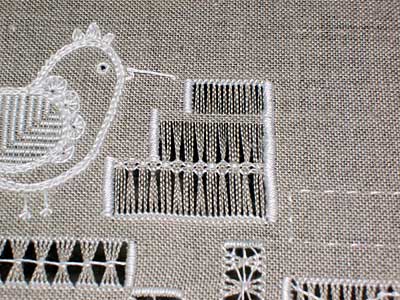
So that’s the diamond stitch. Notice that it bunches together every other group of four threads, and leaves the groups in between straight. That’s ok! For the next step of this section, I’ll work coral knots over the bunches and then through the middle to make a diamond pattern using the drawn threads….
I’ll show you how to do that next time I visit the sampler.
Up later this week – a GIVE-AWAY! Don’t miss the February give-away. I’ll be including some patterns and fibers for you and little fun embellishments. I really need to go through my cabinets and straighten things out again. Whenever I organize, I come up with some pretty good stuff that makes for good stash-building. So stay tuned for that!
Also, I’ve got some reader’s embroidery to show you, a few tutorials, a pattern, and a couple other interesting tidbits from the craft blog-o-sphere. I’m perusing a few books right now, too, so I’d like to review those for you.
Feel free to leave a comment below if you have any questions or input on this technique! Thanks!
More Drawn Thread and Whitework Embroidery
Drawn Thread – Securing Edges with Re-Weaving
Drawn Thread – Securing Edges with Satin Stitch
Drawn Thread – Hemstitch Tutorial
Drawn Thread – Chain Loop Bunches
Sampler Update with Schwalm Embroidery
Online Book on Drawn Thread Techniques
Wow. Let this be a lesson: Always proofread carefully before posting… I sure said “basically” a lot in that article. Drove me nuts just to re-read it!
Ladeeda deedumdeedoo….
MC
Hi Mary!
I’m following all these lessons about drawn thread work and I’m delighted! Thanks for your clear words and photos!
I read carefully but sometimes my English isn’t enough to understand everything clearly.
Let me know what is the difference between “drawn thread work” and “pulled thread work”, pleeeeeease! Haven’t to draw and to pull the same meaning? I thought they were the same work… I’m still a little slow recovering from a very bad flu… so I think I have an excuse for my naive question…Sorry!!!!
I seem to overuse the term “so” on my blog posts, SO I understand what you mean about basically 😉
I am really enjoying these posts on drawn thread embroidery!
Hi, Meri –
Well, maybe it’s a matter of translation… in English, “pulled thread” is embroidery done with tight stitches, so that the stitches pull on the threads and leave open holes. “Drawn thread” means that you take some of the fabric threads out of the fabric – you cut them and draw them out, and then embroidery on the remaining threads. So in these techniques, I am taking the horizontal threads out of the fabric and embroidering on the vertical threads, grouping them together. But in “pulled thread” (like the top of the pomegranate in the Schwalm motif, or the inside of the large side “leaves” or “pinecones” in the Schwalm motif) I did not remove any of the fabric threads – I just pulled the stitches tight, to make open holes in the fabric.
I hope that helps!
Mary
Hi, mub –
I notice I say “so” a lot, too – I also use the word “anyway” a lot when I write! I never notice it until after I’ve finished writing and re-read… then I try to adjust it. But sometimes, “so” and “anyway” are the only words that fit!
MC
Thanks, Mary! As usual you explain very well the difference. I have to write it somewhere, then everytime I “make a knot in my brain” I’ll have your answer near-
Dear Mary
I follow you step by step through each post, of this magnificent work and I enjoy it!!!
Thanks so much by your lessons
Maria del Valle 🙂
Your sampler is just beautiful! You are so gifted. I hope you will be including some Mountmellick work!!!