


One of the most interesting aspects of drawn thread embroidery is the way the remaining threads are grouped together for decorative effects. There are heaps of ways to group together threads! And I’m not even sure all books agree on the names of the techniques. On one drawn thread area on my whitework techniques sampler, I worked a line of what I call chain loops. They’re a kind of half chain stitch that holds the bunches together. This isn’t to be confused with the coral knot used in drawn thread work, which is sometimes just called “knotting.”
This is a simple way to bunch together groups of threads in drawn thread embroidery – and the result is a very basic “decoration.”
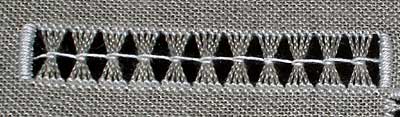
Notice that there’s no knot in the thread that’s running through the bunches. Rather, there’s just a kind of “hook” that looks a bit like a chain stitch.
This method is an ok way to bunch threads together on an item that is not utilitarian. If you’re practicing bunching threads for a sampler or something that will be framed, then this is fine. If you’re making a pillow or some other utilitarian item that will eventually need to be laundered, I wouldn’t use this method of thread bunching, personally. Without an actual knot in the thread, I don’t know that the loops will hold up and keep their proper tension.
For bunches to look good in drawn thread work, they need to be even. In the row pictured above, I began by hemstitching the top and bottom of the row, grouping together two vertical threads. Since I’m bunching up groups of 4 (each group made up of 2 vertical threads), before I started, I made sure I had enough vertical threads. I withdrew horizontal threads over a number divisible by 8. If I only wanted to work three bunches of two together, the number of vertical threads left would be divisible by 6.
I really don’t like the whole counting aspect of drawn thread work, and it’s true that you can hedge a bit on some of it, depending on your project, but when you’re working a sampler where the stitches and bunches and so forth are all very visible, it’s a good idea to count accurately.
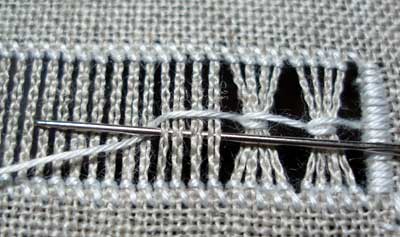
Once the hemstitching is complete, you’ll start with a new thread. Anchor the thread on the right side of your strip, so that it emerges at the half-way point on the right side. Then, take the needle under the bunch of threads you want to pull together, and take it over the working thread, just as you would do with a chain stitch in regular surface embroidery.
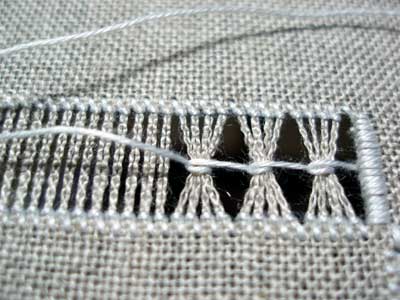
Pull the needle forward through the loop along with all of the working thread, pulling tightly enough to bunch together the vertical thread groups in the fabric.
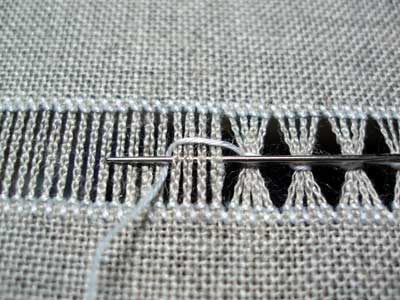
Continue down the row in the same manner, until you finish the last chain loop over the last bunch. Take your thread to the back at the half-way point of the edge, and weave it under your edging to secure it.
And that’s pretty much it. It’s not the most decorative way of bunching threads together, but it works ok for a simple effect. I prefer (personally) using a coral knot, but for getting started, this is an easy way to get an idea of bunching threads. Don’t worry – I’ll show you the coral knot (or “knotting”) in an upcoming article.
In the meantime, I’m still just messing around with the whitework techniques on this sampler. I’ve played a bit with Schwalm – just enough to make a few mistakes and learn a few useful things. I’ll be sure to show you what I mean this coming week!
And phew! I’m glad it’s Saturday! I’m playing catch-up this weekend, which is not always fun after a rat-race-week. I hope you’re able to get some stitching in and that you enjoy the weekend!
I am enjoying this Mary- almost as much fun as doing it myself! For me counting is the most difficult bit – now I find that I need to thread mark every 10 threads to prevent mistakes and use as a check all the way along – taking out the threads is a nuisance but, nonetheless,worth the angst.
Me encanta el calado pero no se consigue mucha información sobre eso yo he aprendido por Youtube..
Hi, My Grandmother taught me something similar but a lot more intricate called tatting. I have since forgotten how to do it. This is beautiful and it brings back memories.