


Bunching threads together in different ways and embroidering over the threads using knots and so forth is what makes drawn thread embroidery pretty. It’s the bunching of the threads that gives it a lacy look. One of the most common (and I think most attractive) ways to achieve a nice bunch of threads in drawn thread work is by using the coral knot. So here’s a little photo tutorial to show you how that’s done.
The coral knot in drawn thread embroidery is not that different from the coral stitch used in regular surface embroidery. Essentially, the movements of the stitch are the same. The difference is, of course, that you don’t have a regular ground fabric in drawn thread work, so the line created by your working thread doesn’t come out looking “couched.” Instead, it looks like a thread with knots in it that hold together bunches of vertical fabric threads.
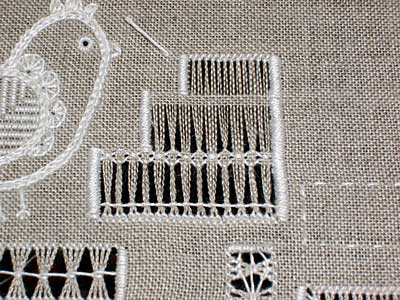
To begin, I’ve already finished my edges using satin stitch and withdrawn the vertical threads. I’ve also hemstitched the bottom of the drawn thread area over two threads. At the top of this piece, I’ve worked Diamond Stitch, grouping together every other four threads.
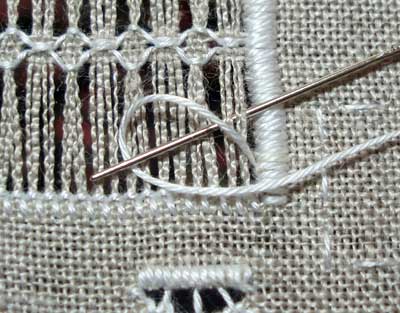
Anchoring my thread in the satin stitch bars on the side, I brought it up on the right side of the drawn thread area right where I wanted the line of coral knots to run. With the needle and thread at the front of the fabric right next to the satin stitch bars, I brought the needle down behind four vertical fabric threads (that’s two groups of two hemstitched threads) and back up again, underneath my working thread and inside the loop formed by it. (The working thread is looped over, then under, the needle.)
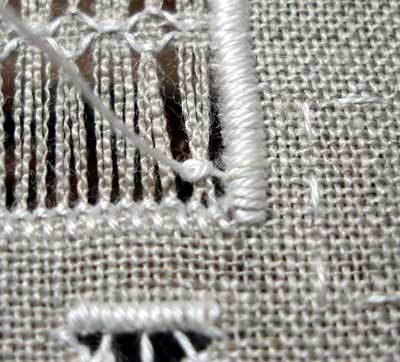
Pull the needle and working thread through the loop, pulling the loop firmly so that the fabric threads bunch together. I find that it helps to pull the working thread forward and upward rather than simply forward on top of your fabric, in order to get the knot to situate itself in the middle of the bunch.
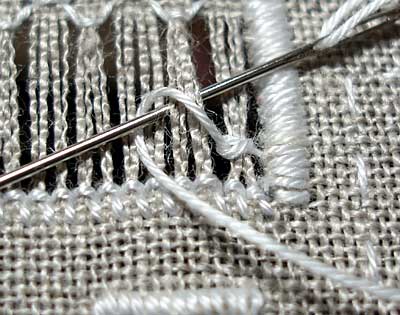
Moving on to the next coral knot, take the needle to the back of the next group of four threads and to the front again (in one motion – “sewing” rather than taking your hand to the back of your work!). Come up underneath the working thread again, and inside the loop.
The stitch requires you to come up from the back, then wrap your working thread up over the top of your needle, then down underneath your needle, to form this loop. It’s easier, though, if you simply leave your working thread looped forward on your fabric and you pass underneath the working thread then up into the loop.
Again, pull the stitch tight by pulling forward and upwards on your working thread.
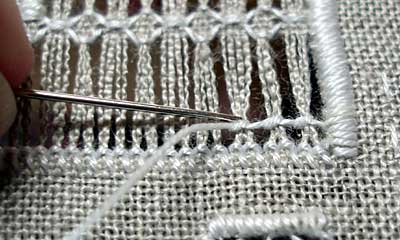
To keep the line of knots straight, you can use your needle and nudge the knots up or down on the vertical threads, so that you situate them right where you want them.
Work all the way across to the other edge of your drawn thread area, then take your thread to the back and anchor it under the satin stitch bars.
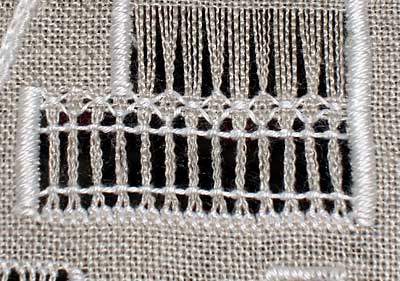
On this piece, I worked a line of coral knots at the top and bottom of the drawn thread area. As tempting as it would be to slide your working thread up under the satin stitch bars to begin the coral knots going from left to right (on the return journey at the top), don’t. The knots in the lower row are moving in the same direction – if you switch the direction of your stitch (and you’re still working with your right hand), the knots will look different.
For left-handers, the stitch is worked from left to right, and the looping of the working thread is the same.
That’s the coral knot! Have fun with it!
More Drawn Thread and Whitework Embroidery
Drawn Thread – Securing Edges with Re-Weaving
Drawn Thread – Securing Edges with Satin Stitch
Drawn Thread – Hemstitch Tutorial
Drawn Thread – Chain Loop Bunches
Sampler Update with Schwalm Embroidery
Online Book on Drawn Thread Techniques
Diamond Stitch in Drawn Thread Work
You can find more tips and tricks for hand embroidery – including all the above tutorials – indexed on my Tips and Tricks for Hand Embroidery page.
beautiful, and great tutorial. So great, that I’ve tried to move the needle with my mouse to see the threads under it… 🙂
Thank you once again for a clear tutorial with very helpful photos. Such neat knots! And the diamond stitch looks good too.
I’m so excited about this website! ! As a reasonably adept beginner, I’m chomping at the bit to learn more, do more and be proud of more hand embroidery. I truly am grateful to you Mary for helping me create “works of art” which I will hand down as heirloom pieces to my Granddaughter and HER grandchildren! ! I need to build up my inventory of threads, books, etc. I am impressed by Donna Kooler’s “Encyclopedia of Needlework,” as it runs the gambit from beginners to pros..(me to you, Mary…(smile) and Thank You Again….Judy Cain…Pittsburgh, PA
It’s looking very pretty!
I am delighted to have “discovered” your website – a wonderful encouragement!
I have two fabulous books from the A-Z series, one is A-Z embroidered flowers, the other A-Z of embroidery stitches. They are both well worn and much loved resources.
And it looks like your site will be the same.Thank you so much.
Kathleen
i don’t know if i did this right or now, but here goes
I’m very new to embroidery and everything I learn is on line…….I’m hoping to get the a=z embroidery, so much i want to learn……wow, those threads are awesome, so many i haven’t seen
jan in indiana
Thank you so much for the detailed tutorials! I’ve done basic embroidery, but am new to white work and would like to try it… What type of thread are you stitching with (in general, not the brand)? It almost looks like the fine crochet thread one might use to make a doily? I live in Ecuador – there are needle craft supplies available, but most of them don’t come with the same size/gauge
listed on the skein I might find in the States, so generalities are better for me that exact sizes. 🙂 Thanks for the help; I’m inspired by your beautiful work! 🙂