


It’s time for Lesson 7 in the Long and Short Stitch Shading series here on Needle ‘n Thread! In this lesson, we’ll be working element #6, the leaf in the center right side of the sampler.
If you’ve just popped in, you can find the rest of these lessons on long and short stitch in the Long and Short Stitch Lesson Index. We’re working incrementally through a small sampler in order to practice filling and shading with long and short stitch.
In today’s lesson, the leaf that we’re working is pointind downwards, and it has some little spikes on its outer edge. We’re going to be working from a dark edge to a lighter center. Other than the shape and the direction of the color changes, the concepts are much the same as those used in Lesson 6, where we stitched a simple flat leaf shape. We’ll be cutting in a bit of color for shadows on this leaf, but I think you’ll find, overall, that this leaf is fairly simple if you’ve already worked the flat leaf in Lesson 6.
For this lesson, you will need the following colors of DMC stranded cotton: 469 (dk green); 471 (med. green); 472 (med-lt green); 613 (pale green); 3012 (med. olive green) and 814 (burgundy)
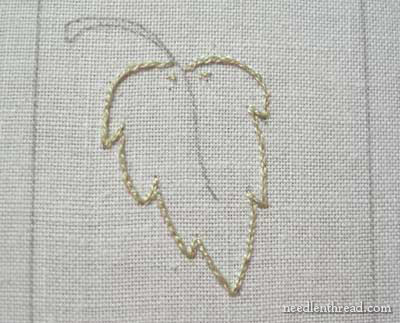
Split stitch the outline of the leaf. To do this, you can use 469 (dk green). I used 613 (pale green) because I was planning different color placement, originally. If you are afraid you won’t cover your split stitch line completely, use the dark green because it’s the color on the outside of this leaf. If you don’t generally have problems with the outside edge, it really won’t matter which green you use for the split stitch outline.
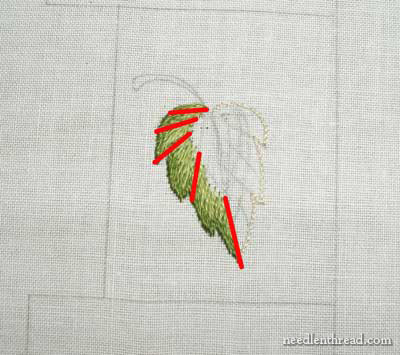
Draw in your directional lines and your shade spaces. I’m afraid I made another mess with my pencil lines, so here’s a cleaned up version so you can get a better idea of where to sketch in your lines!
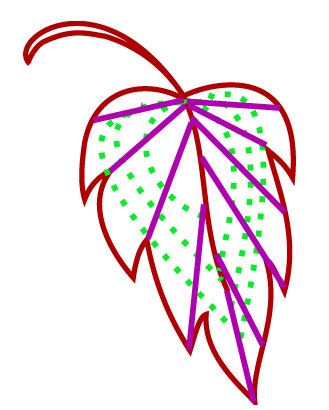
The dark purple lines are stitch direction and the green spotted lines indicate shade changes.
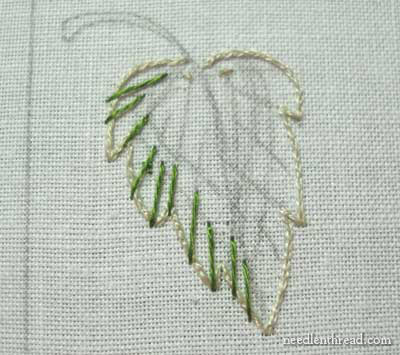
Beginning with the darkest green (469) and working on the left side of the leaf, stitch in directional lines for the outer edge of the leaf. Fill in between the directional lines with long and short stitch, in the same manner covered in previous lessons.
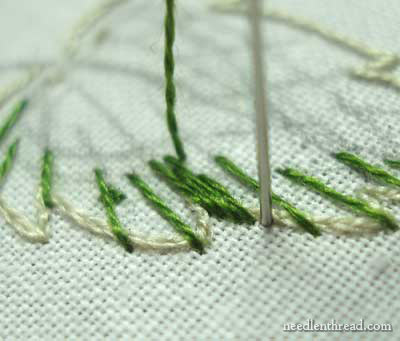
As the stitch direction changes, the stitches “fan out” a bit – that is, they are closer together on the inside of the leaf, and slightly farther apart on the outside of the leaf. Notice that there is some tiny space there between the stitches next to the split stitch line. This won’t be noticeable at all, because the “fanning” out of these stitches isn’t that extreme. If, however, you notice that, in fanning your stitches out so that they lie in the correct direction, there is a noticeable space between your stitches at the split stitch line, take a small stitch over the line (forming a “short stitch”) to cover up the split stitch line. Tucking in a little stitch here and there to fill a gap is not only fine, but it’s often quite necessary!
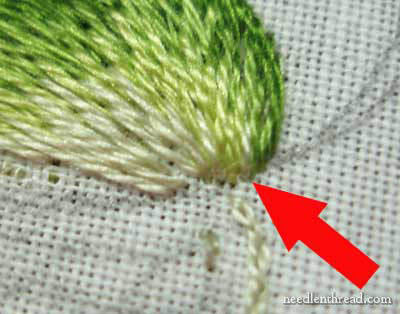
Work long and short stitch in dark green around the outside edge of the leaf, filling it in completely. Your long stitches may be as long as a quarter inch here.
On some parts of the leaf, where the little spike sticks out, you can take one stitch from the tip of the spike and completely cover the split stitch line with it (it will run in the same direction as the split stitch line, so you’ll basically be stitching a straight stitch from the tip of the spike on top of the split stithch line to cover it up.
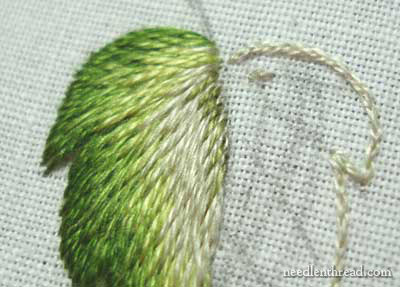
After you’ve finished the dark green all around the left side of the leaf, change your thread to medium green, 471. This will be your second layer of color. Remember to go deep into the first layer as you stitch, and to alter where you start your stitches, so that the starting points don’t create a line on the leaf.
Here’s the stitch direction again.
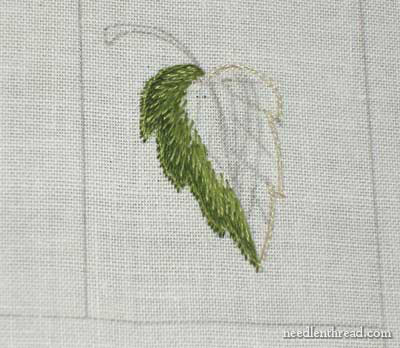
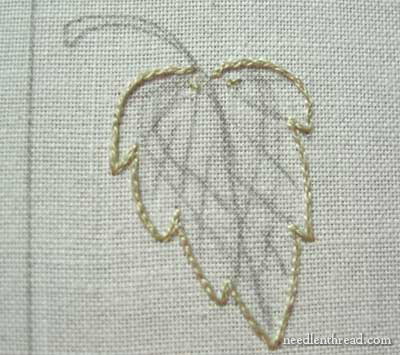
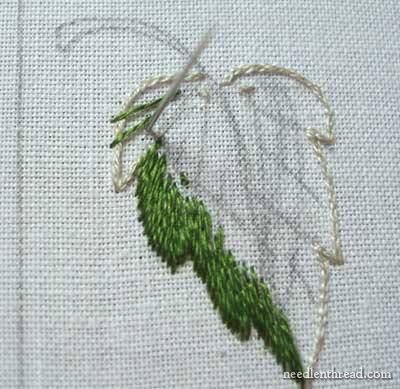
And here’s the completed second layer. Once you finish the second layer, switch threads to med-light green (472) and stitch the third shade of color towards the center of the leaf, leaving room for one more shade.
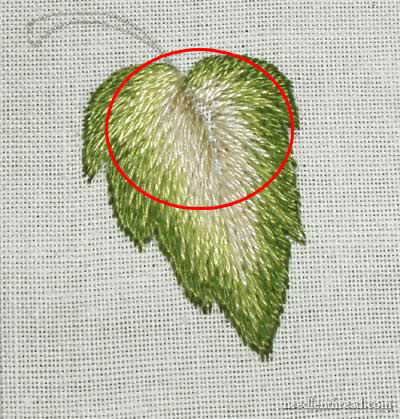
As you get to the base of the leaf with the third layer, you will probably be running into the center vein. That’s ok. In this area, which is slightly crowded, you can take the third layer of color all the way in to the center vein. This is the circled part in the photo above.
On this leaf, you want to keep your central vein area as neat as possible, and you want all your stitches to meet, if possible. Although you will be stitching a vein as you did in Lesson 6, the vein on this leaf is not as thick.
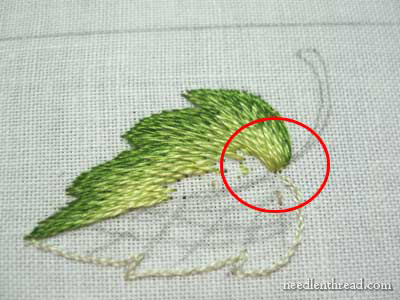
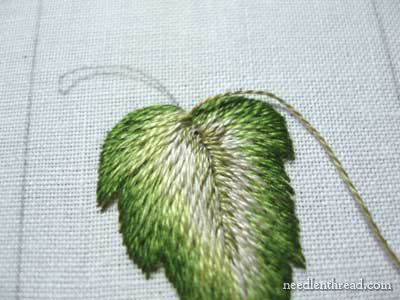
This is what the leaf should look like after stitching the third shade of green. Now, switch your thread to the palest green 613. This is the color you will use to fill in the center of the leaf.
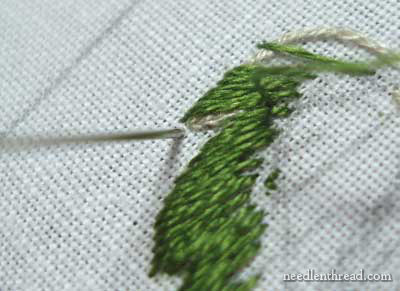
Notice in the photo above that I “cut in” some small stitches in 613, into the stitches that have already met the center vein at the base of the leaf. This is to lighten up that area, so that the color change does not seem so drastic.
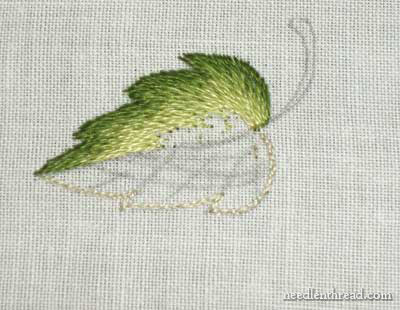
Finish filling the center area with 613, taking your stitches all the way to the vein line in the center of the leaf. Once you’ve finished filling the
center with 613, change your thread again to color 3012. In the very center of the leaf, where 613 meets the vein line, “cut in” some tiny stitches in 3012, to create a shadow along the vein line.
I’m not sure if “cutting in” is a legitimate term. That’s what I call it when a few tiny stitches are being added to an area where the color is already stitched in. So, basically, you’re splitting stitches that are already there – you don’t have any filling space left, so you’re just adding these tiny stitches into the stitches already there.
You’ve pretty much finished the left side of the leaf, so now it’s time to move to the right side.

Again, stitch in directional lines with dark green, 469.
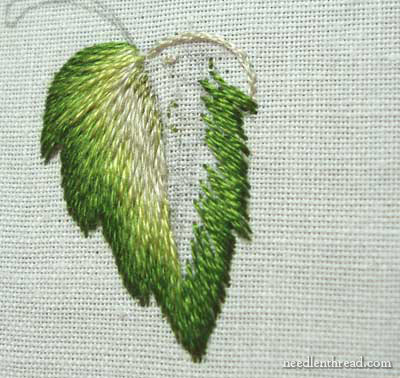
Fill in the dark green in long and short stitch on the outside edge, from the tip all the way to the base. Make sure you cover the base split stitch line.
Now, switch to color 471 again, and stitch the next layer of color. When you finish the second layer, it should look something like the leaf in the photo above.
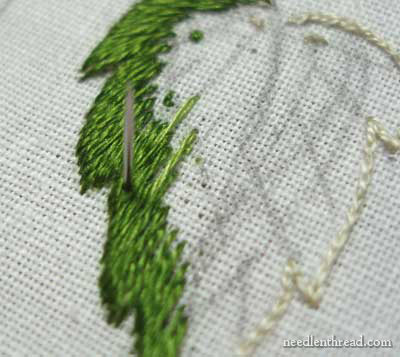
Now, you’re going to switch directly to the palest green (613), skipping the light green layer. Fill to the center, with the exception of a small area, as shown in the photo above. Change your thread to medium olive green (3012) and fill in the remaining area.
You can also “cut in” some tiny stitches of 3012, all the way up the vein line towards the tip, as shown in the photo above.
Once you finish filling in a bit of a shadow next to the vein, take your thread to the base of the leaf, coming up in the center on the vein, and work a long split stitch line along the vein in 3012, to help define the center of the leaf. The “vein” you are now stitching should not extend all the way to the tip.
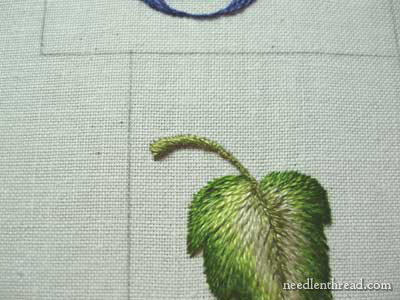
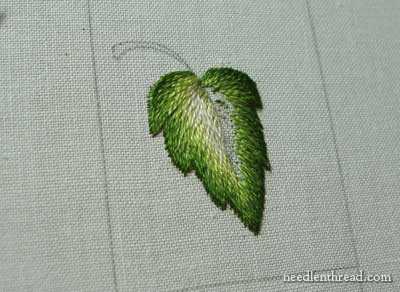
For the stem, I split stitched around the edges in 3012, and then satin stitched in the same color all the way down to where the stem meets the leaf. As the stem narrows, the satin stitches become very tiny.
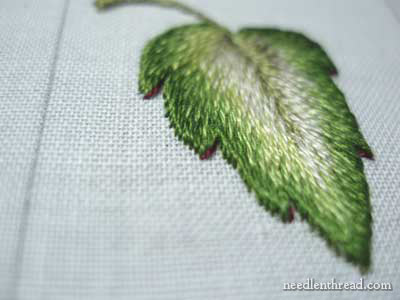
This is the leaf so far. The stem is a bit too large for the leaf, methinks!
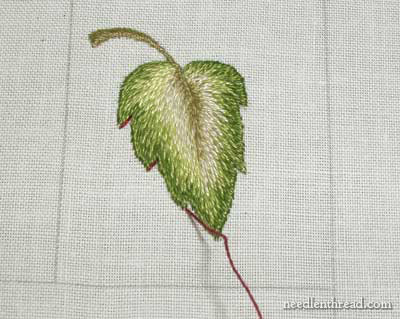
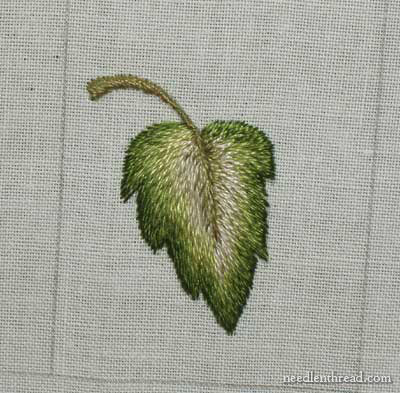
Now, to make the leaf pop out a bit, I took the burgundy (814), and stitched a tiny straight stitch in burgundy on the inside edge of each spike on the leaf. This may look better in a darker brown, but I used the burgundy since it is on our color list. If you have a darker brown on hand and want to use it instead, feel free to do so!
Ta-dum! You’ve finished Lesson 7! Only two more lessons to go!!
If you want to visit the other lessons in this series, go to the Long and Short Stitch Lessons index, where you’ll find the whole list of lessons so far, including one with three videos demonstrating long and short stitch.
If you’re following along with the lessons so far, you can add your photos to the Needle ‘n Thread flickr group if you would like feedback on your progress.
And, finally, here’s a PDF version of this lesson, if you’d like to print it out:
Lesson 7: Long and Short Stitch Shading – a More Complex Leaf (PDF)
Enjoy the lesson! Feel free to ask any questions or add comments below!
Mary,
This is just brilliant, so beautifully stitched and photographed. I must say it's one of the best 'lessons' I've ever seen. I'll be printing out the PDF, thanks!!! You're a gem!!
I just have not been able to find a source for good linen for embroidery. Do you know of a good online source in the US?
Thanks much……
Hi Mary,
I would like to ask you a question about long and short embroidery. It may seem silly, but I would like to get clarification from you. Whenever I do long and short embroidery I feel happy with the output, however, if I hold it against a light source, I could see some gaps in between the stitches. Is it OK as long as I don't see any gaps when I see it without a light source at the background? I beleive you will answer my query.
Thanks!
Mary
manythanks
it's so well explained!!and your photos :splendid
I'd just finished the bloc one and started the bloc 2.I think I have made a bad choice with my fabric i's too fine but I go on!!
Michèle
These lessons are an incredible amount of work Mary, and are much appreciated. I'm printing them off and will save them for when I get some time to 'play' with the stitch. Thank you!!
Dear Mary, in finding your website and blog, I feel I've died and gone to embroidery heaven. I have spent many hours here and am currently viewing my way through your video tutorials, which I save which my "reward" at the end of the day. A thousand thanks, really.
I have the same question as Cynthia, above, regarding your sources for good linens on which to embroider.
Hello, all –
Thanks so much for your encouraging and kind comments. I like putting together these kinds of lessons, and I hope to be able to do more in the future, on different techniques. We'll see!!
Ahhh – LINEN. I love linen. I buy linen from lots of sources and I keep a pretty good supply of "favorite" linen in stock, using it sparingly. Instead of listing here a whole bunch of suppliers, wha tI'll do is write up a post on the subject. I'll have that up this Saturday some time, if that's ok. That way, the shops get a little more coverage, and more readers will be able to find the information (sometimes, info gets lost in the comments!)
So – Saturday. I've made a note to myself and stuck it on the front of my computer screen. If you don't see the post some time on Saturday, you'll know I've gone blind. 🙂
MC
As the others have commented, thanks for taking the time to make these excellent video tutorials. Especially since, as you've noted on your blog, you have so little spare time for your own stitching during the school year.
I have THIRTEEN leaves to stitch in an upcoming stumpwork class, so you can bet I'm avidly watching these leaf-shading videos.
Looking forward to the linen post.
oooo….the leaf looks beautiful. I can't wait to do it!
Looking forward to Saturday's post!
I'll begin this leaf this weekend…
This is beautiful!
Thanks for your precious time with us, Mary!
Ah – sorry – I meant to answer this question about gaps in long and short stitch. This is actually a difficult question, and it can be considered two ways:
1. gaps on the front of the embroidery. While stitching, you might not see gaps in your stitches – and yet, when you hold it under different light, you can. Consider that your embroidery may be viewed under all kinds of different lighting conditions – do you want the gaps to be visible? Probably not. If you have gaps in your long and short stitch on the front of your embroidery, and the gaps are visible when you scrutinize your work under good lighting, you should take measures to correct that. That being said, there are times when the slightest "gap" (especially at the edges when 'fanning' stitching out towards the edge) is really NOT visible, unless you are really being scrupulous in looking at the piece. What you want to avoid are gaps that show up under regular scrutiny – not gaps that you imagine are visible to everyone, but really are only visible to you because you know they are there. It's a difficult question to answer, in this regard.
2. "Gaps" from backlighting. You hold your needlework up to light, and you see that your long and short stitch seems denser in some places and not so dense in others, and so it seems that there are visible gaps. It's usually not the case. The stitching is denser in some areas, so if you backlight your embroidery, you are going to see different levels of light. It doesn't mean that you've failed to cover the area with stitching. It's interesting to backlight the work now and then, but don't judge the overall finished look of the embroidered area while looking at it in front of a light source!
Anyway, I hope that helps!
MC
Mary you are such a perfectionist and a born teacher. I have kept and treasure each lesson and will be working on them real soon. I can see where my heart and hands are headed.
Linda
Such a beautifully stitched leaf and so well explained. You have a great site, i may already have told you!
o passo-a-passo ,pensei que sabia mas aprendi muito,obrigada.desculpe não sei ingles o suficiente para entender e não sei ainda acessar o tradutor on-line,sorry.Mas gostei muitissimo de acessar você.Peço permissão para fazê-lo outras vezes.obrigada.
i just started 1 on Trish Burr’s tiny bird kits (i can embriodery any stitch but long/short) it looks ok, but this tutorial was the BEST i have watched or seen in books. thank u sooo much. i cant wait to start again on that wee lil bird now and with more confidence. i bow 2 thee.
i forgot to thank u for the time and effort u have/and are spending 2 share your teachings and beautiful pics.
Wow! Thank you. I am a beginner, the information you’ve
provided from your site is priceless. Please keep sharing your projects and tricks and secrets.
You are giving me the skills and knowledge to enjoy
this hobby.
Merci beaucoup pour ce partage.
Vous avez une bonne technique.
Bravo à vous
Tal
Perfecta explicación, muy clara y detallada. Gracias por compartir.
So beautifully stiched.I liked it.
thanks so much for tutorials they are very helpful… I am just learning how to embroidery at age 75
I like very much the work of the leave I will try to reach the first lessons because this work is amaising thank you for charring your work
Dear Mary,
I wish to thank you for an awesome way of teaching embroidery. I am 58 and only recently started embroidery. I have been sewing and knitting and crafting for most of my life. Always busy. Idle hands are just trouble, my grandmother used to say.
So I started to Google embroidery and did not have to go very far after finding your site. I learnt so much and it was so easy.
Thank you.
Regards.
Mari Molino
Thanks, Mari! I’m glad you enjoy Needle ‘n Thread!!
Beautifully done and very well explained. Thank you.
You are such a wonderful teacher
Your tutorial are so clear and easy to follow
thank you so much for sharing your knowledge and skills
Thanks, Leonie! I’m glad you like my tutorials! 🙂
Thank you so much, Mary
What an informative tutorial! You explain and show how- to very clearly.
I have been given a design of a garland of anemones on linen and the instructions say to use 3 threads throughout. I’ve just started but it’s looking so” chunky!”
Yes, three strands in needlepainting (or long and short stitch shading) will produce a very chunky result. If you want something that looks smooth, well blended, and practically painted, using one strand will achieve that result. It’s a little harder to see and definitely a little more “fiddly,” but it’s the only way to go if you’re after that realistic looking shading.
Excelente
Gostei muito da sua explicação da folha obrigada
Seu ensinamento foi perfeito. Amei, muito obrigada
I was looking all over for this kind of explanation on this kind of leaves, thank you so much.
Thank you for your long & short videos and other instruction in it, I have been struggling with this stitch . I have been doing a whole length across. Tomorrow will see me following your 3 videos I feel so much more confident of success, I thought I would be doing 1″ squares for eternity but now feel I will shortly move onto a shape.
Your web site was a gift from my friend who knew she would not be here to help me in the future so I think of her with love and thank you for your continuing help.
Hilary