


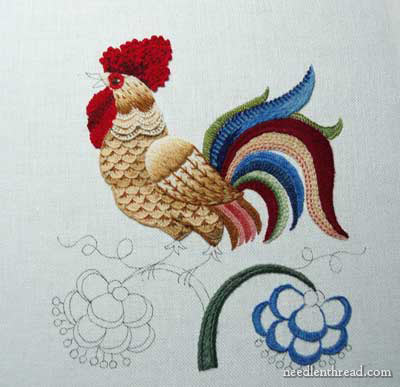
Crewel embroidery is definitely different from regular surface embroidery, as far as the threads are concerned. Wool thread is not at all like working with silk or cotton! There are, however, some wool threads that are easier to use than others, and I had occasion to use two “easier” wools on the head of the rooster – specifically, on his crown. But before we get to the crown (which I’m sure must have a more technically correct name….), I’ll show you my finish on the actual head. Keep in mind, again, that this is a stylized rooster. In truth, the head of this bird doesn’t look a bit like any rooster I’ve ever seen!
I set about to embroider the head of the rooster using Appleton wool, as it’s the only wool I have a creamy white color available in. I planned for the head to be stitched in long and short stitch, from very light (creamy white – like on the top of the wing), through the three shades of gold already used on the body, ending with the darkest. So, in that rather smallish head space, my plan was to use four shades, and it worked out pretty well. The head and the crown, in fact, are the only parts of this whole venture that didn’t get stitched twice so far!

I began by stitching around the whole head in split stitch, in the creamy white. I split stitched the head, and then across the top scallop line of the larger scallops on the neck, so that the whole head was surrounded with the creamy white split stitching. (Unfortunately, I forgot to take a picture of just the split stitching!)
Then, beginning up by the beak (which doesn’t look a thing like a rooster beak!), I started long and short stitch, working down the head. I left the eye blank.
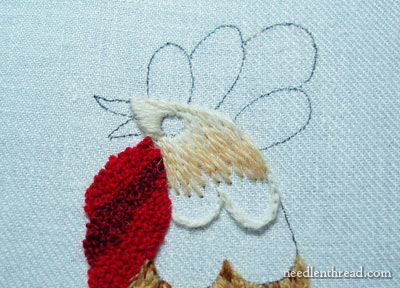
Who would have ever known that the rooster and the shark were remotely related? I think my rooster proves there’s a familial resemblance between the two creatures. The whole time I stitched this, a little voice inside my head was screaming, “Shark! Shark!” I swear I even heard the music from Jaws….
Regardless, I fearlessly continued to stitch, filling in the head with the gold colors found in the body. These are all Appleton crewel wools.
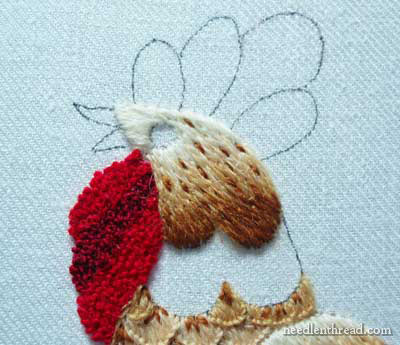
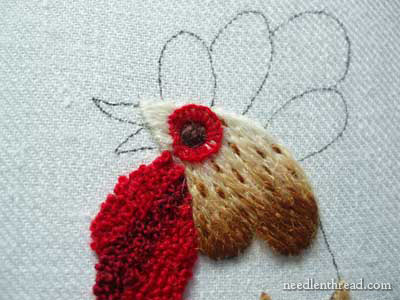
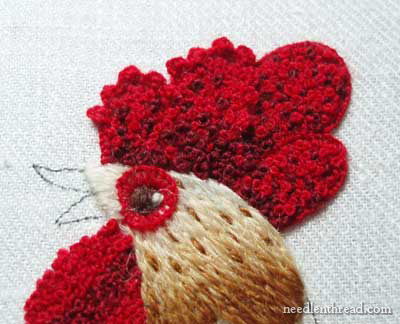
I finished off the head in the darkest gold-brown (the same color accenting the wing), and then I bespeckled the head with small straight stitches.
The base of the head looks a little dark, but I planned to lighten it up later with some stuff around the neck.
The blank eye was still looking rather sharky, so it was time to do something about that.
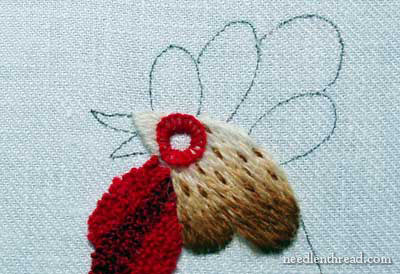
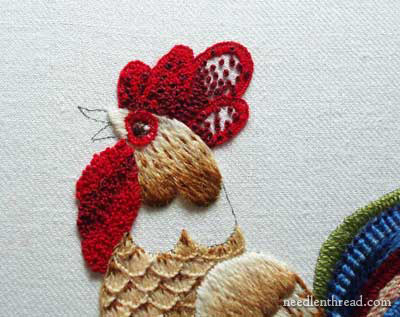
A wee bit o’ red around the eye area – a buttonhole wheel, to be precise, stitched with Bella Lusso merino wool – began to remedy the eye situation.
I thought about filling in the eye with black, but I was afraid that the black would Really Stand Out, since nothing else on the whole piece would be worked in black. Besides, I didn’t have any black wool. So I filled in the eye with dark brown Appleton crewel wool, in satin stitch.
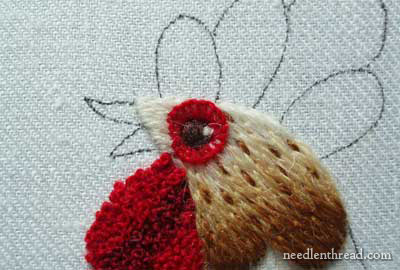
Then I jumped back in with two little stitches in creamy white, to add a glint and pick the eye up a bit. I didn’t want it to look like a sunken hole in the middle of a red ring.
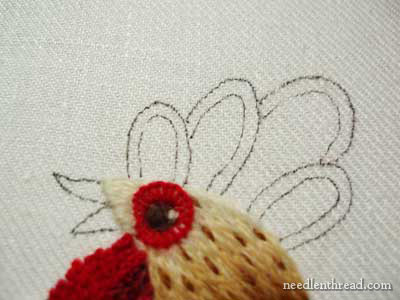
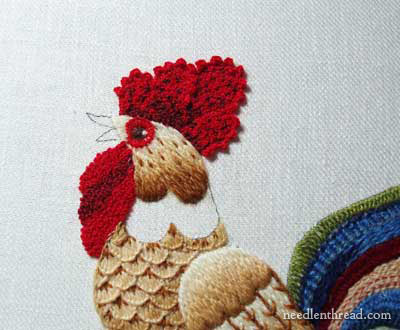
Sorry for the poor color and out-of-focus shot here, but I wanted you to see the lines I drew inside the scallops on the crown. They’re drawn in about 1/8″ from the outside lines on each scallop.
Using Bella Lusso merino wool, I embroidered an outline around each scallop on the crown in buttonhole stitch, so that the twisted edge of the buttonhole stitch was on the outside line of each scallop. I wasn’t worried too much about perfection in this buttonhole stitching, because my plan was to cover most of it up, anyway.
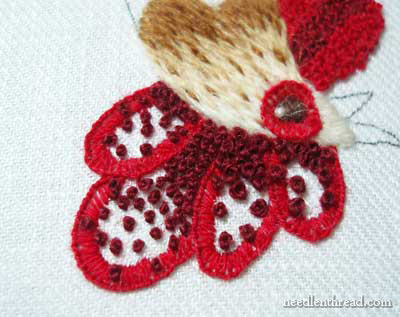
I often turn my work upside down in my stand clamp, to better reach the top edge of the embroidery design. Using D’Aubusson wool in brick red, I randomly stitched in some French knots all over the crown, even on top of the buttonhole stitches around the edges. At the base of the crown, the dark red stitches are denser – I was hoping for a kind of mottled shading.
Then I started filling in around the dark knots with the brighter red Bella Lusso.
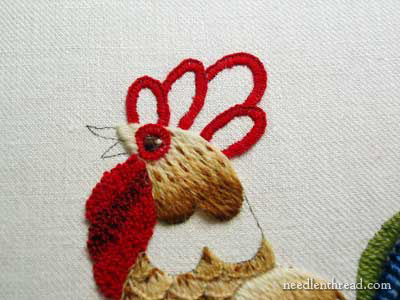
I’m afraid I couldn’t wait to fill in the whole crown before trying out what I had in mind for the edges. Since the first two scallops were filled, I went ahead and experimented on the first scallop. Into the edge of the buttonhole stitching around the scallop, I stitched another row of detached buttonhole stitch. That is, I worked this next row of buttonhole stitches through the previous row, but without passing into the fabric. Then, working around this row of detached buttonhole stitch, I started working some buttonhole scallops to give the crown some bumps on the edges.
I liked it, so I continued with the plan!
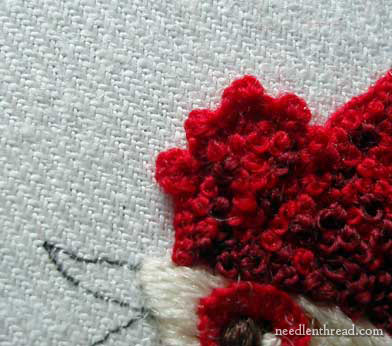
I did the same thing around the second scallop, then finished filling the third and fourth scallops with the bright red French knots.
Then I finished adding buttonhole scallops on the rest of the crown. Overall, I will admit, I was pleased with the effect.
Now, to address the neck, and finish up this whole rooster body!
I got a little eager on the neck scallops, and forgot to take intermediat
e pictures. But this is what I did:
I divided that large scallop area on the neck into three equal layers. Starting in the bottom layer, I embroidered a buttonhole stitch line across the lower division of the neck scallops in the darkest gold (the dark color on the wing). Then, in the middle section, I used the next lightest gold and stitched a buttonhole line. Then, in the next section up (the last division in the neck scallops) I worked the lighter gold. Then, working directly on the dark edge of the long-and-short stitching at the base of the head, I worked buttonhole stitch in the creamy white.
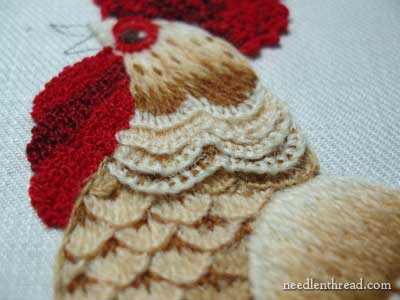
Then, taking the creamy white, I worked a detached buttonhole across each layer of color, working in the twist on the edge of the buttonhole stitches, but not through the fabric. This “lifted” the white edges.
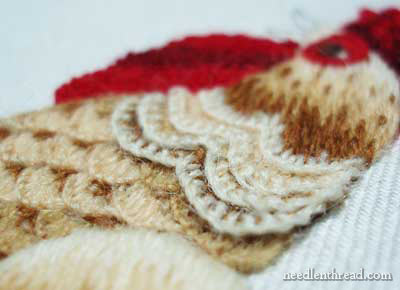
You can see that the white edges don’t go back down into the fabric, but they sort of “layer” over each other.
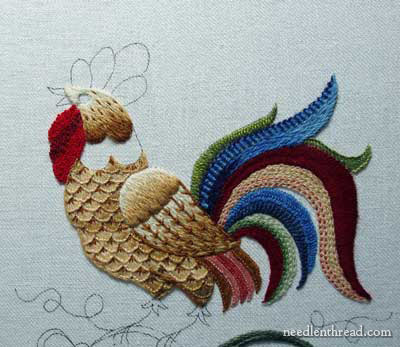
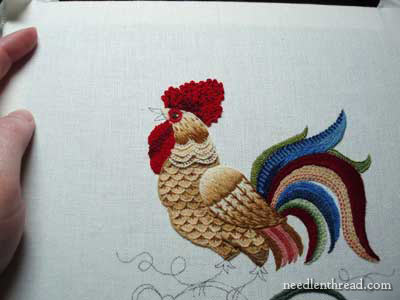
There he is so far. I haven’t done his beak yet, or his legs, and I’m still contemplating the under feathers below the wing.
I’m not exactly sure what stitch to use on the legs. Any suggestion? I was thinking French knots down the line of his leg, to give kind of a bumpy look. But what color? What color are roosters’ legs? What color legs should this guy sport? Suggestions?
Thanks, everyone, for your comments and suggestions so far on this project! Your suggestions have been really helpful!
For further posts on this project, feel free to visit the following links:
Free Hand Embroidery Pattern for The Crewel Rooster
Setting up The Crewel Rooster Project
Choosing Threads for The Crewel Rooster – and the first flower
Crewel Design Books
Stem Stitch Filling on Flower Stems
Scalloped Feathers on the Rooster’s Body
The Beginnings of the Rooster’s Tail
French Knots on the Wattle
Adding the First Blue Feather using a Raised Backstitch
The Rooster Tail, Finished for Now
The Wing – Three Attempts
Adjusting the Tail Feathers One More Time
This rooster is so colourful and beautiful. I am waiting to see what you do with the feathers below the wing.
Magnificent! Is that Detached Buttonhole Stitch?
What will happen to him when you're done? Is he going onto another background? Or covering a box? or hanging on a wall?
Thank you, Mary, for sharing my new website http://www.Luxxee.org with your readers last week! I probably won't be writing too often as the new site is keeping me very busy!
Thanks for all you do, Mary.
He's beautiful! I can't believe how many times you've ripped out work that I thought was beautiful! You are quite a perfectionist.
I especially like the detached buttonhole stitch you're using. Really gives depth and texture to the feathers and comb (technical name for the crown).
Chicken's legs are a strangely bright yellow-orange in real life. I don't have any idea what color your stylized chicken's legs should be. Can't wait to see what you come up with.
Thanks for your comments!
The detached buttonhole is worked around the comb and around the neck.
COMB!! – I've been calling it a comb all along, until I sat down to write this post, and then I couldn't for the life of me remember what the word was!! Thank you!
MC
In my flock, I have chickens with yellow, off-white, or black skin on their legs. Yellow is probably the most likely skin color with the sorts of feathers you've made. It's generally a kind of dark yellow with hints of orange and brown. Also, chicken legs are scaly so French knots will probably work.
Your rooster is amazing! You are such a creative, talented, gifted, (patient), wonderful embroideress. I have so enjoyed watching this little fella develop. That he has come together so beautifully is particularly delightful to see since we have been privy to the whole bumpy journey.
Now the Feet And Beak!! I can't wait!
I love the way the bright comb and wattle balance the brilliant tailfeathers! The eye is really a stunner, too, and the dimensions of the stitching around the neck really bring the feathers to life.
Chicken feet, in real life (don't ask how I know — it's just something I tend to notice in a kind of Seinfeld-y obsessive sort of way) aren't exactly pretty. They may be yellow or shades of grey, but they tend to be almost reptilian (without feathers, chicken skin is, well… chicken skin). Probably not something to worry about — making them as simple and inconspicuous as possible will keep the focus on your beautiful plumage.
This is becoming so beautiful, I'm almost sorry to see you getting so close to the finish. It's been a great, fun ride, watching you work!
Karen from Arcadia
Yup, yellow legs. If I were doing the project, I'd probably use the same color for the legs and for the beak. I'm not sure if french knots will do what you want, the legs may not look solid or straight enough, but you've already proven that you have far more skill with them than I do. And plenty of patience to redo if necessary. 🙂
I love how the neck and head came out! It's fabulous! The speckling on the head really makes that section, I think. The whole project looks very three dimensional, it reminds me more of stumpwork than what I usually think of as crewel. I'm really liking it.
It is admirable, Mary, that you are only working with supplies on hand. The rooster has really come together and is quite phenomenal! This process has been revealing, reassuring and helpful to see how you work. The biggest lesson learned for me has been to persevere past the spots that don't seem quite right (which is usually where I stop a project). I commend you for your bravery in working this project on your blog.
Your rooster is looking mighty regal. I love the dimensional effect on the wattle and comb.
As for his legs, rooster legs come in all colors. Here's a link to a really good picture I found using a Google image search-
You can see that the legs are fairly sturdy and are covered with scales.
I'm looking forward to seeing your interpretation.
Wow ! I am just admiring this gorgeious rooster. Soory no suggestions, no idea – I could not do as well as you do.
Rooster legs are anything from light yellow, grayish, golden yellow, brownish.
But this is a Rooster any other fella would envy – he can have any color legs you want him to have.
For the feathers on the legs, would woven picot stitch work, or would that be to big with wool ?
I agree the feathers below the wing just do not fit in with the rest of him – need to pick and redo
This Rooster has been an adventure for all of us to see what you are ending up with, the colors and your different stitches used. I will be sad when he is finished… what is next?
I must admit I read down through this post muttering under my breath the whole time "If she takes this part out, I will cry" and, eureka, you didn't! YES!! I love all the new parts today and can't wait to see what you do with his legs.
I've really enjoyed watching this fellow grow and develop Mary, he's really very regal. I agree with everyone else about the legs, and the underfeathers on the tail. Perhaps it's just the pink bits that need re-doing? Hope he's destined for a frame or a box top, he needs to be seen and enjoyed after all the hard work you've put in.
Hooroo,
Christine in sunny Sydney Australia.
He's looking *gorgeous*.
I agree with another lady – the speckling on the head really makes it.
And I just love the overlaying layers.
And his comb! It's great. I used to have chooks (Australian for "Chickens") when I was a child, and that is an excellent comb.
Interested in the suggestion of the woven picots for the legs – french dots are not going to give a smooth outline. Will his claws be a different colour? They have big ones, for scratching in the dirt and if you've ever picked a rooster up, you'd know about them.
WOW Mary!! This is mind-blowing… I have been following the rooster story from the beginning and it's amazing to see your patience and constant urge to enhance your work. That's something I have to learn from you. And the effect at this stage is really stunning!!!
Though you might have not been technically correct in calling the comb, I feel its very apt to call it 'crown' on the head of your stylised chap… So beautiful and so 3D, the dark and lighter red shades really stand out. Esp your detached buttonhole stich – I love it!! Wow I'd like to adorn you too with a crown for sharing with us this lovable rooster 🙂
As for the leg, I think it could be a broader line, and it would be good to see in multiple shades – yellow, green, brown – as you like it :). As Melissa told, I'd like to see the beak and legs in the same colour shades.
Eager to see how and where he ends up finally 🙂
Hi Mary,
I love the rooster, but the head is magnificent. You are so inventive, I've been absolutely fascinated watching him grow. He is just wonderful. Can't wait to see how he is going to be finished.
Hi Mary–Your post today was a bit of a surprise for me, as the picture with your hand in it gave me some perspective as to how big it is. During all those posts where you were ripping out stitches, all I could think of was "it sucks that she has to rip stitches out of such a large area." While it still sucks that you had to take them out, I now understand your willingness to do so–the areas you were working with are MUCH smaller than I thought them to be. Interesting how a size comparison can make such a difference in how I look at things.
On another note, I absolutely LOVE his head and neck. The scallops around the comb are perfect for it.
Carol
Mary – this lil guy is turning out to look quite good! I love what you've done with the crown. Echoing a few comments here, but the specks on the face make quite a difference. Overall it looks colourful, but not overly colourful either. Great work!
Question – have you thought about what you're going to do with this piece once its done?
What stitch to do his legs in? You suggested french knots for a lumpy look. Yeah, that would be ok, but how about Palestrina knot stitch? Its such a nice stitch! You've already got heaps of French knots…
No idea about colours for his legs. The only thing I really know about roosters is that they crow ALL throughout the night and day here in Ethiopia! The idea of them crowing at dawn is just simply wrong!
Dear Ms Corbet,
Would you please tell me what kind of marking pen/pencil you use to outline your projects? The line for your Rooster looked like a thin, black pen or marker … is it washable or permanent? Thanks!
C. Murphy
It’s permanent. If the lines are going to be completely covered, I use a micron pen (.20mm) in sepia or brown, sometimes in black, and I usually will iron the piece upside down after doing the tracing, to make sure the ink is fixed. I’ve never had it run, and it is a great way to make a nice thin line. If there’s a chance that the lines won’t be completely covered, I use a pencil, but I usually spray starch the fabric pretty heavily before doing the transfer, so that the pencil easily washes out.