


Roosters are weird. They have these flappy things that grow on their faces and heads. They have these coats of feathers that overlay their backs. They have floppy tails. Poofy, floppy tails.
Actually, when you start looking closely at roosters (if you avoid the face, anyway!) they are rather attractive birds – and in fact, in many cases, they’re downright gorgeous.
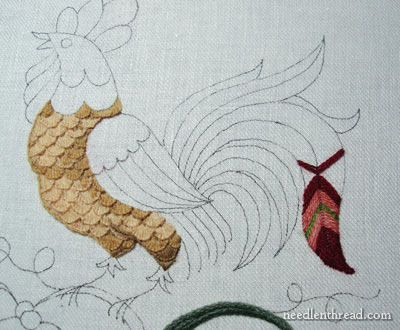
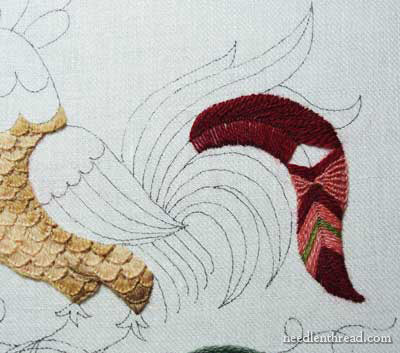
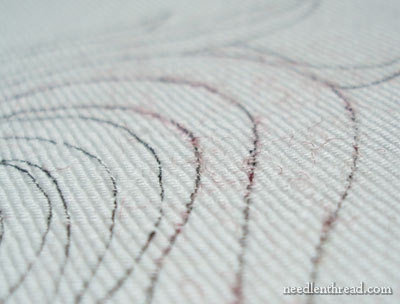
Embroidering a rooster with no reference point has been a bit of a challenge, but on the bright side of the adventure, given the variety in rooster-kind, I figure I can pretty much do anything, as long as the general shape of the bird is there. So I set about to play with the tail after finishing the scalloped body.
Let’s look at the tail today. This is a tale of disaster, but again, it’s all part of the journey!
Embroidering the tail on this rooster design should be fun. There’s lots of scope here for variety in stitches and color.
Now, bear with me on this, ok?
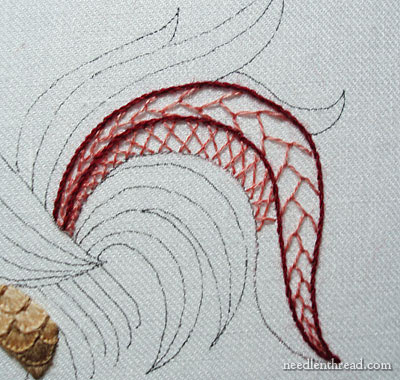
I started at the tip of the largest feather on the tail – and the thread I’m using here is the D’Aubusson wool in a brick red, and Simply Wool by Gentle Arts in a peachy color and a greeny color.
The stitch is fly stitch, worked vertically from the outside tip of the tail.
As I worked into the tail feather, I thought it might be interesting to change colors, so I did. I also thought it might be interesting to change types of thread, so that I could see two different wools side-by-side in the same stitch, for the sake of comparing the look of the threads.
>
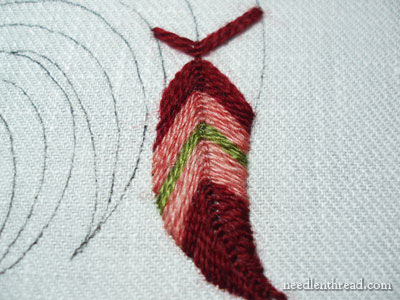
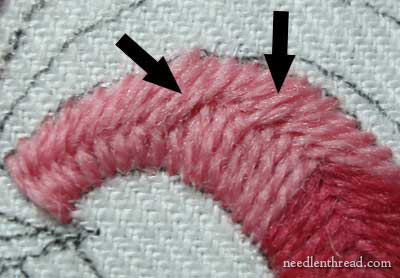
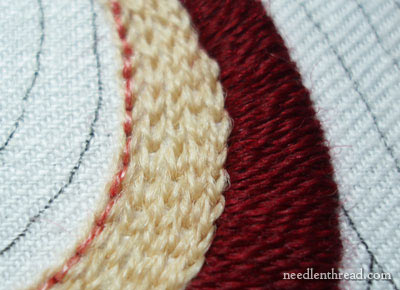
This striped bit towards the tip of the tale shows a notable difference between the two types of threads I’m using.
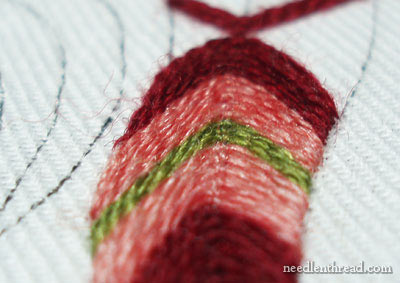
The D’Aubusson wool is a fine weight embroidery wool. Simply Wool by Gentle Arts is, too. But Simply Wool is slightly finer, and it has a lot more sheen to it. D’Aubusson wool looks more like wool, but Simply Wool looks like (and behaves like) a blend of wool and silk, though I know it isn’t a blend. But it is smoother, and it does have a higher sheen.
As for the actual stripe thing going on here, I knew right off – as soon as I did it – that I didn’t really like it. Somehow, it reminded me of a sock. A sock? A sock.
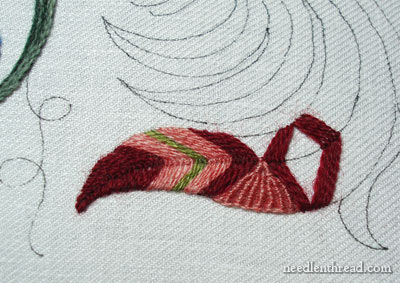
I digressed from the striped effect and decided to add some texture, using spiderweb stitch worked in this fan shape. Now it was starting to remind me of a ribbed sock. I was liking it less and less.
The ribbed spiderweb stitch, by the way, is difficult to work in a tiny space with this thread (Simply Wool). It was not pleasant stitching.
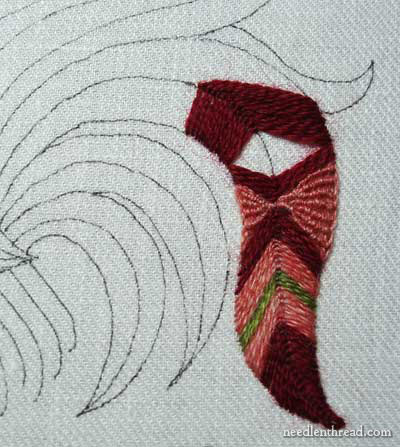
So I worked two opposite triangles in the spiderweb stitch, then picked up the dark red fly stitch again, then decided to change directions on that stitch and leave a diamond-shaped hole for another inset design area. You know, just to sort of spice the feather up and make it look really… really dumb. I didn’t like where this was going at all – but don’t worry!
It gets worse!
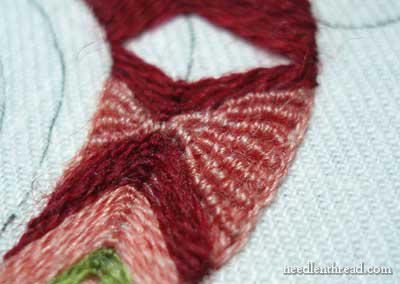
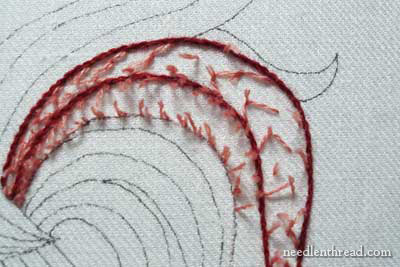
Here’s my close-up of the bumpy ribbed inset on the tail. You can see that it isn’t exactly smooth and perfectly straight, as far as the spines are concerned. They’re a bit wobbly, and, as I worked towards the tip of the triangle, I had to reduce the number of spines by wrapping more than one at a time.
But, besides the stitching, another thing this photo above shows pretty clearly is the soft sheen of the Simply Wool thread.
Working my way around the curve of the feather, I kept going with the fly stitch in the D’Aubusson wool. As I took the curve, it became more and more difficult to compensate for the curve without moving my stitches apart and showing more of the fabric underneath. At this point, I was really not liking the tail at all.
I cut back the red and picked it out, leaving a slight border on the spiderweb triangles. Then I moved to the inside end of the feather, thinking it might help to work this stitch from this direction, and meet the area already stitched. I gave that theory about half an inch, and then resorted to this:

What a glorious picking mess! This is a good time to be thankful for those tweezers in your workbox!
This is also a good time to be thankful for a Really Good Fabric! You can see the fuzzies left from the wool – not a big deal. Take a scrap piece of cloth and, using gentle small circular motions, “wipe” the wool fuzzies off. But look at the fabric.
I have put in a lot of stitching here – some of it rather tight stitching – and then picked it all out. In some places, I’ve done this twice. The fabric holds up really well. The holes close back up, and once you’ve rubbed the fuzzies away, you can’t really tell you’ve had any stitching there.
Ok….. Now what?

Now let’s try some of those fun stitches, like feather stitch. After all, it’s a feather.
And let’s work a row of herringbone stitch underneath that.
And then let’s cut all that out, too.
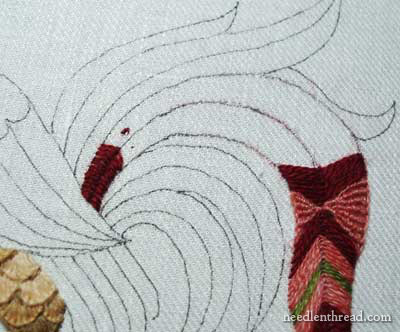
Let’s forget the big feather and move down to the smaller one at the base of the tail.
This is stitched using fishbone stitch, in three colors of Heathway wool. The Heathway is soft and boingy, and it covers well and smoothly.
But by this time, I was tailed-out, and I must have lost my concentration somewhere along the feather. It wasn’t until I actually looked at the photos that I found these two mistakes. I overlapped incorrectly, and ended up with these very noticeable jolts in the center line.
It doesn’t matter so much. Why, you ask? Because deep down, I don’t like the color changes on this. It’s too stripey. More socks! I have a distinct feeling this is going to go.
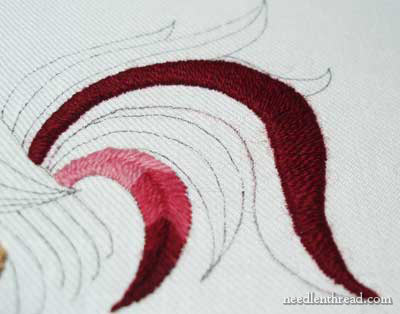
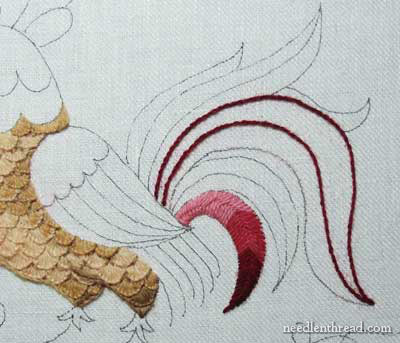
Still, I left it for now, and then I moved back up to that large feather, which I satin stitched in the dark brick D’Aubusson wool.
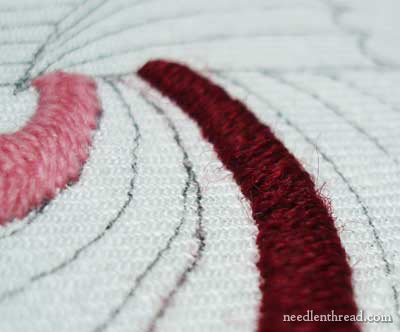
This wool makes a nice satin stitch in small spaces. In larger spaces, it’s definitely necessary to pad underneath the satin stitching to give the top threads some friction to keep them in place. The wool threads line up nicely for satin stitch, and, unlike the Heathway, which looses its twisted look in satin stitch, creating a very smooth surface, the D’Aubusson keeps its twist and looks very clean and neat in satin stitch. The light plays off the twists.
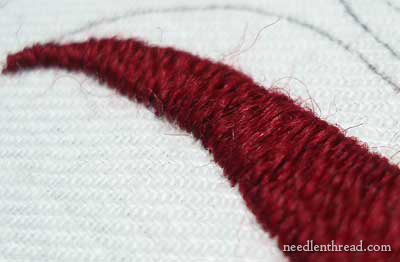
I like satin stitch in the D’Aubusson wool.
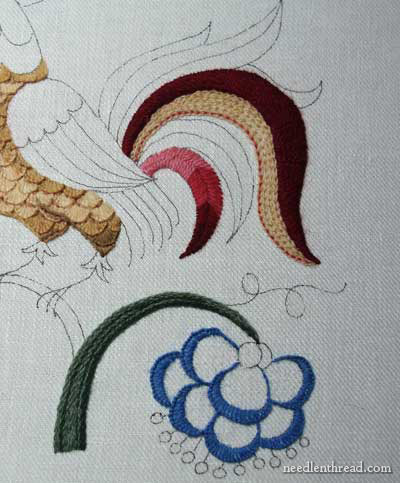
On the lower half of that large feather, I chain stitched in the straw-colored D’Aubusson, to fill the area. Then, on the two outside rows, I worked backstitch through the chain stitches, in the coral Simply Wool from Gentle Arts. I was determined to get the Simply Wool thread next to the D’Aubusson, so that the difference in weight could be seen better.
Above, you can see one row of the chain stitches backstitched with the Simply Wool in coral. The D’Aubusson is a fine thread, compared to Appleton and Heathway. But the Simply Wool is a wee bit finer – and you can see that it has more of a sheen to it.
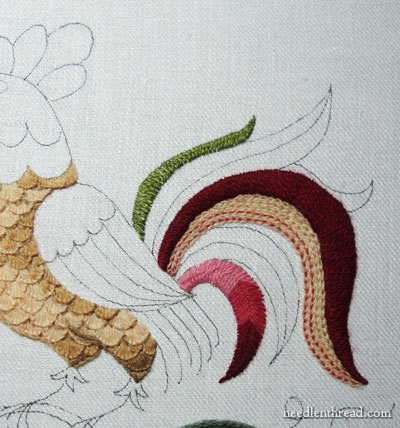
And here you can see the two rows of backstitching in the chain stitch on the middle feather, and the top feather worked in green, Simply Wool by Gentle Arts, in a basket stitch.
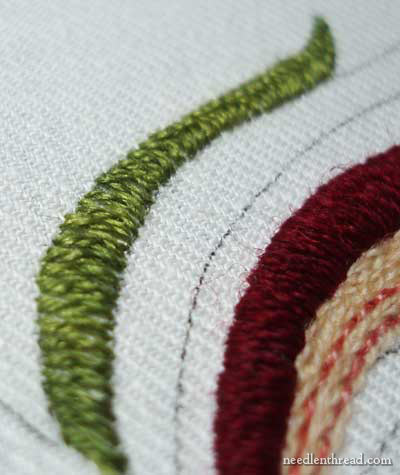
Basket stitch looks a lot like a closed double-herringbone stitch (that is, double herringbone, worked close together so there isn’t much space between the stitches). The difference is that you don’t work two rows – it’s all done in one forward movement of stitching. But more on that later!
The tail so far is half-way tolerable. I will leave the middle feather as it is. The lower feather is bugging me, and it will most likely go. The top feather in the green is likable, so I think I’ll keep it!
One distinct difficulty in working only with threads from your stash is that you often get stuck with colors you wouldn’t normally use in a given project (I’m having that problem with pinks right now), or you end up working without colors you normally would use (I’d love to have several shades of coral for this fellow). Still, it’s fun to make do and see what comes of it!
Do you think the wing should be colorful? What would your approach be to the wing? Any ideas?
For more posts on this project, visit the following links:
Free Hand Embroidery Pattern for The Crewel Rooster
Setting up The Crewel Rooster Project
Choosing Threads for The Crewel Rooster – and the first flower
Crewel Design Books
Stem Stitch Filling on Flower Stems
Scalloped Feathers on the Rooster’s Body
Your crewel rooster is going to be beautiful. I like the colors you are using. I enjoy reading about another stitcher who sometimes struggles with finding the right stitches and colors.
Just want to let you know how much I appreciate your video stitch library. I used it twice last week – once to refresh myself on the drizzle stitch and again to learn the colonial knot, which, for some reason, I had not learned before. I'm working on a textured piece so wanted to use these stitches.
Okay very detailed color suggestions for wings:
the wing shoulder cap should be a warm milk-white done in diamond-covered couching. Scallop shaping in one of the lighter browns that's been used on the front.Each diamond intersection dotted with one of your famous French Knots. The striped area of wing could be alternating pale celery green with toned cocoa brown in split or encroaching stitch. Did you have something preplanned for it already from your wool stash?
Hi Mary,
I simply love the way you have created the textured effect in the rooster. Will start stitching a little later.
I love the textured effect that you have created .
Oh Mary you have made me feel sooooo much better! I picked out and restitched my daughters Christmas gift four times! Wrong color, wrong stitch, another wrong color and stitch and a final wrong color! The linen held up pretty well and it was lovely when it was finished but the time it took!
I appreciate your candidness about the trail and error method of coming up with colors and stitches you are using. I think it's all part of the creative process andm though it's frustrating and time consuming, it's a good way to lea4rn!
Keep showing us the process, please, and good luck!
You are sooo patient to go through this again and again. Thank you for giving us the chance to learn through your experience
Mary, I really like the look of the back-stitched chain stitch. As far as colors, there are 2 things I notice, and they are related. When you shade a feather (like the lowest tail feather), I would consider shading darker nearer the body and lighter out toward the tip. Similarly I would try light along the top of a feather, and darker on the underside. I'm no artist, but I think that might look more natural to the eye, considering the source of the light, like you did on the breast. What do you think?
I think you're right about the stripes on the tail feathers. I guess the whole pattern is stripey enough that it's just too much. This guy has so much going on with texture, shapes, and colors already that he doesn't need much more embellishment. Although once most of the tail is done, it might be interesting to have just a couple of stripes on one or two feathers. Just my $.02 🙂 I was a little surprised you worried so much about the breast – once the feathers are done, it'll positively fade into the background!
After a lifetime of working with DMC cotton, I finally got some silk thread (Soie d'Alger in a couple shades of green) this weekend. I expected it'd be shinier and smoother, I didn't realize it was so soft! And it embroiders like a dream. I may never be able to use cotton again – I blame you for this! Your blog has introduced me to embroidery techniques and materials I wouldn't have tried otherwise. Thanks for the inspiration!
Hi, Everyone! Thanks so much for your input! As you can see, I need it! This is going to end up being the "group project" rooster!
Laura – you know, I finished the wing late last night, after writing up this morning's post. And you know, I think I'm going to pick it out and go with some of your suggestions! Plus, I just got a little packet of Renaissance wool in the mail, so I have a new wool and a few new colors to play with – strangely enough, they're all kind of in the pink family. What was I thinking?
Melissa, what actually has ended up happening is that the piece looks kind of "separate" – there's the breast, and then there's the tail – and right now, they look like they belong to two different birds. Argh. I am glad, though, that I included the straw color in the tail, because it does sort of draw the whole thing together a little bit. But not much. I really botched it with the wing, though – way too much color – so that's going to be another exploratory situation.
Isn't Soie d'Alger just the greatest to stitch with? I really love that thread!
Wendy – good point on the feathers. The light to dark on the tail was actually something I thought about pretty carefully! And you see where thinking got me! My bird – I have a parrot – has dark tips on all his decorative feathers. They're lighter towards the body, and darker at the tip. That's pretty much what I ended up basing that decision on. But as it works out, it doesn't matter too much, as the bottom feather is coming out. The colors are coming out, that is. For the dark on the top of the large feather, my thinking was more along the lines of "focal point" – it's the focal point of the tail – so I wanted a strong color there. In the scheme of things, I think it'll work out ok… but if it doesn't, and I have to pick it out, you're coming to Kansas to pull out the shreds!
That's one of the problems I am having with the overall approach to this – I made the mistake of shaded stitching on the body, tending towards realism (though I think we can all admit it doesn't look anything like a rooster!), but now the tail (and the wing) are ending up fantastical.
It'll be interesting to see how it turns out. Even for me. And I'm the one stitching it!
Thanks again, everyone, for your encouraging and insightful comments!
MC
It looks great, Mary.
I'm embroidering the Red Poppy from Trish B. you've sent me and I'm looooving Au Ver a soie silk! So different from cotton threads…thanks for the chance.
WOW! I missed the rooster breast post from yesterday. It looks GREAT, Mary! The color combination really works well together.
As far as the tale goes, you've Er-err-err-er-erred! How appropriate, no? (I couldn't resist, don't wring my neck, I'm such a big chicken, okay?)
Thanks once again for the candid and thoughtful demonstration of your design process. I'm so grateful you are letting us follow along. Just think how you'll "crow" when it's all complete!
Stopping now…
Sheila 🙂
It is great that you showed all your trials and errors.
Personally I like the striped feather and would remove the yellow feather if you made me choose one.
A fantastical rooster will look great. Keep going.
I love your crewel rooster. I was just starting a crewel piece myself and was wondering…how do you keep the edges of your fabric fraying? I normally use my serger, but it decided to quit working on me today. Thanks!
I'm glad to see lots of suggestions today, after I was the only one I know of to make a shading suggestion on the breast (and kinda hint that you put in more Vs). I felt a bit big for my boots!
Could you do a review of Jacobean books that come with stitch and even colour instructions? It's great fun watching you play, but I would have put the stretcher through the window by now. (or rather, tucked the piece away for another day, a long long time away. I just don't have the experience with stitches to be able to pick and choose like you can)
What if you replaced the pink in the tail with a darker colour (the same dark burgundy?).
Hi Mary – What embroidery technique (that you've not done before) piques your interest – you'd like to try it, but haven't done so yet? I would love to combine some Bargello work with some Brazilian Embroidery. I have never done Bargello before. What interests you about it? I love geometric designs – they have always appealed to me. And I love BE. I think that if you do some Bargello in the background of a BE piece, the combinations could be stunning. And what has prohibited you from trying it up to now? Time and a fear of creating the design. My stitching time is not as much as I would like it to be, so I tend to want to capitalize on getting something done when I stitch.
Hi Mary, I know this post is several years old, but it is currently relevant to me. When you do padded satin stitch in wool, what are your thoughts on the occasional overlap? I do a lot of padded satin stitch around tight curves and find myself overlapping a lot. My finished product does look “tight” and “bulky,” but I think it looks cool … like thick icing sitting on a cake. Is this a crewel no-no?