


It’s not unusual to be asked to see the back of an embroidery project. I do believe that on just about every project I’ve done here on Needle ‘n Thread, someone has asked at least once to see the back. Working with the Blackwork Fish project, the question of the back of the needlework seems a bit more pertinent, because I’m working with black thread on white fabric. Carrying threads any distance on the back of the fabric would seem a horrific idea, because surely the black thread would show through the front!
That sounds right, but in reality, there are a couple things going on here that prevent the threads showing through the front of the fabric.
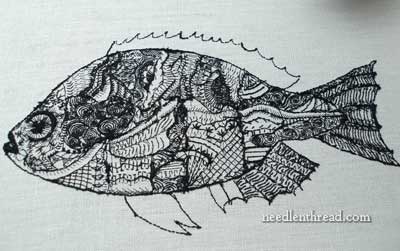
So this is the back of the fish. (Note that he’s swimming in the other direction!)
True, it’s not the neatest looking back in the world. There are some concentrated globs of decidedly darker areas, where I’ve built up threads a bit more than I probably should have. I could have avoided that by not starting and stopping so often in the same places.
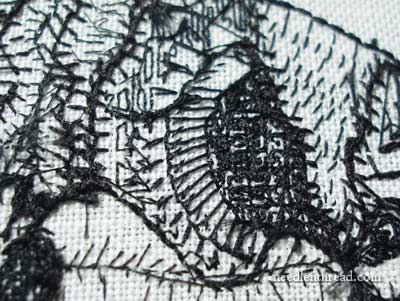
Where there are areas of close stitching on the front, there are areas of close stitching on the back.
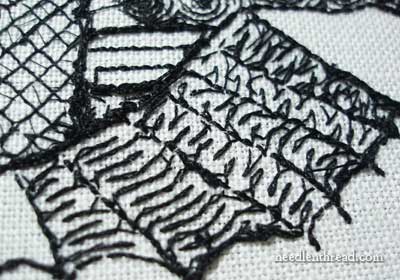
And the fin areas are a bit stripy, just like the fins on the front, though the ones on the back get a bit messy there for a bit.
The threads don’t show through to the front of the fabric – even if I shine a light behind the work, you can’t see any threads being carried from one place to another across the back, and here are the reasons why:
1. I don’t carry threads across long spaces on the back. If I need to move from one area to another, and I don’t want to change threads, I “travel” the thread through stitches that are already on the back of the fabric. (You can get a clearer idea of “traveling” a thread on the back in this hand embroidered lettering tutorial, which deals specifically with the subject.) Basically, “traveling” on the back of the fabric is simply moving from one spot to the next by whipping or lacing the working thread through stitches on the back of the fabric, to get to the next starting point, in such a way that you’re not crossing any open spaces. I wouldn’t do this from one side of the project to the other, but I would do it if I were only moving an inch or two away to start up again.
But that point is pretty much moot. Why? Because there are no open spaces to travel across on this piece, which brings me to point #2:
2. The concentration of stitches in the piece make it practically impossible to see through the fabric. Even though there are some “white spaces” in the design, these are very small – not large enough to see anything through them, because of the concentration of threads on the front and the back.
3. The fabric is a medium weight linen, and most of the black threads are too fine to show through. The three or four heaviest weights of black thread would show through, if there were more white space, but for the majority of the filling, I’ve used the four finest weights of thread in the thread pack (which is made up of 8 weights of black silk). The linen is thick enough to hide the stuff, if one of the finer threads were carried across a white space.
All that having been said, it’s a good idea to avoid habitually carrying threads of any length across the back of your stitching, whether they can be seen from the front or not. The reasons? One is that a long-ish loose thread on the back of the fabric can easily snag on things – your fingers, tools, something the work is brushed across. And such a snag can dislocate or distort the stitches on the front of the fabric. Another reason is that a loose piece of thread on the back of the fabric, over time, can cause the stitches on the front of the fabric to loosen up, too. Long threads are more difficult to keep under tension. Finally, as you stitch over carried threads on the back, you can end up with frustrating knots and in some cases, as you stitch through the thread on the back, you can end up pulling fibers of the loose thread through to the front. Why put up with the frustration?
Those are the primary reasons I see for not carrying threads any longer distance on the back, even if they can’t be seen from the front. Do you know of any other reasons? What do you think about carrying threads on the back of the fabric? Is it something you’re concerned about when you stitch, or do you think it’s silly to make a big deal out of what’s happening on the back of the work? Any advice on how to avoid carrying threads? Leave a comment below with your input, tips, thoughts, speculations, suggestions, questions… we’re all ears!
I don’t think its necessary to look at the back.I also don’t run my threads over open spaces if at all possible. If the front looks good (as it does on yours) why bother with what the back looks like! I am assuming you are going to finish it in some way and no one will ever see the back. Like you, I don’t like it when I end up with threads bunched in one spot, just in case it leaves on bump seen on the front when framed. I believe its more important that the front looks “perfect” as is possible.
Mary,
Thank you, thank you! 🙂 Your photos are great, and I really appreciate the detailed explanation about how the stitches can end up getting distorted, and how the thread thickness and linen count also come into play. Carrying thread is one of those snaggly details that seems to be the difference in an amateurs attempt or an experts.
Off topic, I once had a ceramics instructor who was emphatic that the bottom and inside of every piece look as good as the outside, regardless of whether anyone was supposed to “see” it, because he believed that it should all look beautiful. It’s really stuck with me, all these years.
The front of the fish looks beautiful and the back does have some areas which are darker. But don’t we all follow the maxim ” It is for me to know and for the others not to find out.” I am sure that you will find a novel way to display this piece…
Once again you have done a work of art, Mary.
Your back looks almost as good as your front.
Nice work! Thanks once again for a very informative insight on the what and what not
to dos.
Hi Mary!
Well dark side is clean!
I do just as you do perhaps because I’ve learnt with you!!!
The drawn thread is finished so I’m ready to go to your monograms (again!) to embroider letter M for my niece – when finished I’ll send you a picture, if you don’t mind…
xx
méri
It makes me smile how ‘divided’ we embroiderers are over the back issue. I’m a tidy back person, for me it is a bit of a zen thing but I also think there are many practicle reasons for a tidy back, less bunching, snagging, show through, etc as Mary has said. One additional point, if you are travelling more than an inch or so, it takes less thread to finish off and restart than it does to travel.
It is often those who are new to embroidery or a certain technique who like to see the back. Comparing the back of their own work to that of a more experienced stitcher can give them confidence that they are doing something correctly.
Hey Mary,
I love the fish! I would have used a bright color or several colors, if he were my fish!
I’m new to embroidery, so I was wondering do I have to use linen only, and should I knot my work, or will it stay without knotting?
I haven’t done any stiching yet, but your videos are very helpful!
Thanks, Jillian
Mary, this is such a timely post for me. I am very new (3 months) to embroidery and the whole back work issue has me tied up in knots. (Har, pun intended.)Of all the books I have checked out from library and online vids I watched, no one speaks of the practical matter of keeping the back clean and snag free.
Yesterday I got drove to 2 diff ‘stitch’ businesses in the city, desperate for advice. Alas, they only work they specialized in was needlepoint, felt work and other crafts. (Doesn’t anyone plain old embroider these days?)
Today you posted this gem! Thank you so much for explaining and showing. It never occured to me to ‘travel’ the thread by weaving. Brilliant and so simple. For practice I have been working on Aunt Martha transfer pattern designs (plus my own doodle designs) on flour sack towels. One in particular gave me fits. It was a pineapple. All those separate squares that make up the pattern. How to tackle the logistics of it in most efficient manner boggled my mind. Do one square at a time and tie off? Work in rows, doing one side of square at time but dragging thread? In the end it looks like poo. I have half a mind to rip out and start again. (For thrid time!)
I am especially picky over back work because I want to create useable items for gifts, i.e. cocktail napkins, dishtowels, tote bags, tip towels, hankies, etc. Being snagproof and durable it top concern.
Once again, thanks a million for this post.
So these tips you give are priceless to me. Thanks much.
Hi, all – Thanks for your comments!
Donnajean – I’m glad I could help! “Traveling” the thread works fine for me. Sometimes, you do have to be careful that you’re not doing it too often over the same area, or it’ll get thick and bulky. Good luck with your stitching – and have fun with it!
Hi, Jillian – I use linen a lot, but it’s not the only thing I use. Any natural fiber fabric is good – cotton, linen, silk, wool… I personally don’t like using blends that include man-made materials like rayon & polyester. I think they’re more difficult to stitch on, and they’re harder on the embroidery threads.
I don’t knot, but some people do. Knots can form bumps on the front of the work, so instead of knotting, you might want to take a look at these picture tutorials on starting and ending threads:
Starting and Ending EmbroideryThreads
Thanks again for all your comments, everyone!
The fish is exquisite! front and back!!! How many hours do you think this has taken you. Congratulations on a wonderful site, each time I see your work I am inspired.
Margaret
My grandmother and aunt really introduced me to and got me hooked on needlework. My aunt said, “Just remember, when you are finished, the back should look as good as the front!” I have never forgotten that advice and will take whatever steps necessary to avoid a messy back!
I don’t care what the back looks like although I tend to have very tidy backs on my projects. As others have mentioned, it’s the front that matters.
The only exception I can think of is for something like a table linen/napkin. In those cases I would tend to care what the back looks like and would make sure that it was especially neat with no hanging thread, lopps, knots, etc.
I travel my threads by weaving through other threads. I don’t like to have lengths of thread on the back that aren’t somewhat fastened down and can catch (as Mary said).
I prefer not to travel across blank areas unless the fabric is sufficiently opaque or I’m using backing fabric.
Basically, don’t worry about the back unless it affects the front!
Hi Mary,
I also try to make the back as tidy as possible and “travel” along to the next spot to stitch, especially if the back will be visible like, say, on a tea towel. Before starting I try and “plan” where I will start and finish, so that there is as little “travelling” as can be managed.
Your fish looks almost as good on the back as on the front. As usual, when I see what you do, my eyes pop out and I go “WOW”.
LOL
me encanta una buena terminacion reves¡pero es muy dificil lograrlo,,,no formando arrugas,ni soltandose … me preocupo a la mitad.por o mismo que dice una chica una mescla de materiales
esto es genial,gracias Mary por la oportunidad
un abrazo
lidia
CHILE
I too learnt from my Grandmother, who in turn was taught by a lady who would snip out her work if the back wasn’t as neat as the front…
Since then I have inherited a couple of tablecloths from a great aunt who wasn’t so pernickety and we have to be very careful where we put glasses and teacups because the knots on the back make the surface perilously uneven!
Hello Mary,
I have just started doing embroidery and stitching work again after many,many years. When I started a lot of people advised me to use that iron on backing stuff to strengthen the material and make it easier to sew. It also helps a lot if for some reason you have to go across bit further than you should or because you are a bit lazy (I admit, I am sometimes in the pursuit of getting the item finished). My question is, do you use this backing?
Thanks, everyone, for your thoughts on “the backside”!
Elaine – Thanks for your comment. I don’t use interfacing on the back of hand embroidery. If I want to line a piece of needlework to strengthen the fabric, I line it with another piece of fabric – usually, 100% cotton muslin (or calico, depending on where you’re from). I hoop up or frame up both layers – the ground fabric and the backing fabric – at the same time, both along the grain of the fabric. Sometimes, I’ll baste the two pieces together, sometimes I won’t, depending on how they’re mounted. (If I’m using a hoop, I usually do baste them together, because I take the fabric off the hoop after each stitching session. If I’m using stretcher bars or a slate frame, I don’t baste them, I just make sure they’re lined up and stretched evenly when I mount them). I’m not a huge fan of iron-on interfacing, unless it’s a very light interfacing between two pieces of fabric for things like applique, when necessary. But I don’t generally like stitching through the stuff!
Have a great weekend, all!
Looks great 🙂
btw. thank you for the pics of the back side 🙂
I love the classic simplicity of the black fish. There are times when I am so overwhelmed or overstimulated by color that a piece such as this is a perfect, relaxing, “getaway”. Thank you so much for sharing it with us.
Hi Mary,
I also try to make the back as tidy as possible and “travel” along to the next spot to stitch, especially if the back will be visible like, say, on a tea towel. Before starting I try and “plan” where I will start and finish, so that there is as little “travelling” as can be managed.
Your fish looks almost as good on the back as on the front. As usual, when I see what you do, my eyes pop out and I go “WOW”.
LOL
I always try to figure out if I’ll use more or less thread to lock and cut and try to carry (usually by traveling) only if carrying would take less thread.
It looks very neat, to me. Not messy at all!
Thank You Mary for such a great website. I would like to ask what methods can be employed to cover the back of an embroidered piece? I, too, am a stickler for neatness but would like to put a ‘banding/facing/lining/backing on a towel I plan to embroider. The needle work will be on the flat section of the towel (most every towel has one) near the top edge. No needlework will be done on any of the looped areas. I would appreciate your opinion-and that of the Needle ‘n’ Thread community- on how to handle this task.
Thank You, Once Again
Hi, Dezzy – Ah. I don’t normally line the back of a towel, so I think we will have to open this up for others to make suggestions! I was trying to think how you could kind of “applique” something on the back, but since it sounds like it is a heavier towel (not a cotton flour sack, for example, but more like a bath towel, of terry cloth), then I don’t see how you could do that and make it look right. Is the flat strip thick, like the towel, but without the loops? Hmmm… I’ll have to think about that one for a bit!
MC
This may be an off-topic question but–is there any historical basis for having a “neat” backside to embroidery? Especially if the backside will be enclosed, such a pillow cover or a glove cuff…I`d appreciate any examples you might know of; it`s for documentation purposes for a project…which has many colors and different thread textures (such as gold purl) which make the neat part difficult..
Hi, Barb – Thanks for your question. I don’t know if there’s any historical basis for it. I think most folks try to keep the back as neat as possible, on the principle that, when finishing – whether the back is exposed or not – a very messy back (with carried threads, knots, built up lumps for starting and ending threads repeatedly in the same place, and so forth) can actually influence what the front looks like. This isn’t always the case, but it quite often is, especially in framed work, where the piece is mounted on a board. With goldwork, keeping the back neat is easier, I think, because in most goldwork, the only thread that passes to the back is the gold-colored thread used for couching or sewing on the goldwork. This is usually a relatively fine thread, so it is easy to start it and end it without building up too much thread on the back. Of course, there will be “lumps” where passing thread is brought to the back and sewn down, but if this is distributed on the back rather than all built up in one spot, then it keeps things pretty neat. But I figure it all depends on what you mean by “neat”…. In most embroidery, compared to the front, the back tends to look messy. Well, I doubt this response helped much – I’m afraid I can’t give you any historical references for a neat back off the top of my head, without delving into research! But maybe someone else out there can?? Anyone?
~MC
Dear Mary Corbet … Thank you so much for your very helpful tips as I haven’t been doing embroidery for very long, and I instinctively want the back of my work to look as neat and tidy as possible. Initially I noticed ridges appearing on the front of my work where I had threaded ends through the back of stitches so I have become quite particular about how I stop and start. I’m pleased to see that I am not alone. Once again, thank you so much.
Kindest regards. Sonja
“The back should look as good as the front!!!” I had that drilled into me when I first began embroidering by my teacher/mother. She would make me rip out the stitches and begin again. I began to hate it and quit early on. Only in my 30’s after I realized that it did not matter what the back of my embroidery projects looked like I picked up embroidering again. There isn’t a day that goes by that I don’t have a needle and thread in hand. It is NOT a set in stone requirement for good workmanship or your ability as an embroiderer to have the backside of a project a mirror image of the front. I strive to make my stitches neat, small and even…that is what matters.
Hi, I am doing a tablecloth topper with Chicken/Hen scratch embroidery but I am not happy with the back of my work. How do I go from square to square leaving neat work on the back. How to start a stitch without a knot as taking a back stitch in area where it will be seen is very hard. Being that it will be washed many times, I want to be sure that the threads are secure. I hope to enter it in a local fair, and I know that the back has to be tidy.
Thanks for any
Thank you so much for this! It is really helpful. When working whip stitch across the back, do you work it into every stitch or every alternate? x