


Last week, we looked at the Most Frequently Asked Question that I’ve received on Needle ‘n Thread: How to Transfer an Embroidery Design. This week, let’s take a look at another question that pops up quite often, regarding filling large areas (including backgrounds) with embroidery, especially in a solid color.
Mostly, this question of filling larger spaces has to do with satin stitch. “Should I use satin stitch to get a solid fill, and if so, how to go about doing it?”
First, let’s remove the myth that satin stitch is The Stitch for filling larger areas with solid color. It isn’t. Satin stitch works best over relatively small areas. If the space you want to fill is wider than the length of a regular embroidery needle (and the satin stitch has to travel that length), then satin stitch isn’t the answer. Technically, satin stitches that are longer than 1″ – 1.5″ are risky, unless they are well padded, or unless they are stitched over with some sort of line or lattice-type stitching to keep the satin stitches in place.
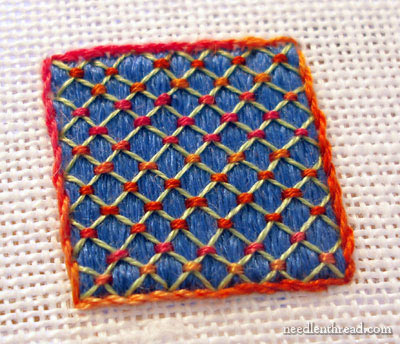
In the photo above, the blue background is worked in satin stitch. The area stitched is about 1″ square. Leaving the satin stitches naked, stretched over an inch (or longer) can lead to loose stitches, snags, and all kinds of other unpleasantries. So the satin stitches are covered with lattice work to hold them down. This doesn’t precisely achieve a solid filling, but if you were going to use satin stitch stitch to fill a large area with solid color, you could work a lattice over it in the same color.
So satin stitch on its own is not ideal for filling anything large. Further below, we’ll see how satin stitch might be used to fill large spaces, but only in conjunction with other (usually couched) stitches on top of it.
What are some other options for filling large spaces with embroidery?
If you want a smooth overall finish – not nubbly or textured – then you might try long and short stitch. Though long and short stitch is often associated with shading, it can be worked to very good effect in a solid color. And – a huge bonus – it’s super-duper forgiving, especially when worked in a solid color! You can go back and fill in missed areas, or stitch over misdirections pretty much without worry. The stitches just sort of morph into each other.
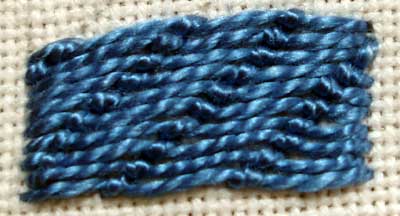
Another stitch that you might try for filling larger areas is Roumanian couching.
In the photo above, the area being stitched is only about an inch long. But see the little “bump” in the middle where the couching stitch is stitched over the long stitch? That couching stitch can be repeated along the line as many times as needed, to hold the stitches down. It can be worked from line to line in different spots, to form a pattern or a slight texture in the filled area. It can be worked to fill shapes, or just stitched in long lines closely together, to fill a background. It’s quite versatile for filling.
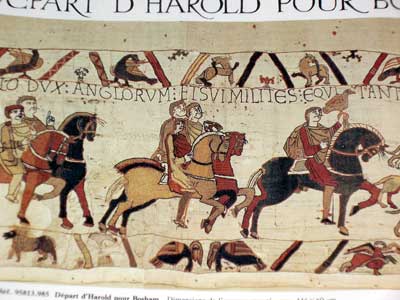
See the large figures in the image of the Bayeux tapestry above? They are filled with what is now known as Bayeux stitch. This is a technique that involves long stitches (like satin stitch, but they don’t cross the back of the fabric) that are held in place by perpendicular lines that are couched at intervals. Stitch by the Embroiderers’ Guild of the UK has a very good PDF online explaining Bayeux Stitch.
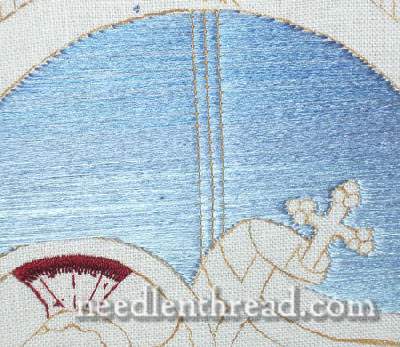
Much like the Bayeux stitch is the Italian Stitch, which is what was used to fill the sky background on my Agnus Dei project. Basically, Italian Stitch is a stitching technique involving satin stitches (or even long and short stitch, apparently – there are different versions of the technique in different old books on ecclesiastical embroidery) that are couched over with gold (real metal) threads. Like the Bayeux stitch, the satin stitches in this technique do not cross the back of the fabric. They are worked with the stitches on the top going across the fabric, then the needle coming up right next to the place it just went down, to take the journey back across the fabric on the top again. The gold thread couched over the long stitches hold them in place.
Bokhara couching is similar to Roumanian couching, but with a bit more texture. The couching stitches show up a lot clearer in Bokhara couching. Because of this, Bokhara couching looks great worked as a pattern background. It’s a good way to get a solid filled area, with a bit of texture and pattern to it.
Finally, another excellent stitch for filling large areas is Klosterstitch, and for this stitch, I’m going to refer you again to Racaire’s Embroidery & Needlework. If you check out this photo of her wallhanging project on Flickr, you’ll see what can be done with Klosterstitch! And again, under “Handouts” in the right column of her blog, you’ll find a PDF devoted to Klosterstitch. Definitely worth reading!
Now, for filling in other individual parts of designs – smaller shapes & things – the possibilities are endless! You can fill shapes with heaps of different stitches, from chain stitch as a filling, to coral stitch, to couching, to stem stitch, to trellis stitch, to… Really, the list could go on forever! You can find many stitches suitable for working as a filling in the How-To Videos here on Needle ‘n Thread. But I think the best bet for beginners for finding out what stitch to use to fill parts of a design is to invest in a good stitch dictionary. There are several reviewed here on Needle ‘n Thread, under Books & Links, if you’re looking for one.
Finally, it’s your turn! What stitches do you recommend for filling in large areas, especially backgrounds, with solid color? Input would be dandy, so do share your experiences, ideas, etc.!
Hi Mary, Thanks for these suggestions on stitches for filling large spaces. And particularly, for the two links to the how-to’s on Bayeux Stitch. Racaire’s site is a great resource.
Thanks for these tips 🙂 Large areas are always difficult for me to figure out how to fill so I tend to avoid them. Maybe not after this 🙂
I don’t have any suggestions, just wanted to say that this these are excellent suggestions with good, clear illustrations!
If you haven’t already posted about this (I’m behind in my blog reading), I see that the Koala Conventions Australian Needle Arts Shop site is now up and running.
I have had good luck filling large areas with rows of closely spaced split stitch. The finished areas have a sheen like satin–individual stitches do not stand out. You can achieve a lot of shading using different colors or variegated/overdyed threads. An area of grass, for example, could be worked with one strand of solid green and one strand of shaded in the needle.
The nice part about doing it this way is that the contours of a curved shape can be followed, which allows even more opportunities for shading.
Mary,
I use row after row of outline or stem stitch to fill large areas of a design in my vestment making. Depending on the design, these can be in straight lines… like, following the threads of the fabric, or round and round, working from the outer edge of an area to the center. Sometimes, as in filling in areas of “clothing” on a figure, I’ll follow an imagined line or drape of the fabric and outline the folds in slightly darker shades. I get a sort of “stained glass” look to my designs that way.
Tess
There’s the long arm stem stitch! With long arm there is less thread “wasted” on the back. This produces a lovely texture.
What an excellent tutorial, Mary! Learning how to fill large spaces (long & short, “painting w/ thread”, etc.) was such a feeling of “freedom” for my personal creative process. I still remember how thrilling it was when I felt somewhat competent. Still learning, however…..
Close lines of stem stitch work well, especially with wool (anything is easier with wool!!). But I have been wanting to try the Bokara for a while now!
Thanks for such good suggestions, Mary.
Mary,
My comfort zone for filling in would be the stem stitch. As you know, I just got some Long & Short stitch practice in, your lessons are excellent!
Look forward to trying some of the stitches in this post.Great links!
Thank you for all the inspiration and information.
Thanks for this, Mary 🙂
Thank you, Mary. This post was particularly timely for me; just last night I was fretting about a new design that has some large spaces to fill.
Great posting! Many thanks for mentioning my embroidery handouts and my work 🙂
I think you already know my favourite techniques for surface filling stitches… 🙂
btw. I also like surface couching for this purpose (like this one: http://embroidery.racaire.at/?p=1150)
Chain stitch, though it can be fiddly to get around curves and into tight spaces. Also, French knots.
I love the how to videos thanks will bookmark
I just wrote about one of my favourite filling stitches the other day! It’s the brick stitch, which is actually very much like the long and short stitch. 🙂
I know this is an older artcle but I’ve just stumbled on it. Wanted to let you know how helpful this is. I’ve returned to embroidery after a long hiatus. My previous encounters with embroidery were very basic even though it was my media of choice for a long time. Now I am really interested in going much deeper with it and I’m trying to dabble in all it’s basic forms. This article is great and your site is an incredible resource. Thanks for staying with it.
I have a question: when cross stitching a birth announcement on aida fabric, and sewing a cross stitch single stitch ‘frame’ around the motive, do one have to fill the whole background between the motive and the sewed cross stitch frame with stitches?
I would really appreciate advice.
Thanks
Estelle
Hi, Estelle – not normally. It’s usual in cross stitch to have the background fabric showing between elements in the design.
This is fantastic! I’m working on a giant embroidery project using yarn instead of floss and some of the spaces to fill in are quite large. This is so helpful, thank you! 🙂 Lisa
Old post or not – I have to say thank you for all those handy suggestions! It was just yesterday that I’ve been mulling over the best way to fill a whole background in an embroidered image. I’ll go for Bayeux and the couching stitches!
Angela from the Ore Mountain
The two Racaire links aren’t working.
Also–I’ve been on your site for going on two days, now. Thanks for all the information! My daughter asked for a set of tea towels with my cartoon character on them, rather than the dancing vegetables I was going to do. I’m torn between just doing outlines or filling in the character’s body. His head is 1″ across… Maybe I’ll just leave him in outline with a shaded area to give him roundness…
Anyway, I love your site and think you are a wonderful, wonderful teacher!
Thanks, I deleted those!
I have a feeling an outlined head will be more feasible! 🙂