


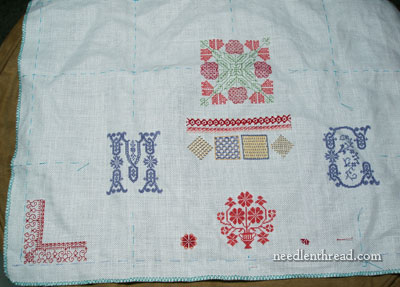
Still working with counted stitches on the spot sampler, the next step that I took on mine (and that my students took in the Needle Arts class) was to add a Quaker motif to the sampler. In class, along with the Quaker motif came a lot of history on samplers, the Quaker samplers, the various school girl samplers, and so forth, to fill in some background information on samplers for my students.
If you don’t prefer to add a Quaker design to yours, you don’t have to! But if you’re following along on developing a spot sampler and want to follow the same steps we took, then the Quaker motif is the next thing to add to your sampler, and to that end, here are some motifs for you.
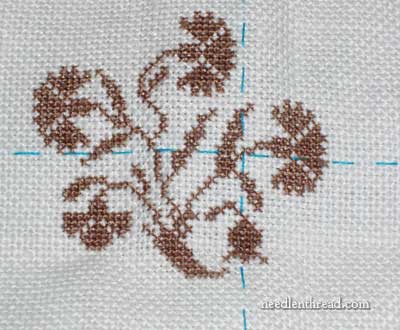
As to the placement of a Quaker motif on your sampler, you can center it somewhere, or you can do what the student did in the photo above. Basically, she just “plopped” it anywhere on her sampler. While we gridded off the sampler fabric to give some general notion of an organized layout, many of the students seem to want a more organic, loose development to their samplers, and that is just fine!
On mine, I put it in the center at the base of the sampler.
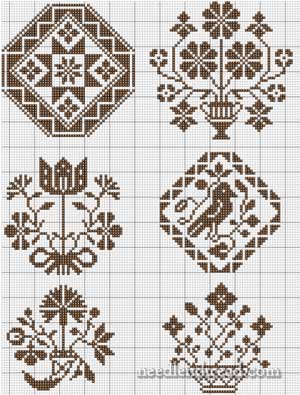
I gave my students a chart of eight Quaker motifs, allowing them to choose whichever they preferred. For the most part, they worked the Quaker motif in monochrome (one thread color). The motif is stitched over one thread of fabric, using one strand of floss.
If you’d like to add a Quaker motif to your sampler, you’re welcome to use the following chart and pick one of the eight provided here, or you can squiz around online or through books and find a motif you’d like better.
Here’s the chart of eight Quaker motifs, in PDF form:
Quaker Motifs (Update: Much lower resolution version that prints in two pages without having to reduce the size…)
It prints on two pages, and the shaded area is the overlap.
If you want to follow along with Developing a Spot Sampler, you’ll find a convenient Index for this series under Tips & Techniques.
Also, for those you interested in keeping a stitch journal, the page that I posted a while ago is available.
Next up in the spot sampler series is adding a touch of blackwork. Then we move on to other stitches that can be used in counted work: herringbone (and several variations and decorations), then various filling patterns. This will bring us to the end of counting, and we’ll be launching into free-style surface embroidery stitches.
Have a terrific weekend!
Want to let you know your quaker download is downloading very large.
Hi, Dawn – Thanks for letting me know. Maybe I should go ahead and save it at a much lower resolution. I have bad luck with slow resolution grids – the lines go wonky when I print them. But I’ll try to compress it a little bit and see what happens. Thanks again! ~MC
Is it just me, or does the PDF file not download properly? I can’t get it to appear on my screen. Sandi
Hi, Sandi – Hmmmm…. It opens on mine, but it is a relatively large file (I saved it at “high quality” because otherwise, sometimes the grid doesn’t print clearly), so it take a bit of time to download. Drop me an e-mail, and I’ll be happy to send it to you in reply! Maybe it’ll work better that way….
Best,
Mary
Mary,
At our ANG meeting last night, one of the ladies showed us the new(?) FriXion pen by Pilot. Have you seen these? They work just like a pen to mark canvas or linen, but when you apply heat (like an iron), they disappear without a trace. I’d be interested to hear if you have tested these and what you think of them for transfering designs.
Hi, Rinda – No, I hadn’t heard of them! Thank you for the heads up. I’ll give them a try. I’m always a bit wary about chemical-reaction-type pens, because I’m afraid they’ll work the way I want them to at first, but … what if later, they re-appear? It’s happened to me with water-soluble markers, for example, and I’ve also had yellowing from the blue water-soluble pens. BUT – that’s not to say I’m not game! I’ll look them up and give them a try! Thanks for the information!
Best,
Mary
Oh My Goodness! I fixed the Quaker chart – it is now a much smaller size and prints in 2 pages without having to re-scale it before printing! Thanks, Dawn and Sandi, for letting me know there was a problem!!
~MC
Hi, Mary. Just wanted to let you know that it printed out fine this time. Thanks a lot for the designs. They are wonderful. Sandi
Speaking of chemical reaction pens I would be wary of using them on any “important” work, but that is just my suspicious self. Personally I just get along with a common pencil, or a white pastel for dark fabrics: most of the lines will be covered, and if not, brushing gently with a toothbrush (for accurate aiming, and not riuning the stitches) during the final wash and a bit of marseille soap does the trick. Of course it would not work on stuff you are not going to wash…. but that is exacly the kind of stuff where I would not want chemicals. A part from yellowing and the like thisstuff is tested forexaclty fiveminutes not for years, and there isno knowing that in a couple of decades it won’t haveeaten holes in your heritage crewel work piece. Bah!
Hi mary sorry when i give any cooments iam in small city i do not write great commentes but ido copy to any others i heart pl show how to design beadwork to cloth
Que pena, Mary! El enlace al archivo de puntadas de Sharon ya no está disponible….
Un abrazo grande!
Thanks for letting me know, Nanny. I’ve removed the broken links! 🙂