


So far, on the Goldwork & Silk Tudor-style Rose embroidery project, we’ve satin stitched the outer leaves and petals, embroidered the inner petals in long & short stitch, couched the gold tambour thread around the outside petals, and now it’s time to move to the inside ring of petals.
On the inner ring of petals on this piece, I’ve used two types of gold thread: the #7 tambour thread that I used on the outside petals and a #7 check thread, to add some sparkle and texture to these inside petals.
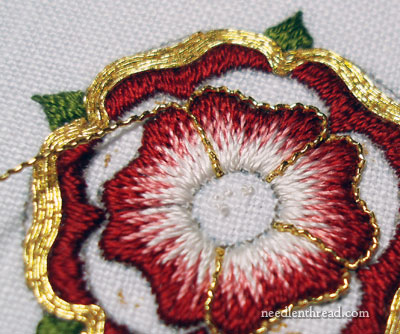
Check thread is quite easy to work with. I’ve written about it before, when I used it in my goldwork pomegranate project. You handle check thread pretty much the same way you handle passing thread – the only difference is that check thread is wavy. It’s great for outlining!
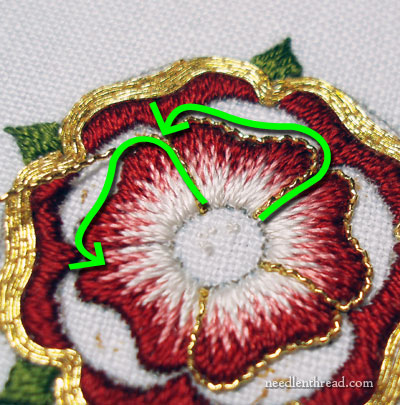
The green arrows mark the path for each piece of check thread. For the 1.5″ rose, you’ll want to cut 5 pieces of check thread, each about 3″ long. Starting in the middle of the flower and leaving about 3/4″ overhang of check thread, couch the check thread up the right side of the petal, around the top, and end it in the little “valley” where the adjacent petal meets the one you’re presently working on.
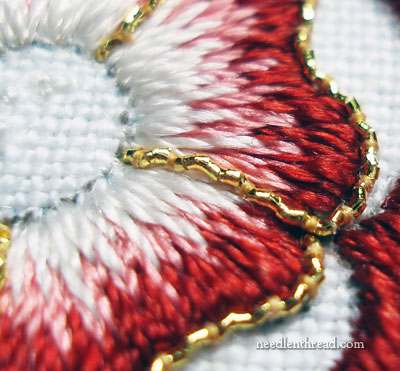
I used the YLI #100 silk thread that I talked about in yesterday’s post to couch the check thread, and I couched at about every other “wave” in the thread.
After couching up the right side and across the top of each petal, plunge your ends and secure them on the back. This is how I secure my plunged goldwork threads on the back of the work. I don’t always “strip” the gold, but sometimes I do, if I need to squeeze the threads into a tighter space. It just makes the threads a little easier to secure.
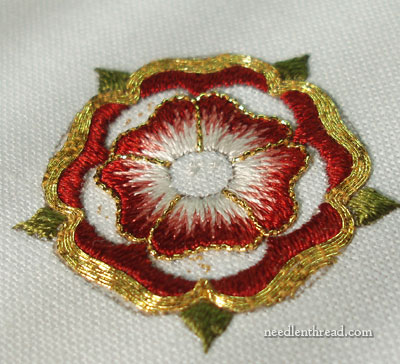
Work all around the five inner petals this way, until you’ve plunged the last bit of check thread. Now, you’re ready to fill up the rest of those inside petals with gold! But we’ll save that for a bit later!
Here’s a lits of all the Goldwork & Silk Tudor-style Rose tutorials in sequence, in case you want to follow this project from beginning to end.
This thread is so exciting!!
I’m starting to think to alter the design of my Bishop’s cope, from 2 Tudor Roses at the top on a white appliqued section, to one big rose and do a 1.5 or so ” one – it is so lovely!
I want to use it in my piece in any case, but it deserves to be a feature I think!
Thankyou so much for the lessons. They help pull things together for me 🙂
This project is utterly stunning! I especially love that shade of red which looks like rubies melted onto the cloth, encased in shimmering gold. It is sheer beauty to the eye!
Please check out my lace blog. I will be adding pics each week and would appreciate comments on the different laces.
This has nothing whatever to do with today’s subject, just wanted to offer congratulations for your article on historical online pattern sources in the latest issue of Inspirations!
Thanks, Janice! I had forgotten it was coming out – just saw it today, too. I love getting Inspirations in the mail right before lunch. Makes for a great lunch break!
Thanks, all, for the comments. I’m planning on putting the whole “Tudor-Style Rose” into one PDF, eventually. Since I have to stitch several more of them, I’ll be able to get some close-up photos of trouble spots and trouble-shooting.
MC
That is looking out to be a beautiful piece. Gold thread embroidery is fantastic and you’re using it well.
Hi Mary,
I absolutely love this. I have about half the stuff now to make one of these, some of my stuff is on back order with needle in a haystack. I got a yard of the alba maxima linen…heaven. I got my first batch of different silks and also my goldwork sampler kit from Berlin embroidery came!
I am like a kid in a candy store.
Ok, I can totally see this coming up in the future. There will be history books that will site Mary Corbet as being the driving force behind the 21st century revival and surge of silk and goldwork embroidery!! It all started with a beautiful crimson tudor style rose!!!
🙂
Enamored with silk and gold,
Mindi Hammerstone
Hi Mary,
Could you please tell me what and how the lasso was that you used with the gold thread?
Thanks and cheers,
Lyn Dornauf
Beautiful, félicitatuons milles fois
Fernande