


Raised stem stitch is a great way to create thick, textured ribbons, bands, ropes, tree trunks, caterpillars… lots of possibilities with this technique!
There are different ways to go about raised stem stitch – you can really raise it by working it over a cord or rope padding (as is done in Casalguidi embroidery), or you can raise it moderately by working long lines of horizontal stitches, over which you can then work the vertical stitches you’ll see in the tutorial below, and then the stem stitch over those. Or, you can just barely raise it a bit, by working the vertical stitches right on the fabric, as we’ll do here.
In today’s Stitch Play, this is what we are going to create:
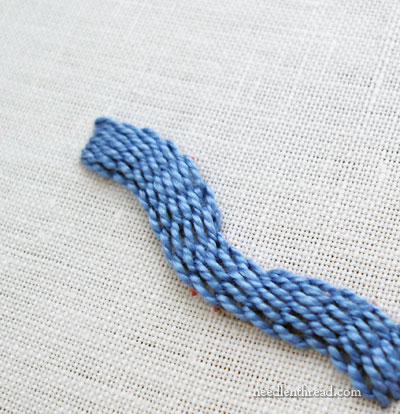
Now, if raised stem stitch seems ho-hum to you, I’d suggest watching this develop, because other stitchy ideas may pop into your head as you see this come together. I’ll also show you how to thicken one part of the band while leaving other parts narrower, which could come in handy for tree trunks and branches, or irregular bands that are thick and thin in spots. If you like textured embroidery, this is a nice element to add to your textured work, varying the thickness of the band will make it more adaptable to different stitching circumstances.
Beautiful and meaningful photo, isn’t it?
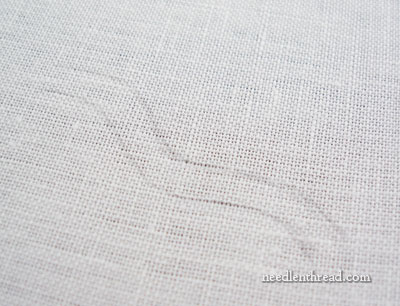
We’ll start with this step – draw a double line on your fabric, where you want your raised stem stitch to be. I drew a wavy line, so that you can see that this technique works well on wavy lines.
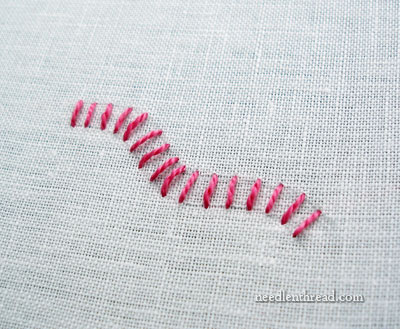
Between the two lines, work evenly spaced straight stitches perpendicular to the lines. You’ll have to compensate a bit on curves. What you want to accomplish are relatively vertical bars that you’ll be working the stem stitch over.
Don’t pull these stitches too tight – you’ll need room underneath them for your stem stitch.
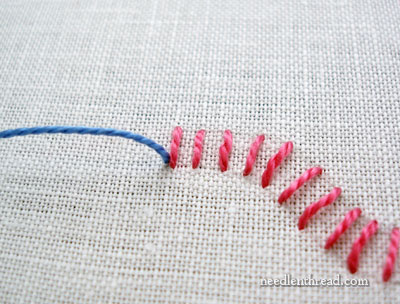
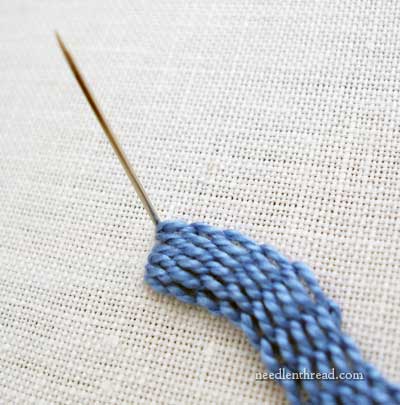
Beginning on the left end of the squiggle, we’ll start the stem stitch. I’m working with a second color of thread, so that the stitches are clearer for this tutorial. If you work with the same color of thread, it’ll be easier to keep those underlying bars discreet.
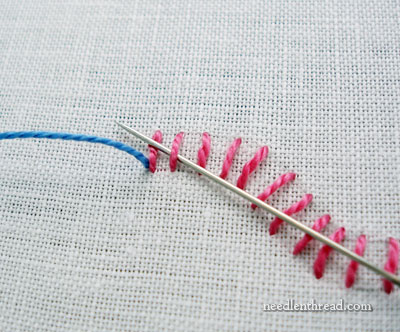
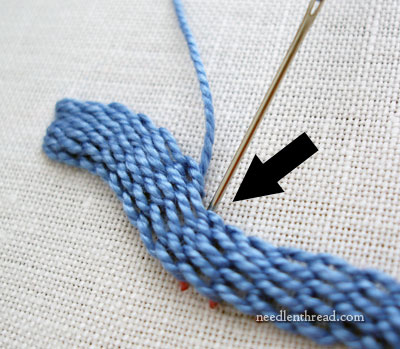
Cross over the first two vertical stitches, then back underneath the second one and out, as shown in the photo above. Keep the working thread below the needle, just as you would for stem stitch.
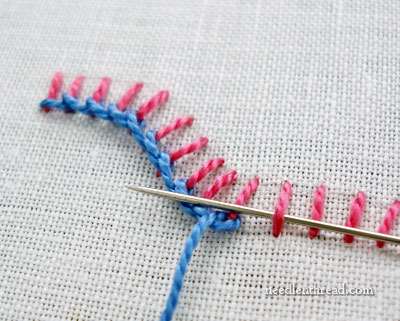
Work the stem stitch all the way down the line this way – going over two bars, and back under one, with the working thread below the needle.
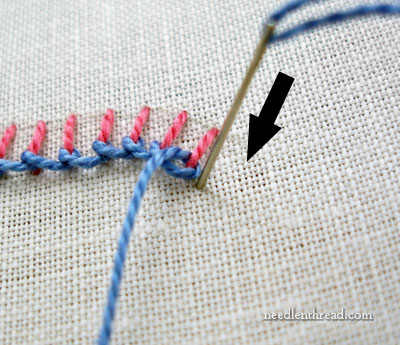
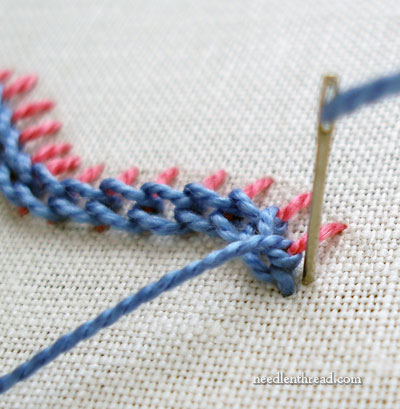
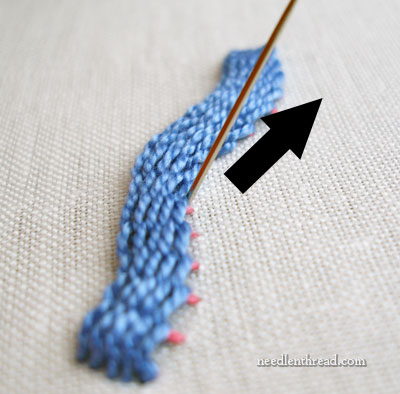
When you get to the end of your line, after you’ve passed under the last bar and out, take your needle down into the fabric right at the end of your line of stem stitches. Turn the work over, and run the needle under the backs of your stitches, to take you to the starting point over on the left again. With raised stem stitch, always working from the same direction keeps the look of the stitched band nice and consistent.

Now, right here, you can see an interesting combination that you could actually incorporate into your stitching as is. It looks like a two-colored buttonhole stitch, almost, doesn’t it?
Or a skinny blue centipede in profile, with long pink legs.
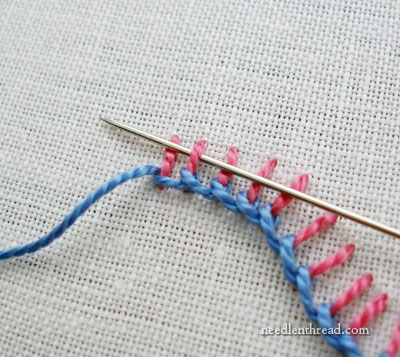
But let’s keep going! Work the next row in the same manner as the first, from left to right.
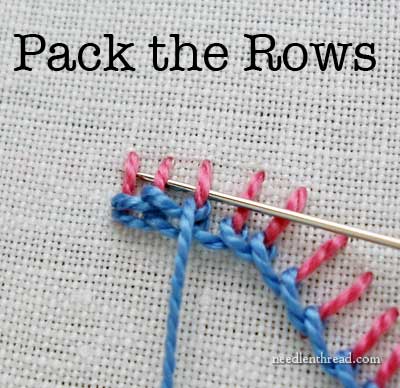
Pack the rows together as you go. I like doing this from the back of the pink bars, taking my needle behind them and pushing on the back of the stem stitches, to push the rows together. But you can do it from the front, too.
And as you get to the end of the row, take the needle to the back, run it under the backs of the stitches, and get back to your starting point on the left.
And then go through all of the above, again, until you’ve filled up the area well and good!
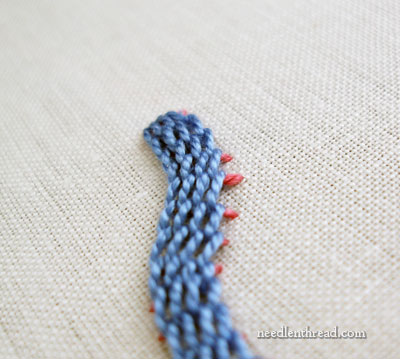
Hmmmm. A bird’s eye view of the same centipede?
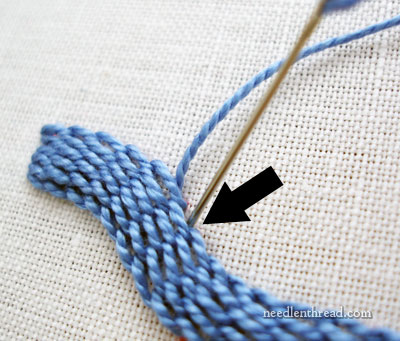
Now, if you want one area of your band thicker than another – say, the left part, before the center wiggle in this band – then you can actually start at the beginning, fill with the stem stitch, and end part-way along your band, by taking the needle to the back right before the next bar that you would cross. Angle the needle a little in and under the stem stitched area, to hide the end of the stitch a bit.
And you can continue to fatten that area on the left, by working yet another half-line…
… and ending a little shorter this time, if you want.
If you want to fatten out the other end of the squiggle, you can bring your needle up past the center wiggle in the line, and fill the right section of the squiggle, leaving the middle skinny and the two ends a little fatter.
So that’s how you work a raised stem stitch. I had to hold myself back from adding little green fly stitch legs to this thing, and a big googley eye one end.
This is a technique that offers lots of possibilities for sculptured or textured stitching. Later on, we’ll go beyond this a bit and play with it further!
Hope you find some use for it!
Stitch Play is a new stitch series here on Needle ‘n Thread that explores, in pictures, various things you can do with different embroidery stitches. If you have any stitch, technique, or combination of stitches you’d like to see featured, feel free to let me know! I’ll see if I can work it out for you.
Stitch Glitch is a new series here on Needle ‘n Thread that works out, in pictures, different difficulties that may arise in stitching situations. If you have any requests for Stitch Glitch, I’m all ears! I’ll be happy to help you out if I can!
What a great stitch, Mary! I’m going to incorporate this into a sampler I’ve been working this weekend (yes, it’s primarily cross stitch).
But this brings me to a possible website upgrade. I really want to print this, and it would be really cool to have a special print format for your stitch play and stitch glitch posts.
Just a thought,
Keli
OHHHHHH. That is how you do a raised stem stitch. I did it all wrong on my little caterpillar on my needlebook. I mistakenly thought that raised stem stitch was stitching stem stitch over some foundation stitches to give the stem stitch lift and more dimension. I LOVE the method you describe here. It is so beautiful. Amazing how much there is to learn in the world of embroidery!
Have a great day.
Tania
Hi Mary!
I’m with a BIG smile in my face! Guess why I’m working with something like this but in a circle which need short straight stitches between the straight stitches between the two lines of the circle to compensate – can you understand what I mean? my English sounds a little mess…
It is for a project I was asked to make 🙂 Hope I can show it soon
This is just so good. I love, love all these great tutorials you do – they are so thorough, so detailed, so clear and easy to understand.
You are a GREAT teacher for all of us who have nowhere else to go to learn about embroidery and if I did not know the English language I could easily learn just by watching your photos.
I’m a fan, addicted, excited, a groupie (will you marry me???)!
Thanks for a great tutorial. Lots of ideas there!
Nice! 🙂 Great technique for making centipedes or caterpillars 😀 thank you for sharing 🙂
I like this stitch and can see how it would be useful. While reading, I kept wondering how it would look where you have the pink satin stitch on the medallion project.
Hmmm….can you work this in sections? For example, I’m stitching a white work map of the Nile. I think this would keep the river from blending into the background too much, but the length seems a bit too long for me to feel comfortable running the needle back to the beginning. Would it look too piece-y, or would it blend well?
Mary….Thanks again for coming up with another fantastic way to share your talents with us with Stitch Play and Stitch Glitch! Your directions and photos are always so clear to understand. I just wanted to let you know how much you are appreciated!
ohhhh, ahha. That’s how to widen and shorten the caterpillar. That makes so much sense. You make it sound so easy to do. I learn so much from your teaching. Your directions provide the switch to turn on the light bulb for stitching clarity to me. Thanks a bunch for another switch turned on!
“over cord”….oooo!
Lovely. Thank you for sharing.
Mary, thank you for being so inspiring! I am having a wonderful time getting ideas from you. I have some silk fabric from the 1800’s that I REALLY want to embroider. It is fragile, yet sturdy enough I think to accept stitches. Any suggestions on how to handle the fabric, or leave it alone?
Mary,
It is beautiful stitch. I have used the same technique but I did chain stitch. I just felt to share my project to show how the stitch look when worked on designs. Here are the links ..
http://sadalas.blogspot.in/2010/04/knotted-broken-chain-stitch.html
http://sadalas.blogspot.in/2010/04/knoted-buttonhole-stitch.html
I love the look of raised stem for bows and some monogram styles, especially when worked with a variegated thread. It produces a nice shaded effect.
I took a class with Kari Mecca several years ago and she had us turn the work around, basically working stem in one direction and outline in the other, rather than plunging the thread and returning to the beginning again. I’ve tried it both ways and don’t notice a difference. It’s easier to remember whether the needle should be above or below the thread your way, though!
Stitch Glitch: I have difficulty with diagonal stitching. I tried to do a Schwalm piece that had a filling stitch called the “rose” stitch that was placed diagonally across the pattern. My eyes could not follow the diagonal pattern at all. I’ve also noticed this difficulty in other stitchwork. Any help?
i am so glad i “stumbled” across this site. i just love it. thank you for all the tutorials. i never knew there were so many stitches.
Great idea! This stitch looks so nice. Thank you.
hi mary, i m so impressed with your stitching style, especially the variations u make with typical stitches. i have learnt a lot from you and have practiced most of them, esp. all of the shisha stitches.
I love this stich! Thanks!!!
very nice project to serve to women. thank you.
great tutorial glad I found it. I will start embroidry again thank you.
Hola, me quede encantada con esta publicación, es del año 2012, sigue estando la página?
Me encantaría recibir más, estoy aprendiendo a bordar crewel, todo por internet.
Usted de que país es? Yo soy de buenos Aires Argentina.
Muchísimas gracias por su molestia. Espero contestación
Veronica
Do you have a book of patterns or know of one? It’s frustrating to try to find interesting transfers for one who is not an artist. Thank you for your beautiful work and clear instructions.
First-timer to your site. I’ve been embroidering for 40 years and I now see all these fun stitches and I love the tulip letters! Thank you so much!
This is amazing! Will I be able to use this on my quilt?
Can you please show video of what you’re doing? It’s hard to follow a picture. Thank you so much for your time and contributions to this blog, I’ve keep coming back to learn more.
There is a video. You’ll find it listed in the how to index here: https://www.needlenthread.com/videos
Wonderful! Thanks for using different colors so the individual stitches stand out clearly in your pictures.