The last time we looked at the Medallion Project, it was undergoing a little demolition. But the demolition wasn’t really a set-back, you see! It was just Something that Had to Be Done. And I’ll tell you why, below. Trust me, the reason will not bowl you over with any brilliance. It was just a small, stupid mistake on my part!
The five goldwork and silk Tudor-style roses around the outside of the medallion are finished, too, which is a major chunk of the piece at this point. They were actually finished before I started in on demolishing the dots, though after a while, these little details begin to blur together…
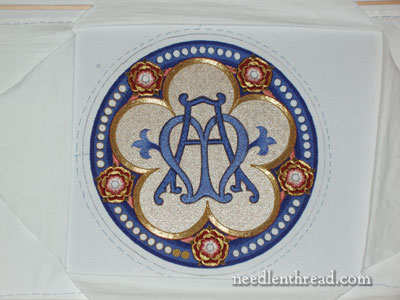
Here, we have the medallion from a bit of a distance, straight on with a flash, which really picks up the flat silk on the background of the monogram area. The roses are finished, with the exception of their gold centers.
Isn’t it funny how, when seen from a distance, it just doesn’t look like that big of a deal. It would be hard to convince people who know nothing about needlework by hand that they are looking at over 400 hours of work right there!
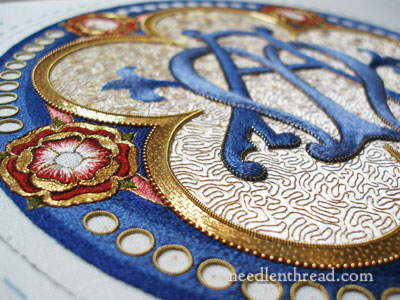
You can see in this photo that these dots are still outlined, because the dots that I demolished the other day were not these dots. The dots I demolished were the first ten goldwork dots on the lower right side of the medallion.
Note: Take clear, consistent notes when you work on a project like this. I generally do, but there are times when I tell myself I’ll “write it down later,” and then I forget to. The first ten dots had to come out, because I used a different thread size on them. I used a size 1 on the pearl purl outlining the dots. I should have used size “very fine.” The very fine looks much better than size 1. It takes the tight curve of the circle better. Initially, when I discovered the mistake, I thought that it might not be that noticeable. And maybe it wouldn’t have been that noticeable. But I sure saw it, so the first ten dots had to go.
It was a good lesson! Don’t forget – when you’re working a project, especially a Big One, keep good notes, and write down any changes you make immediately.
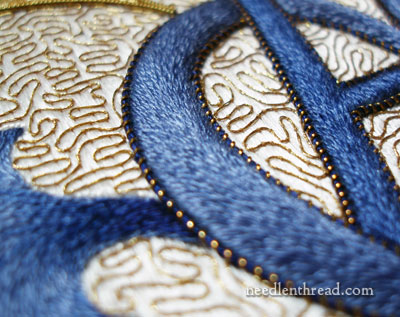
When I’m stitching, I often find myself thinking about the project I’m working on. Not just thinking ahead, mind you! I think back over the parts already completed. The other day, I found myself trying to pin down my favorite part of this project. And this is it, right here in this photo: the background of the monogram area, the monogram, and the lizardine outline. I’m not sure why I like this part best, but I do.
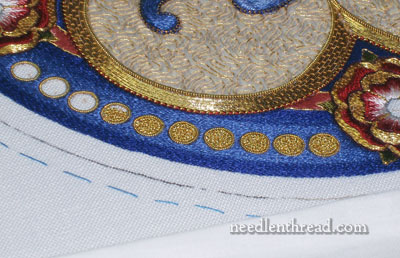
And here, you can see that the New Dots are filling up!
Another Note: This is not a technique that I would recommend for beginners. Making the join on the pearl purl couched in tiny rings is really difficult. If I were doing the project again (hahahahahahahahaha), I would not do the dots this way. But it was too late to change tactics at this point. I was actually hoping that, by the time I reached dot #25, some Magic Formula for making the Perfect Join with pearl purl couched in tiny rings would make itself apparent. But it didn’t work that way!
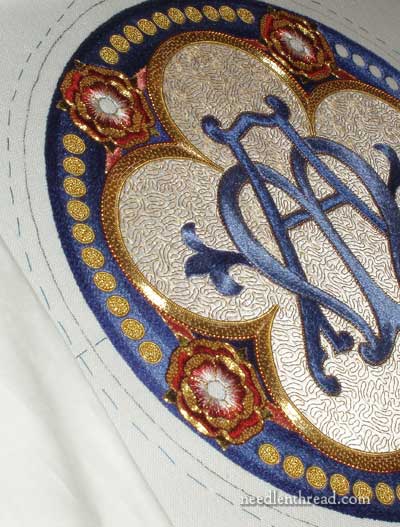
And…. Almost there!
If you’d like to follow along with this project from beginning to end, in chronological order (with the backstory, tips, techniques and instruction for various parts, and even all the mistakes!), you’ll find every article relating to the project listed in the Medallion Project Index.
If you’d like access to all the tips and techniques discussed in the Medallion Project, including complete step-by-step coverage of the Tudor-Style Rose, conveniently collected in one document, interlinked, referenced, and indexed, why not add the Marian Medallion Project e-book to your library? It’s packed full of all kinds of embroidery tips for undertaking a project like this, all in a convenient electronic format for easy searching.


I think I’ve missed it, but have you posted a close up shot of the dots yet? They look amazing!
Oh, Glory be, that is looking like some kind of beautiful, Mary. 🙂
Mary, I just wanted to tell you how much I enjoy the posts on the medallion project. It is such a pleasure traveling with you on this beautiful journey. Thanks for taking the time to share this project (and all of your embroidery goodness) with the rest of us.
Barbara Q.
I’ve been away for awhile as far as commenting as we have been moving, but I’ve still been following the project and you’ve really made a lot of progress in the last couple of weeks. It is looking absolutely gorgeous — and now you’re in the home stretch! This is so inspirig and I hope that one day my work could be a 10th of the quality of yours!! Thanks for all you share!
That is so annoying to make a mistake like that! I hope you were able to salvage the check pieces. Otherwise that would be a fairly expensive mistake.
When it is all finished, could you try to emulate church lighting for a photograph so we can get an idea of how it would look in a church? Just maybe a few candles, as it would be pretty hard to have a stained glass window around. It’s really looking wonderful.
Hi, Cynthia! All told, materials wise, it’s about a $4 mistake. Time-wise, that’s another question. I’ve made more expensive mistakes in my life, I assure you!! 🙂
I think even a non-stitcher will understand that they are seeing something extraordinary. So beautiful. It will surely find its place in a museum someday.
Dear Mary,
Oh the leisurely, relaxing, enjoyable pursuit of the needle arts … the angst is surely the mark of a true master. Worst still if the miss-matched dots were left. Your work is stunningly beautiful and this is why … nothing but the best you can produce will do all the way to the finish line. Thanks for sharing your journey (marathon 400 hours plus), the setbacks and triumphs. You are truly inspirational.
There is something almost sad about reaching the finish line. That tender sweet feeling of an impending graduation ceremony is there, along with a joy at having accomplishment within sight. It brings the knowledge of a job well done, but also a sense of loss: loss of action, of the struggle and of the actual working part. This is a magnificent work Mary, – a piece created for celebrations that can be celebrated in its own right. One last question though! Is there going to be a finished edge around the whole thing? I keep sensing that you should have a heavy stretched pearl purl with a very dark color perhaps encircling the entire medallion – or is the heavy deep blue line going to pop against the chasuble itself? Oh and BTW…my favorite part is the vermicelli on white satin.
Oh my gosh! My heart dropped to my feet when you left us with the cliff hanger the other day. I enjoy hearing all of the tales through your posts. It’s real life in the making of beautiful embroidery. You go girl; looks like you’re nearly to the end of this project!
Very beautiful. Has it been half-a-year so far on this project? It is a very worthy project to focus on. I love it. Is it heavy? What is the finished size? Do you attach this applique to the garment (or vestment) or do others perform that task?
Mary, The piece is exquisite. The stunning gold work has inspired me to try a small piece of my own. Which leads me to my question. Would you be able to recommend a kit or specific artist for a first time goldwork embroiderer? I guess my knowledge/skills fall into the intermediate category. I would like something that would hold my interest but not be overwhelming. Any thoughts?
Thank You for sharing this beautiful piece of art and the journey of it’s evolution.
Sandi Ratliff (Happy Stitcher in Florida)
Mary,
I humbly bow to your greatness! This project is just taking my breath away! Your talent makes me want to do more with my own…thanks for the endless inspiration!
Kathy
WOW!!! I just keep saying WOW!!! your journey has been epic and you’re reaching the end. Your work truly is inspiring, Mary. I hadn’t done any hand embroidering in oh about 35 years until i stumbled on your site. Even then I just kept reading and reading until you came out with the tudor style roses. Then, and only then did i start embroidering again and you’ve been instrumental in my resuming embroidery, not just counted cross stitch. Now ask me if that’s good or bad….lol….i don’t know yet. All i know for sure is that i’m learning a lot from you and branching out further and further into embroidery. I just got from the library The Art of Embroidery by Lanto Synge and can’t wait to dive into it.
So kudos Mary for your work and patience in teaching us all about the ups and downs, ins and outs, over and under of hand embroidery. I certainly do appreciate it.
I have a favorite part: the couched goldwork rim around the monogram. The glint of the gold’s reflected light catches my eye. So very pretty.
Mary thank you for posting your progress.
I really do look forward to them.
Personally I am not a religious project person so I look at them as art and it is a pity that I and others cannot stand in front of it as you can.
Did you ever consider red dots but as a little domed mound with the gold circlet?
To me the all gold dots seemed lost a bit but that could be the light.
Other than that I think it is a beautiful work and I am glad I am not doing it.
I look forward to your updates. Thanks for sharing.
OMGoodness, Mary, 400 hours! I have recently been wondering if I have been making too much of a meal of my BOM project, but I think you have just set my mind at ease!
Mary. What can one say? What should one say?
This is undoubtedly the finest piece of needlework I have ever had the privilege to see. Only 400 hours, wow, you do work quickly.
What I wouldn’t give to see this for real, up close and personal, and on the back of a priest moving around.
Aloha Mary,
It looks stunning! So glad you saw the problem before too many circles were done. Almost there! Good luck.
ji
G’day there Mary,
The mind boggles! The eye oggles! the jaw joggles!
What a journey, “and all for under a pound you know…and the wheels going round.” Thanks for the free tickets for this amazing ride. I feel very fortunate to be part of it, if you’ll excuse my impertinence for claiming to be part of it just by looking over your shoulder and hanging on every word!
When it is finished you’ll hear a cheer from Down Under as we applaude you. Actually, it’s building up even now!
Hooroo, Kath
Ahh! Now I see why you had to remove the dots. For a moment I thought that you had gone completely crazy 🙂
Absolutely exquisite!! Gorgeous effect with the subtle shading in the monogram.
I’m sure the vast majority of us wouldn’t never have noticed, but if you do that’s reason enough to change it. You would never be happy with it and, if you’re like me, would be constantly pointing out the ‘mistake’ to people.
‘wouldn’t never’???? Yikes. Left my English skills in bed this morning (being that I was up at 4:30 I suppose I might be forgiven??)
Dear Mary
How beautiful the Medallion project is a true work of art. You’ve worked so hard on this project not only on the embroidery but sharing it with us through your detailed posts and photos thank you.
I’m sure the recipient will love it.
Regards Anita Simmance
Absolutely stunning piece of work! Gorgeous, wow! Congratulations on finishing.
Hello Mary,
It is such a pleasure to follow your project, with its worries and sucesses. I am stunned by your 5 roses : they look perfectly the same, and this prooves your technical skills !
You should be proud of yourself to be able to produce such a wonderful piece of work.
Thank you Mary for the twilling stitch tutorial! Now i know how to do this stitch
went on line to your website and found the ‘missing’ posting -do not know how i missed it
sorry -should have known that you would not leave us in the lurch
Hi Mary,
I am a lurker! Just wondering if while you were working on this amazing project you were thinking….. What are you going to do next? Oh you are allowed to have a little time off in between major works as well!:-)