


An embroidery hoop seems like a pretty basic piece of equipment, doesn’t it? Something that doesn’t necessarily require explanation? But setting up an embroidery hoop correctly is often the key to better end results in your embroidery, so I think it’s worth covering!
I often see beginning stitchers using hoops without a clear understanding of what the hoop is supposed to do for them. The hoop is not simply there to give us something to hold onto. Its purpose is to supply tension on the fabric. But how much tension is enough tension? And how careful are we to ensure that the tension does not change significantly through the course of an embroidery session?
So let’s look at how to set up a hoop, and talk about some different aspects of using a hoop for hand embroidery.
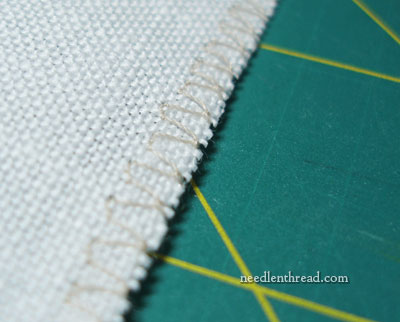
Before placing your fabric in an embroidery hoop, the fabric needs to be prepared. Most embroiderers have their own favorite method of preparing fabric for the embroidery process, so if you already have your go-to method, then don’t worry about this! This step is to prevent your unfinished fabric edge from fraying while you’re holding your work. On every embroidery project I undertake – even if it’s just free-style surface embroidery with no pattern, or even if it’s just for working up photo samples for the website – the first thing I do after cutting the fabric is run the edges through my sewing machine, using an overlock stitch (which requires an overlock foot). If you have a sewing machine but not an overlock foot, you can set your machine on a zig-zag stitch and stitch right next to the edge.
If you don’t have a sewing machine, you can do this by hand, by working a quick whipstitch around the outside edge of the fabric using regular sewing thread.
Some stitchers will tape the edges of their fabric with masking tape or similar low-tack tapes. This technique of binding the edge is often used for needlepoint, on the edge of stiff canvas, but it can be done on fabric as well. It’s not a method I prefer. The tape stiffens things up on the edges, while sewing the edges keeps the fabric supple and easier to hold. Exposed sticky parts of the tape can be a magnet for dirt and thread snippets, too.
Now, here’s where we could discuss the best types of hoops to use for hand embroidery, but since I’ve already done that here on the website, I’ll just refer you to the article, which is called The Embroidery Hoop, and in it, I discuss what to look for in a good embroidery hoop and where to find them.
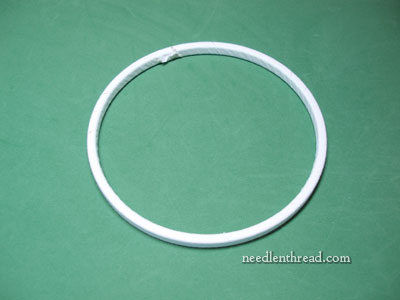
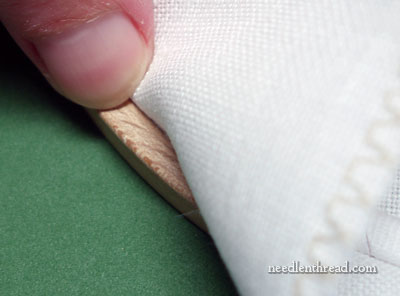
Once you have a good hoop, you should bind at least the inner ring of the embroidery hoop. It seems like a pain in the neck to bother with this, but it makes such a humungous difference in the way the hoop works, that you’ll definitely want to do it! And if you do it right and do it well, you only have to do it once.
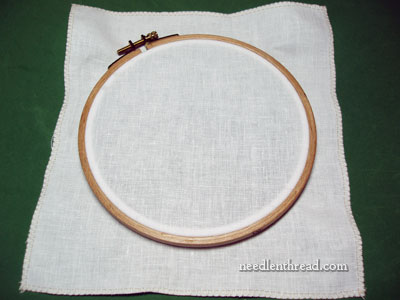
With your fabric ready and your hoop ready, lay the inner ring of the embroidery hoop on the table.
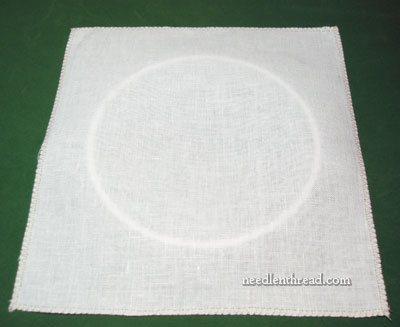
Place your fabric over it. If your fabric has a design on it (this piece is for free-style embroidery, with no design), if possible, center the design in the middle of the ring. If not possible (if the design is much bigger than the hoop), center the part of the design you want to work on.
Note: Generally, your hoop should be small enough that the fingers on the hand you are holding it with can reach to the middle of the work in the hoop. Larger hoops work best when they are mounted on some sort of stand, leaving both hands free for stitching.
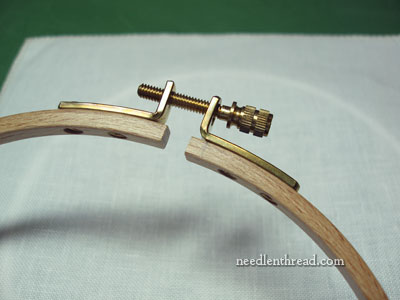
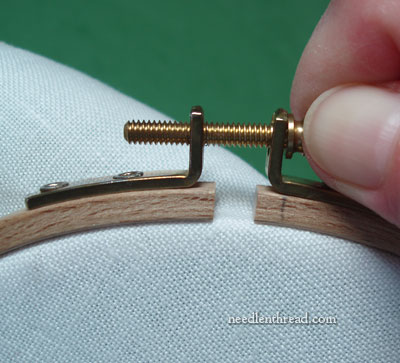
This is what the hardware on a good hoop looks like – it’s sturdy, brass hardware that isn’t going to bend and warp when the screw is tightened. For right handed stitchers, the screw head should be pointing to the right, and for lefties, to the left.
Make sure that the top ring of the hoop can be flexed open a bit, and pull it open enough to fit it over the fabric and inner ring without having to push hard to get the outer ring on.
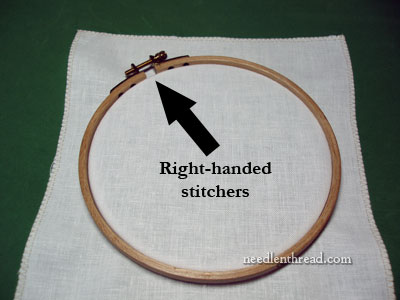
If you have a design on your fabric, for right-handed stitchers, place the outer ring hardware to the top left of the hoop, at about 10:00 or 11:00 o’clock. If you are left-handed, place the hardware to the top right of the circle, around 1:00 or 2:00 o’clock. These are the best spots to minimize catching your thread on the hardware while you stitch.
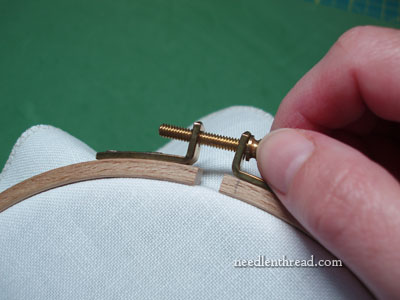
You’ve flexed open the outer ring and put it over the fabric and inner ring. Now, tighten the screw using your fingers, closing it enough to grip the inner ring and hold the fabric in place.
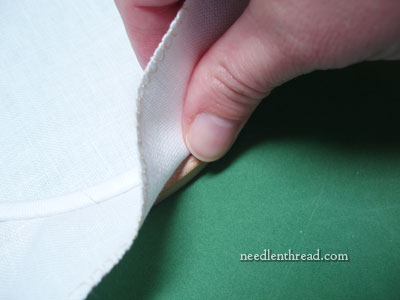
Then lay the hoop face down on the table, and using your thumb on the outside of your fabric and your other fingers on the inside of the fabric, go around the hoop, tightening up the fabric.
While you circle the hoop, pulling the fabric taut, your fingers will be pushing down on the inner ring, while your thumb and fingers are pulling on the fabric.
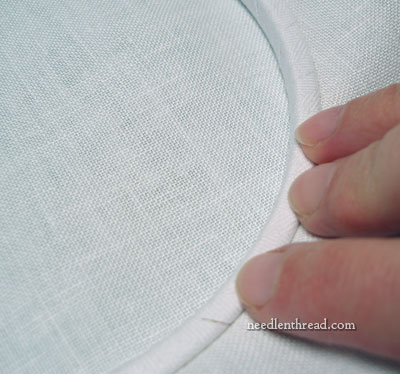
Make sure that, as you pull, you are pulling evenly all the way around the ring. You don’t want to warp the direction of the threads of the fabric towards one side of the hoop or the other.
Once you’ve gone all around the ring, pulling the fabric, tighten the screw as much as you possibly can with your fingers. You’ll get to the point where you think the screw is completely tight, because your fingers can’t tighten it anymore.
Good so far, but you aren’t finished!
Go around the hoop again, pulling the fabric taut in the same manner described above.
Tap on your fabric. It should sound like a drum. Nice and taut.
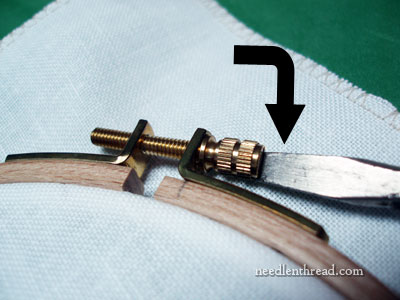
And now, because your fingers are going to be pretty ineffective against the screw on the hoop, break out the tools! You do have one of these in your embroidery tool box, right? If you’re a hoop-user, you should! A flat head screw driver is the hoop-stitcher’s best friend. It’s essential for the final tightening of the screw. Tighten the living daylights out of that thing!
If you have a good hoop, the hardware will stand up to all this, and your fabric will be delightfully taut for your entire work session.
When you’re finished working, don’t forget to take your fabric out of the hoop. It really shouldn’t stay in the hoop for long periods of time.
Ok, ok. I’ve left my fabric in the hoop for several days, and have suffered no ill effects. But if you’re packing away your stitching for a while, or if you know you aren’t going to get back to it for many days, take it out of the hoop. You don’t want permanent hoop marks or dirt rings to develop on your fabric.
What about you? Do you hoop up differently? Do you avoid hoops altogether? Do you use a different type of hoop you like better? Are you a frame fanatic instead? How do you supply tension to your stitching surface? Any input you can give will certainly be appreciated by all! Feel free to leave a comment below!
Great post, Mary! One can always learn something new. I never thought about facing the hardware in a certain direction. But, I turn my work a lot, so I suppose it wouldn’t make a difference to me, anyway. I choose my hoop according to the size of the piece I’m working on in order to avoid having to re-hoop often. The screws on some of my hoops are not compatible with a screwdriver, so I use a small pliers to tighten.
Hi, Debbie –
I’m a work-turner, too, when working in a hoop. But I generally keep the hardware part to the left, when possible, because I’m right-handed and it helps eliminate catching the thread (usually) on the hardware.
Thanks for your comment!
Hi Debbie,
Just FYI, some LNS carry a little package of Creative Notions Comfort Grips. They are brightly colored, rubbery little cylinders that slip over hoop adjusting screws, with or without a slot for a screw driver. You can very firmly tighten the screw without hurting your finger. I love the little devils, and they are a lot smaller and lighter than a pair of pliers.
Happy Stitching! Sara
I prefer to sue stretcher bars and only rarely use a hoop, but I would NEVER use a hoop that couldn’t completely encircle the design. I was surprised that you think it is okay.
I am right-handed and I personally find that the best place to position the screw is about 7 or 8 o’clock. That way I hold onto the hoop there and there is no chance of the thread catching on the screw.
Hi, Susan –
I’ve never had a problem hooping up embroidery over stitches. I don’t hoop as tightly, necessarily, if I’m working the kind of needlework that requires moving the hoop around, and sometimes I’ll hoop up a layer of muslin on top of the embroidery fabric, cutting away the area I’m stitching in, which does provide a little more protection. But I’ve never had a problem with ruining the stitches. If they get squished a little, they fluff up in the finishing. When working something like a large tablecloth, for example, there’s just no getting around having to move the hoop and coming in contact with other stitches.
Good idea to hold the hardware area!
MC
Ok, it’s great when you start a new work but what to do when you move the hoop over a part already embroidered. Do you close so tight? Do you ever use the hoop for machine embroidery?
Thank you for your site, it’s always so interesting!
Angela from Italy
Hi, Angela –
When working a large piece, like a tablecloth, I move the hoop around and hoop over the previous stitches. Sometimes, I’ll have another layer of cotton over the embroidery fabric, which helps protect the other stitches somewhat (and keeps the work cleaner), and, depending on the type of stitches, I don’t necessarily hoop as tightly. It just depends. I’m always careful when hooping up over other stitching, but yes, I do it all the time. There’s no getting around it on larger pieces.
I don’t do machine embroidery, but for many types of machine embroidery, I think a hoop is necessary, isn’t it?
~MC
Angela,
I do a little machine embroidery on a single needle Viking Diamond sewing machine and have watched many demonstrations with professional 6-12 needle equipment and they all use a hoop and usually with stabilizer under the actual work to keep it from stretching out of place besides. It is hooped very tightly, but trying not to distort the grain of the fabric, much like hooping for hand embroidery. When you have to rehoop my machine, you still have to hoop over stitching at times, but in machine stitching we often just use a bigger hoop until as Mary said in a large table cloth or picture one cannot avoid it and then machines can use a specialized endless hoop. I’ve seen demos of this at Viking Club, but have not tried it yet.
I usually make my quilt labels by machine since I machine quilt and have just learned to use my embroidery arm to quilt in the hoop for smaller projects like pillows. It isn’t as relaxing or joyful as hand quilting and stitching, but my clients are satisfied because it is cheaper for them because of the time.
I am like Debbie. I usually hoop a larger piece of fabric which will be cut away from the finished project and therefore don’t remove the fabric from the hoop until the item is done. Also, I often work with two layers of fabric – a broadcloth under a fine or expensive fabric. This gives more structure. If I am making a larger piece I use a frame rather than a hoop.
Hi, Heather –
I too will mount a piece of muslin or something on top of my embroidery, when I’m working on a large project that requires a hoop (say, the Schwalm tablecloth I’ve had underway for a couple years now). But for just every day embroidery that requires a hoop – like working a flour sack towel or something of that nature, I don’t always bother with that.
I use frames almost exclusively for small projects and large, depending on the type of embroidery. But when it comes to stitching household linens and the like, a hoop is much more practical.
Thanks for your comment!
~MC
As of a couple of years ago I was using craft super store hoops-they’re inexpensive right? AND cheap as I mean in quality. For one of my birthdays my husband bought me a couple of Hardwicke Manor hoops from Hedgehog. Man oh man! What a difference. For a few dollars more these hoops are top of the line. They are sturdy, finished on the inside and out with strong hardware. Lets face it once you buy a hoop its not like you run to the store every week to get a new one. A few standard sizes and a person is pretty much set. After getting the hoops I decided to bind the inner circle. Something I had never done before. Well this made a big difference too. It provided friction to keep the cloth in place and took just a few minutes. Turn on some music that you like, the t.v. or get into some good conversation and in no time at all the hoop will be bound.
I also really like the few Evertite frames that I have. It keeps the project taught and it stays on the frame until the project is completed. There is no fear of the stitched work getting squished by a hoop.
Now I have been itching to own the Millennium Frame. Convince me that I need one…
Agreed, I also hated those craft store balsawood nightmares. It is sad that stores only sell those cheapies and the wierd plastic ones. The price of the Hardwicke Manor (and several other brands I found of equal price and quality, cost the same amount I would spend in a few months for hoops in the craft stores, but they have lasted several years, so it is all good. 🙂
Hi, Wendi –
Ummmm. How’s this: you NEED a Millenium frame. Ok, you don’t necessarily need one, it’s true. I’ve been using mine lately, to record video for the website. WOW – it makes it So Easy to change fabric in and out and to roll up the fabric to expose new work surface. It’s a wonderful frame!!
(Did that work?)
~MC
Dear All
Millenium Frame wwwooonnndddeeerrrfffuuulll, wouldn’t be without one!
Regards Anita Simmance
OK Wendy, you need, you really really need a Millenium frame. I have one and it is just beautiful. But what it is like to work with I don’t know since I can’t do anything with mine except admire it. My woodworker Dearly Beloved is going to make one, since the shipping cost to Australia makes the Millenium one veeeery expensive, but people keep asking him to make things for actual money, so my stand is pushed down the list again. Never mine, it might not happen overnight but it will happen. However, if you buy the Millenium frame, buy the stand with it would be my advice, fwiw.
This post is quite timely, as I plan on hooping up a project in the next couple days. I hadn’t really given any thought to the position of the screw. Do you tend to keep your hoop in one position when you stitch? I find myself turning it around and getting frustrated when the hardware gets in my way.
I turn it often, too, Courtney – but generally I keep it somewhere to the left. Otherwise, the thread just catches too much and it drives me nuts. If I can’t keep it to the left, so be it. Sometimes, you can’t. But it’s nice to have it out of the way when possible!
~MC
What do you do when the hoop covers threads already there. Won’t they be smashed down?
Hi, Jean –
They might get a little “smashed” in a sense, but not usually in a way that is permanent. Moving a hoop around usually has to happen on larger projects like tablecloths and the like. These types of projects end up being laundered in some way during the finishing process, and this normally returns any flatter stitches to normal.
I don’t necessarily bring the hoop to this level of drum-tightness when working over other stitches. It just depends on the stitching situation.
~MC
Good series! Please refer folk back to your wrapping the hoop article, too. Invaluable! I always pad my hoops, and stick to a 6-7 inch diameter, which I’ve found for me maintains the tension best. I’m with you on Hardwicke Manor hoops being well worth the investment. (Plastic hoops are useless).
More hoop musings:
I sand my upper (outer) hoops with very, very fine sandpaper when I first get them, just in case. I wipe them down after with a damp cloth and let them sit (no finish, no oil).
I tend to position the hardware to the lower left roughly 7:00, just below the point where my left hand holds the hoop. No particular reason beyond the snag-avoidance you cite, just habit.
When removing the hoop, I tend to relax tension via the screw first, especially if I’ve hooped over a stitched bit.
When hooping over a stitched bit, I carefully set the hoop over the previous stitching, then do any additional tightening on the unstitched areas. The idea is to limit the friction on the stitched parts.
Sometimes I’ll even make a donut-shaped mask out of clean muslin to place over the stitched area prior to hooping, to protect stitches already worked. The mask also keeps the edges of the work cleaner.
Because I want to perturb previous stitching as little as possible, I plan my sequence of stitching to minimize re-hooping. I usually start in the center and work out.
I reserve hand hoops for tough, washable threads and fabrics, and projects with short, flat stitches (cross stitch and its siblings, double running, split stitch, some of the flatter, less leggy/bumpy chain or feather variants) in mostly cotton or linen. Delicate, friable silks, areas of satin stitch, textured stitches, shiny ground cloth, embellishments, metal threads, knotted stitches all get worked in a flat frame.
Hope this is useful to someone. – K.
Thanks for suggesting the muslin donut to protect previously stitched sections! I’ve used acid free tissue but it sometimes tears so the muslin would be an improvement.
I use muslin, too, when I’m working something “fine” (like a linen tablecloth, for example). It not only helps protect previously stitched areas, but it keeps hand oils off the edge of the hoop area.
Wow. I’ve never had a need to sand Hardwicke Manor hoops. They’ve always been smooth as glass. But, it’s wood after all, so I suppose there’s a chance that a spot was missed in the finishing. Of course, if the inner ring is bound, this takes care of those types of problems on the inner ring, anyway. Sometimes, I bind the outer ring, too. It’s just a little trickier to do so.
Good tips, thank you!
~MC
One question I have – well maybe more than one – how do you decide what size hoop to use? Should you use a hoops that will never go over your embroidery piece or is it ok to tighten it over stitches and take it off later? I know many of us cut our fabric to make it larger that the piece but how big is enough when taking into consideration the hoop? I hope I’m making sense. I often don’t 😉
Hi, Donna,
You should have a couple inches outside your hoop. Otherwise, it’s really hard to situate the fabric in the hoop correctly.
I rarely use a hoop larger than 8″, because I find it difficult to stretch my fingers to the middle of the work and still hold the hoop, if I’m using a larger hoop. When using a hoop, you have to hold it and still use both hands for stitches like bullions or French knots….
MC
Hi Mary,
One question: When using a backing fabric (such as muslin under silk) do you still recommend taking out of the hoop at the end of each session? I was taught to NOT take it out because when you go to put the two layers back in the hoop they could shift. Then you could potentially get tension from the fabrics not going in the same way again (and pulling against embroidery already completed) that could cause wrinkling and/or bubbling in the final work. Did you loosen your frame while you were working on your BIG medallion project?
Hi, Marque – I usually baste my two fabrics together, around the perimeter of the design, and then once stitching starts, that’s an added security to keeping the fabrics together. You can actually do the basting once both fabrics are hooped up together. You have to make sure the grain of both fabrics is aligned, too – you don’t want, for example, your lining fabric to be on the bias!!
I don’t always remove the hoop at the end of every stitching session. If I’m working great guns on a project and stitching on it every day or several times throughout the day, and if it’s especially complicated to hoop it up, I might not remove it from the hoop. But generally, if it’s a linen tablecloth or a cotton towel or something like that, yes, I take the hoop off.
~MC
Hi Mary. I used to frame up just the way you have described it but at a recent class I was shown a different way.
You place the bottom hoop on the table with the fabric centred on top. You tighten the screw so that the top hoop will not easily fit over the bottom hoop. Place it on top of the fabric then push down with even presure on both sides. If the fabric can be tighten by tugging, the top hoop was too lose. Remove, tighten some more and try again.
The idea is that this does not distort the threads.
In addition I was shown to place a piece of cling film over the fabric before fitting the top ring. You then tear the cling film were you need to stitch. This improves the grip on fabric and keeps the fabric around the hoop (were you might hold it) clean.
Thanks, Carol-Anne! This is a good way to hoop up if you aren’t moving the hoop around. If you have to move the hoop around and mount it over other stitched areas, it won’t work.
But if you’re careful when you pull the fabric all around to tension things up, you don’t normally warp the fabric threads, anyway. I think most problems with warped fabrics come from being in a hurry and not actually looking at the weave of the fabric when hooping up a project. Beginners are often unaware of the fabric weave, and have to be taught to look at it and notice it.
Thanks for the tip! It’s a good way to hoop up something that won’t be moved.
Do you like the cling wrap method? I’ve tried it before – in fact, I used to do it frequently, because someone told me I should. I didn’t like it. I don’t like cling wrap and I think it’s a pain in the neck to work with. Finally, I asked myself why I was bothering to put myself through it! And I’ve never used it since. I do often hoop up a scrap of muslin and then cut out the center area where I’m stitching. This works a lot better for me, and I can use the fabric over again.
I’d like to warn against using masking tape for another reason – if you are a slow stitcher like I am, masking tape will dry out, fall off and leave a nasty residue on your fabric. It’s not a problem so much if you intend to trim the final work down more, but if you are needing every bit of fabric…
True, true, Gail! Thank you!
This post was one hoop-de-do worth reading! Thanks for a well written basic lesson – I thought I knew this step – because a well hooped foundation makes a huge difference in the quality of the final work. But your tips on how to tighten and RE-tighten the fabric – (something I have not been doing properly) are something I am glad to have learned anew. Thanks!
Glad it helped, Elizabeth!
These are great directions, Mary! I especially appreciate the tip of where to position the hardware as I’ve managed to snag my thread on it more times that I care to mention.
*Clearly I needed to do this several times in order to learn the lesson. 😉
Hi, Sheila – Snagging the thread on the hardware is probably one of those irritating happenings that will plague stitchers until the end of time. 🙂 No matter what we do to prevent it, I think it will still occasionally happen. So the key is to minimize the possibility as much as we can! ~MC
I agree with you on the depth it holds it more taunt and is easer to handle.
I got rid of my cheap hoops years ago and switched to the brand you recommend. But I still have my old 5 inch hoop from the late 1970’s, it’s wonderfully smooth from years of use! I did finally bind the inner ring on it, since it has warped slightly.
I use a 3 step zigzag stitch with my sewing machine, it holds down the edges better than a regular zig zag stitch. But I started out whip stitching the edges.
Thanks, Cindy, for the zig-zag tip! Good to note!
I love the idea of using a small hoop that I can hold in my hand. As always, the instructions you give are very clear and help us to understand how this is best done. I normally use stretcher bars and attach them to a stand according to the size of the piece I’m working on. Although this works quite well, I find I often have to re-tack the piece to keep a good tension. I’m not sure how this works with a small hoop. I’ve always assumed that the stitching I’ve already worked on would be spoilt when I moved the hoop, so have only used this method for very small pieces. Having read your post I’ll give the hoop another go.
Hi, Lynn – It depends on the type of embroidery you’re doing, too! Sometimes, stretcher bars are more suited to a given type of embroidery (say, stumpwork or goldwork). So not everything works in a hoop. But they are nice for larger projects, linens, towels, household stuff, clothing, and whatnot… ~MC
I use Q-Snap frames lined with acid-free tissue paper. I cut away the tissue paper over the area to be stitched.This way my hands never touch the fabric.
Hi, Pam – thanks for the q-snap tip. Q-snaps only ever work for me if I put a strip of a thicker fabric like felt inside the snap. Otherwise, they are constantly turning and rolling, loosening up the fabric. I like them ok when they stay put, for certain types of stitching. The felt strips have worked fairly well for me, when I do use them.
~MC
I have never thought to wrap my under hoop. I would assume this would keep the fabric from slipping through the hoop over time so the tension would stay even. What a great idea! I also use a stand most of the time with my Q-Snap frames. I have them in different sizes, but this frees up both hands to stitch or quilt. I usually finish the edges with s mall zig zag or overlock stitch as well. I’m not good with things that are sticky and end up with a mess of tape on the edges. I always learn new things from you, thanks.
Glad it helped, Debbie! Yes, the bound hoop does help keep the tension over time. It’s great for that!
Thanks for the refresher on hoops. I wish I had known many of the things you share with us years ago. I made a crewel work pillow about 35 years ago. I used a metal embroidery hoop. I started the project over the summer and didn’t pick it up again until after Christmas. When it was finished and I finally removed the hoop, there were rust stains from the hoop. Ugh! It’s an awful way to learn a lesson.
I agree, Katie!! That’s always a disappointment! I came across one of those old metal hoops a while ago – it was all rusted on the inside. One of my students brought it to class to use, and I gently suggested she use one of mine, instead! Yikes!!
My granma used to use those nasty metal ones. We still have them kicking around the house, but I prefer wood. 🙂
I have been told that we hoop too tightly in the US. Can you or any of your international readers give me some insight onto how tight people in other places tighten their/your hooped work? This is also an issue for quilters as well, because good tension on all the layers of the quilt will make your back and front lay smooothly together and keep the back from getting those unslightly puckers we hate.
Hi, Debbie – I kind of doubt there’s a “regional” approach to using a hoop. The tension you need depends on the work you’re doing. Some types of stitching don’t require as much tension, while others do. So really, it just depends on the work. Very loose tension in a hoop is pretty useless (why use a hoop?), but a lighter tension is good on certain types of stitching – for example, when it’s more efficient and neater to use a “sewing” method with the needle rather than a “stab” method (making coral knots comes to mind).
Great tips about where to place the tightening on the hoop – i’ve never thought about where I’m fastening it compared to being right handed. I prefer using smaller hoops in all my work – always think you can keep it more taunt in smaller hoops.
I agree! A smaller hoop is much easier for keeping good tension…
One thing I am glad of is that I have found hoops that last longer than 3 months. When I first began embroidering in 4th grade the only ones I could find were the 99c balsawood nightmares available at craft stores. The brass adjuster would tear out of the wood after 2-3 months so I was replacing them constantly. Several years ago I did some online research and found several good wood hoops and purchased one of each to see which ones I like best. I did order several more of one brand, but all three brands are WAAAAAAAAAAY better than the 99c balsawood tree-rings I was always replacing. I have not had to replace any hoops since. 🙂 I have never tried a frame, since I am not in a position to keep anything that large around. I do not have a specific stitching space, besides my grab and go basket and the end of the couch, plus my floss stash basket, sewing machine drawers (tiny) and floss storage container.
Mary this is basically how I do my hoops. The only thing I have done different is that I usually put the screw thing at the top instead of at between 1 & 2 o’clock. I am going to try it your way.
I have never embroidered without a hoop. I didn’t know that you could do it that way. I will stick with my hoops though. =)
I like using a hoop and I set it up much as you do, except I reverse top and bottom on the hoop. That means the working portion of the design is recessed into the hoop and the back of the design is taut. This position makes it easier to neatly end threads on the back of stitching.
Thanks for the tip!
I forgot to add that I’ve probably made every mistake possible with hoops –
My first hoop was a metal one with cork on the inside and a spring, and always had to pull the fabric tight as I worked. Then it rusted. :\
Then I got a cheap wood hoop that I didn’t know to wrap in fabric. The flimsy hardware bent, and still wouldn’t hold the fabric tight.
I also have hoops with a springy metal hoop that fits inside a plastic ring with a groove. They seem to hold the fabric ok and are easy to use, but those handles sticking up can be really annoying.
Actually one of the best I’ve had so far is the square plastic pipe hoop. It held suprisingly well and was easy to let the fabric go slack with just a twist of the clamps. But then I was doing a hardanger project, and it didn’t need to be drum tight it seems.
I also have some wood hoops bought at a garage sale, no adjustment screws, I’m not sure what to do with those. Maybe just use them for mounting and displaying?
Oh, yeah, I’ve also left a project in a hoop for months 😮 . Must have been beginners luck as it didn’t hurt the fabric or stitching.
Lol Ditto!! Reading your story seems to follow my life as an embroiderer. I think I still have the metal hoop with the cork band in the center of the inner ring and spring outer band! Too funny….
I like that method of tightening with the thumb on on side and the fingers on the other; I will try that on smaller projects. On bigger projects, I like a Q snap.
I use fray-stop or no fray around the edges instead of getting out the sewing machine or risking tape residue.
I think it makes a difference in how you use/prepare a hoop depending on the technique you are planning to work. For example, simple cross stitch may not require a “drum” tight hoop. These days I use scroll bars for most of my xstitch and they aren’t drum tight. Also, if my piece is large, then likely you will need to move the hoop and potentially cover some stitches. No way would I want to use a screwdriver to tighten the hoop over them! OTOH, if you are working some detached stumpwork elements then IIRC a drum tight hoop is desired. But in this case, I would be using a small-ish hoop that can cover the entire area of my detached items and not have to move it over any stitching.
I can see where a quality wooden hoop could be nice when you want the very tight situation. But I’ve used the cheapie hoops for years on basic xstitch pieces without any problem. Another thing to consider, if you wrap your bottom hoop you may not be able to use the screw from the inexpensive hoops as it will be too short. Is this a problem with the Hardwicke Manor hoops?
When people talk about “hoop marks” I’m not sure if they mean the creases or the dirt from your fingers. When I used a hoop for a large xstitch project I usually placed a sheet of tissue paper on top of the fabric under the top ring. Tear away enough space over your work area. Then if my fingers are grasping the hoop and get onto the fabric they touch the paper instead.
Hi, Anita –
I agree – it depends on the project.
Yes, the screws are long enough on the Hardwicke Manor hoops…
MC
I just thought I’d add my little bit to your informative article…I tell my students to always put the ‘hardware’ bit of the hoop over the fabric first so as not to tear or scratch the embroidery.
Mary estoy buscando puntos para bordado en oro, en especial en canutillo, me podrías ayudar a investigar
I detest those hoops with the screws. And wrapping the inner hoop never worked for me.
I bought an 8″ cheapie one for 2.99 – those wood grain flexi-hoop things. Flexible plastic, with the top hoop flexible enough to ‘roll’ onto the fabric – and it’s SO MUCH sturdier and drum tight than the other ones. I can roll it right on top of stitched areas with no problems.
The only fabrics I won’t use this hoop for again are velvet/velveteen, due to hoop burn. I’ll try my Q-Snap frame for those.
I was looking into starting a project on velveteen and found this on using a hoop on velvet.
http://www.hookedonneedles.com/2008/07/embroidering-on-velvet-with-hoop.html
Haven’t tried it yet but it looked like an interesting way to avoid crushing the velvet. =)
Hi There,
I put a nappy linner between the hoop and the fabric and then cut out where my design is so that i can work. I then flap the nappy linner down when i am finnished and tomorrow when i work again i just flap it up(if you can imagine that) and it keeps my work claen and the hoop does not leave marks.
Regards
What an interesting topic this one is. Mary, you have the happy knack of getting us all worked up over something as simple as hoops and we find out heaps of stuff.
Nobody (I think) has mentioned the Susan Bates hoops – is that because they are so bad as not to warrant a comment, or because no-one uses them? I have, and I do, and I find they are not too bad but you must take the work out at the end of your session.
I have also used Q-Snaps but they make me very frustrated, although Mary says she puts some felt between the plastic and the work. Sounds good and I will try it as I like them for the size; you can fit a bigger piece of work in them than you can in round frames.
I can’t wait to try out my Millenium frame but patience is a virtue and I am trying soooo hard to be a virtuous woman …..
You, know, hooping embroidery becomes such an intuitive thing after years of doing it. I haven’t thought it through in a long time and find it so beneficial to read the post and the comments. I learned a few things, as is usual with your posts,Mary. Thanks.
I pretty much do this process you’ve described when I’m hooping fabric, too. I agree that a better hoop = better quality stitching. One thing I do when I have a backing fabric and I know a piece will take a long time stitching it is to make the backing fabric much larger than the embroidery and use the excess to protect the edges of the embroidery. I just pin it in place neatly around the hoop. I know this isn’t the customary or traditional way, but it’s nice to not have to recut protective paper or what not to fit around the edge. When I move the hoop, I just refit/repin the fabric. When I’m done it looks kind of like a small fabric doughnut around the top of the upper hoop. It protects from grime and dirt rings and I find it pads the edge of the hoop, too, making it comfortable to hold for long periods of time for my aging hands. I also use muslin strips to wrap the inner hoop. I very rarely wrap both top and bottom, although I know folks who always do. I’m an impatient stitcher, I guess. Some shortcuts are okay. Others are not worth it.
How timely…was just reading Trish Burr’s “Redoute’s Finest Flowers in Embroidery” and she suggests steaming fabric after it is in the frame to tighten even more (page12) . Since I know nothing about using an embroidery hoop, is this something you would ever do?
Hi, Sue – I probably wouldn’t do it using a hoop, but I do it all the time with frames. Actually, I don’t steam it – it’s not really necessary to steam it. After I frame up a piece of linen or cotton (it has to be a natural fiber, and it works best with linen), I just mist the whole framed fabric lightly with water and let it dry. This firms it up really well and makes it a perfectly taut surface for stitching. But again, I only do this when I’m working on a frame (slate frame, Evertite, Millenium frame), never with a hoop.
~MC
Please more
Realmente buena su explicación! thank you!!
Just wondering: I read an article where the inner hoop is placed on top, the purpose being that when holding onto the fabric you’re holding it from underneath, with the wrong side of the fabric over the hoop edge, thereby keeping the top right side cleaner. I’ve used this method and it seems to work. Is there a downside to doing it this way?
Hey, if it works for you, great! Thank goodness there are no embroidery police. 🙂
About the only downside I see on putting the inner hoop on top are a slightly smaller effective working area due to the angle imposed by working “inside the drum.” Other stresses on the hooped over parts of the work, or the filth factor from hands, and from putting the work down remain pretty much the same.
(Off to experiment with this idea) – K.
Hello
I’m proud to say my grandmother taught me to embroider when I was little, but rarely do many projects of this nature. Thank you so very much for the tip on binding first.
I’ve decided to hand embroider a quilt label and trying to stick to a strict budget, so I’m using items I already have.
I wanted to know if I could use strips of fabric from my stash instead of the twill or bias tape? I planned to use 100% cotton with a stabilizer on the back (not sure if this would matter with the option of binding one would use).
Also, it must be said, this site is AMAZING!!
Emily
I never buy bias tape and always make my own binding from the fabrics I am using for quilting. You can cut strips on the bias and fold it just like bias tape or you can use straight grain edges as long as the label is square. I often finish the edges of the label to keep them from raveling with a tight zig zag stitch or button hole stitch, or even do needle turn applique as I stitch it to the quilt– around the edge if I want to have it blend in and want it to look as if I pieced into the quilt top. Stabilizer on the label helps to keep it square and can be trimmed to create the fold lines for applique work.
Thank you so very much for the helpful tutorial! I’ve been crafting, sewing, making Art now for my whole 35 yrs of existence and you have finally taught me how to properly use an embroidery hoop! Although, I hate to admit I won’t be embroidering with it, I will be beading a design I have marked out with chalk. Is there anything you would reccomend to “fix” the chalk on a fabric temporarily while I do the beading? Perhaps hairspray? Which is what we used in art school, but never on fabric… I’ve never tried a temporary fixer on fabric before… Any advice would be welcome! Thank You so much for your help! I ❤ the embroidery! I wish I could do it, my arthritis is awful in my hands, have to stick to large beads…
Hi!
I’m very new to embroidery. This article has given me some great tips as I begin this new hobby! As a beginner, what kind of fabrics do you recommend are best when using hoops and want to create either freestyle pieces or traced items?
Thanks for this lesson…I’ve never done this before…but am gonna do this from here on…. It will make doing my fav thing so much more enjoyable….
Is there some reason hoops don’t come already wrapped? I’ve never wrapped mine…mostly because I think that things should come the way they were meant to be used; I don’t want to do extra work to make something usable. I do think that my old-fashioned metal spring-tension (an actual spring pulled against the top of the hoop) with cork on the inner hoop work really well for tension, probably partially because of the cork…but they were designed to have that cork. Any knowledge on why hoops wouldn’t be designed to actually keep the fabric taut without having to add an intervention?
Hi, Mandy – You don’t have to bind the embroidery hoop if you don’t want to. When I’m doing quick little projects, I always don’t use a bound hoop. But when I’m working on a project that’s larger and longer-term, I like to be sure I don’t have to readjust my fabric while it’s in the hoop, and binding the hoop helps avoid that.
Thanks!
Hi Mary,
Thanks for the excellent tutorial. My new Hardwicke Manor 10” inner ring is now cozily wrapped in cotton twill.
I had difficulty going around the fixture where the ‘stick’ attached to the hoop. I fudged it pretty well, but would be interested in learning how you dealt with that obstacle on the ‘race track’.
I don’t have any clothes pins, but found that my Clover Clips worked really well to hold the tape as I went around. They neatly gripped the tape even on the rather thick Hardwicke hoop.
Thanks again, and have a Happy Stitching summer!
Sara in Wine Country, CA
Great embroidery hints. Thanks.
Hello Mary,
Hope you don’t mind another question from a newbie – it seems from what you wrote in this article that if your design is bigger than your hoop, you can enclose parts of the completed design between the hoops as you work, providing it is not a very raised design, does not have beads, etc.
Your website is proving very helpful to me. Thus far today you have helped me pick out a loop and a transfer pen. I am going to tackle a couple of free DMC patterns. I have the idea of using them on garments or bags. I might start out with a floral motif on the pocket of some pyjamas I am making. Then I liked the idea of a bigger motif on the front of a top, and maybe putting “clashing” floral designs onto tartan or check fabric. I am excited to try a few ideas!
Best regards,
Sarah (in Australia)
Hi, Sarah – Is your question whether or not you can move a hoop around on an embroidery design, over areas already embroidered? Yes, you can – as long as there are no beads, goldwork, or raised work. It’s perfectly normal to move your hoop around on designs larger than the hoop – it’s been done for centuries!
Many thanks, Mary, that was exactly my question. I am eagerly awaiting my embroidery hoop in the post!
Thank you so much for the ever so helpful information you give us. Your videos on how to do stitches are a real boon. Your advice and time are invaluable. Would like to wish you health and happiness in this new year.
This is easily the most helpful page on your site (which is full of extremely helpful things). I’ve had embroidery hoops for long enough to have worn two out, but it never occurred to me to turn the damn thing over and no instructions elsewhere (books, online, mother-long-time-ago) have suggested this either. Thanks!
Many thanks. All makes good sense … clear, simple, direct/concise. helpful pics, and most appreciated. I am in my seventies, a dad/grand=dad and just beginning needlework. I have sewed for my children and now want to try embroidery. You sound a kind and stable/experienced. Thanks.
Your site is just what I was looking for to fine tune my self taught embroidery techniques!
Hi Mary, I am curious what size flat head screwdriver do you use?
Thank you so much.
Now, I never thought to look! It’s about the width of the top of the screw on my hoop. I’ve never paid attention to the actual size, and I don’t have it here at home with me right now. I’d say a medium size would work!
How is an embroidery hoop sized? inner hoop or outer hoop
They vary, depending on the manufacturer.
There’s so much to getting ready to embroider! Thank you very much for all the tips and information Mary.
Excellent information, thank you!!!!!!