


At the beginning of this month, I showed you some progress on my “secret” embroidery project that’s being worked in silk, with lots of satin stitch and stem stitch. I pointed out an element on the project that was really bugging me, and that I knew I would eventually have to fix.
I’ll show you, close up and personal, how I went about The Fix. Today, we’ll look at removal, and tomorrow, we’ll look at replacement.
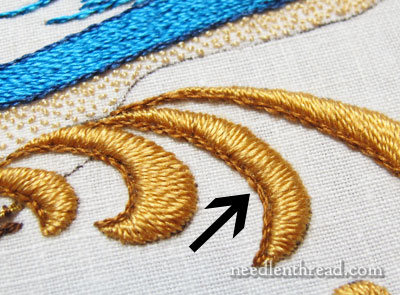
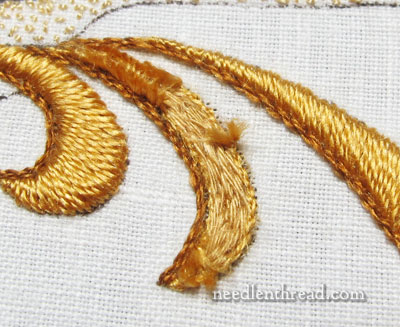
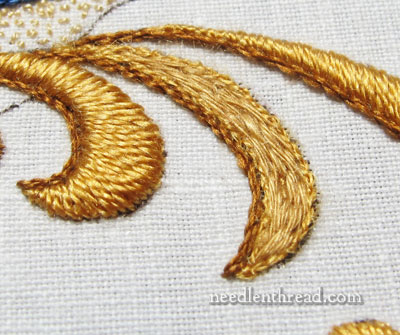
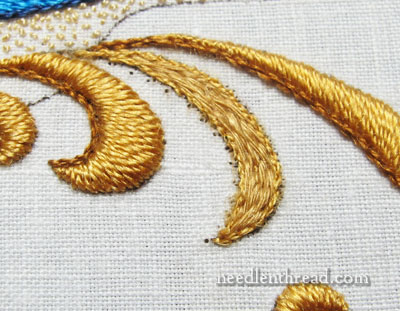
The arrow above points to the element that I want to fix. The shape of the piece is not-quite-right. It is too flat on the right side of the element. Every time I looked at the piece overall, this element jumped out at me. It was screaming to be fixed! There was nothing for it – I acquiesced.
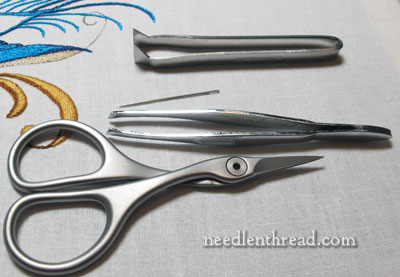
The tools! When you’re getting ready for surgery on a piece of embroidery, the first thing to do is to line up your tools – in this case, a very sharp, small pair of scissors, some tweezers (I have two pairs, depending on which one works better for what I need to do), and a needle.
Some folks like to use a seam ripper for removing stitches the way I’m getting ready to, but I prefer scissors. There are two reasons: 1. I feel like I have more control, and 2. I don’t like to pull upwards on a seam ripper. With scissors, I don’t have to put any “pull” on my fabric or stitches – it’s just a matter of taking small snips.
(I wrote about these scissors a while ago, by the way. I still absolutely love them! I’ve used them practically every day since I got them, and they are still in pristine, perfect cutting condition. They are excellent scissors for a very reasonable price.)
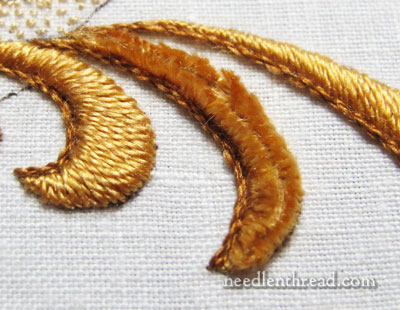
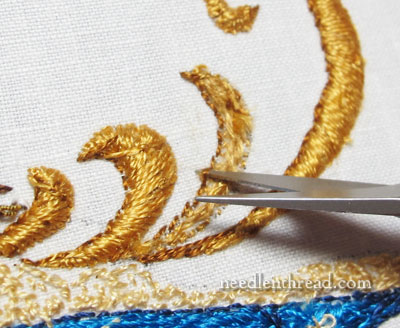
First thing’s first! We’re dealing with padded satin stitch here, and my goal, if possible, was to remove just the top layer of satin stitch and to leave the padding intact. The first thing I did was carefully cut through that top layer of satin stitches. I didn’t remove the stem stitch on the left side right away, although I could have done that first without a problem. But for some reason, since the satin stitches were the looming mountain that I needed to face, I wanted to tackle them right away.
Slicing them right up the middle like this makes it pretty easy to pull out the stitches.
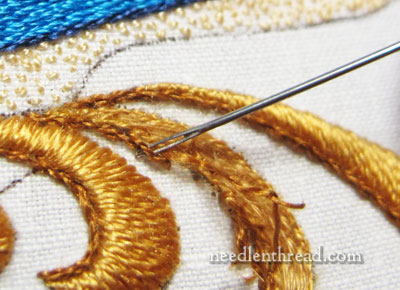
And then come the tweezers. Carefully picking from just one side of the element, I pulled out as many of the stitches as I could, one by one. It’s tempting to grab a bunch of stitches at a time and yank them out, but removing them one by one keeps the amount of fuzz down.
There were a couple stubborn spots along the way, where new threads were started or ended. These require a more thorough approach – I turned the work over and ferreted out the threads using the eye of a needle, just to loosen them so they would pull out.
Ahhhhhhhhh. All the satin stitching came out fairly well, leaving the padding intact.
Incidentally – and this is probably pretty important to mention! – when I work on a piece like this that has disconnected elements that all work together into the design, and that are all stitched with the same threads, it would be very tempting to carry threads from one element to the other while stitching. For example, if I had some thread left over from the first “curl” here, I might move on to the second curl, using the same thread. Right? Well, there’s no rule that says you can’t do that, but I always treat each element in a situation like this separately. And it’s a good thing, since I ended up having to pick one out. If my threads were connected to the other elements, it would not have been as easy!
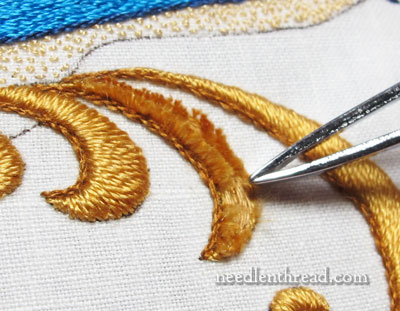
Now, to tackle the stem stitch. Stem stitch is really easy to remove from an embroidered surface. Turn the work over, and snip the back of each stitch. They look just like little backstitches back there (because that’s what they are), and if you just slide the tip of your scissors under the back of each stitch and snip it….
… you can turn your work over, and using the eye of a needle, slide it under the front of each stitch and lift it out. Looks messy, but it’s one of the easier stitches to remove.
And there it is, ready for improving.
You can see that the actual outline of the element is the problem – it is flat up on that right side, where you’d think it would round out just slightly. This problem is actually on the design itself. I’ll alter the design before it is used again.
And the rest of the story? Here’s how I prepared the padding area and corrected the shape of the thing.
Any questions, comments, suggestions? Feel free to leave a comment below!
How brave!!!! You schould have made a video film of this experiment so we could follow you. So curiousmabout the outcome!
While it’s not good that you had to do this, Mary, these lessons are the best part of your projects. We learn so much from you. I especially like that you discussed the issue of not carrying the thread in disconnected elements. It’s the most logical thing, yet most of us would be too lazy to follow through with it.
Hi Mary,
Have you ever inadvertantly cut the ground fabric? What did you do to fix it? (I ask this because I recently cut my ground fabric while taking out a mistake. Yikes!)
Ann
I would have done exactly the same as you, ie taking out the offending work. Many times I’ve shown something to someone and asked what they think about a problem. I always get the answer ‘it looks fine, leave it’, but I always end up taking it out. It’s the ony thing to do. If something is worth doing, it’s worth doing well.
Hi Mary, OMG your tools look like you’re about to do major surgery. But you do it with perfection. Seems like I stitch an area one day and take it out the next and redo the area. What would we do without tweeters. I know that redoing the will turn out perfect for you. Thank for all the info. I tend not to be too careful. I will remember the lessons learned. Thanks for the info.
Mary – This is the stuff that makes your site and blog invaluable – the little, fiddly stuff that otherwise, self-taught embroiderers like me have to figure out for themselves through a process of trial and error. For example, I thought I invented/discovered the whole starting satin stitch elements in the middle thing – it wasn’t until I came here that I discovered it was an actual technique.
Have you ever considered writing a book? Something along the lines of The Principles of Knitting? Not a pretty picture to be found in the entire thing, but if you need to know how to do something or fix something or an obscure corner of the art – it is the bible. I think you could do the same thing. Of course if you wanted to include some pretty pictures of illustrative examples, I certainly wouldn’t complain. Anastasia in the Wilds of Rural Utah
Other than your giveaway for Trish’s sweet little kits…this may be your most read post this week…..”Read all about it, Mary removes some of her beautiful stitching!!!” LOL, I am teasing you, you are always open and honest with your stitching trials and errors. Really, we learn as much from the “do overs” as we do from learning a new pattern. The ability to back track removing one layer at a time, is a much needed skill. I have been frustrated and just started cutting away at the stitches, without thinking some could be saved. Thanks again for allowing us to peek over your shoulder….in good times and bad.
Deb
Oh Lordy lord lord. That ripping out is a work of art. I have learned that the ease of ripping stitches go along with how the stitches are laid. I can’t see how this problem is related to the design though.. I will follow along and try to learn.
I am so appreciative of you taking your time to show us these reconstructions. It gives me confidence to correct problems on some of my work. I have never known how to even begin. Thank you for all your instructions!
Nicely done. I suppose if you had accidentally snipped one of the padding stitches you could have tacked it down and left it (yes?). You would be putting satin stitch over it.
Those little dots along the edge: those don’t look like marks from transferring the design; they look like holes left from the stem stitch. Will you try to reduce their size somehow before stitching again? I’ve dealt with holes before by lightly spritzing the fabric with water and gently rubbing the area with my fingertip. Then as it dries the holes tend to shrink up and disappear. These seem so large in relation to the element you’re working on.
Hi, Irene –
Yes, you’re right – if I had snipped the padding, I could have just tacked it down. Well, depends on how much I had snipped it!
The dots on the left are from the stem stitch. The problem is actually on the right side of the element. The design line there is flatter than I would like, and I think this is what bugged me. I’ll correct that in the pattern, too…
MC
Love watching and the clarity of your photos!
On another note, since you must sit many hours of the day, how do you care for your PHYSICAL body? Do you exercise? Eat healthy?
When I’m in a ‘mode’ and really into a project, I’m almost possessed and could stay in my jams all day and just drink coffee and eat snacks b/c I don’t want to stop and do what I should for my body b/c my brain is so happy to be stitching!
Lynn
Hi, Lynn – Well, I do other things besides stitch during the day. I usually embroider in about 45 minute bursts, even when I’m “absorbed” in a project. It’s important to move around and do other things, rather than sitting for hours in the same position, stitching. My workroom is separate from my house, so dressing and getting out is an essential part of the day. When it comes to meals, big pots of soup are great, especially in winter…makes great left-overs without having to think! -MC
Dear Mary
Thanks so much for this post it’s so useful as I’m always having to snip out thread at some stage during my stitching I am guilty of yanking stitches out so thanks for showing us the right way to take out stitches. I love your tweezers and scissors.
Regards Anita Simmance
You reminded me to take it slow, one step at a time. Thanks. I got those scissors after you talked about them and I too love them. Every time I use them I think of them as a little bird helping me with my needlework. That little pink eye is so cute.
Mary, I just want to thank you for taking the time to share this. I sat spellbound watching how you so meticulously fixed this (mistake?). I had to look very very close and study the picture to even see a problem! I’m a newbie to this calibur of embroidery and just love your articles…it’s the next best thing to having a great stitcher sitting next to me! Thanks again.
Mary,
In your photo, I noticed little holes left after you removed the satin stitches. It made me think of a question I’ve had when stitching. Do you only insert your needle into the holes already there in the woven linen or do you sometimes pierce through the fibers? It seems that you must pierce through the fibers as well as go through the holes between the weaving. Maybe this is a silly question, but I have often been conflicted about what to do. Thanks!
Thank you for yet another set of priceless pictures and how-to’s. I have two comments.
1. I got some of these scissors when you first recommended them. They are indeed WONDERFUL, quality instruments. I am going to give some as gifts.
2. I learned a lot about picking out stitching, but klutz that I am, I don’t “see” the problem that made you unhappy. I would have been proud to have done any of these leaves.
I feel for you. I hate it when I have to rip something I have worked so hard on and it did not turned out like it should.
Love your newsletter. You do a great job of explaining and wonderful pictoral representations.
Hi Mary,
Well, in one sentence you have cured me of a habit based on being “frugal”; jumping from one element to another with the same thread and or using the same thread for the padding then working it back to center to do the satin stitch. NEVER AGAIN !!
All the best,
ji
You are so good! Thank you, for showing this, I have had the same problem before, and I was not quite sure the solution. Now I know , I should just redraft the curve!
hola Mary .que bueno es poder ,tener aceso a este nivel de puntadas y mescla de materiales
,tratando de resaltar estos detalles
es un privilegio ,poder opinar ..en mi opinion ,,la puntada no tenia la caida perfecta
un abrazo y gracias
Mary,
There are lots of blogs out there, but yours is the only one that I faithfully read every day. I’m mainly a quilter but I’ve been wanting to put embroidery in some of my quilts, so I’m trying to get back into it.
Thanks for taking the time to show us in detail how to unstitch as well as how to do the different stitches right in the first place. I’m learning so much from your blog.
Thank you for another fantastic tutorial Mary.
I use double curved scissors and I wonder what you think of them? I like them because I can see where the point is and also I can get very close to the surface to clip off unwanted threads, but I see that you prefer straight scissors.
I also see that you have some of those wonderful tweezers with-no-name – the ones at the top of your photo. I only wish those little points at the end were sharp for cutting.
Thanks again for another great lesson.
Hi Mary,
When I have to redo, especially with nested curves, I photocopy the piece then draw the new curve on the photocopy until it looks right, before transferring the new design element to the piece. This can avoid having to redo more than once. From what I can see of the adjacent elements, the reworked curl may also need to curl more at the tip as well. Good luck and thanks for sharing – love your blog.
G’day Mary,
Thanks for the reminder about the scissors. At Anita’s they’re on special just now for under $27.
And thanks for reminder of correct/best way for removal of stitching. And for making it an ok thing to do, not as a guilty secret but just as a normal stitching correction, no different to deleting a few words that ‘don’t be right’!
Cheers, Kath
Also when doing the padding stitch it’s important you are using the thread in the same direction as it comes off the bobbin (or whatever). If you thread the needle with the end that comes off the bobbin first, then do that for the next thread. If you don’t do this the “nap” of the thread will look different in the stitching. This is just like if you put 2 pieces of corduroy fabric in opposite directions of the nap.
Judy
I don’t know about anyone else. But I am new but it looked great before you decided to fix it. I almost had to look away. soooo pretty work. I just love it.
What material is best for embroidery? Flour sack is not ….i want some that is more stable and professional. Thank you. So enjoy all your tips….Bev