


Oh, goodie gumdrops!! I’ve been waiting all week to write this article for you!
All the preliminary work that goes into setting up an embroidery project for stitching is certainly necessary, but it’s not exactly Thrillsville, if you know what I mean.
I’ve learned to like the set-up process, but it is ever eclipsed by the anticipation of those first stitches.
Often, for me, the first bit of stitching tells me if the project is going to click. Will I like it? Will the colors work? Is the fabric right? Normally, these questions are answered with the first foray into stitching.
On the Mission Rose project, I decided to start with the large leaves on the rose. Perhaps it would have made more sense to begin with the stem, since, perspective-wise, it is the element in the design that is farthest back or underneath everything else. But I wanted to work the leaves first because I wasn’t quite sure about my choices of greens. Working a leaf would settle any doubts.
Were my doubts settled? Well, let’s work through the leaf and see!
I’m starting with the lightest green Soie de Paris silk (2211). For a needle, I’m using a #10 crewel needle from Wendy Schoen Designs. I love her needles! They’re good quality English needles and they’re available as small as size 12. It’s hard to find good embroidery needles in size 12!
Ok, back to the stitching. The outside of the leaf around the teardrop shaped center will be worked in long and short stitch. If you’re not familiar with long and short stitch shading, you might check out my long and short stitch lessons, especially this article on shading a leaf similar in shape to this one.
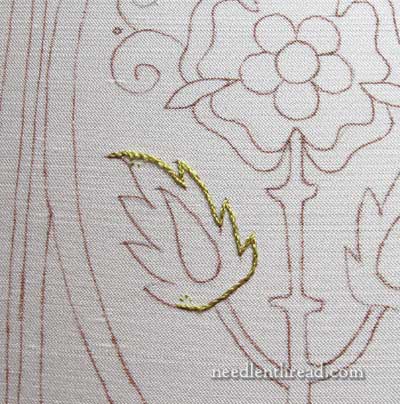
To begin, around the perimeter of the leaf I worked the split stitch, just on the very inside edge of the design line.
For the outline, I prefer split stitch to split backstitch or regular backstitch. That is, I prefer coming up into the stitch to split it, rather than going down into the stitch to split it, or just using regular backstitch.
Why do I prefer regular split stitch? Two reasons: 1. As you can see in this article comparing split stitch to split backstitch – there’s significantly less thread build up on the back of the work with regular split stitch. 2. As opposed to backstitch, which creates a “bumpy” line, split stitch creates a smooth-topped line – as you can see in the photos in this article comparing split stitch to backstitch.
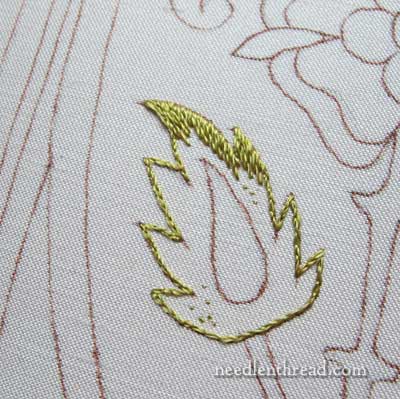
Once the outline is complete, the next step is to work the first layer of long and short stitch, from the outside of the leaf towards the inside, using the lightest green.
My desire is that the inside of the leaf, around that tear-drop shape, will be dark, because there will be a gold thread outlining that shape, and I want the contrast between the gold and the dark green.
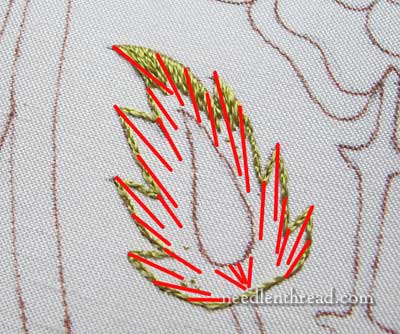
The red lines above indicate the general direction of the long and short stitch. When working something like a leaf, it’s normal to work towards the “growth point” where the leaf emerges from the stem. Thanks to the interruption of the teardrop in the middle, there’s a little section in the lower center, right above the stem area, where I’ll have to sneak in some stitches.

Here’s the first layer of long and short stitch, almost finished.
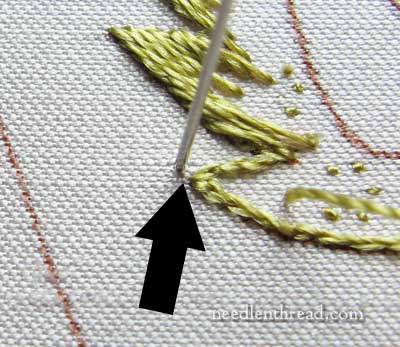
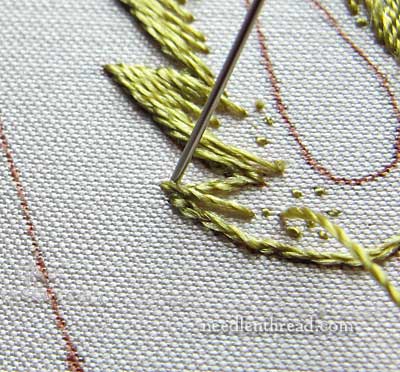
To make sure that the tips on the leaf come out nice and sharp, here’s a little tip for you:
Take your stitch down into the fabric from the inside of the leaf, over the split stitched outline tip, and slightly beyond it. The arrow in the photo above points to the small gap between the outline and where I’m taking the needle down.
Now, with your stitches just to the right and left of that long center stitch, bring the end of the stitch just over the outline and snug up close to the long center stitch, almost tucking it just under the edge of that stitch. This will give you a nice tip on the leaves, and keep them from “rounding out” around the outline.
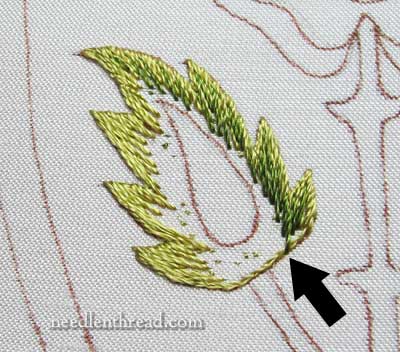
Now, it’s time to work the second shade of green. There’s not a whole lot of room in this leaf shape for many shades of green, so I’m only using three shades of green on the large leaves (out of the four selected for the project). This middle shade is 2125.
The arrow in the photo above points to where this second layer of stitches begins to extend down over the outline on the base of the leaf.
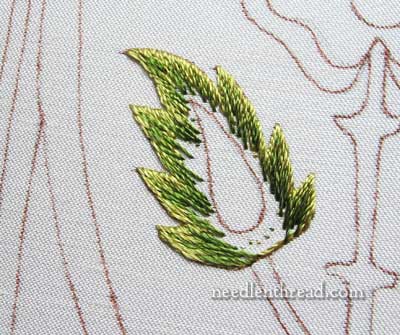
Here’s the middle shade of green (the second layer of long and short stitch), finished.
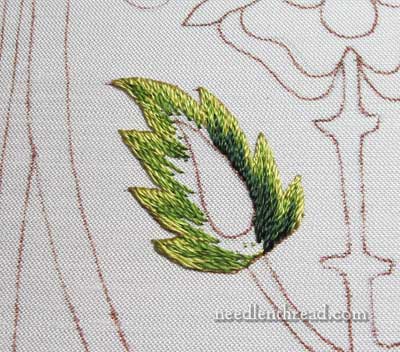
And finally, the darkest green. This is what I wanted – a real contrast, with a nice, deep green center.
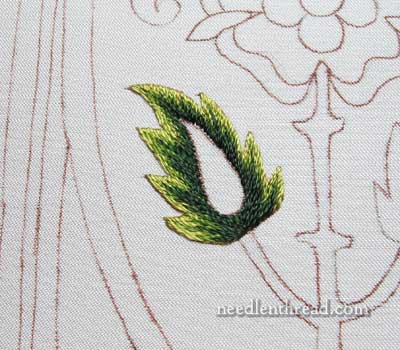
And here’s the completed silk embroidery on the outside of the first leaf.
Did it click? It did. I like this leaf so far. And I’m chomping at the bit, ready to move on!
The next step will be the second large leaf, and from there, the small inset leaves on the rose, and then the small leaves at the top of the design. I’m getting all the leaves out of the way first! Then, the stem, followed by the rose and the bud. Then the appliqué fabric on the outer corners, followed by all the goldwork.
Any questions? Comments? Suggestions? Feel free to have your say below!
If you’d like to read the backstory on the Mission Rose project and follow it along step-by-step as it develops, please visit the Mission Rose Project Index, where you’ll find all the articles relating to this project listed in chronological order.
Beautiful. I’ve always been partial to leaf shapes for some reason. Your exquisite stitching makes them look so real.
I love it! I love it! I love it!
Yummy Mary
Hi Mary 🙂
Will you be laying gold around the entire leaf, or just around the teardrop shape? As always, your stitches are amazing. and the photography… ditto.
Thanks, Dawn! Yes, gold around the outside, too – a very fine gold, either tambour thread or Elizabethan twist. I’ll know better once I get to the gold part… MC
This is the best lesson I have ever had on the long and short, Thank you
This is BEAUTIFUL!!! I am having so much fun following along!
Brilliant! Your “little tip” for making leaf tips come out nice and sharp is not so little … it’s so helpful and valuable (and clear!) and lovely.
Bonjour Mary,
Your embroidery sure can lift a spirit, It `smells`like snow this morning here in Québec but it is OK, I am glued to my computor reading your instructions, so clear, I just love it. Thank you Mary for brightening a gloomy day.
France.
Good Morning
I just love the way you write and the beautiful pixs- for a beginner or anyone its a real person to person learning skill. thank you
Wonderful instructions–love it! Can’t wait to see the inside part…what suspense!!! 🙂
Hi Mary,
I’m really enjoying watching this work emerge, your work is beautiful!
This is fantastic, I have ordered the threads but have not received them yet so I cant start with you Mary. I am going to use a cream Dupion Silk as I cant get the pale pink but I am hoping it will be OK, otherwise I am going to do exactly as you do………….if I can.
Thank you so much
In the months since I found your blog I have never once failed to learn something every day. Today you make me want to jump back in time to a few moments and projects where I could have benefited from your technique for crisp, ‘pointy’ points!
BEAUTIFUL!!
Hi Mary, I have just set up a new project and no, it’s not exactly Thrillsville. I particularly dislike the framing us because it rarely gooes smoothly for me. I stitch transferred this project and had ‘clicked’ with it before that step was finished and was eagerly anticipating those first stitches.
As I am doing a Japanese embroidery, I am starting with the foreground elements. I’m pleased with the first one and am now having fun with the second.
I shall enjoy watching your project develop as I continue stitching mine 🙂
It is always such fun to watch a new project slowly transform from lines on fabric into a beautiful embroidery. This one is especially interesting because I am very fond of the border surrounding the Rose.
Did I miss something – you said you are going to “applique fabric on the outer corners”? That sounds interesting. Or am I just confused?
🙂 No, you didn’t miss anything, Paula. I do plan to use an appliqué technique on the project in the corners …. if it works out! If it doesn’t – well, that’s another question …. But that’s my plan, yes! ~MC
Dear Mary
Thanks for the instruction and your tips on the long & short stitch which are very informative and I really like the way the colours and stitches blend in together on the long & short stitch and your leaf is lovely. I feel like following along with you on the Mission Rose project it looks so enticing!!!
Regards Anita Simmance
Desculpe, não sei escrever em inglês.
Seu trabalho é maravilhoso. Eu acompanho e estou
aprendendo a bordar pontos diferentes com você.
Obrigada por compartilhar seu conhecimento.
Deus Abençoe você e sua família.
Beijos
Regina
The shading of the greens are beautiful and you did indeed, get that good contrast between dark green and the gold. Can’t wait to see more!
Very nice, Mary. Detailed and easy-to-follow instructions. Thanks!
INSPIRING!
OMG! This is so beautiful and so detailed tutorial. I love you for this sweet heart.
when you do your long and short stitches does the needle go in the middle of the stitch or on the side. sorry to ask such a dumb question but i am really new to embroidery.i watch all your videos more then once i might add,could you tells us how many threads you use also.thank you.great work and great site.
Hi, Cathy – for the first row of L&S stitch, the needle comes up inside the element and goes down over the split stitch line on the outside. For subsequent rows, the needle comes up into the previous row, and splits the threads, so right into the stitch, splitting it. Where it comes up depends on how deep or how shallow you’re going into the previous row. Looking at the L&S stitch lessons in the link in the article will help illustrate this a little more clearly. Hope that helps! -MC
Mary…I love your photos (including red direction lines and black arrows) plus your very clear descriptions/directions! I am new to this type of stitching and your clarity really helps me to “see” how to put things together! Many thanks!
Your leaf looks terrific and beautifully stitched. The shading looks wonderful and your explanations and pictures are superb.
Beautiful! I haven’t been doing much embroidery lately, and it’s taking it’s toll on my nerves. But I did want to comment on your red lines in the photo that shows the direction of your stitching. I find that I have to draw them in so I can follow the proper direction.It really helps to create that sense of movement in the leaf, you’ve done it without any guidelines, of course.
Hi Mary, I love the leaf so far too! I’m curious though, what is going to be in the center teardrop shape of the leaf????
Aha! Now, that would be telling! Actually, I haven’t entirely made up my mind! I have two possibilities I’m playing with – we shall see which one wins! -MC
That was to be my question too, Cathy. Now that I have some idea of how Mary works I could probably take some guesses at what she is thinking but I won’t make a total goose of myself making my ideas public.
Mary, these colours are gorgeous. So often people choose ‘pretty’ greens, even almost turquoise for leaves which looks very odd to my eye. Besides I dislike green in the main and always go for the murky olivey-pond scum type colours.
Gracias:es muy grato ver como ama lo que hace,esto me hace participar de su trabajo y disfrutarlo mas,es precioso.
I am a patchworker and do very little emboidery. I love your web page and have learnt such a lot. I am so impressed with all your lessons and help you freely give to us. I think you are my hero. Thank you so much for all the work you do. Regards, Dorothy in Canberra, Australia.
Thank you so much Mary for the picture tutorial. I appreciate the information on the execution of the leaf. With each piece I do I become so much more respectful of all needlework. I guess that is commonplace, but it is a great revelation to me. I will follow this work with a better grasp of your explanations now.
My husband even ventures on your site when he needs an idea for a gift for me and he found it looking for needle painting information. He will sometimes say “you should check out Mary Corbett’s site, she has a wealth of information and I believe she researches her subject thoroughly”. I just nod with a special smile on my face. Little does he know he struck gold!
G’day Mary,
This is excellently helpful, stitching, leaf design and colour etc. Yes it works. Thanks, and cheers, Kath.
Great Long and Short Stitch and a great Tutorial.
Hi Mary, I like the leaves as you have worked them so far. I cannot wait to see the finished piece.
I have really enjoyed following this project as you go! Are you dividing the Soie de Paris or using all 6 plies?
After going through all the pics n description, I could only say Waw!!!!… 🙂
U r jus awesome..
M following ur blog since few days, I can’t stop myself surfing it more n more..
keep rocking..
love u for ur works… 🙂
Todo lo que publica es maravilloso.
¡¡¡ Felicitaciones !!!