


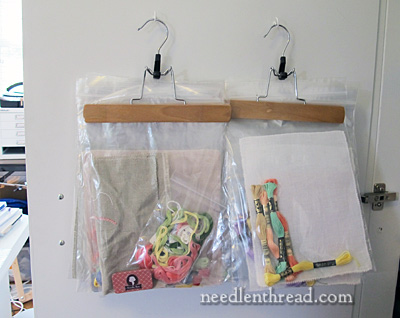
Yesterday, when I mentioned the tip on using spray starch when transferring embroidery designs, one thing I didn’t expect was an influx of email asking about the last picture in the article:
So, today, I’ll clarify how I organize future embroidery projects.
Categorizing Embroidery Projects
First, I drum up embroidery project ideas that fall into different categories. These include projects to blog about, projects to teach, and projects to convert into e-books or kits or what-have-you (maybe for publishing proposals for magazines or whatever – things that I wouldn’t go through step-by-step on the website).
Now, at some point, it’s true, all these categories could overlap, or the projects themselves could completely jump category.
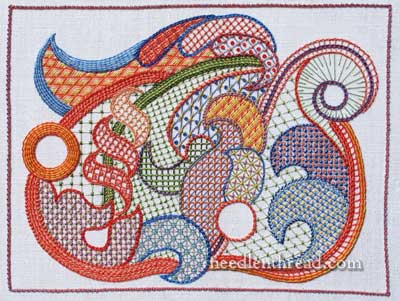
For example, the Lattice Jumble Sampler was a blog project first, and then, due to popular request, it became this e-book.
This is the same case with the Marian Medallion Project – blog project first, then e-book.

But then there are the projects like all the Little Things (which will be available this Friday), which were never a blog project. That whole concept from the beginning was planned as an e-book.

Projects that are solely for the blog (like the Mission Rose project) tend to develop organically – they change a lot, and the changes are recorded here on the website. I don’t normally kit them up in advance. I just make sure I have the stuff I’m thinking of using on hand… though the ingredients can always change as I go!
Gathering & Preparing Materials
Once I’ve conceived an idea and developed it to the point that it becomes inevitable that I will do it (I have lots of ideas, but they don’t necessarily ever reach this point!), I start to gather and prepare materials.
The “future embroidery projects” you see hanging inside my cabinet doors come into play only if I’m preparing something for instructional purposes – for example, right now I’m preparing some projects I plan to use for an online class here on Needle ‘n Thread. I know that I will need lots of photos of the many different stages and stitching circumstances of the projects involved, and many different approaches to the projects. So I will have to work several versions of the projects several times.
So, I put together kits. The kits include fabric, thread, and needles – everything I need to work the project samples.
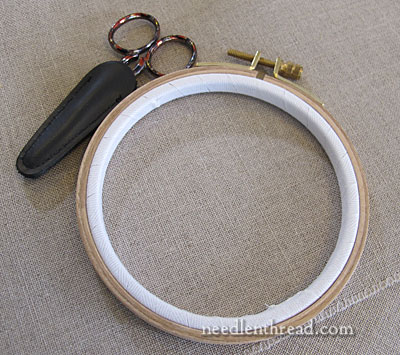
The only things the kits don’t include are scissors and a bound embroidery hoop, because I move those with me from kit to kit.
This is pretty much the order of preparation and gathering, assuming the designs are already prepared:
1. Decide on ground fabrics or all possibilities of ground fabrics and get them.
2. Narrow down choices of ground fabrics.
3. Prepare the ground fabrics by pre-washing (I usually work with linen), cutting, evening up, neatening the edge.
4. Transfer the design to the ground fabric samples. Sometimes, this means transferring the design several times – or, up to 52 times, with the project I’m working on now! I may not stitch all of them completely – sometimes, I only stitch part of a sample, to test an idea, a stitch combination, a color combination, and so forth.
5. Select threads, and this includes possibilities of threads, even the “maybe’s”. If necessary, order any threads that are missing.
6. Individually bag each sample in a zip-lock with fabric, needles, threads, copy of design, and any notes I may have made for that particular sample.
7. Stick all the bags in the clamps on skirt hangers in the order in which they will be approached, and hang the hangers on the hooks inside my cabinet doors.
8. Finally, I close the cabinet doors, and forget about them until I have time to approach them. And when that time comes, everything I need is there and ready…
…until I start making changes…
…which are inevitable!
Hooks on Doors for Hanging Kits
I use regular screw-in hooks on the inside of my cabinet doors to hang anything hangable on.
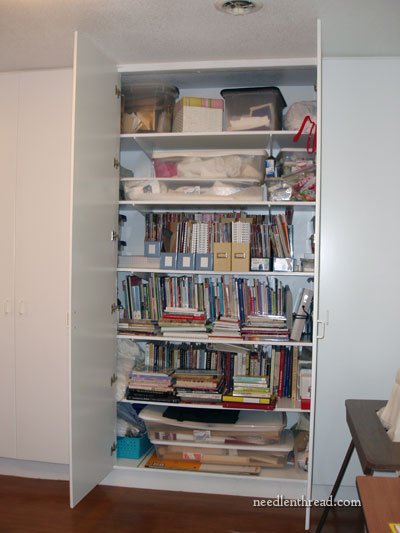
These are the cabinet doors – they’re pretty much floor-to-ceiling. But there’s a good 8″ of space between the doors and the edge of the shelves, and all that space would be wasted without those hooks. Anything that can be bagged up can be hung on a hook. And all kinds of tools can be hung on hooks, too. So the hooks are great space savers.
So there you have it – probably much more than you ever wanted to know about how I organize future work, and what those bags hanging inside the cabinet are!
What about you? How do you organize your future projects or your works in progress? Do you have a specific system? I’d love to hear about it! Feel free to leave a comment below and let’s exchange some ideas!
I am so jealous of your big storage cupboard – I guess you won’t make that your next giveaway…!
More seriously, one thing I have learnt the hard way: when putting projects away – never, ever leave any needles or pins in the fabric or touching the fabric. (That goes for any staples and paperclips on instructions leaflets too – keep them away from the fabric.) Just in case damp gets in and rusts them before you start the project.
Dear Mary
My goodness you are so organised but then you would have to be to keep up with your embroidery career. I love your storage cupboard oh I wish! I have all my embroidery threads in various ex-video cases and my gold pieces in a cardboard box and my small selection of fabrics in a kitchen cupboard and my accessories in the lid of a box and various bits and pieces in another box. I need a space for all my embroidery work so I been toying with the idea of purchasing the small Bisley cabinet the one you wrote about I will have to think on that one. Thanks for your tips on how to organise new projects very informative.
Regards Anita Simmance
can’t wait for Friday to purchase Little Things hurry up!!!
Regards Anita Simmance
I can’t wait till Friday to purchase the little things.
Dear Mary
Thanks for a great blog, I enjoy reading what you say.
I haven’t left a comment before but here goes!!
Many years ago when my children were little, I needed to get my
Rotary cutter out of the way, so attached a piece if string to it and
Hung it on a hook on shelves above my sewing . Felt quite good
That I had taken the precaution.
Some time later I had an electric lock and intercom installed on our
front door (we lived in South Africa and these were necessary)
The only place to connect the electricity was behind my machine
On the floor Can you see where this is going?
The man stood up, hit the cutter which pushed up against the hook
And sliced his head open!! Hospital – stitches – shocked children – guilt!
In those days the cutters were spring loaded, thankfully they have
Changed the design.
Holy Cow! That is awful, Amina!! I’m glad you saved the kids from the cutter, but I’m sorry about the electrician episode! I keep my scissors and anything sharp in drawers. Hoops work well hung on hooks, though – and I’ve never heard of a head injury yet from a hoop… but then, maybe I should knock on wood…!
I’m glad to know you too have more ideas than will fit in a lifetime. You’re so good about sharing your process with us. Would you consider talking about how those that are implemented percolate up the list?
Mary,
I’m excited to read a hint about a new class. Is this something you do online? Since you are putting kits together, do you also provide materials? Please share!
Anxious Pamela
Northern California
Hi, Anxious Pamela! No need to be anxious – yes, they’re for an online class hosted here on Needle ‘n Thread, and yes, kits with the materials are part of the class fee. I use the best materials for the technique and give you everything you need to complete the class projects, except hoop and scissors. The class that’s in the prep stage won’t run until after August some time – no exact launch date yet. Lots of samples to stitch still! But I’ll be kitting it up by the end of August, so the launch should follow not too long after that. Fingers crossed, and all that! Thanks for asking! -MC
I really liked your idea of gathering supplies together for projects and keeping them hanging up together. Mine are stored in boxes and not so easy to get to. Thanks too for taking the time to write down all the steps you go through in preparing for projects. Although I may have fabric and threads ready, dividing them up into separate bags for different versions is a great idea.
Mary, what do you do with the raw materials when the embroidery project is finished? Do you save thread & notes together in case a repair is needed later? Or do you just fold everything back into your regular supplies?
Claire, if the project that I have finished is a framed picture, I slip the remaining bits and pieces of thread and pattern in the back of the framed picture (between the backing paper and actual completed project)for the future.
Holy cow! How many projects do you have going at one time?! Do you sleep?
Well, Kathy, I do sleep. I can’t avoid it. I looooooove sleeping!!! However, now and then, I wouldn’t mind 48 hour days. But more than that, I’d like 10 arms that could all be stitching something different at the same time. But that’s not quite the way hand embroidery works, is it? :-/ MC
Great ideas!!! Thanks.
This article is terrific! My next question is how do you store threads? I can’t afford expensive cabinets so need something inexpensive. And how do you find it once you store it?
Meg, she gave some good suggestions in the past. I hope these links send you to the right place: Part 1 https://needlenthread.wpengine.com/2006/07/floss-and-thread-organization-storage.html and Part 2 https://needlenthread.wpengine.com/2006/07/floss-thread-organization-storage-part.html She has other great tips/techniques here too https://needlenthread.wpengine.com/tips-techniques
I am jealous too of your storage cabinet but even if you had one as a getaway I wouldn’t have anywhere to put it 🙁 I bought some generic 2 gallon storage bags and put my stuff in them. I tend to buy stuff and forget what I bought them for unless I put them in a bag with the instructions enclosed in a separate plastic bag-wouldn’t want ink transfer on the fabric, etc. I can hardly wait for the Li’l Things on Friday. Thanks for all the tips
I too use zip lock bags to store projects I love that I can see what is there and it stays clean. My crochet and bead projects are grouped in a similar way but I never thought of using the skirt hangers – that is brilliant! Thanks for the idea
Love your use of skirt hangers. I also use plastic zip bags for projects, but I put a metal shower curtain ring thru them and hang on a coat tree that has many arms. I organize floss by DMC groups, using the tiny floss bags for each color, hung by DMC group on shower rings affixed to a couple of old belts and hung on coat tree. Now I’ll add skirt hangers for the ones I’m “actively” working on. I am a fast starter, but a slooow finisher. I add my thanks & admiration others have expressed.
I know someone out there organizes their projects like I do. Let’s hear from you 🙂
1. See a project and say to yourself, hey! I think I’ll do that.
2. Gather your supplies and find that you don’t have the right kind of thread, your needles are somewhere but you can’t put your fingers on them, your local shop doesn’t carry the linen you want and you don’t have the right size hoop.
3. Go to the store and get the supplies you either don’t have or can’t find and substitute that linen for something comparable.
4. Come back home and get ready to transfer the design.
5. Find out that your vision is so bad you can’t see the design to transfer it and your makeshift light box is now being used to store old C.D.’s.
6. Go back out to the store to find a magnifier so you can see your work and get a new light bulb for the light you used in your makeshift lightbox because the other one is burned out.
7. Get back home and discover the “real steal and good buy” magnifier you found just doesn’t cut it. Everything is blurry and you can’t draw with one hand and hold the magnifier with the other.
8. Research online through the Needle-N-Thread website and other embroidery sites and find a good magnifier. Ooooh, I like that new lightbox thingy too.
9. Order it up off the internet.
10. Wait until it arrives and you’re ready!
11. Go back to see where you put your stuff that you had all lined up for this project to find that you put it “in a box” – “in the closet” and it’s gone where no man dares to go…into the great void called – THE BOTTOM OF THE CLOSET.
12. Have a cup of coffee and read Mary’s Blog.
13. Hey….there’s another project that looks like it would be fun to do…….uh oh.
Brenda, Wilmington, Ohio
LOL! That was hilarious, Brenda! Thanks for the smile!
Very impressive! I am nowhere near as organized as you, nor as tidy! Like the others, I store in boxes and pull them out I do, however, have a “Master List” of work orders! Keeps my head organized much more than my workshop!
I love the idea and do something similar but did replace a shelf and put a rod to hand bags. The problem is that way I accumulated way to may projects to make. Have been reading you since end of 2011 and am now following you on Pinterest.You are quite a mentor…love you God bless you
Hi Mary and all. I waited for some responses to see if anyone had super ideas. Your plastic envelopes are exactly what I do. I took the plunge and purchased some archival quality envelopes from Tanya Berlin. They are large enough to comfortably fold material and add threads. I keep the projects of the future in a square basket so I can flip through them (like the old Roladex holders). I do keep pins totally separate. I can slip an index card in the sleeves that denote what the material is, the thread count,threads stored and possible project planned. I can also note if the material has been properly prepared, Plus, due to the quality of Tanya’s “sleeves” I feel comfortable slipping printed patterns in as well, always faced away from the fabric.
Thank you Mary,
No wonder you have so much time to do everything…..method and organization are the secrets!
Hi Mary
I am glad to see that I am not the only who plans so far ahead. One of the thrills for me is the “gathering”. Even if my projects “hang around” for awhile I still enjoy looking at them every now and then and making small changes depending on my mood. 3am is usually the time I think of the changes!!!
I hadn’t thought of the same “skirt hangers” as yours, only the hinged rings which hang around my studio.(which I insisted my husband build for me if he didn’t want to “find” my dropped needles and pins!!!!) He always asks “when am I going to do all these”??
Hi Mary,
Thanks for the great tips.
OK – when I look at the picture of the inside of your cabinet, my first thought was “Look at all of her books!”
Wow – not only is everything organized, but your books are all there – in one place. That would be so great. This past week, I was searching for my book on symbols for work on design patterns at the Monastery, and it took 3 times through everything to find the books needed.
Someday – I really hope to have space to keep everything together and organized…….and with your continued suggestions, it’s bound to happen.
Hi. Unfortunately and fortunately I have my daughter’s small bedroom for my craft area. There are 3 long large shelves where on one shelf I store magazine boxes with needlework charts and magazines organized by subject. One shelf has books, and another shelf has boxes of kits from classes I’m taken, or kits I’ve put together. I almost bought the Bisley cabinet but in the end I repurposed a multiple drawer unit from Joann’s Fabrics for my fabric. It’s organized by fabric count. And…I ended up organizing all my DMC in a very long pull out drawer that I purchased from The Container Store. My fabric storage unit and the DMC container are in the closet. I ended up storing other specialty fibers in individual containers. They are in the closet also. I love my room. My husband actually suggested I convert my daughter’s old room into my “craft” room. It is wonderful with a special stitching chair, a floor lamp, and desks but when you (I) have a lot of room I tend to fill it hence I have toooo much stuff but I’m happy.
Thanks for being you, extending yourself & sharing. It is appreciated.
If I had a craft room organized like this I would be a miracle.
Mary, It seems like every time our group gets together to stitch I forget something. What items do you suggest to have as a general sewing kit? What would you keep it in? I tried to have a different bag for each kind of project,ie redwork,cross stitch etc but then I never know what to carry it in. Also, the bag gets everything all jumbled up, a box doesn’t have a carry handle…. I’m a mess! Seems silly but it’s starting to drive me crazy.
I’ll look forward to your ideas.