


You know when we start discussing frames and hoops for an embroidery project, the actual stitching part is getting pretty close!
I thought I’d take a short break from the thread discussions we’ve been having to tell you about my framing choices for the Secret Garden project and to make some suggestions for frames or hoops.
Please, please, please keep in mind that I’m just discussing what I’m doing, or what I would do, if I weren’t doing what I’m doing (?!).
If you already have a favorite frame or hoop method for your embroidery projects, feel free to ignore me completely.
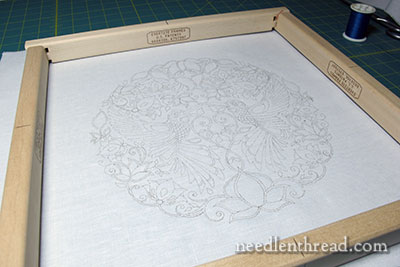
For Secret Garden version 101 (I always laugh when I type that – it seems so silly, but it helps keep things straight), I’m using Evertite stretcher bar frames.
You can read all about Evertite frames and how to use them (and what their advantages are) in this article that shows you the Evertite frames up close.
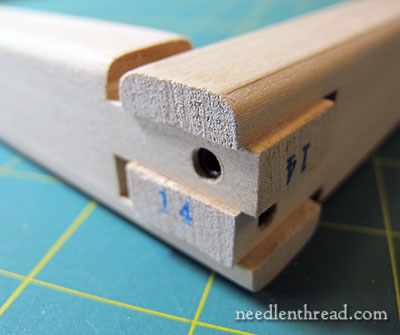
If you’re fabric is 15.5″ – 16″ square, the 14″ stretcher bars will work perfectly.
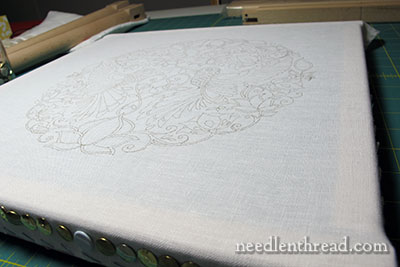
So, here’s the first version of the Secret Garden project, framed up and ready to stitch! It’s nice and taut, a perfect surface for surface embroidery.
You might be wondering why I didn’t use a Millenium frame for this project. I really love the Millenium frames, which I’ve reviewed here. But I don’t have the right sized side bars for this particular piece of fabric. It’ll work for one of the other versions of the project.
And what about hoops?
You can certainly use a hoop for this project. Because of the size of the project, practically any hoop that will work well for the project will need to be shifted around as the embroidery fills in.
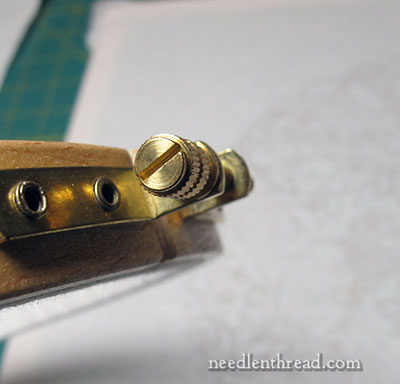
My suggestion for hoops is that you use a good quality wooden hoop, with good hardware that will allow you to tighten the hoop using a screw driver. Hardwicke Manor hoops are my go-to embroidery hoops, and you can find them through various needlework shops online, or any locally owned shop that carries goods from Access Commodities. Needle in a Haystack is a good choice, if you’re looking for an online shop that carries them.
If you can invest in a good hoop, it will last you a long time and serve you well!
Hoop Size
When talking about hoop size, I know there’s a lot of personal preference involved. But if you’re using a medium weight linen, normally, a thicker hoop will work better for you than a thin hoop. A 5/8″ thick hoop works well with the linen I’m using.
No matter what size hoop you use on this particular project (as far as diameter goes), you will most likely have to move the hoop around to work the whole project. You could use a huge 15″ hoop (hoops this large are usually sold for quilting), but hoops this large are problematic with surface embroidery.
For one thing, unless you have a hoop-holding stand or some sensible arrangement for propping the hoop up as you work, your hoop-holding hand will get tired of holding a hoop that size.
For another thing, the larger the hoop, the more difficult it is to maintain drum-tight tension.
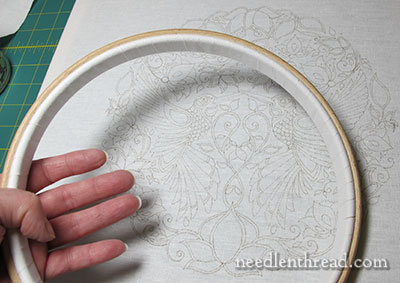
For diameter, I’d suggest nothing larger than 9″, and if you do decide to go with a hoop that large (9″), it really needs to be at least 5/8″ thick to hold the fabric well.
If I’m working with a 9″ hoop, I always work with it in a stand, so that both of my hands are free when stitching. You can see in the photo above that my fingers don’t reach even nearly to the middle of the 9″ hoop when I’m holding it. (This may differ for you – I have short fingers.) If I’m going to hand-hold a hoop, I have to be able to reach the middle of the hoop with the fingers on my holding hand, just in case I need those fingers while I’m stitching (to make French knots, for example).
If you’re holding the hoop in one hand and stitching with the other, I think even the 9″ hoop will prove heavy and cumbersome over time. So you might want to go with something smaller, like a 6″ hoop, which means you have to move it around even more often.

No matter what size hoop you use, if you’re going to use a hoop, bind at least the inner ring with twill tape. You can find a tutorial for binding the inner ring of a hoop here.
This extra step, even though it takes time, will pay off in the long run! The bound inner hoop will help maintain good tension on your fabric and will also help protect your fabric.
For further fabric and stitch protection, it is helpful to hoop your fabric with a layer of plain muslin (calico) over it, with both fabrics in the hoop, and then to cut out a circle from the muslin to reveal your stitching area. The layer of muslin also helps with tension, but more importantly at this point, it helps protect your ground fabric from dirt and oil when handling the hoop.
You can then move that layer of cut muslin around with your hoop when you move it.
Always remove your work from the hoop when you’re taking a long break from stitching. This will decrease the chances of hoop rings on your fabric.
Frame vs. Hoop
At this point, I probably don’t have to mention the pros and cons of frames vs. hoops. But just a few thoughts, if you’re oscillating between the two choices.
Pros of a frame:
1. With a frame, you decrease the likelihood of having to clean the project at the end.
2. With a frame, you have the whole exposed area of the project before you.
3. With the right kind of frame, you only have to frame it up once, and you can maintain perfect drum-tight tension through the whole project.
4. With a frame, you do not have to worry about hoop rings.
5. With a frame, even if you don’t have a stand to hold it, it’s easier to prop your work on a table so that both hands are free for stitching.
Pros of a hoop:
1. With a hoop, your embroidery work is more portable.
2. Hoops are more widely available and generally more affordable.
3. Hoops take less time to set up (but you have to set them up every time you stitch…)
A Few More Fabric / Frame Points for Consideration
Setting up your fabric on a frame or in a hoop is a Very Important Step, and it’s important to do it right from the beginning. Making mistakes here can lead to puckering fabric or misshapen embroidery.
If you’re working on a frame, line up the grain of the fabric with the sides of the frame, so that when you frame the fabric up, it is perfectly square on the frame and not at all askew on the (diagonal) bias.
If you’re working with a hoop, make sure you tension your fabric evenly all around the hoop. Avoid pulling the fabric in one area more than others.
If you are planning on working this project on a different ground fabric, be careful in choosing your ground fabric! Use a natural fiber – linen or cotton (or silk, if you want to get fancy). Polyesters, polyester blends, and even linen / cotton blends are not the best choices, as they usually have some give or stretch to them, which can also lead to puckering or misshapen finished work.
If you believe your fabric is too light to support your stitching, you can always line it with a cotton muslin (if you’re using a white ground fabric, make sure it’s white cotton) or with another piece of light linen.
Fusible Interfacing?
A couple readers asked me earlier this week if they should use an iron-on stabilizer to decrease the chance of puckering and to ask for recommendations for fusible interfacings to use behind this project.
If I could kneel down and plead before you right now, I would – I’d clasp my hands, I’d well up a goodly amount of tears in my eyes, and I’d say in my most pathetic of begging voices, “Please. Please. Pleeeeease don’t use a fusible interfacing behind your work!”
The best thing for a beginner to do to decrease the chance of puckering is to set up the project correctly from the beginning. If you need another layer of something behind your ground fabric to support your stitches, use a plain cotton fabric or another layer of light linen. (This isn’t necessary at all with the linens I’ve recommended for this project.)
Here are the primary reasons I would not use a fusible interfacing behind my embroidery:
1. If, at the end of my project or some time down the road, I need to wash my work, fusible interfacings can (and often do) bubble and separate from the fabric.
2. Fusible interfacings can be affected by climate change, high humidity, sunlight and heat, etc. and can bubble, become brittle, or even discolor with long exposure.
3. Fusible interfacings are more than just the fiber they’re made out of – they’re also the glue. Repeated embroidery through most fusible interfacings is more difficult (it’s more difficult to pass a needle through a layer of fabric, a layer of glue, and a layer of interfacing). Yes, fusible interfacings are often used in machine embroidery – but the machine, not my fingers, is pushing the needle through the fabric.
4. Fusible interfacings cause more wear and tear on embroidery threads, so I’d have to work with shorter lengths and change them more often.
Having seen and experienced all of the above, I don’t think they are worth it. There’s no really good reason to use a fusible interfacing behind surface hand embroidery – better, instead, to learn to set up your projects correctly and to establish a good tension on your stitches through practice, than to mess with fusibles.
Caveat: In crazy quilting I know certain types of fusibles – like Mistyfuse – are used quite a bit. And in certain types of appliqué, fusibles come in handy. But for surface embroidery projects that are meant to be more along the lines of “art” (framed and hung, finished into pillows, stitched on table linens, etc.), please give fusible interfacings a miss. At best, they’re a crutch, and only for embroidery that isn’t necessarily meant to survive the test of time.
Concerning wash-away stabilizers like Transfer-eze and Solvy’s printable fabri-solvy – these can be handy for projects like dish towels and the like. I use them for that and for teaching children to stitch. I wouldn’t use them for a project like this. But I’m not the Embroidery Police. I’m not going to tell you not to, if you’re determined to use them.
Still, I’m sending out massive waves of encouragement to you, topped with a good dose of persuasiveness and a large dash of pleading, to do the project without using these artificial interfacings and stabilizers. The more you practice embroidery, the better you will get at it (it’s a foregone conclusion, if you are diligent), and the less you’ll feel inclined to turn to stabilizers and the like in hopes of making your work look better.
Questions? Comments? Input? Troubles? Confusion? Beratings? I’m all ears! Feel free to leave a comment below!
If you’d like to follow along with the Secret Garden project or catch up on the backstory behind this project and see how it is developing, you’ll find all the articles relating to it arranged chronologically in the Secret Garden Hummingbirds index.
Mrs. Corbet,
Besides leaving hoop-rings on your fabric, will leaving your fabric in a hoop for long periods of time stretch your fabric funny? Or does that just depend on the fabric that you are using?
Thanks, Sarah 🙂
Well, it does depend on your fabric a little bit. But if you’re using a good linen or cotton, you shouldn’t have a problem. If you’re using a good linen or cotton (and colorfast threads) you can always rinse your project at the end of it, and then damp stretch it, and that will normally remove all hoop marks and any distortions. It won’t automatically remove puckering if you’ve got some heavy tension problems, but it will often alleviate it a bit. ~MC
hi mary – i am looking for a REALLY stable floor stand to use in my basement when hubby and i watch tv in the evening – i saw that you use the needlework system 4 and wonder if you can tell me where i can order it. i’m a needlepointer and wonder if this stand would work for me like it does for you? thanks in advance for helping me with this
arlene
Hi, Arlene – Yes, it works with needlepoint, if you use stretcher bars and the frame clamp option. I think it also depends on how large your canvas is – although I’ve used mine with fairly large frames (30″ wide and 20″ deep) without a problem. I like the stand a lot and use it all the time. Another good option is the Necessaire floor stand from the UK. It works well, too, and even with the exchange rate and shipping, it is less expensive. The difference is that it is wood, and it’s a little more limited in its adjustment options. Also, there’s often a backlog of orders for the Necessaire.
You can find the Needlework System 4 stand through a variety of needlework shops online. I usually recommend Threadneedle Street in Issaquah WA, as they have the best prices and excellent service. It’s easier to call and place an order than to place an order through their website, though.
Hope that helps!
Bless you Mary!! I try and talk, plead, beg people out of using iron-on stabilisers for their hand embroidery whenever I get the chance. A plain cotton muslin works SO much better – even for very dense or heavy work. Thank you for bringing this up. 🙂
Hah! Mary! I’m sure you will be dismayed to know that after reading that wonderfully informative article the primary image I came away with was a picture of you in your most pathetic posture, tears welling, warning of the pitfalls of fusible interfacing! I still have a smile on my face, so, thanks for a truly funny lift to my morning.
LOL! If I could have drawn a cartoon for you, I would have! 🙂 But it sounds like your imagination is pretty much producing the same image I was trying to convey!!
Mary,
I totally agree with your thoughts on stabilizers. It is my discovery that with machine embroidery they keep the tension smooth and allow for the high speed and pulling of threads to work without bunching up the fabrics, but with hand embroidery that is all controlled by not over pulling your threads too tight and proper hooping techniques.
Sticky/fusible can also gum up your sewing machine needles and cause thread issues just as it does for hand sewing/stitching. I won’t say I never use it, but it is problematic and not my go to stabilizer unless it is a down and dirty get ‘r done type of thing.
As one who teaches quilting and sewing, doing needle-turn applique I have also learned that using smaller needles and thinner threads will make stitching smoother without the bulk which can cause problems during the quilting phase of these projects. I only use stabilizer if items will be machine stitched.
Even in garment construction, iron on interfacing or stabilizer shows the glue through thin fabrics like organza and lace or soft silky knits. When I need stabilizer for button holes, cuffs or neck facings, I sew it into the seam allowances to keep it in place because the glue will eventually wash out or give way.
Thank you for the information in this email. You know I have been stitching for many, many years, and this is the first time I have seen a suggestion for wrapping the inner hoop which really makes a great deal of sense when I think about it. Why hasn’t any of the shops or designers ever mentioned this??? Thank you for giving the name of the shops where you have purchased hoops.
I did a sample for a quilt shop recently and I had to use fabric that was lighter than I normally like for stitching. I don’t carry my thread, but there were a LOT of French knots and it was going to be problematic.
I used a product called Presto Sheer that ironed to the back of the fabric and it was amazing. It was incredibly light and sheer and I doubted whether it would work.
It did! It didn’t change the feel of the fabric much and while I would always try to choose a fabric for stitchery that didn’t require it’s use, it worked for this.
BTW, how do you handle French knots if you have a lot of them in an area? Not grouped together, but 1/4″ to 1/2″ apart? I tried tying them off, but I was afraid of cutting too close in case they unknotted!
gracelister. Oh, how I agree with all you have said Mary. In teaching for the last 30 or 40 years the number of times I have had to tighten hoops for students. One of the most important items in my sewing box is a screwdriver to tighten hoops. I am also in full agreement with you over forbidding the use of fusible stabilisers. The cotton or linen fabric we should use for embroidery of this type should be enough to support the stitches and does not need the help of these new support items. An additional piece of thin cotton is all that is needed if anything at all is necessary.
Thank you for making this all so clear. I have been trying to drum this information into people for so many years.
Re hoop-rings – my grandmother and mother always taught me to remove my hoop, each and every time I was done stitching for the day/night. As my grandmother put it, “You wouldn’t go to bed with your girdle on, would you?” This comment used to send me into titters, as I was a young girl, and didn’t wear a girdle. I grew up not ever having to wear the confining contraptions of my grandmother’s age, but I still remember the warning with amusement.
LOL! Your grandmother had a good point! Of course, as I sit here looking at my waistline, I can’t help thinking I might have benefitted from life in a girdle or a corset! 🙂
Dear Mary
This is a great article on setting up fabric for embroidery projects and your points on frames vs. hoops is really helpful. I have both the Necessaire stand and millennium frame and the System 4 stand which are great and like you I can really recommend them both. Thanks for your point on lining the grain to the frame and making sure the fabric fits the hoop evenly. These points are so important when starting a project, thanks for the advice. Thank you for your advice on not to use fusible interfacing for a backing, really valid points. A great article Mary and thanks for sharing with us your tips and techniques on how to set up a project. I hope you have a great weekend.
Regards Anita Simmance
G’day!
I love how the 101 project is developing! Its better than the majority of beginner embroidery books Ive come across. Your humour is better too! This is fun. This is a joy to follow on. Great work girly!
Hi Mary,
I have been using Evertite frames for several years, I like the way they keep the piece drum tight. I have never attached the fabric around to the edge. That would surely keep my thread from hanging up on the tacks. Your picture doesn’t show the corner, do you have any trouble re-tightening the frame? Is the fabric on the corners loose enough that you can still use the “T” tool?
I have learned so much from your web site, wish I had found you years ago. Thanks.
Hi, Alice – yes, I just peel back the corners to use the T tool. The fabric is relatively tight over the corners, but it does peel back for access. Since they’re the whole point of the Evertites, I definitely make sure the corners are accessible! -MC
Hi Mary
the fusible interfacing question could have come from those of us that follow Trish Burr. She just said that and I bought fusible interfacing for the first time, and shared with my friends so we could all use it. I bet she was only referring to thread work which is very tightly threaded. Or lots of thread.
I know you follow her site also.
Thanks for unconfusing me. I will only use it for thread painting.
Have a sweet day. Thanks for babysitting all of us. Christine
Mary,
Would you have a list of all the materials needed to make this project? Would Hedgehog have all items? I am going to jump in and make this. I have been procrastinating. Love your tutorials.
I have a Hardwick Manor 6″ frame on its way from Hedgehog . It’s the 5/8″ you
Recommend. I’ll wrap it when it arrives. Just for practice , I wrapped a cheaper 1/2″ hoop I’ve had for a long time. I’ve never had a quality hoop before in my whole life. This Mary Corbett embroidery world has only opened up to me about 4-5 months ago. As far as a stabilizer , I would never have considered that. My fabric is a good quality white cotton that I could trace through. I thought about tea dyeing to give it a little color.
I’m anxious to see what thread you use. I’m a 101 student. The thing about floss is that you can get all the colors easily anywhere .
i have uses batting behind embroidery. how do you feel about that?
Hi, Kay – If you use it and it works for you, I think that’s Great! Is it for stabilizing? Is it because you embroider on quilts? Is it to create a dimensional effect? Is it so that you have a soft padded backing for framing or finishing?
Again, I’m just mentioning what I do and why, and giving the reasons why I suggest certain approaches. If a method works and gives you the results you want, then that’s fantastic – no reason to do anything different!
MC
I guess I use batting behind my embroidery for several reasons. It probably serves the purpose that the twill tape does, it provides a “cushion” for the fabric and embroidery on the hoop. It also gives that little bit of depth that you spoke of. I don’t see batting as a stabilizer, but maybe it does that too. It also works as a great backing, or can be incorporated with quilts, since it is a larger that a “normal” piecing area, the batting seems to protect the embroidery. At least, that is my opinion.
Dear Mary
Thank you for all your advice and tips. I am trying to gather the courage to start tracing the design! I have practiced on a scrap and my tracings are never perfect. I thought I would try spray starch and a fine pencil as I thought the fabric may be more stable. I am not sure but the humid weather we are having in Darwin May be making the linen harder to handle. I am waiting for a frame to arrive in the mail. In the meantime I am dreaming of colours fo the Secret Garden!
Regards Jude
I totally agree with you about not using fusibles. I am a purist and I don’t think we know what the glue does over time and I don’t see what the problem is for people in just using another piece of woven fabric for interfacing, without the glue. Another embroidery person, Trish Burr (sp?), has been raving about fusibles in the last couple of weeks, but I don’t agree with her. I am glad someone else agrees with me. Thank you for taking a stand, even if it may be an unpopular one.
BBrown
Hi, Barbara – I think different stitchers have different approaches. Trish is an amazing needle artist – her stitching is incredible! But we can definitely take different approaches, and even disagree on approaches. If fusible work for her, that’s great. And there are places – especially when comstructing actual items – where fusibles and other interfacings come in handy.
I did communicate with Trish about this – she said she tested the woven fusible she’s recommending under all kinds of circumstances, washing it and so forth, and was pleased with the results.
For me, I’ll stick with regular fabric when I need more support, though, because that method works better for me.
Hola Mary,
Thank you for all the useful information. Regarding the Evertite Frames, are all four stretcher bars 14 inches? I’m in the process of buying the frames and need to know what sizes to buy.
Thank you.
Marta
Hi, Marta! Yes, you’ll need two pairs of 14″ frames, if your fabric is 15.6-16″ square. -MC
I’m just starting putting my fabric in a wooden frame. How do I embroider with two hands free when leaning frame against a table. If I lean frame against table I need one hand to hold? Need some help.
Thank you
Hi, Dianne – Usually, you can rest the end closest to you on your lap or your torso. You can also clamp the frame to the edge of the table, if you have a clamp (or two, if you want – one for each side) like the quick grip one in the first photo here: https://needlenthread.wpengine.com/2013/04/substitutions-for-a-needlework-stand-clamps.html
MC
Re: hoops. Why wood and not plastic?
Plastic hoops are fine, if that’s what you have access to. Eventually, if you’re going to put a lot of time and energy into embroidery, it’s nice to invest in a good hoop. With good wooden hoops, you can really tighten them – more so than with plastic hoops – and they don’t give up their tension on the fabric as easily. Plastic hoops only come in one thickness (except for one hoop out out, I think, by Clover, which only comes in one diameter), so for projects using slightly heavier fabric weights, you don’t have the advantage of a thicker hoop for holding the fabric. Also, you can’t bind plastic hoops, because of the lip on the inner ring. Good wooden hoops are also more stable, especially in larger sizes. Plastic hoops can be wobbly. So there are lots of advantages to using a good, solid wood hoop! But if you’re just starting out and don’t want to make the investment, the plastic widely available Susan Bates hoops are a good way to get going. -MC
Hi Mary,
When you say to use a piece of muslin for interfacing, how are you attaching it to your project? Do you make some basting stitches in non-design areas to hold the two pieces of fabric together or just use the hoop/frame?
So excited for this project!
I usually just frame both pieces up at the same time. Once you get some stitches in, it’ll hold. You can frame them up together first, and then run a simple basting stitch around the outside of the design, inside the frame or hoop, for extra security, especially if you will be moving a hoop around. You can also do it before you put the fabrics in a hoop or frame – just make sure that both fabrics are perfectly aligned (grain wise) and that you pin them together before stitching (before basting them together), to make sure the backing fabric remains aligned with the ground fabric.
However you do it, you want to make sure that both pieces are aligned according to the grain of the fabric. You wouldn’t want one turned so that the grain runs diagonal to the other, or you’d get stretch in the turned one.
Really enjoyed your newsletter. I have just started using my System4 floor stand and really love it. Your advice regarding this was truly helpful. Thanks. Sue
I was really interested in your section concerning fusible interfacing. I am working at finishing some projects that have been in limbo and had been told to use fusible interfacing. I’ve already done that with some of them and was horified to learn of the possibility of discoloration. I do crazy quilting and back the individual pieces with muslin. I will now use muslin/cotton instead of fusible interfacing if I need more backing. Thank you so much for educating us!
Hi, Connie – Well, formulas change. The newer, good quality name brand interfacings should not have discoloration issues. So if your finishing instructions call for a fusible interfacing, there may be a good reason for it. You might read up on it, look for finishing examples and reviews and so forth online, and see what other folks are doing with the types of construction you’re working on. I think for finishing, you have to weigh and balance what will work best for the type of finish work you’re doing. ~MC
One response stated, working through the glue can be awful – I agree! And it will gum up your needle and threads in short order. I usually use something tightly woven: a fine cotton batiste, or silk organza. The cost of doing this is far outweighed by the result.
I’m so glad to see what you had to say about using interfacing fused on the back of your embroidery fabric. Trish Bur had a blog recently telling how she used fusible interfacing to keep her embroidery fabric from puckering after stitching. She was very happy with the results but I had my reservations. Now you have answered my questions. I quilt as well as embroider and know I have difficulty sewing through the fabrics plus the fusing glue in applique. I suffered many needle jabs sewing through that mess. I also wondered about the wear on the threads. So you have settle all my questions. Thank you very much. I know if I go to your web site or send an email I will not be lead astray.
Mary I just found you a couple of months ago. I do embroidery and am learning tambour with a scheduled class with robert haven in the fall. My question will be strange to you I’m sure. I want to do emblishment for a wedding sash and sleeves for grands wedding dress in tambour. I use a stand for applique and large pieces but what do you suggest on how to do a backing for the sleeve. I have no polemic with sash. I don’t know if I should sew it on after I embroider and bead the piece or am I supposed to try to get the tambour needle through both pieces, fabric and backing. I’m so confused on this. Thanks for all your posts. They are just wonderful.
Hi, Jan – usually, embroidery is done before the piece is constructed, so I’d probably do the embroidery first through the ground fabric then construct the garment with the backing. – MC
Why only bind the inner hoop? I usually bind both. I figure if the hoop is smaller than my work and I have to move it around then my stitches won’t get so squished by the bare ring. Does it make a difference?
You can definitely bind both (here’s a tutorial for binding both rings, if anyone is looking for it: https://needlenthread.wpengine.com/2010/10/embroidery-hoop-talk-binding-both-rings.html). I normally bind the inner and then mount muslin over the ground fabric in the hoop and cut a hole for the stitching area. This gives a layer of fabric to protect the ring area of the ground fabric and it accomplishes the same thing as binding both rings… -MC
May I add a plea for NOT using fusibles as stabilisers. I had a piece of silk that had been dyed using various techniques to form a picture. Used as a screen over a non-opening window area for a while it was put away. It cracked in places and I thought to rescue it by adding embroidery. So I stabilised it BUT whilst ironing on the protecting fabric I had not noticed a ruck appearing between the silk and the fusible. Nothing can be done – it will not unstick – washing cannot be vigorous as the silk is now so delicate. All is lost. Neveragain will I use a fusible to support an embroidery.
For another option… I use silk screen frame rails for a lot of my projects. They tension using cord instead of the doweling that the Millennium uses. They come in a wide variety of sizes and are comparable in price – or less expensive than – the Evertite bars. Right now I have a couple of pieces framed up (silk surface over silk ground) and they are quite literally drum tight.
Hi Mary,
While going through some of my miscellaneous items, I discovered I already have Hardwicke Manor hoop. I was already going to buy one but discovered this unused one amongst my things. However it is a 5/16 x 6 or 7″. Will this work on the Hummingbird project? Can you explain the reasons for the depths for each?
Thanks!
Catrina
Hi Mary,
Finally getting motivated to complete my tracing! I did fine a super light blue batik fabric! I did some stitching on an extra piece of batik and have decided it needs more stability. I want to pack with 200 count muslin and I will be doing my work in a hoop. My question is this: I know you don’t recommend fusibles and I totally agree. My thought is I will have to baste the two pieces of fabric together. Is there a particular configuration with the thread I should use? Or do you have another Idea on how to get fabrics together so when I remove from hoop daily they won’t shift between sessions.
Thanks so much, Cheryl.
Hi, Cheryl – I usually just baste around the design area, if necessary, and sometimes, I might baste a large x through the middle. Once you start stitching, you can remove any basting threads that are in the way. Your stitching will further secure the fabric. – MC
Sometime people come to rue their words. Mary, you are lucky not to have to do so. In this case, your words written in 2014 saved me. I was setting up my redwork project according to the directions which called for fusible interfacing applied to the stabilizing fabric when my nighttime reading brought me to this article. Suddenly I remembered several lovely pieces of my cross stitch which I did long ago that had to be discarded. The sticky back mounting boards I used on them ate through the fabric — what a mess. So no, I will not use the fusible interfacing! Thank you!