


I really wanted to have the leaves on the Secret Garden project completely finished by today.
In my head, I set a deadline for yesterday evening. But for some reason, I’m always overly optimistic when I set stitching deadlines.
If I add a calendar year to every stitching deadline I set, I’d be more likely to hit the mark!
In any case, the leaves are moving along, and today, I want to show you my favorite leaves, and talk about a bit about the order of shading with long & short stitch.
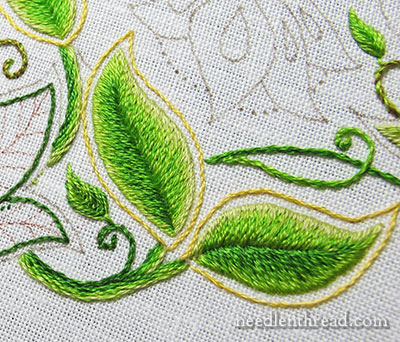
Here are my two favorite leaves so far. They’re located at the left top of the hummingbird design, hanging down. But, to reach the work better, my frame is turned with the design upside-down, so instead hanging down, they look like the tail of a whale sticking up there.
Now, you might be looking at them and thinking they look pretty much like all the other leaves on the Secret Garden project so far. And I wouldn’t blame you for that!
But there is a subtle difference, and maybe this leaf, close-up, will reveal it better:
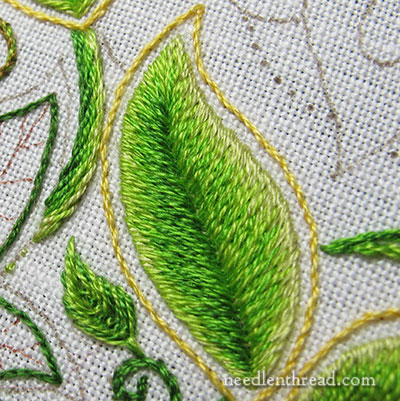
If you look at the right side of the leaf, the subtle difference is slightly less subtle.
Up to this point, on the leaves, I’ve been shading them all pretty much from lighter on the outside to darker on the inside. You can definitely switch the order up – you can shade from darker on the outside to lighter on the inside. But I like the “glow” of the lighter colors on the outside, especially with that yellow outline around the leaves.
If you find your shading a bit harsh – the darker insides seeming a bit too dark next to the lighter outsides – you can always work in a lighter shade on top of the darker shade right along the inside vein of the leaf, which is what I did on the leaf above.
So, on the outside left of the leaf above, working in long & short stitch, I started with what we’ll call “A” (the lightest green), and then worked a layer of B (the next lightest green), and then C (slightly darker than B). Then I backed up to B again, right next to the inside vein on top of C, and worked in some sketchy long & short stitches in the lighter B.
I did the same thing on the left side of the leaf, only I started on the outside with one shade darker in the green, and ended in the middle with one shade darker, so that the left side of the leaf is darker than the right side.
The upshot: when working long & short stitch on leaves and the like, feel free to experiment with the order of progression of your shades. Taking one step backwards towards the end of your shading choices can “lift” the color a bit, or break up an area that seems dense with too much dark or too much light. Don’t stitch the last layer, where you’ve stepped back a shade or two, densely – just work some sketchy long & short stitches in – and this will help lighten (or slightly darken, depending on your shading) the filled area.
And that, my friends, is your long & short stitch shading tip for the day!
If you’d like to follow along with the Secret Garden Hummingbirds project, which features a design from “Secret Garden: an Inky Treasure Hunt & Coloring Book” by Johanna Basford, you can find all the articles relating to this project arranged in chronological order in the Secret Garden Project Index. Among the articles, you’ll find plenty of tips and techniques that will help you with your own embroidery projects.
I love the leaves.
I have a question with the long and short stitch: After you get the first color done and you start adding in the second color, are you going between the threads or through the threads (i.e. splitting the thread)?
Thanks!
Hi, Shell – I always go up into the previous row and split the threads. This helps create a really smooth transition between the shades. You can see it done on the long & short stitch shading video here, if it helps!
Dear Mary
The deadlines I set for my embroidery are often not met so I can emphasise with you. The leaves are lovely I love the shading you’ve chosen for the long and short stitch. I agree the lighter shade on the outside matches the yellow outline. Thanks for the tips and techniques on the long and short stitch very useful and helpful.
Regards Anita Simmance
I like it! Subtle, yes, and I didn’t spot all the subtleties until you pointed them out. But in the overall scheme of the piece those subtleties will come out. Thanks for sharing your beautiful work Mary.
Oh if only I had a dollar for every time I thought I’d have my stitching done! Mrs. Corbet, this is just Exquisitely Lovely. Thank you for sharing.
Enjoying watching you do this lovely piece and relishing all the stitching tips . It’s looking good !
Hi Mary,
I am always so happy when you post an article about the secret garden project, especially the articles on stitch selection, color choices, and long and short stitch.
I have never tried long and short stitch so I went back to your long and short stitch sampler and am working that. Boy oh boy, is it going to take a lot of practice on my part to achieve the beautiful shading in your work! The sampler is a great practice tool, however, and I am writing to thank you for developing it.
Your emails are a joy every morning!
Mary,
Wonderfull,I never tire of admiring your work. You play with colours same plainter and I love this.My work is not the same but with your lessons and exercices,I advance.I noticed différences colors order but not this subtle to the extrême left.I love it bright light.Thank you Marie.
That is a very naturally shaded leaf,beautiful work as always.