


Here’s a quick update on the Secret Garden embroidery project, wherein you will see that six embroidered flowers are complete, and I’ve made one stitch alteration.
I’d also like to share a some embroidery advice for those who have expressed some concern about their embroidery. It’s just a tiny bit of advice for any embroiderer – beginner and beyond – whether working on this project or not.
So, first up:
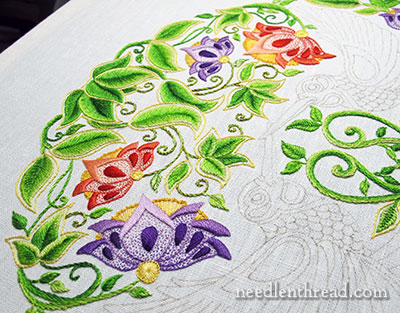
The large purple flower is embroidered and I’m ready to finish embroidering the last two small flowers on the lower left of the design.
I prefer this large purple flower to its opposite, the large red / coral flower, because of the shape of the flower. It doesn’t seem as swooshy.
The purple, however, is more inclined to show stitching flaws up close, because it’s a darker thread on a light background.
Hand Embroidery Advice
And that brings me to a little embroidery advice that I need to share with you. But, like all free advice, you can take it or leave it. You may find it worth exactly what you pay for it…
To set the stage, here’s part of an email I received, and a couple similar ones have come in as well:
Mary, my satin stitches look like crap up close. When I see your pictures, and then I look at my satin stitching in photos and enlarge them, I want to tear it all out! From far away they look ok. Then I start examining up close in photos and get depressed. Help!
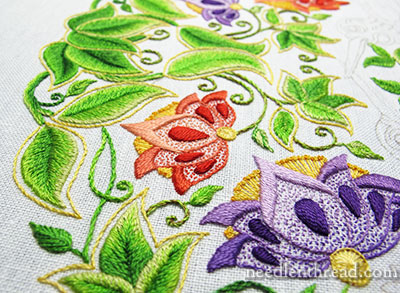
First: Understand that my satin stitches are not always precision-perfect up close, either. And this purple flower above is a really good example of that. In any case, are you blogging about your project? Are you sharing close up photos of it with others, and trying to help them through the project? If you’re not, don’t worry about what your embroidery looks like in close-ups!
Second: Make sure your lighting is good, and if you need magnification to see, invest in some kind of magnifying lamp. Sometimes, we don’t realize we can’t see the work well. At least test a magnifier somewhere, if you’re wondering if you’re not seeing all you could be seeing. Needlework shops and hobby shops usually have floor models you can test.
When I do use magnification – and it isn’t all the time, but on tricky sections of work, or anything that’s exceptionally fine, I do – I use this Dublin Craftlite Magnifier, which I reviewed a while ago.
Usually, if my lighting is good (I use Blue Max floor and table lights in my workroom, which I’ve reviewed, too), then I don’t need magnification. But if your eyes have gotten to That Point, you might need at least slight magnification.
If you wear specs – and specifically glasses for reading or handwork – make sure that they are the right prescription for your needs. When you get your eyes tested, show your eye doctor where you normally hold your needlework, so that any adjustments can be made in your prescription.
Third, and Most Important: Look at your work from about arm’s length away. If it looks good, then all is well. A zoomed-in photo where you can see every tiny stitch placement is not the way your embroidery will ever be viewed (chances are). And if it is ever viewed that way, you want it to look like embroidery, right? Not like some print-out made with computer graphic precision.
Strive to embroider as well as you can – always moving towards little improvements in your stitching here and there – but don’t stress over flaws in your embroidery that can only be seen with magnification or in an enlarged photos. That’s not how your embroidery will be seen.
Relax. Enjoy the process…
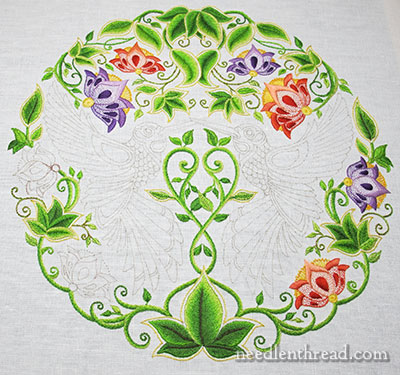
Here’s the whole piece so far.
Actually, that’s a fib. I’ve got the next small flower almost finished. I just haven’t photographed it since then.
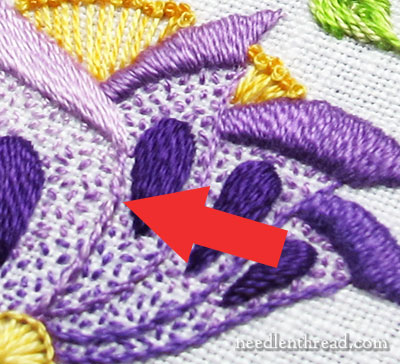
And here’s the stitch alteration. Follow the red arrow.
What I’ve done is whipped the stem stitch outline on the center petal.
Originally, the center petals on all the flowers were outlined with stem stitch (except where the satin stitching is) in the lightest color in the range. But I don’t like the way the center petal ends up losing its definition. To help fix this, I’m going to go back and whip stitch the lighter stem stitch outlines with a medium shade, to darken up those lines and give them more definition.
The way I see it, whip stitching the stem stitch is a decent alternative to picking out the lines and re-stitching them with another color. To keep things consistent on the flowers, I might whip stitch all the stem stitch outlines. I’ll play with it a bit before making a decision, though.
See What Other Stitchers Are Doing
There are a few new photos over in the Secret Garden Embroidery flickr group, where other stitchers are sharing their own progress and approaches to the Secret Garden Hummingbirds project and other Secret Garden embroidery projects. There’s a fantastic peacock on display, stitched, as well as some completely different approaches to the stitching – some really fun alternatives that will inspire you!
Questions?
Any questions, comments, suggestions regarding this project so far? Feel free to have your say below!
If you’d like to follow along with the Secret Garden Hummingbirds project, you can find all the articles relating to this project arranged in chronological order in the Secret Garden Project Index.
From my experience, we tend to be our own toughest critics. While I know I have room for improvement with many things I do, I found I was overly harsh with my perceptions. Sometimes that can lead to discouragement and a lack of desire to learn more.
I would look for photos of sweaters to compare my work with others. Theirs looked perfect and mine did not. But I have gotten to the point at 52 that sometimes what I did do ain’t looking so bad.
This is only a recent achievement and I still need to grow more. But this is what has allowed me to try my hand at embroidery…with much less fear.
Lovin’ the colors and learning about the project process!
Hi Mary,
I found this article very close to home. I started the Secret Garden Project and did all of the stems and some smaller leaves. I was so unhappy with my work I literally threw it away. I did not feel the stitching was smooth enough. I also compared my stitches to yours. Your close ups were so smooth and when I looked at mine they seemed awful. It was not because I could not see as I have a great magnifier which I used. In any case at the time I felt very discouraged. However after reading that others felt similarly perhaps I will give it another try.
Barbara La Belle
Hi Mary,
I’m so happy to have recently discovered your website with lots of embroidery information! My question is this: Some people lightly iron their floss after separating the strands and then threading it through the needle afterward. Is this a good process?
Thank you,
Barbara
I think so, depending on the thread, or depending on how it has been stored. Most of the time, if it’s coming off the skein or spool new, it isn’t necessary, but if you’re using a thread that is kinked or “bouncy” it can help. Also, if you store your thread on those little floss bobbin card thingies, the thread can be kinked where it winds around the flat card, so ironing can help eliminate that. This is one reason why I don’t store floss on those cards, though – I don’t like the kinks, and ironing just adds another step for preparation. -MC
Odd, I find the thread is much less difficult to manage with the tiny cards, rather than straight from the skein. As a matter of fact, I think skeins are undercover torture devices. I’m usually able to smooth my thread out just with my thumb and forefinger after I strip it.
Good advice, Mary! Thanks.
Hi Mary,
Well, it’s certainly looking colorful- and I love it.
Regarding satin stitching, I notice that the back side of the satin stitches -on the wrong side of the fabric- often look smoother than those on the right side. Have you ever seen this ? Do you know why?
Thanks,
ji
Dear Mary
The Secret Garden project is looking really lovely, I can’t wait for the peacock stitching. I agree with you the times I have been so downhearted with my stitching and thought I just want to throw it away but I have struggled on and completed them and then after some time when I re look at a project I’m surprised to find myself liking the work and thinking it wasn’t that bad. I think when you are in the throws of a new project you want to get it perfect and when you view you work after stitching you are your worst critic, so I’ve learnt to complete a project and give it time and review it to see how it looks it’s amazing how your view changes. Thanks for the tips and techniques on different aspects of embroidery.
Regards Anita Simmance
Mary, this question is not about Secret Garden, but I don’t know where I should post a general question. I asked this question on your Facebook page, but it “disappeared.” Maybe that was the wrong place. Anyway, I need a needle reference chart to help me decide which needle to use with what thread. I searched your website and found a link to one on the Country Bumpkin site, but the link didn’t work for me. If I search their website I come up with no result. Then I read your review of the little book “Needle Index.” But I can’t find a place to order it. Can you direct me to some sources, please? Thanks!
(with apologies to Joni Mitchell)
I’ve looked at mine from both sides now,
from near and far but still somehow,
When Mary’s stitches I recall
I think I can’t match her at all.
Leaves and flowers in floss are there
With birds still waiting in the air.
Not always happy with what I’ve done
But enjoying it anyway.
Tears and fears but feeling proud
To say It’s good’ right out loud.
Don’t dream and scheme join the crowd
And stitch it just your way.
Nothing to lose but all to gain,
No two will look quite the same.
No illusion to recall if you post on flickr for us all
To view and have our say.
Liz
I love the colors and your embroidery is exquisite. I have started on mine and still working on the stems. They are trouble enough for me. I’m nearly 74 and my eyes do give me trouble, but a good light and great magnifiers are a big help. I’ve decided to keep pluging along on this “practice” piece now and then, until I see what you do with those birds. I surely like everything else you’ve done, but just can’t get past the mean looking birds.:-)
I appreciate your encouragement! I’m a beginner and to me this project feels advanced and very big! I stitched some stems and small leaves and put it aside for a bit before tackling the satin stitch which I will be learning. I wish I had a better frame. I’m using an old cheap scroll frame with no stand.
I am also learning to machine quilt on a small machine and that was a challenge at first. I just kept telling myself it’s a practice piece, I’m learning, don’t rip it out and just keep going! When it was done it looked good and you don’t even notice all the imperfections. I’m hoping it will be the same for this embroidery. The main thing is to have fun. And imperfections really do give a piece handmade charm. It’s like playing piano…it takes practice. Mary, your work really is amazing…I always think it’s much larger than it really is! Thank you for helping us all!
I find this article quite timely because I feel I’m on the verge of some major stitching blues. After yesterday’s hanky, and today’s Secret Garden update, I still feel a pinch in my heart that my stitching seems so bumpy and graceless. from far away it doesn’t look too terrible, but I’m sure other stitchers could at a glance how unrefined my techniques are. I know practice is vital, but I seem to be making much slower progress than I had hoped I would. Have I really been doing this since age eight? I’m certain anyone with true experience would say my current project looks as if it was done BY an eight year old. (sigh) Still I must keep stitching, I do love it so.
If I want perfect stitches, I would do machine embroidery. It’s the small things, like that slightly off stitch, that make it mine. 🙂
I picked up some excellent satin stitch advice from the tutors at the RSN, where I am working towards my certificate. Mainly: don’t get stressed. Getting stressed tends to make you pack stitches too tight, then it goes wobbly. Give the thread enough space to sit without being pushed about by the stitches around it. The other thing was direction of work. It us easier to maintain the same slope on the stitch if you work from the obtuse angle to the acute (hard to explain without a diagram!). Start at the obtuse side and give the thread plenty of room. Then go down at the acute side (the leading point of your worked area) tucking the stitch in quite snugly. I found this really worked well for me.
Another tip for Satin stitch is make sure you are using the correct sized needle. If the needle is too big for the thread then you will never get the 2 threads to sit side by side. The needle will take too much room to plunge.
Mary, I just read the comments about the satin stitch. Until I took the online class you offered( strawberries), I could not do a satin stitch that looked at all good. That class was sooo good that my satin stitches are now the pride and joy of my work!! I did not know all of the little tricks that I learned in that class!! Perhaps you should offer it again (it was pricy but worth every penny!!).
Thanks for the class and the great website. Lynn
Mary, thank you for this post! Sometimes we need to hear that we shouldn’t be so hard on ourselves! I, too, feel bad at times that my embroidery stitches aren’t “perfect” and need to remember to take it easy! I was on the other end of the stick earlier this year. My friend was unhappy with her quilting on the longarm. I went to her house to give her a little lesson and she watched me follow and stitch a pantograph. It was like a lightbulb moment for her. She said “you don’t stay on the lines all of the time either!” I said, no, not at all – but if your movements are smooth, it will look great!
Hi Mary,
I’m from Morocco,
The first I can’t speak verry well englech so try to understand me if i can’t express my self
I was navigating in the sites of embroiders and accidentaly i fell on your site , i like it, it’s verry interresting
This is the first time I try to practice this embroidery, I made a cushion I send you his picture to tell me how you find my brodery
I do another kind of embroidery that we call fes: Tarz El ghorza
Good contunuation