


Last week, as part of the Stitch Fun series, we saw how to embroider a simple scalloped edging using buttonhole stitch and beads.
Today, I’m going to show you a different version of a scalloped edging. It also uses buttonhole stitch, but instead of the larger beads we used last week, worked over slightly looser scallops, this tutorial will show you version 2 of a beaded and scalloped buttonhole edging, using tiny seed beads.
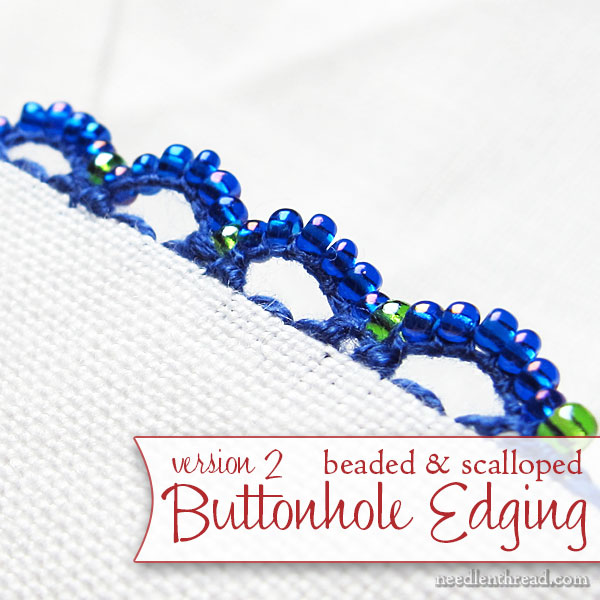
What I like about this particular embroidery finishing technique is that the scallops are a little sturdier and the beaded edging along the scallops is much smoother.
Both beaded buttonhole edging techniques start the same way, with a backstitch line. You can refer to Version 1 of the beaded buttonhole edging to see how to set up the edge of the fabric using the backstitch.
In today’s tutorial, I used three strands of regular DMC embroidery floss (from the six). I stripped the floss and threaded the three strands into a #7 crewel needle. I used three strands for both the backstitch base line and the first layer of buttonhole stitches.
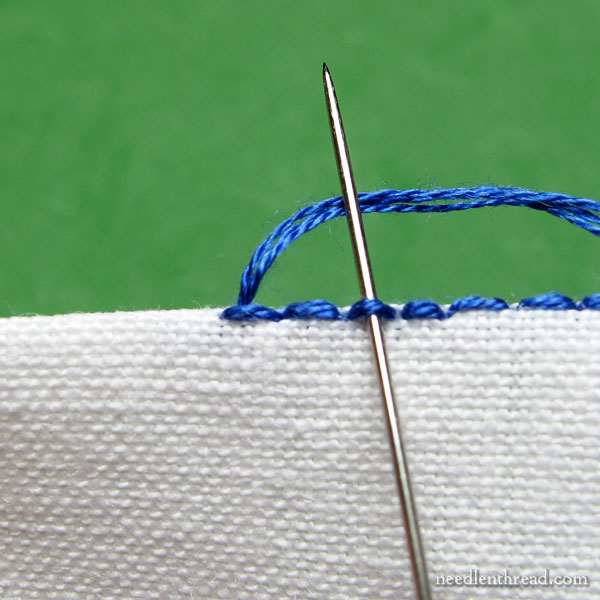
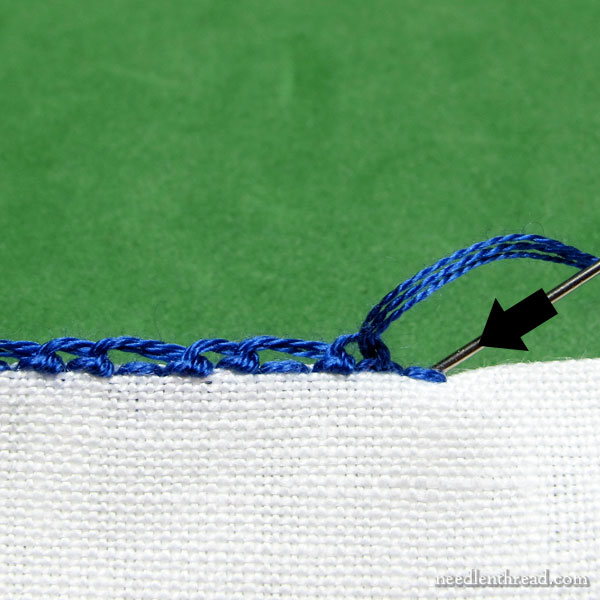
Once your backstitch edge is worked and you’ve finger pressed your fold along the backstitch line, bring your needle up into the fabric behind the first backstitch (this would probably be on a corner, if you’re finishing a square or rectangular piece of embroidery).
Skip the next backstitch, and, taking the needle under the third backstitch from the beginning of the line, come out over your working thread and pull through, as shown in the photo above.
Remember not to pick up any fabric – you’re using the backstitches as the anchor for the buttonhole edging.
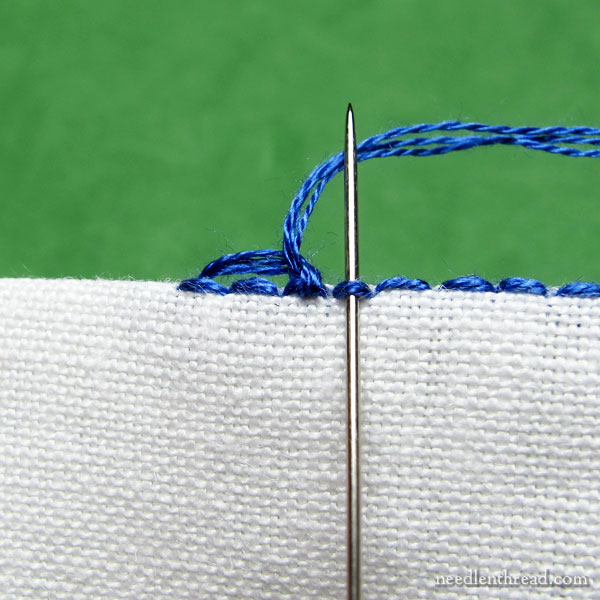
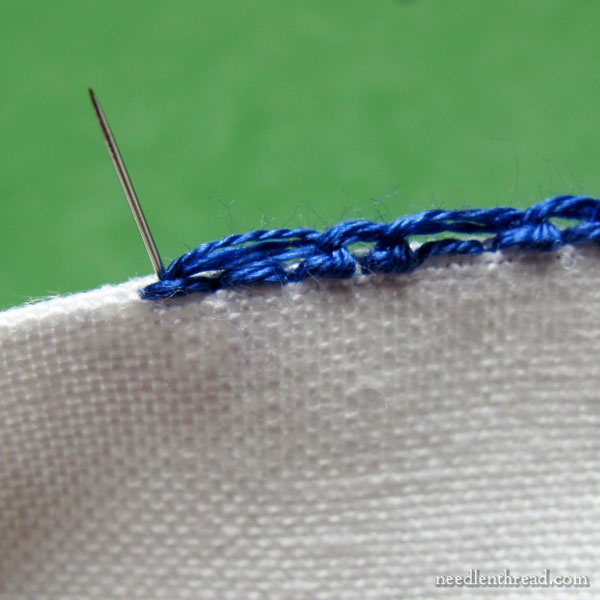
The next buttonhole stitch after a long one is a short one, and it’s made by passing under the very next backstitch, coming out over the working thread, and pulling through.
The tension on these buttonhole stitches should not be too lose. It’s easier to keep an even tension on these stitches if you keep them somewhat tight – not tight enough that they pull on the backstitches, but not so loose that they are floppy. You can see in the photo above about how tightly I pulled by buttonhole loops.
The next buttonhole stitch is a long one, skipping one backstitch.
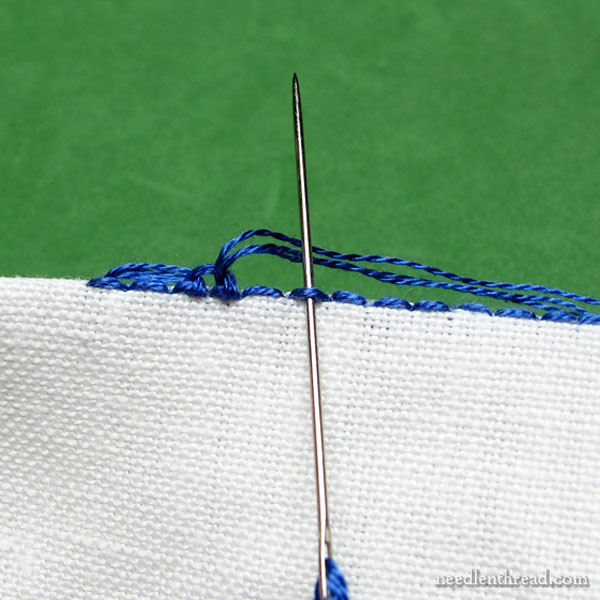
Continue alternating long buttonhole stitches (by skipping a backstitch) and short buttonhole stitches (by working a buttonhole over the very next backstitch after a long buttonhole) until you reach the end of your line, or, if you’re working around the outer edge of a stitched object, until you’re back at the beginning where you started.
If you’re working around the outer edge of an object, as you come back to the beginning, gauge your stitch length so that you end up with a short and a long buttonhole stitch next to each other where you meet the beginning of your stitching.
To end the scalloped buttonhole base here, just take the needle down behind your last backstitch, into the seam of your work and anchor it by making a few tiny stitches in a place where they are hidden by the seam.
Now it’s time to buttonhole the larger buttonhole scallops and put the beads on!
Switch to a #10 or 11 crewel needle (or a beading needle, if you have one). The needle you use here must be able to pass through a small seed bead (size 15/0) with one strand of floss threaded through the eye.
Bring the new needle up behind the first backstitch, where you began your initial scalloped foundation.
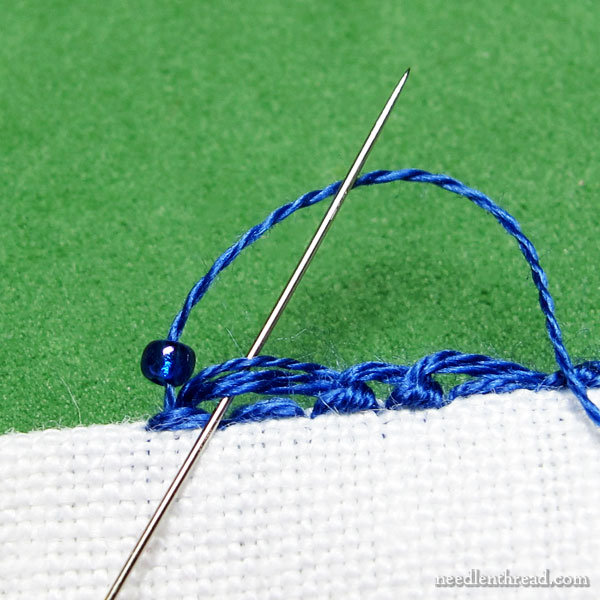
Pick up one seed bead and then work one buttonhole over the three-strand buttonhole base, by passing under the base stitch (this is a long buttonhole, made of three strands). Do not pass under the backstitch, now! Just under the looser, long buttonhole stitch.
As you pull this buttonhole stitch tight, pull it towards the beginning of the scallop where you just made your stitch. You want to fit a good five or six stitches on one long scallop, so you need to make sure you’ve got room there to do that.

Once you’ve finished that first little buttonhole stitch, pick up one more seed bead and make the next one in the same manner.
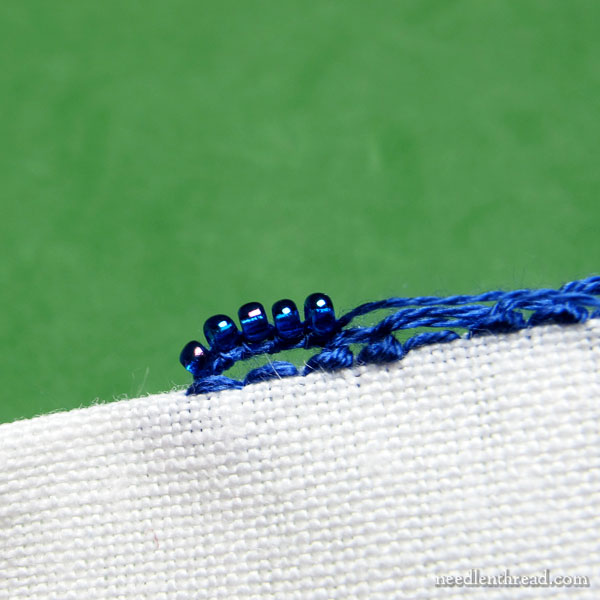
Continue working one buttonhole stitch at a time over the long foundation stitch, picking up a single seed bead, until you have filled the long scallop. I used five seed beads (and therefore five buttonhole stitches) to fill one long scallop.
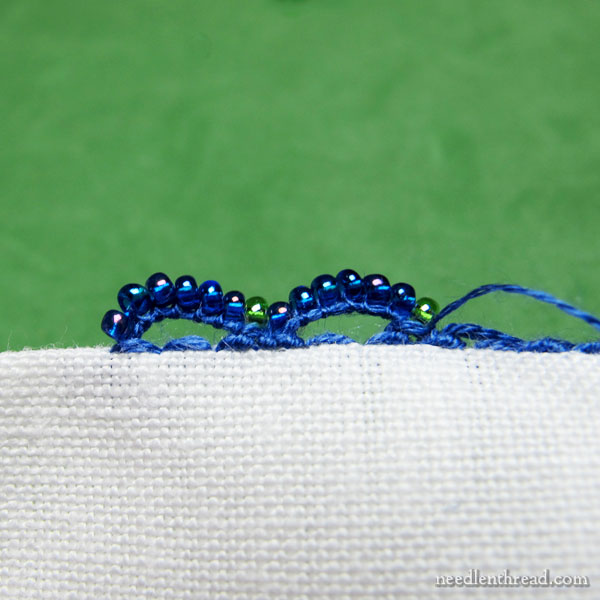
In the short buttonhole stitch on the foundation, just place one bead. I used a green seed bead to mark where this single buttonhole stitch is.
Once you’ve stitched one seed bead onto the short buttonhole scallop in the foundation, start covering the next long buttonhole.
This works best if you can keep the number of stitches and beads the same across each scallop.
And this, by the way, is why it’s important that your initial backstitch foundation is as evenly stitched as possible!
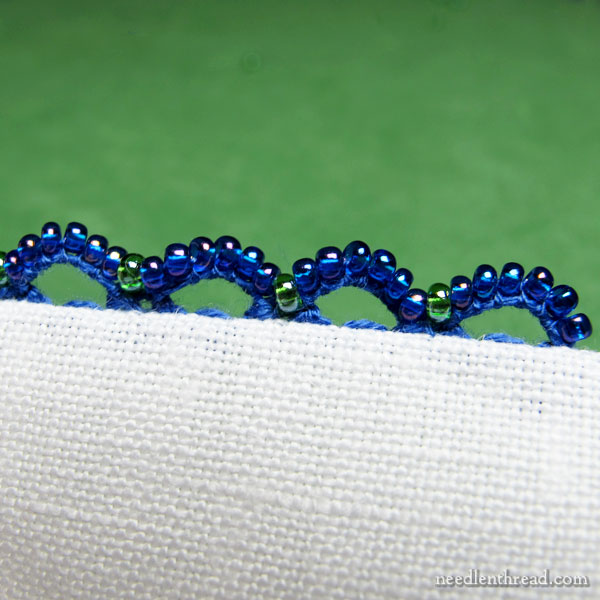
Continue down your line, covering all your larger foundation buttonholes with buttonhole stitch and seed beads.
Then, just take your needle to the back under the last backstitch, and anchor the thread by taking some tiny stitches into an area of the seam that won’t be seen.
And that, my friends, is the second version of a beaded buttonholed scalloped edging – and methinks it is the way to go, when you want a nice edging with a little zing from the beads, but an edging that is sturdy and that holds its shape well.
As I mentioned in the last tutorial for the scalloped, beaded buttonhole edge, this technique would make a great addition to any Little Things that you might be stitching from Lavender Honey and Other Little Things. In fact, this particular technique would work great with the Little Things, because it uses tiny seed beads and makes a nice, firmly stitched buttonhole edge.
Let’s See Your Work!
If you ever do anything with it, let me know! Send me pictures! I love to see what the Needle ‘n Thread community is up to, and it’s especially heart-warming and encouraging when you learn a technique from here and put it to good use! You can submit photos of your own work inspired by Needle ‘n Thread by dropping me a line any time!
You can find heaps more stitch tutorials here on Needle ‘n Thread! The Stitch Fun series features step-by-step photo tutorials for stitch variations, composite stitches and stitch combinations that are perhaps a little more obscure or a little more challenging, while the How-to Embroidery Stitch Videos cover over 75 basic and more advanced embroidery stitches.
Thank you for this tutorial! I JUST finished a little needle book from Lavender Honey. Too late to go back and add beads to it, but I will try this on the next “little thing” I make. Your tutorials and photographs are excellent, and they make me want to try everything all at once.
Love,
Patty
I forgot, I was going to mention a book that I just finished reading through the Internet Archive. The author considers buttonhole to be the most useful stitch, and her designs are largely based on it. I have a million buttonhole ideas dancing around in my head now!
An Embroidery Pattern Book, Mary Waring (1917_
https://archive.org/details/embroiderypatter00wari
Patty – thanks for the book link. I’ve looked at a few pages and it should be a great addition to the library.
Just beautiful. Again seeing this kind of edging made me think of a dressy blouse. I might have to buy special material and make myself one to do the edging on. Thank you for the wonderful instructions Mary.
G’day Mary,
Beautiful.
Cheers, Kath
G’day, Kath! Thanks! 🙂
Thank you for this tutorial! I really like this edging.
I must use this someday.
You’re Awesome
Sarah
Dear Mary
Oh I really like this it reminds of the edging on the tutorial class you gave on the Nesting Place only without the beads, I loved embroidering that. I will definitely put this on my to-do list as I really like the Buttonhole stitch it is so versatile. Thanks for sharing another great turtorial with us and for sharing more emboidery techniques.
By the way did you receive my photos of the Soie D’Algar Thread colour chart I received and what did you think?
Regards Anita Simmance
Oh, I love this. I tend to add beads and metallics to designs even when they’re not mentioned in the directions. 😉 But I’d love to do this along the edge of a biscornu. I do backstitch on my biscornu pieces anyway to use for joining top and bottom. And I have added beads along the edge when joining but never like this. Time to dig out a pattern and start on another. I’m going to pin this to keep it handy. Thank you.
Thank you for this tutorial. I too like this version a bit better. Not just because of the smoother appearance, but I like the option of adding another color bead between the scallops.
Many thanks for this! One thing (out of many) that’s stopped me trying beading is that I’ve never known what thread to use to attach the beads. You’ve answered that, as well as giving us all a great way to add beaded zing.
Would this work on an edging where each piece has a backstitch around the edge, then lacing is done between the backstitches to join the two sides of the article together? I’m thinking one would ignore the lacing stitches and treat the two backstitches (one from each piece) as one backstitch to put in the three threads around which the beads are put. The hard part would be anchoring your stitches since the object being beaded is already put together.
Hi, Sharon – that’s right, that’s how I’d do it, too – thread the two backstitches as one. You might have to fiddle with it, though, and test it, because your scallops could end up slanting. If it doesn’t work out the way you want, you can whip the backstitch first, and still pass under the backstitches to add the buttonhole. That would work, too.
Mary,
I think I’m in love with these beads. I tried beading back in the early 1970’s and I just couldn’t get the hang of it other than to string them on a cord. They would not be practical on the edge of one of my quilts, but beautiful on the edge of a table runner or tea towel or a simple sheer fabric used for a scarf. I’m determined not to start anything new until I get the counted cross stitch UFO done. Then watch out! BTW–Thanks for the personal update. I agree with your business space needing some separation from your private life. It keeps your website interesting and useful teaching tool without it getting mired down in TMI that is really no ones else’s business. You do a great job of maintaining that boundary.
Thank you, Debbie! I figure that’s why we’re all here, anyway – embroidery!
no offense but i really couldnt give a rat’s you know what about your personal life. i dont want to hear about a kid being sick, or whats for dinner tonite, or you and your husband are having a rough time. aren’t we all into one of these categories. i embroider to get away from it all. and i dont care about someone elses problems. i have my own. i know i love your website. i think you do marvelous work. and i dont really care if it’s you for someone you hire. i still love it and always wish i could be half as good. so please don’t pay attention to the non-sense and do what you do best…embroidering. thank you!
Mary, I am just horrified by what some people say. I absolutely love your site, all of the incredible work you do and share with us. It never would have occurred to me that you are not a real person because I feel like I know you even though I have communicated very little with you. Reading this information has just made me want to support you more and more. I commend you for all the work you do and the courage you had in taking such a big leap of faith. Keep up the good work.
Miss Mary you have the finest hand with a needle and thread. Thank you so much for sharing. I love embroidery and I love beads. I have an idea of using this particular buttonhole beaded stitch as a border around a scoop neck shirt that goes a little too low for my taste. Such lovely work you do. I haven’t done embroidery work for several years and you make my fingers itch to take it up again. Thanks.
you never cease to amaze me. as always beautiful embroidery.