


When you work with stranded embroidery floss (like DMC or Anchor cotton floss, stranded silks, and the like), it’s pretty standard procedure to separate the number of strands of floss, one at a time, from the whole thread of six, and then put the number you’re going to use back together again to stitch with them.
This is called stripping your embroidery floss, and I show you how to do that in this tutorial here.
Stripping your floss serves a purpose: it keeps the strands (if you’re using two or more) from twisting around each other, so that you get good and smooth coverage with every stitch.
Whether you’re doing counted work or surface embroidery – whether it’s cross stitch or stem stitch – stripping the floss makes a huge difference in the way your stitches look. It’s a good practice.
When I wrote about this thread organization system the other day, I made the comment that I like using precut threads hitched through a hole, because they allow me to pull out individual strands of floss without having to strip them from the rest of the threads (well, the comment was something to that effect, anyway). I don’t have to replace the unused portion of the strand. I can just pull out one tiny little thread at a time.
This garnered a bit of comment and a whole flood of questions via email, so I promised I would clarify.
And here’s the clarification of how this whole one-strand-at-a-time floss pulling trick works.
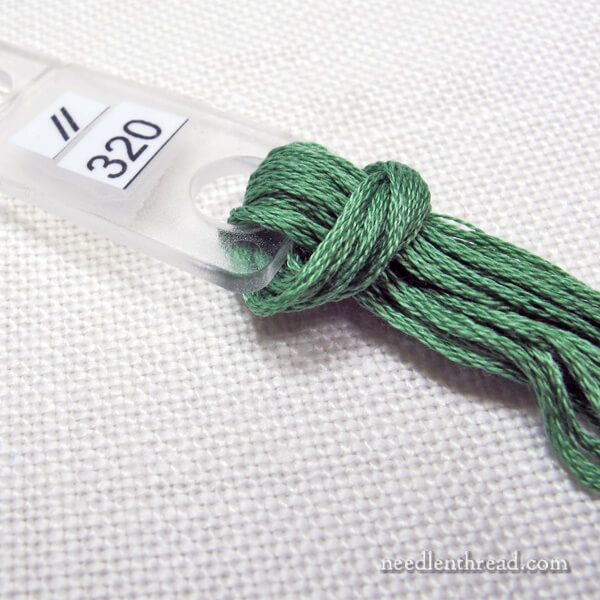
Separating embroidery floss in this manner assumes that you’re using precut floss arranged somehow all together.
The arrangement of the precut strands might vary. For example, you could cut your floss, pass the cut threads back through the color number tag, and then braid the precut strands together to make a tidy bunch. You can hitch your floss through a hole in card stock or on a thread card – which is pretty much the same principle as above – or you might loop your floss on a ring or something like that.
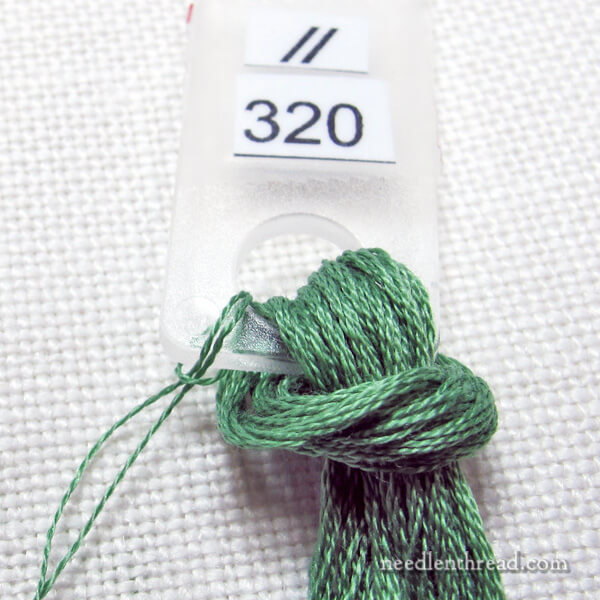
In this particular case, I’m using the acrylic keepers from Annie’s Keepers thread organizing system, and I’ve hitched the precut strands through the hole on the acrylic keeper.
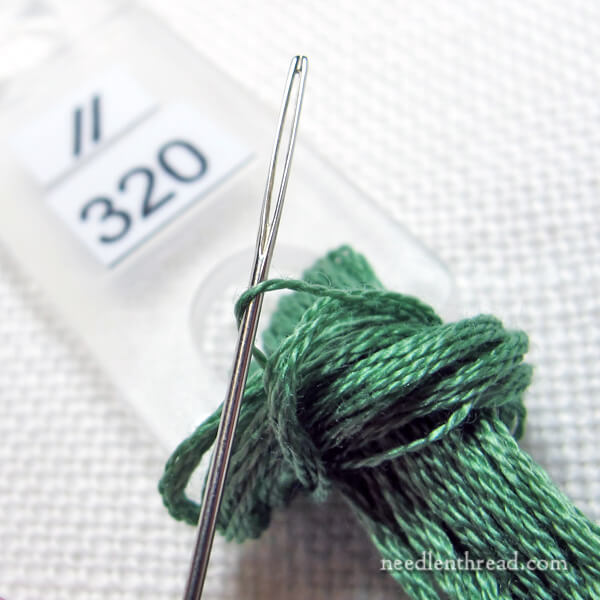
Sliding the eye of the needle under one single strand of floss on the front of the hitch – the part that crosses over the rest of the strands – you can then pull that one strand out slowly, by itself.

As you pull, the precut floss may indeed bunch up a little bit, but…
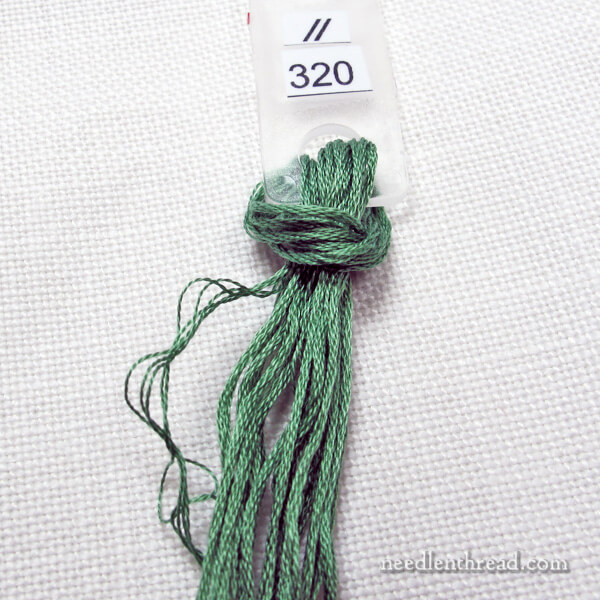
…once the single strand is completely drawn out, the rest of the bunch will fall again.
You can see the thread that the single strand was pulled from. It’s a little discombobulated, but you can smooth it gently with your hands and keep going.
I like “floss pulling” this way for a few reasons:
1. My threads are precut – I don’t have to cut new lengths from the skein, or even deal with the pull skein again.
2. It doesn’t require me to remove the whole thread and strip off the strand or two that I need, and then replace the rest of the thread.
3. I can strip any number of strands that I need this way, pulling each one individually, and it only takes a second to do it.
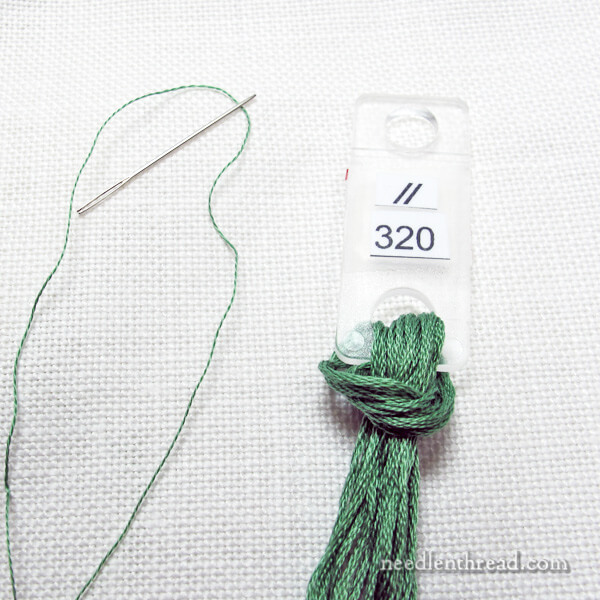
Of course, in this case, since I wasn’t using the strand I pulled (it was only for demonstration), I had to put it back. I just hitched it into the hole, and when I need this color, I’ll unhitch it the same way and use it.
So, you can always add strands back by hitching them in the hole with the correct color.
There are disadvantages of using precut threads, though:
1. If you have cats or curious little hands about, you might not want precut threads about, because they are more prone to getting snaggled if you’re not vigilant.
2. It requires extra time at the front end of the project to set the threads up.
3. If you don’t use all the thread, what do you do with it? (I put it in a tiny ziplock and put the color number on it and stick it in my thread drawer.)
Overall, though, I find that a system that allows floss pulling like this (which I’ve used on many a project – including this one) provides a much more efficient approach to accessing individual threads for stitching, which keeps the stitching part of the project moving along at a better pace.
So, that’s how I remove one individual strand at at time from the bunch.
If you don’t have a favorite method of setting up your threads, you might consider trying this approach.
But if you do have a favorite method already that works for you, keep it! If it isn’t broke, don’t fix it.
If you have any questions, comments or suggestions, feel free to join the conversation below!
Thank you! I, too, was wondering how you did that.
I know each person can pick the length of thread they are most comfortable with but what length do you use? What length is to long with this method?
I use 18-20″ when working with cotton floss. I think really long lengths might be problematic – the longer the length, I’d think the threads would get messier and be harder to control. But I’d say up to 24″ would work ok. Just guessing, though, because mine are usually less than 20″.
This seems like a great method. What lengths do you cut your thread before securing in the keeper?
I use 18-20″ when working with cotton floss.
I love how you prepped your floss – but what is the easiest way to get your skeins of floss into strands? Is there a secret to make it not tangle and knot up? I get so frustrated with floss skeins!
Thanks, Amy
Hi, Amy – Yep, pull skeins can be very frustrating. I’ll follow up on this question – you’re not the only one who’s asked in the last few days, so it would be a good topic to touch on!
That’s how I’ve been doing it for years! I’m glad to know a professional does it the same 😉
Dear Mary
I wondered how it was done and good advice to pre-cut floss and a great way to strip strands of thread one at a time, I will try this system as it looks an easy way to separate threads and does not disturb the rest of the bunch. I don’t really have a method of setting up thread so this is very useful for future projects. Thanks for the tutorial and for sharing the tips and techniques on floss pulling a very useful and informative tutorial.
Regards Anita Simmance
You take so much time to teach us when you could be stitching. I am new and have learned so much from you. Thank you so much.
Well said, Jackie! I, too, have always been grateful for the time Mary takes to teach us, and for her generosity with sharing her tips and techniques.
Yes agree with your comments and I am grateful to Mary who is so generous in her time and effort to teach and instruct us when she is so busy and could be doing so many other things.
Regards Anita Simmance
That’s how I’ve been doing it for years. Glad I do it like the professionals! 🙂
My cat would love for me to organize my threads this way.
😉
Thank you for taking the time to show how this is done. As always, the pictures help me a lot. I love the “show” part of show and tell. Now I’ll pass this on to my husband since he stitches too. He loves to have his floss on project cards.
Mary, your response to this subject, complete with photos, is above and beyond! Your words are always beautifully clear and the pictures reinforce them perfectly.
I’ve been working on a year long project and have used your help on stitches every step of the way. This system of organizing comes at the perfect time as i know the snags i’ve had by not paying much attention to the topic.
It’s exciting to be nearing completion on my “labor of love” and i’m equally excited about knowing how to manage the mess of floss i’ve created!
Many, many thanks!
Aw, I’m glad you like it Barbara and that Needle ‘n Thread comes in so handy for you! Thanks for your comment! 🙂
HA! I’ve always separated the individual strands like that (like in your linked post)! It just struck me as much easier and felt natural to my fingers, and I rarely need more than one strand at the time. I do cross stitch and favour the loop start.
I do remove all the thread from the hole to separate one from the bunch, though. It’s easier for me because otherwise I feel like I can’t really see what I’m doing. I like using two holes with each colour so that I’ve got one hole for my bunch and another hole for shorter left-overs and the rest of the thread I’ve started with. If that even makes sense. 🙂
Murpheys law says if I try this, it will end in a huge nasty knot. I may try it once I need to pull new strands, but I’m likely going to waste more time getting the floss to re-settle than it would take to un-hitch, pull 1-2 strands and re-hitch.
If you train your pets right, they’ll leave your project/s alone.
The most ‘attention’ my cats have given my projects are sitting in front of them when the frame is leaning against the couch back, or sitting on the finished product when I’m trying to take a completion pic.
Even as kittens, they didn’t show much interest in my floss hanging from the music stand, or bobbins laying around before I stuck them back into the master box.
I can leave a ball of yarn on the floor and have it be ignored. Of course this disinterest comes in handy with paper towels and toilet paper 😉
(This doesn’t mean I leave supplies out willy nilly unsupervised, I know they’ll get interested the minute I don’t think they will.)
Awesome! Thank you.
This is pretty much how I’ve always pulled floss strands. The only difference is, I tend to cut only one or two lengths at a time from the skein – I haven’t had nearly as grand a project as this one! – instead of cutting the whole skein at once. That’s just personal preference. It also means I don’t run the “risk” of having several lengths at once with 3-4 strands in, just because I pulled the next strand from a different length by accident.
I have never seen or done this before. I think it’s brilliant, and I look forward to giving it a try!
Hi Mary,
Love and use your ideas!! My question for you is that when I started learning smocking, the teacher told us to strip threads but keep the bloom ends together and the cut ends together. So I do this. How would this work for your method of stripping each strand? Too much trouble to inspect each end for me! Sometimes I feel like going “wild” and putting the threads every which way, and not be so fussy!!! Another person told me to iron the stripped stack before embroidering!! What? I don’t think that was a good idea. Help me on both counts. Keep up the great work you do!!
Well, I cut as they come off the pull skein. Once you cut, which end is the cut end? That’s the question. I think this idea goes back to the whole “thread grain” thing that we discussed a few weeks ago. I don’t really pay that much attention to it!
How do you do a quilter’s knot???
That’s pretty slick. I thought it must be something like that, but I’ve never seen it done. I think I’ll try it for my next project.
(BTW I did the chicken-scratch watermelon runner! I’m *this* close to done with the embroidery, and I have rick-rack and backing ready to go. Whee!)
Interesting! I have not tried this method before. I have always laboriously pulled the threads apart, creating a big tangle. At one point you wrote about a handy gadget that will clip on one end of the threads, and you gently pull them apart while it twirls around for you. I was given one of these tools 2 years ago and have used it constantly and to great effect since then. However — with my next big project I’m going to try to use this method. Pre cut my threads, then hitch them (not decided on what yet) and pull out the strands I need at a time. Thanks, Mary!
Thank you – I’m definitely going to give this a try! I was wondering how you were easily going to get the floss off the holder to use (and of course the only thing I could think of was taking the whole hank off every time and pulling a piece out. What a pain that would be!)
Do you take care, when using two or more strands, to keep the direction of the threads consistent? I was taught decades ago that you want to do this for smoothest threads, that the threads are plied in a particular direction and you want those to be the same in your needle. In other words, calling one end of the cut length A and the other end B, if you pull two strands, do you keep the A ends together as you thread your needle?
And that brings up the question, with pre-cut strands, how do you know you always have each “reload” of your needle threaded from the same end?
If this is indeed an issue – direction of thread – then I don’t know how you can use your method without some further clever arrangement of cut lengths.
Hi, Kathleen – here’s my earlier article on that subject: https://needlenthread.wpengine.com/2015/08/thread-talk-the-debate-i-dont-want-to-have.html
I think it’s the most intelligent system I’ve ever heard of and I wish I had found out about it many years ago. Thank you!
Thank you so much. Once again, you have given us practical, helpful and useful information. You sure are a great resource!
Shelia in Oklahoma
If the people in this group could see the mess some of my thread is in, they would lol. The thread I have the most trouble getting tangled is my coton a border. I can never keep it from tangling even when I pull from the right side.
I’m not even sure pulling from the right side works.
Thanks for such a great tutorial. x
Super for solid color threads, but doesn’t work to take the best advantage of overdyed threads. I am currently working on a good-sized counted canvas project with many different colors of Waterlilies. I stripped out two strands (one at a time) from the whole 6 yard skein and wrapped each strand around the cardboard label, taking care to wrap each strand in the same direction. As I need a new needle-full, I can reel off two strands and maintain the the order of color change as I stitch. this way I get the full benefit of the color changes made all the way through the skein. When I suddenly need three strands ( or just one, although this has never happened, I can’t pull a thrid thread out of the skein and match it up to where I am on the other two threads; I have to pull three strands and proceed as I did for the first two. Anyone have a suggestion for another way to do this?
Thank you so much for posting this information again! I was one of the people having trouble getting this procedure to work correctly for me, but I figured out my dilemma was due to not having my threads pre-cut to the length I use (18″) before looping it onto the card stock thread-organizers I usually use for my projects. I think now that I’ve read this again I won’t have any future problems. (Keeping my fingers crossed.) Your tips, information and tutorials are invaluable and very much appreciated. Kevin in FL
This is a great way to control your threads and I find it works equally well with both silks and wools and have used it for years. However when dealing with varigated or ombre threads threads if they are multy ply another method is necessary. I have found that a multy holed card can keep track of the order in which they are cut and used, Your ‘Annie’ system could be put to good use in this instance.
Hi Mary!
Thanks for doing this article, as I wasn’t quite clear what you meant about pulling out 1 strand at a time.
I do have a question about the Annie’s System. I had been looking/searching for some type of thread storage before you posted these articles, and I was very interested in the Annie’s. Currently I have my floss on the plastic bobbins, but I hate the kinks it puts in the thread. I know you use the Bosley Cabinets, but do you think the Annie’s would make a good storage system also? They are kinda expensive so I would like an expert opinion:)
Thanks so much!
Hugs,
Gina
Hi, Gina –
Well, I like the Bisley cabinets for long term storage of large sets of thread in skeins. I probably wouldn’t use Annie’s for that, just because they’d have to all be precut, and I’d always have to prepare the tabs with thread types and numbers. If you just have one type of thread and you work with precut threads all the time, I’d think it would be a good system, and you could set it up in a metal file cabinet (I wouldn’t use wood for long term storage). So it just depends on the quantity and types of threads you have, I think.
I have read the article about grain in the thread and you mentioned “burnishing the satin stitch.” Can you explain this, please.
regards
chris
Exactly what I do too! :o)
G’day Mary,
Thanks so much for this. Valuable, spot on and all that!
Umm, do you try to pull from the same group of strands each time or just pull a strand from any?
To finish a group at a time I’d probably find it suits better to loop a whole 6 strand group on the side, as you’ve done with the single one, and use from there, repeating when it’s finished. Of course would be a little more time consuming which does add up.
Thanks Mary,
Cheers, Kath.
I can hardly wait to try your floss pulling technique on precut threads. I “unhitch” a hank, select the end of 1 strand, hold the whole hank loosely in one hand and pull the strand out. The hank “bunches” in my cupped hand and is easily straightened. But…. I then have to rehitch the remaining hank. I am hoping that your method works as easily. It would keep me from unhitching and rehitching the hanks. Thanks, Mary!
Thanks so much for this! I love your site and have learned so much! It’s been years since I did any embroidery, mostly from lack of inspiration. But now I’m so enthusiastic I can barely force myself to eat! I just got a new inexpensive hoop stand (for my newly wrapped hoop!) What fun!
This is what I needed! I have a renewed interest (childhood activity) in embroidery and have been using this website as a resource. Cutting the thread to length prior to “hitching” makes so much sense now that I have read it. LOL I was prepared to use my yarn swift and ball winder to make “mini balls” of my thread. Thank you so much for the floss storage post and for all you provide on the website.
I saw your post the other day about getting the Annie’s Keepers system. I am really interested in this system for myself. Will you be using this system for *all* of your thread in the future, or just for projects? I am considering using it for all of my thread, since I don’t have a lot, but I wonder if I would regret cutting it all to a specific length.
Hi, Zoe – I won’t use it for all my threads, just for the threads for this particular huge project. I store my threads in Bisley “collector” cabinets, in skeins, arranged depending on the type of thread. I have full sets of threads, like DMC, Au Ver a Soie silks, crewel wools, and the like, that I use for designing. I wouldn’t want to have to precut all the threads and make up tabs for every color and type! But if you only work with stranded cotton and you don’t have full sets, it would make a neat storage system, if you like having your threads precut.
I use a similar system except I have 2 holes for each colour. When I need to have a strand, if there is no floss or wool in the second hole, I move the thread to the second hole and take out the strand. I then use strands as needed from this second hole so that only full threads/wools are in the first hole.
This has been vital for kits with no excess wool. I have ended up with little “shreds” of 1-3″ in the second hole when I am using every scrap of wool to finish.
Oh, how I love this method of loosely tying the floss and stripping a strand! Thank you!! I made some card stock holders like your plastic ones. Two (1 inch wide) fit rather snugly under the normal plastic file tab of a hanging file folder for storage (I put 5 tabs on one folder, alternating sides). The holders slip out when needed. Nice cheap system for amateurs!
Thanks for the clear instructions on this technique for pulling floss. I’m looking forward to giving this a try.
I like to leave my thread attached to the skein so that I always work with the thread in the same direction. I pull out the desired length of, in this case DMC Floss, thread. Then strip one thread or more if I am using multiple strands. I only cut one strand at a time. Then I always know the direction of the thread. The cut ends on the skein get a bit messy but I do not mind
Is there a website that breaks down all DMC variegated thread sometimes I want 2 match 1 colour and cannot please help thanks Christine look forward your reply all there variegated from double numbers right through 2 4502 higher
Not that I know of. I have Coloris and Variations broken down, but they’ve since added new colors to Variations, so that list isn’t complete. You can find what I do have here: https://needlenthread.wpengine.com/2016/06/dmc-coloris-corresponding-colors-in-solids.html
Hi, what a great idea. How long do you cut your DMC and would you cut GAST or WDW threads as I just use them as they come off the skeins, it’s a bit of a chew on but I manage…
Best wishes
Mavis
North East of England
Hi, Mavis – I cut most threads that I work with (cotton threads, anyway) around 18″ long. So that would be about the same with Gentle Art and Week’s. It actually might even be slightly shorter – my typical measurement is from the tip of my finger to just past my elbow, and admittedly, I have short arms. But that’s a comfortable length for me to stitch with, and the thread doesn’t generally get worn.
When the thread is twisted how do you get the one thread. I found an end and pulled and became a big knotted mess.
Thanks
Lynn
Yes, it’s never a good idea to pull from an end, when you’re working with twisted threads – especially because they are likely folded and twisted, and they could be folded a number of times. Normally, you have to untwist your thread skein first, and then remove the thread. It helps to cut and strip one thread out – that’s the surest way to avoid a knotted mess.
This is one of my favorite embroidery websites. I recommend it to my embroidery students every semester. This post is one that I use with my 7-12th grade homeschool co-op class. The excellent photos are especially helpful. Thank you!
Thanks, Darlene!!