


After initially setting up Late Harvest, the embroidery kit by Hazel Blomkamp that I’m working on for sheer fun right now, I tucked all the supplies that came in the kit, along with a copy of the book, neatly into a bag, ready to grab at a moment’s notice.
I mentioned previously that this project is going to be my carrot this year – my if this, then that project. If I accomplish this, then I can work for a while on that. It’s nice to have a carrot – it helps me get other things done!
Well, I promised myself that, once I finished the Stitch Sampler Alphabet e-book, I would allow myself one weekend where I could stitch just for fun. And that weekend finally happened.
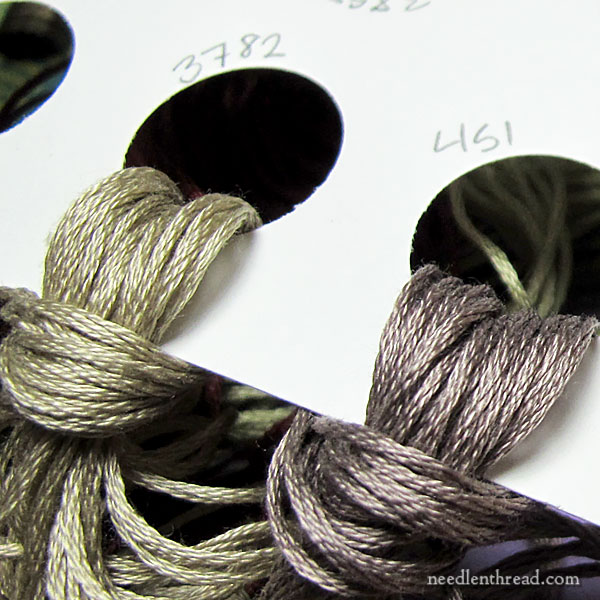
As I dug into the project, I noticed one thing: there are enough colors in this project, and they are such similar colors, that a thread organization method becomes quickly necessary.

Most folks who have been stitching a while have their own favorite approach for dealing with thread organization while working on embroidery projects.
And there are certain lots of approaches you can take – baggies often joined with rings, thread drops, winding threads on card bobbins, using specific systems like DMC’s Stitch Bow system, and so forth.
One some projects, I don’t bother organizing the threads in any specific way, especially if I’m just working with a few colors (say, six or fewer). In cases like that, I just keep all the threads together in one bag, and I work them off the skein, and then I wrap leftovers around the skein until the next work session.
But on Late Harvest, there are some 14 or 16 skeins of thread, in subtle shades within a few color families. And this can lead to some confusion, especially if you strip a few strands of floss out and leave the remaining thread on your work table. Next thing you know, you have leftover threads of very similar shades all mixing together in one heap on the table, and it’s hard to sort them.
Those zip-lock baggies for embroidery threads
Little zip-lock thread bags can help solve this problem. Each time you need a thread, you can open the little baggy, take out the skein, measure off a cut, snip the thread, strip the number of strands you need from the main thread, then tuck the leftover back into the baggy and close it. And next time you need that color, you can open the baggy, take out the cut thread, strip another strand or two off, and put the leftovers back in the baggy.
I’m not a huge fan of the baggy system. I think it takes up stitching time.
Make your own thread cards
Instead, I make thread cards. I cut out card stock and I use a 1/2″ hole punch to punch holes in it. Next to each hole I write the color number. I open the skeins, cut my threads to a good length (usually around 18-20″ if I’m using DMC floss), and then I loop the whole bundle into the hole on the card and hitch it.
Thread cards like these (and the very similar thread drops that you can purchase – they’re a little more heavy duty than regular card stock) are convenient for two reasons:
1. They allow you to easily access each color of thread in the project.
2. They eliminate the need to separate the strands and put the leftovers back. You simply slip the eye of your needle under one single strand and pull the single strand right out, leaving the rest of the thread (and skein) hitched in the hole. No leftovers to find a place for!
This is my favorite way of setting up threads for a project. To keep the threads clean, I put the whole thread card into a bag which goes into the larger project bag with the rest of the project supplies.
If you’re looking for a thread organization solution for individual embroidery projects, you might consider this one. It’s inexpensive, easy to make up, and quick to use!
How do you organize your threads for projects?
How about you? How do you organize your threads for individual projects? Tell, tell!
It’s always nice to get other ideas. Your input will help other stitchers who are looking for solutions, too. So chime in below and tell us how you organize your threads for individual projects!
Like what you see?
If you enjoyed this article and you’re looking for more inspiration, information, and instruction on hand embroidery, why not sign up for my daily newsletter?
There are all kinds of reasons to have Needle ’n Thread delivered to your inbox – check them out and sign up today!
I keep all my colors on bobbins, unless it’s a color that’s likely going to require the entire skein.
If it’s a very small project I just pull the colors and leave them on a table or footstool next to where I’m stitching and replace in my bobbin box when I’m done.
Small/medium projects I put the bobbins (and/or skeins) in sandwich ziplock bags.
Large projects get the gallon ziplock bags for the bobbins and skeins.
I also make my own floss cards for the large projects (think Teresa Wentzler; minimum 30 colors per project). I take empty cardboard boxes (cereal boxes, cracker boxes etc), use my hand held single hole punch and punch away (my hand gets tired after 20 or so holes). I then write the color/s and symbol (cross stitch) above the hole.
I typically only cut 1 length at a time off the bobbin/skein unless I’m headed to a section where I’ll need a lot of that particular color. Otherwise I find the floss cards get difficult to manage. Unless it’s a kit of course and it all goes on the card.
i am currently working on hazel’s bountiful season it has over 40 different colors. i have three project cards loRan which cost three dollars. they are heavy paper stock and you can write on them. this is my second project with these cards i simply turned them over and used the other side. each card holds 20 different colors and with this project i have all three in use. i am working this project in sections following the book. at the start of each section i thread all the colors needed (purchased a pack of 16 needles was a good idea) and them simply thread the needles to a piece of paper with the number next to it. the prep work makes the sewing fast and easy and the paper can hold quite a few needles with threads ready to sew.
Your needles might like it better if you put them in a scrap of fabric instead of through a piece of paper. I used to use paper, but found it dulled the needles. I wasn’t able to hit the exact same hole each time. I have scraps of Aida cloth that I got when I trimmed a project to frame it.
Try putting a strip of Scotch “Magic Tape” on the LoRan pages where you write the numbers first. If you use a pencil to write the #s you can easily erase them when you are done.
Hi Mary. I do what you do, but add the symbol for the colour as well as the colour number. I find it’s even easier to find the thread I need, because I don’t have to check back to the number. Thanks for all the great tips and tricks. I look forward to your newsletter every day.
I was a baggie person, but I recently “inherited” some thread and it was set up by number on cards. I did not think of making my own – brilliant as usual – and I am changing to the card method
When I am stitching for a particular project, I keep the threads in a box only if I have less than 6 colors (all together). If more than 6, then I keep them in a Darice or DMC box, in numerical order. All my threads are on bobbins. If I am working with silks, I keep them inside zip lock bags, inside a box.
Generally I have all my DMC cottons on those little paper bobbin cards. But occasionally I get a kit and then arrange all the floss on a card as you’ve done here. What has always given me a fit is getting a strand of thread out for stitching. Unhitch the floss from the hole, pull off one of the 6 strand pieces, pull out a single strand, then straighten it all out and put the floss wad back into the hole.
I need to try your suggestion. I think I understand what you’ve written. Sounds much easier.
You know, I think somewhere here on the website, I have a picture of separating one strand from the hitch. But darned if I can find it! :-/ But it really is simple – you just slide the eye of your needle under one tiny strand (not the whole six) and pull it right out. No stripping, no leftover threads to hitch back up!
Irene,
I’m the same as you- thought this way sounded brilliant. Can’t wait to try it tonight
I use snack bags with some holes poked through to allow some airflow, but I also add a piece of card stock to each one with color name, number, source, and any other helpful info. The card gives the bag stability and makes it easier to organize them into drawers or those colorful photo boxes.
Hi Mary.
I have a series of plastic boxes that are separated into smaller compartments, and as I buy skeins of thread I wind them onto card bobbins and then load them into the boxes in numerical order (DMC prints sticky labels you can use as well). When I start a new project, I gather all the thread colours I need, and load them into a smaller bobbin box that takes up less space and then I don’t have to have all sorts of threads I don’t need hanging around. The good thing about bobbins is that you can wind the remainder threads left after you strip the one or two you need back onto the bobbins. The downside is that these bobbins get very tatty looking quite quickly. I do have a few in hard plastic and these work much better. Unfortunately, since Ottawa lost its one and only stitching shop, I have to rely on the big box store for my DMC threads (not a bid deal), and any replacement bobbins, etc., which can be a bigger issue.
Hi Mary.
I use bobbin boxes to store all my flosses. As I buy new colours, I wind them onto bobbins and store them, with their numbers marked on the bobbins, in numerical order into my big boxes. When I start a new project, I find the colours I need and load them into a smaller box, also in numerical order, and I also stash any replacement skeins if I think I’ll need them. The good thing about this smaller box is that it fits comfortably into a Large size Zip-Lock freezer bag for easy transportation.
To store my unused or new skeins of thread, I bought a plastic box with about 100 different drawers at the hardware store. It’s meant to be for storing different screw sizes but it works perfectly for thread skeins since the little drawers are exactly the length of a skein of thread. On the outside of each drawer, I put little labels with the numbers inside. These labels apparently don’t stick that well because periodically, I see a little label lying on the floor. Nonetheless, the cabinet-thingy doesn’t take up much space, is light enough to pick up and hold in your lap, and keeps a lot of thread.
Dear Mary
When I embroider a project with a lot of thread skeins I keep the threads I’m working with on my desk separated in a line and I take a length of thread at a time to work with and when I have finished with the threads I pack them away in a plastic container and then start the process again on the next part of the project, but sometimes they do get mixed up. But I do like your way of organising your thread which would keep them more organised and you have the numbers of the thread on the cards and what a good idea to thread up a strand when needed and pull them out of the skein. I will try this method next time a project requires a lot of thread. Thanks so much for showing us this method it is really useful and helpful and not expensive.
Regards Anita Simmance
I am also a bobbins and boxes person. I have no specific crafting space, aside from the projects box I keep it all in so I have no choice but to take up as little space as possible. 🙂
I much prefer the Floss Away zip bag system. I have all my DMC floss organized on rings by color numbers.mwhen starting a project, it’s very simple to remove the necessary colors or to see which colors I need to buy. I place the project bags on a ring and tuck them into my project bag. Bits and pieces of the heed are easily stored in the bags along with the skeins.
By now I should have learned to proofread before hitting send.mit shou read “bits and pieces of thread…”
I store my threads on bobbins but when working on a project I keep the threads in small envelopes. They are fairly cheap at the dollar store and I can write the number of the floss and the symbol on the putter corner.
Mary I do exactly what you do with your threads.. And I put them on a Ring.
Its easy and yes I make my own I’m a card maker also so I always have card stock on hand. And hole punches too but I have a Cameo Machine that cut the holes and shapes for me. Very easy and very inexpensive. Have a great day and week everyone.
Hi Mary, I punch holes in cardboard too. My mother used to make a long pincushion mounted on cardboard, write the numbers on the cardbaord and stick a needle threaded with the colour in the pincushion above the number. Sometimes she had 20 or more threaded needles in her pincushion! I love wooden tools so have many, and I mean many, wooden thread holders, all different shapes and sizes and I use one or two of these with each project. Pity we can’t add photos!
Oh I wish you could post photos too!!!
I do the same thing you do – make thread cards out of card stock and cut my threads about 18″ long.
How do you deal with leftover partial skeins when project is finished?
Now, those I will put in a bag, marked, if there’s a good bit left, instead of leaving them loose to jostle about in my thread drawers.
If you are using the kind of cardboard thread keeper Mary describes, and have noted the color numbers, then at the conclusion of your project cut the keeper apart keeping the holes (with floss still looped through) intact. The individual hanks of floss are now safe to keep with the rest of your floss in whatever way you organize it. Jane
I use the bags because it helps me keep track of the pieces left as you change colors so I can use them up elsewhere in the picture. On the bag,8i I put the number along with the symbol in the pattern’s color. The color coding helps me keep from making a mistake in choosing the right thread.
The project I am currently working on requires 30 different floss colors, some extremely close. I use this Pako product for several reasons. Because I hate threading needles, I love having all 30 of the colors threaded up and ready to go. When I need to rethread, I remove one strand at a time just as you described using the eye of the needle.
http://www.amazon.com/Pako-Floss-Organizer-11-1-Inch/dp/B004R9GJ4Q/ref=sr_1_1?s=arts-crafts&ie=UTF8&qid=1433173826&sr=1-1&keywords=floss+organizer
I use the plastic bags, as I have just have so much embroidery floss. People are always giving me theirs as they no longer embroider. I can see it might be coming back, I love to embroider. Am working on a very large counted cross stitch pic, so the bags work better for me plus I need to keep them in numerical order.
I have a question rather than advice 🙂 Have heard of the need to keep the floss skeins intact in order to know which end to thread. Does anyone have a method that helps you know which end goes into the needle? Or not worry about it?
Hi, Beth – someone else asked the same question… Don’t worry about it! Cotton thread doesn’t have a grain or nap. I know there are some teachers and stitchers who swear by using the thread for the “right” end of the skein, but it doesn’t make a difference.
I use thread cards too, but in addition to the number, I include the symbol that is used on the pattern. It works for me.
I also use bobbins. All of my embroidery threads are stored in a compartmentalized box that I made, and I made a removable tray with a handle to go with it. Whichever threads and tools I’ll be using go in the tray, and the tray hangs out with me while I stitch.
Several decades ago, I learned a neat trick for this, from a very wise lady, who I think was just born knowing everything. But, I bumped it up, a notch. She cuts, then braids her skeins. When she is ready for that color, she pulls up just the number of strands she needs. I was blown away, at how easy it was to pull individual strands from a braid, and the concept of all of the skeins in one baggie – and not tangling, at all. But, I’m a bit lazier than she. I decided to loop my cut skeins through a lettered palette (I attach them, the same way you do – in the same order as they are listed for the pattern) – then, note the letter on the palette next to the number on the pattern sheet, then braid them. Now, no baggies to deal with at all, no tangling, no little tags to keep track of, and no mistaking similar colors, they stay organized – even if I don’t come back to a project for years. Yeh. Years. *hangs head in shame*
Hi, Carla – I braid my coton a broder and floche just like that, and pull out individual strands. Works great!
I have special little box ( metal oe cardboard) of all sizes and put my threads in ,also use small plasctic bags from Dollor Store.for small amount of threads.
Sometimes I will take my entire rolled up skein on those special plastic holder and thread a needle for each color,so went it’s time to use I am ready. Working on Tris Burr Little Bee Eater and all my stuff is nicely organized.I also teach hardanger and embroidery painting and encourage every lady that takes my class to do the same thing.
Thanks for all that you share with us I Love every minute of it
Diane
I, too, use a thread card. But rather than use white card stock I use pretty greeting cards I have received. I cut off (or out) the front part of the card or a pretty section of it. Then punch holes in it. In order to reuse the cards, I number each hole 1-10 (or whatever will fit) then number my floss key on the pattern. This way I get to use something I probably would have just recycled or thrown away. I often will write on the back who gave it to me and for what occasion. It really does make a nice stitching tool!
Hi Mary, I use my own paper tubes, similar to the original, which I make from rolled up paper.
This is brilliant. No more cumbersome baggies for me, I’m giving this idea a try. Thank you!!
I do not like folding the thread and pulling it through a hole as you suggest. To me, it takes too long to retrieve a working length of thread. Do you have an efficient way of removing your working thread(s) when using the punched hole method? I feel it’s faster to pull the skein from a small baggie than from the punched hole. Any suggestions would be greatly appreciated!
Hi, Judi – as I mentioned in the article above, all you have to do when the threads are hitched in a hole like this is slide the eye of your needle under one individual strand and pull it right out. I find it much easier than messing with bags.
I use the same type of method. If I’m working on more than one project at a time,I use different colors of card stock. On the back side of my project I write the card stock color. This way if I have more than one out, forget to put one up or they need more than one piece of card stock I know which project it goes too. I love color on paper as much as thread.
Hi Mary
Yours is the method I use most often, and I, too, usually make my own cards with a hole punch for storing thread for a project.
I have a question — even though my search of your site has not uncovered it, I have a vague memory of reading that floss has a “nap.” Is this correct? If it is, how do you keep track of the nap on your floss when you have transferred it to a project card?
Thanks for your fabulous blog!
Jane Dickey
Hi, Jane – there are some stitchers who hold firmly to the belief that floss has a nap, and that’s well and fine. But cotton floss doesn’t have a nap, if examined under a microscope. So I think it’s more a matter of what one was taught, than actually being the case. I don’t like to complicate things. I never pay attention to nap or the end of the skein that the thread is coming from. And I’ve never noticed a difference!
You’ve already listed my favorite – punched and labeled holes. In fact, I use this whenever any of the colors are closely related because then I don’t have to worry about tricks of lighting.
I find that I enjoy reading the comments as much as the original article on this sort of post. I was given the LoRan system for organizing threads many years ago. I still use it, supplemented by project cards I make myself. I write the color name (if one is given), the floss number (and brand if not DMC) and the symbol next to the hole holding each color of thread. We use a lot of tea around here, and the rectangles of card separating the tea bags are perfect for small floss cards.
Your method of making your own thread cards is one I use often. I usually just use index cards as they are handy but the idea of using heavier stock is a good one especially if it is a long tern project. It also works well with the use of overdyed threads. I have used the thread card method to keep track of overdyes as i cut them from the skein and number the holes in order of the cut so the color flow is maintained when I use the extra thread. If there only a few colors to keep track of, I have just been putting the skeins in an acid free 4 x 7 box along with a threader. It serve two purposes: keeps the threads clean and handy with the project.
I use two methods of keeping track of my stash. I like the Stitch Bow method for the DMC collection and the acid free 4×6 boxes available for Scrap Booking that are contained in a larger box. The plastic bags are a pain but I still have my collection of DMC Flower threads and the Danish Handcraft Guilds cottons in them by number.
i love your idea. I hesitate to buy the hard plastic thread organizers for fear a pencil number would rub off them too easily and that ink would come off on my thread. Card stock seems like the perfect solution. Today is Day One of Gay Ann Rogers’ Catherine stitch along with lots of threads so the timing is perfect. If you have not seen Catherine, hop over to her website and peek. She is breathtaking!
Um…is putting everything in an old Gelato container considered organizing? ‘Cause if it is, then I’m the queen! I have recently taken my 300 odd skeins and moved them from two tea boxes (PG Tips and Twinnings) and a jar that once held fancy peaches to plastic boxes meant to hold beads. I felt really organized when I started doing them by color. Except my sister kept insisting that my pinks were actually purples and my blues were really greens.
I use a very similar system, Mary, with home-made thread cards like yours. If I’m doing a cross stitch project, I’ll mark each thread colour with both it’s number and symbol. I also like to have a few needles threaded up with different colours which I store on my needle magnets. The magnets are one of my favourite tools … I no longer lose needles into the sofa arm now that I have them! 🙂
I use a variety of methods, depending on mood and the number of colors, but one thing I do consistently is organize the floss by color and add the symbol next to the number.
Works great if you don’t have pets. My 2 dogs and cat love this system. They grab and chew or walk under or pull off the table. And please don’t lay it down it’s fair game for tug of wat, rolling on and hiding. Baggies take a little longer but animals won’t bother them.
Did you sneak into my house and watch my web searching this morning as I was looking into better organization systems for my embroidery? This post is extremely timely! I’m a new embroiderer–just picked it up a couple of months ago; I’m a long-time quilter who was wanting to increase my ability to embellish art quilts in interesting ways. Little did I know how hard the embroidery bug would hit. I now have quite a collection of threads and needles and such. I travel a lot for work and enjoy having a portable creative outlet, but I need to find better organizational carriers for travel. Since I use a lot of different types of threads, I’m finding the bobbins only work part of the time; they don’t effectively hold other, funkier threads. I use a 3-ring binder ring to hold my larger threads but can’t label it, so I like your card system. I still need to figure out a good travel container, but this card idea is an excellent start!
After pre cutting skeins, I also loop my threads onto separate 3 ring binder rings and then group these smaller rings of the same colour family onto a larger ring. To label the colour, I snip just the colour number portion of the tab and put it on the smaller ring as well. Just like the cards, this makes taking out 1 thread at a time very easy. I like that with this system I can group colours; this made it particularly helpful for the Hummingbird project – grouping the greens, corals, purples, and yellows each on their own larger rings. I can also then hang the larger rings from the standing frame I work on, thereby having everything on hand. Also, it allows me to separate and regroup a particulat colour to use for another project. Up until 2 months ago, I was a lifelong needlepointer, and this system, that I’ve used for years, has translated well for me. I started to embroider after finding Mary’s brilliant site; I was utterly intrigued and knew I had to try it. Now, alas, I am an addict, and cannot get enough…
When a kit uses DMC threads, I put the left over thread on my bobbins with my other DMC threads. Sometimes, the colors don’t match, especially when looking at them in daylight. I’ve also found that when I needed to purchase a new skein, it didn’t match what was left on the card. I’ve had to take out part of a flower and restitch it with the new color a few times.
I’ve run into that as well. I’ve finally loosened up and use those ‘odd’ bits in nature scenes where the colors are naturally a bit different from place to place. So far it has not negatively impacted anything.
I use snack bags to hold my thread when working on projects. I also make ‘cards’ from old file folders, to give the bag stability and mark them with the color symbol. I like that I can thread extra needles and drop them into the baggie (Before we got the cat, I used to use the Pako needle organizer) along with slightly used pieces that I can use later. Everything stays together. Most of my thread is on DMC stitch bows which will fit and if I have thread on a bobbin it goes in too. I don’t like the kinks that the floss bobbins create so I am trying to use that up or rewind onto a stitch bow. I made printed labels for the stitch bows and taped them on because while you are supposed to put the label on, most of the time they are too loose and fall off, or are too small and won’t slip on. When a project is finished, the stitch bows go into recycled binders with the inserts. If I had it to do all over again, I would just use the baggies with a blank card to make it stand. Then when working on a project, I would add a second card with the symbol on it that can be reused from one project to the next.
I’m not a bag lady either, they are very difficult to work with, although I do use them for some needlepoint projects. But when stitching with cotton floss or silk I prefer a card like you use – I use the LoRan cards. Much simplier to get thread off and back on – but I’ve never thought about using the needle to slip off one strand – will try that next time. Outstanding idea.
For those in which the floss is not from skeins (such as kits) I use similar to what you are using.
I wanted to comment that when using the same type of thread holders I take the floss off the holder, remove the precut piece of floss I will be using (remember these are from kits) and put the rest back. I then remove the number of strands I need and then put the rest of the strands not needed at that point, back separately into the same hole of the holder. When done with the strands I am using, if they are not all used up, I put those back, also separately, again in the same hole of the holder.
When working with skeins I will wrap left over after immediate use around the skein. The skeins will be in whatever the project is stored in.
When working at reenactments I have the colors I have started using and/or think I will need to use that day wrapped around wooden period reproduction holders which are basically shaped like X’s. I take off what I need and any excess is wrapped back around the holder.
I take the labels off of the thread and with DMC I open the skein, fold it in half, then half again and then twice more. I now have 16 pieces that are about 19 inches long. I slip the threads back through the label that has the color number and flip the strands through a handmade thread card with the label at the center of the thread showing at the loop on the card. This way I know the color and brand of thread and are ready with my thread easily cut to size. I keep similar colors on separate cards, reds, light blues, med blues etc…
I am a life long stitcher of all sorts and thoroughly enjoy your newsletter! Thank you, Maryann
I’ve been trying to organize my threads and ribbons for year without success!
I’ve about come the conclusion that I’m meant to stitch my way through life in chaos!
I admire those of you who are so organized, you make it all look so easy!
setting up for a large project depends on the threads I will be using. Stranded
Silks or cottons I put on thread holders like you do. Balls of pearl cotton I
Put into little plastic containers I found, which I punched a hole in the top of
To feed the thread through to keep balls from unwinding. Carded threads
I leave on cards. I have a project bag for each project I am working on and
Like to have everything together so I can pick up whatever project I want
And know all I need is there. Sûe in Bermuda
Hi Mary,
I use the baggy system to collect threads together, but when I’m actually on the project I use a thread card like yours, but I punch the holes in pairs with a slightly larger space between the pairs. I use two holes for each colour; after numbering the pairs, I use one hole for the 6-strand lengths and the second hole for the 5, 4 or less threads of the same colour. So the spares go beside the full threads, if you know what I mean. The extra threads don’t get lost and they are kept with their colour. It does mean that I can end up with 2 or 3 or more cards, but it is worth that.
For basic storage I also use whatever comes to hand when I have a sorting blitz – bobbin boxes, plastic clip-lock boxes, tiers of plastic drawers, special tins, etc. I even have a couple of those wire box frames covered in organdie (or something) that I got perfume/toiletries in! They have my odd skeins of silk threads in them, like Caron waterlilies, just because they are special! 🙂
I’ve used both the methods you described, and I do like the thread card idea best, but I must say you’ve given me a great tip that I didn’t know about. That is leaving the threads on the card and pulling off a sdtrand at a time. I used to undo the threads off the card and then put them back on when done separating threads, I always thought they would tangle up. Plus the threads from a kit were too long and there wasn’t enough spaces to accommodate all threads and so cutting them shorter would have eaten up even more space. So any how it’s a nice tip to know and will be used in the future, thanks! 😉
Here’s one more quickie tip, I’ve found that when I buy sheet sets they often come packaged in a clear plastic zippered bag that even have inside pockets to hold your scissors. They’re big enough to hold your project and all the accessories and supplies you need, they’re free, and you’re recycling!
Hi…
I have all of my threads wrapped around plastic bobbins – which hold up quite nicely. Each plastic bobbin has a precut label where I can indicate the thread color. I have a craft metal filing cabinet with shallow drawers so that I can file my bobbins in number order – standing up for easy viewing. When I am working on a project – it makes it very easy to go to my filing cabinet with my thread list and pull the required thread colors with ease. I then place the bobbins in a plastic bag except for those that I will be using on a particular area as I start stitching. When I am finished… I file all of the bobbins back in the cabinet according to their number so that they will be easy to find the next time. I really love working with threads on my sturdy plastic bobbins.. they stay organized and prevent waste.
I’ve used bobbins, the DMC Stitch Bow System, the card system (like the one you show above, Mary) and the baggie system, and a friend handed me all of her old floss that was meticulously braided onto small rings. Hers was by far the loveliest, but was cut much shorter than I like to stitch with. I’ve been stitching for thirty plus years and have finally settled on the baggie system. It has it’s drawbacks, and I might have to start adding cards as some have suggested as that would certainly add some strength to it, but I’ve found that using the baggies is easiest for me. I just grab what I need along with a ring and put it in my project bag. I keep the balance of my floss in a couple of boxes that my husband adjusted so that there’s two wooden dowels running across them and then I hang all my floss baggies on rings, and the rings from the dowels. Works well for me.
I’m just getting back into embroidery [I did it as a child] and it doesn’t take long to accumulate lots of thread. I’m using the zip-lock baggie method at this point but wanting something better. These look perfect!
Like you I keep my threads on cardboard strips with holes punched down the sides. I label them with the number of the thread and the symbol for that colour. I also have a strip of scrap fabric and with a water soluble pen I number the threads down the side and keep my threaded needles in this ready for use. When all is finished I just rinse it in water and it is ready for the next project.
I started with hand-made organisers or the ones that come with kits. I found a real bargain on eBay for the plastic organisers so I treated myself.
I use 2 holes per colour: one for the full length strand of about 15″, the second for shorter strands. When I need wool I see if I need a full strand or not so the shorter ones may get used up. Many kits require using every scrap of thread.
If the wool numbers are given, in theory I can return left-over lengths to the baggie system I use: one bag per colour and manufacturer. If the wool manufacturer is given but no number I can use my thread cards with thread samples to identify the wool. This has been handy when there is not enough wool and I have some or when I want to put extra wool away.
I have found with my organisers that sometimes an unlabelled colour is used again in another kit from the same manufacturer.
There is surprising little left-over wool. I store the left-over unidentified wool on the organisers with the completed piece – I have yet to properly finish pieces by mounting. I haven’t decided what to do with my finished pieces.
i am systematically working my way up kits in complexity. I expect to have left-over wool with Phillipa Turnbull kits as she supplies full skeins but I am still in the foothills.
Regards,
Helen
My brother bought several flexible plastic cutting boards from the dollar store, cut them into strips, rounded the edges, punched holes on each side and put them together with large rings. I enlarge the pattern page with the color numbers and symbols at the copy place, cut them apart and tape each one by a hole. I use the left hole for the skein and the opposite right hole for leftover pieces of thread. When I’m done,the tape comes off the plastic with no residue and I’m ready for the next project.
Martha, what an absolutely brilliant idea!!! I think I may try this one. It couldn’t be easier (or cheaper)!!! I hope since this came in later that others don’t miss it. Again, brilliant!!! Thanks for the tip.
Am new to using needle and threads….could you do a short video on how you do your cardstock organization of threads….especially pulling a thread from the card….
I love the idea of knowing exactly the color numbers and where purchased etc. Thanks
Mary,
I’m so intrigued about your method of pulling a strand off the
“Thread Keeper” without disrupting the rest of the skein. I read your
post and have tried now several times without success – and a
tangled up mess – LOL!
I’m wondering what I’m doing wrong?? I cut all the lengths to
18″ and looped them through the hole in the cardstock like you
displayed in your post. When I separate one ply with my
needle and try to pull it out, it just seems to pull all the rest of that
6-ply piece of floss with it and bunches all up. Am I doing something wrong?
Thanks for your advice!
Hi, Kevin – Well, you have to hold onto the rest of the floss, or it will crawl up. If you scroll down in this post: https://needlenthread.wpengine.com/2014/02/repurposed-embroidery-thread-rack.html you can see the same concept at play, pulling out a single strand from floss hitched on a spaghetti drying rack. But yes, you do have to hold onto the bunch with your other hand, just up by the neck – hold it not-too-tightly, but not-too-loosely – and pull the single thread out. I’ve never had it not work for me, unless I’ve had a tangle somewhere in the hanging tails. But under normal circumstances, it should work just fine.
I just wanted to say that you email comes into my inbox 6 days a week and it is always a joy and delight; always beautiful and fills my world with the delights of embroidery and your wonderful way with words. Thank you so much. For the Joy you bring to me and so many, many others. I enjoy all the journeys you go on with your projects and am inspired to continue; to carve out of my full days a few moments when beauty and peace collide and all the world seems so much better. Again thank you Mary …..
Well said, and I ditto! Thank you Mary.
I’m saving this page. It has given me a couple of ideas to try. Right now I am a combined Stitch Bow and Baggie lady. But I may give the metal ring idea a try. 🙂
thank you, Mary! I love seeing everyone’s ways, for instance, I never thought of writing the code AROUND the hole, I always wrote it NEXT to it, which takes up space at times, especially if you didn’t have a big width of card left! 🙂
I have different methods for different kinds of projects, I’m a fan of baggies for all that’s delicate or hand dyed; like for silks or hand dyed threads that I want to keep in a coherent variegation order (if that makes any sense, it does in my head), etc.
I use Stitch Bows for my ye olde DMC collection because at that time I started with that system that had just come out and once you start.. 😉
but for small projects I like the home-made cards, and your notes around the hole rather than next to it will be definitely implemented.
I wonder what you mean by taking out one ply using your needle’s eye though.. sounds awfully handy and fast but I haven’t figured out how you do that. must have more coffee, clearly.
I use the DMC Stitchbow system and add my own twist.
I have a binder for each project with the stitch bow pages you put each color in a sleeve. I assign each color symbol a number and put the corresponding number on the sleeve, this way I do not look for color numbers at all, its all organized in my binder. I have tried many ways but I often have projects that have up to 90 colors. I find this works best for me
Boy I can still learn at my age! I have always used thread cards to separate my threads but never thought to cut the threads in18″ lengths.. I have been just taking the individual clump and put them on in a slip knot in the hole. Why did I not ever think to cut the treads in same lengths first? I will do this from now on. Thanks
Oh my!! when I saw that mess of thread, it reminded me of when my mom used to do embroidery. She gave me the job and to keep me busy aka quiet, of sorting the colors winding them on a piece of carton. She had a store which was a store where she sold fabrics, zippers, threads, embroidery threads, lace buttons buttons and more buttons!! I learned my colors and how to count in that store as there was no daycare back in the 1960 and school started at age 6! She also was a dressmaker sewing in the back of the store for her customers. I still have many embroidery threads (and a zillion buttons) still sorted in their original boxes although I haven’t embroidered in decades!!! I love your embroidery and I can’t count the times I almost started a project only to have my sore hands say not today! Thanks for the memories!! I like the idea of the tag with the hole in it.
I’m not into kits, I just like to fool around with pictures and stitches I find on the internet, or pictures I can convert to line drawings in a vector program and then print onto fabric.
With that mindset, fooling around with threads is part of the hobby, so I don’t mind the time-suck that is the baggie system!
RE: N&T 5/29/2017 – thread cards
I should try this before I write – but I see that on your thread cards, you have a hank of thread, cut into your lengths, and hitched into the hole …. are you saying that you can pull “ONE” of the six threads – making up the strand, from this card, without removing the whole hank? so you aren’t separating at the end of the strand but from the hank loop?? WOW, sounds fantastic. Also, is there a particular card stock weight that you use? Thank you so much for sharing your wonderful talent!
replying to my own text – should have read the comments first!!
Hi, Nark – just regular card stock, usually, because that’s what I have on hand. Yes, just one thread at a time. Slip the eye of the needle under one strand in the crossed over loop on the front, and pull it out!
When I am working on a project……………… I put all the threads and supplies for that project in one organizer and they stay there till I am finished. I also put any other threads or embellishments I would audition for that project.
Mostly I put my filament silks on 3/4″ rings. I can then twist them and tuck the ends, put in baggies, put on a wooden hanger, or slide them into 35mm negative sleeves and keep them in a loose leaf binder. It keeps them free of snags and I can keep track of my inventory.
I’ve also created my own thread drops which I sometimes use for silks but almost always use for cottons. They’re plastic, a bit heavier than card stock, with a hole to hitch through and a pair of slots to tuck ends into so it keeps twists nice and tidy. They also can be put in negative sleeves, or put on snap rings or the pasta rack.
Goldwork supplies go in A4 or B5 plastic document boxes (Daiso for the win!!!) and project packs go in zippered pouches – either tightly woven mesh or nylon, usually.
I usually do the thread “bobbins”, but frequently forget to add the color number! I like your method very much and think I will adopt it.
DMC pearl cottons come in a skein that is 18 inches long when the lable is removed and the skien is untwisted. For one yard, cut the threads at the little knot that keeps the threads in one loop. If making small stiches the threads are easily cut to 18″. Then slide the little lable to the mid point of the threads. With the threads folded in half over the lable loosely braid them. One thread can easily be pulled from a braid.
Braiding embroidery floss also allows individual strands to be pulled from the folded end. If your project has easily distinguishe colors they can be all braided together.
Another trick is to combine putting your threads on the card by simple threading them into the hole with or without the hitch knot then braiding all the threads behind the card.
Happy Stitching
When I was doing counted cross-stitch projects, I bought some clear window envelopes (like bills and paychecks used to come in.) I wrote the color number on the left upper corner. It held skeins, and all leftover threads – no matter how small!
I stacked them in a storage box when not in use – number up. I have to say, I never once had thread fall out of the envelope!! The window let me see the color inside so it worked by number or just gathering ‘reds’ for a project.
doni @ Oregon coast
I would like to receive your newsletter please.
I’m new and self taught to cross stitch and I’m finding it very time consuming trying to make if less time consuming in a way to make handling floss in a kit.
Are there any good you tube clips I can watch to help me, I really enjoy cross stitch but struggle with all the little but very important things you need to know, like is it ok use any end of the floss, can I knot the ends. Thanks in advance. Janelle in Australia
Hi, Janelle, I think one of the key results of embroidery or cross stitch is relaxation, and if we stress too much over the little things, sometimes, stitching becomes more overwhelming than relaxing. You don’t have to go to any huge efforts to arrange and organize floss in most kits. Most kits don’t require a huge number of colors of floss. You can use the floss straight off the skein – you don’t have to take the skein apart and “re-organize” it. But if you want to reorganize your floss, there are many very inexpensive ways you can do that, probably with items you have right at home. For example, you can make your own thread cards, just by punching large holes in a strip of card stock and loop your floss into the holes. I’ve written some articles on thread organization ideas:
https://www.needlenthread.com/2009/07/organizing-embroidery-threads-for.html
https://www.needlenthread.com/2019/03/make-your-own-thread-keeps.html
As far as knots go, on counted cross stitch it is more difficult for a knot to stay in place, because it can slip through the holes in the fabric. If you need to use a knot, use a waste knot. A waste knot is explained in this article:
https://www.needlenthread.com/2008/09/starting-your-thread-waste-knot-photo.html