


So, I mentioned the other day that I’m setting up this crazy-big needlework project.
It’s essentially a counted cross stitch project, but I’ll be working it in tent stitch on a 30-count linen.
Last night, as sleep was wafting over me, I found myself contemplating switching to a 40-count silk gauze, by the way. When I awoke this morning, I instantly recalled the thought, and then I forthwith brushed it aside as a nightmare.
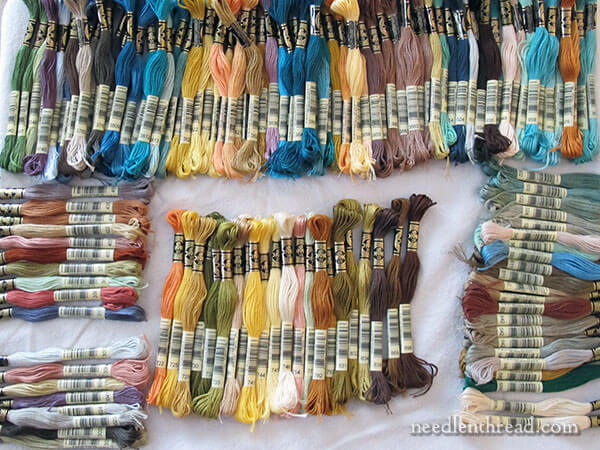
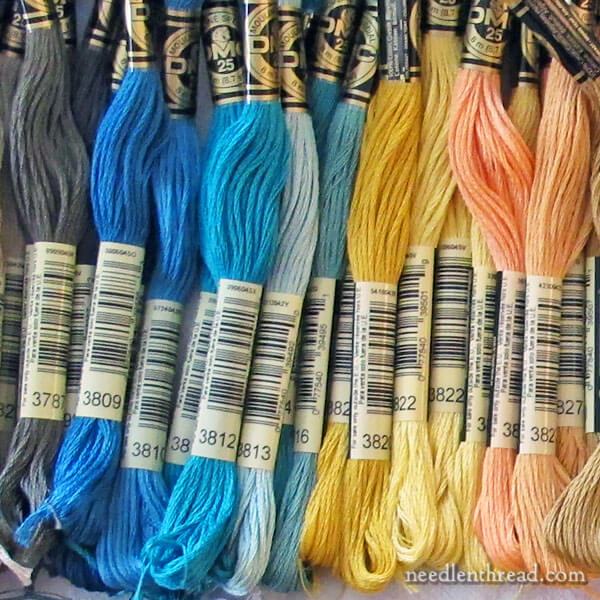
The project involves 200 colors, a little less than half of which are solid (only one color of thread in the needle at a time) and the rest, blended (two colors in the needle at a time).
Now, when you’re dealing with This Much Thread for one project, there is no way around it: you must come up with a reasonable, logical, efficient organizing system for your thread.
I know this. You know this. But the question is, what system to use? How does one go about organizing this much thread for a project of this scope?
This is a question I contemplated for a while. I came up entirely empty-headed from my own efforts.
So, I went looking for different ideas for thread organization. There are lots of “systems” available out there for thread organization!
Jotting down what I considered important for this type of thread organization, these are the points I came up with:
1. Above all else, the system must allow for clear labeling with room for a symbol and color numbers in print large enough to easily see.
2. The system should accommodate pre-cut threads, to make the project more efficient.
3. The system should be as space-efficient as possible, despite the large quantity of threads.
4. The system should be able to be neatly contained, closed up (to keep things clean), and even easily portable, so the project can be moved from spot to spot easily, or taken somewhere else entirely.
5. The system should allow for easy replacement of threads and rearrangement of threads if necessary.
My question to you: Have you ever organized a large number of threads for a project, using a system that incorporates all the points listed above? If so, how did you do it?
I’ve settled on a way to organize my threads already, but I’d like to know what other people do with this type of project. Maybe I’ve got it all wrong!
So far, as I work through getting the threads in order, the system I’m using seems to be working out quite well. I’ll show you what I’m using and how I’m setting it up, once I get it all together.
In the meantime, though, I did discover one important point: before you try to organize this many threads for a project, the smartest thing you can do is put your threads in numerical order. It is So Much Easier to find a specific thread if you lay out all the project threads and arrange them numerically.
At first, I was just digging through a heap of thread on the table, looking for each color number. That lasted about two skeins. I realized I wasn’t getting anywhere, fast. So I laid out all the threads by number and voilá! Finding each color to associate with each symbol is now a breeze.
I’ve been setting up my system for about four days now, off and on. It may sound like a bit of a drag – it takes a lot of time to get threads for this type of project organized! – but I have to admit, it’s a lot of fun. I love organizing threads!
Besides, I figure doing this type of work carefully ahead of time will pay off in the long run.
What’s Your System?
If you’ve ever been crazy enough to venture into an Extreme Project like this, where you’ve had to organize some 200 colors with associated symbols, how did you do it? What advice would you offer to others venturing into the same type of project? Do you have a favorite system for organizing large numbers of thread for a project? Or have you seen anyone else’s system that you thought was logical and efficient?
I’d love to hear your thoughts on the topic! Please feel free to chime in below with your ideas!
I’ve been tempted to tackle projects as big as that, but then I sit down and watch something on Netflix and the feeling goes away.
I like your method of sorting by thread number.
I wish we had a like button. 🙂
in the 70s I had a brass hook and pulled precut threads thru a drinking straw and taped the number on it. — failed. No place for left over threads, hard to keep in order, and when down to a few threads the remainder fell out.
In the 80s, a company came out with a book that you tied the threads into. — failed. Too big, hard to pull out and replace threads and no easy way to add new numbers in order.
In the 90s, little card bobbins came out at the same time Floss-A-Way bags were introduced. Transferred everything to the bags and never looked back. My husband put dividers in a left over nightstand and I file them all by number. Let’s me pull the bags I need and put them on a ring. I don’t put the symbol on the bag.
Very similar to my method – except that I use sandwich sized Ziploc baggies – accomplishes the same end & I also do not put the symbol on the bag, but I put the bags on a ring in numerical order.
i am working a project with 50 different colors. i am using cards with twenty places on each card. plenty of room to write color number etc. i did put the colors in numerical order. each color has a 60″ length of thread (6 ply) and i tied a knot in the center to hold it in place so the threads hand 30″ and i cut off what i need as i go. the rest of the threads i put into small zip lock bags with the number and color in case i need to add more thread. these bags are in number order in a small box. i have the cards thumb tacked to the top of my desk and i can easily see and access the colors as i work. can’t wait to see this project.
Hi Mary,
I have never done this many threads. However I use a lot of colors when needle painting. I have found the small plastic bags that are made to go on rings work for me. I file the bags in an antique recipe file holder I have. It is larger than the modern type and made of sturdy wood with a hinged lid. I use dividers with a numerical system. I can find the number easily and take just what I need from the bag.
I take a piece of cardboard (5 x 12) and make slits with scissors 1/2″ apart down the 12″ side and corresponding slits along the other 12″ side. I cut my threads in 18″ lengths and run them across the 5″ cardboard and tucked into the slits on each side. I have room above to right down the symbol and color number. I have always done it this way and works well for me. My Mom taught me this when I was only 14 and I’m 58 now. She used to use cardboard from cereal boxes.
i do something similar but i use a paper punch and punch holes down the sides of cardboard ( like cereal boxes ) and write the color number beside the hole . they cut 18 inches of floss halve it and push loop thru hole and then the ends thru loop. my cardboard is about 3 inches wide and i do holes on both sides . when i finish project the board goes in a ziplock bag and next project i hunt thru bag to find leftover colors that i need for new project
I organize my the same way and have also done this since I started needle work sixty years ago. For me it is the best method.
I do the same as Katherine :o)
Except instead of using cereal boxes I find that the cardboard dividers from the 100 pack of Twinings English Breakfast tea box works perfectly…. they are small lengths of card and I only punch on one side but I find it easier than having a large piece of card as it fits into the plastic folders better!!
I have not tackled a project with that many threads,but have some in the works that have 100 threads. I wind my threads on a floss bobbin, and then put them all in number order in a clear plastic bobbin box. When I need a certain number I just pull it out of my box and easy refiling.
There must be something cross-stitches in the air. Having stayed away from cross stitch for years because I never liked any of the patterns, I have just discovered the Chatelaine cross stitches which are amazing! (Www.chatelaine.de). It doesn’t sound as big as yours, certainly not as many threads, but oh the joy when they all arrive in the post! But as for a system, I’m currently going with – squash them altogether in a bag and spend ages looking for them when I need them!
What I would love is a long flat box so I can lay them out neatly (artist paintbrush boxes could be good), and a table where I can leave all utensils like scissors out so I can reach for them instantly. Unfortunately, a 3 year old whirlwind child means I have to pack and hide everything away after every sewing session!
Your project sounds intriguing, looking forward to finding out more.
Kirsten, I know what you mean about the Chatelaine designs. I’ve looked at them for years and years but just can’t seem to fit the flosses, etc., into my budget, not to mention that I’ve never been able to decide which one I wanted to do. I haven’t been to her site in a long time, maybe i’ll go take a look and something will hit me at just the moment when I have a little extra cash.
This is a tough one. When I still did tapestries what I normally did was to start of with the darkest colour first and work my way down to the lightest colour. With needle painting I tend to do the same. The most colours I used in needle painting was between 60 and 70 for my snow leopard but I can see how 200 colours can be a big problem. My advice, do it carefully, very carefully.
Love Elza xxx
Hi, Mary….I keep all my floss in individual 4 x 4″ plastic ziplock bags. (I purchase them from Royal bags…grat customer service…1,000 to a box…I keep almost all my threads this way). I use a Sharpie marker to note the color number on the outside. Then, I have a plastic shoebox with lid to line them up in numeric cal order. This system works great…no frustration of digging through a pile of threads, and cut pieces can be put in the bag along with the skein.
Good morning Mary,
I sort my threads by number: I make a cardboard strip about 2″ wide and punch in holes to slide the skein, cut in half for working lengths, through and lightly knot. I have one cardboard strip for each set of numbers: starting with 0, starting with 1, starting with 2 etc. Next to each big hole for the whole skein, I have a smaller hole for short lengths of thread that are still usable.
I always , always, ALWAYS use cardboard thread drops sorted by number, colour description and manufacturer of each different thread whether the pattern uses 5 or fifty threads. I then hang them on a Ring which I suspend from my lamp! Within easy reach and never out of order.
40 count! Are you nuts! Lol! I am working 30 at the moment and that is enough of a challenge for me.
I use thread drops as well but I was wondering what you store the thread drops in once the project is done? I use small 3×4 inch bags and store them in the boxes you buy to store hockey card collections in.
All those threads look so tidy. I want to see a before and after picture. 🙂
Wendi
I have never used that many threads in a project but when there are a multitude of threads, I wind them on bobbins and use the plastic box designed for them. Cut threads are wound in the other direction on the same bobbin. I write the colour number and the symbol on the edge with the original tag under the startIng wrap. Maybe for the blended threads a strip of cardboard with slashes each with the numbers written beside?
I use the same system, with floss wound on bobbins and stored in numerical order in a plastic bobbin box. I even wind the loose threads in the other direction on the box. I write the number (actually, I use the little stickers with DMC thread numbers on them). Bu I don’t put symbols on them, because I’ll likely use them again for another project.
I’m curious, Mary, since you’re using 40-count linen, do you plan on making your stitches over one thread or two?
I can’t wait to see the system you’ve come up with!
Melissa
I used the floss cards, and put them on an o-ring, but I was only dealing with 20 or so colors. As I unwrapped the skein, I slid the piece of paper that holds the color number UNDER the floss as I started to wind, that way I could always see the color, and when it was empty, I just threw the paper away — no sticky residue from tape/stickers/etc.
I have the floss box that holds the skeins and the floss cards, but that can get clunky to carry around.
I did google and found a few things that *I* liked. I *loved* the look of a binder of floss cards. I wondered how well the floss stayed in the little holes, and then I came across this tutorial:
http://ruthsfiberphotos.blogspot.com/2011/01/embroidery-floss-storage.html
I hope that it helps!
Ida
I am a huge fan of the project cards with holes on the side and a space for the symbol/number. They can be purchased easily and cheaply at craft stores. I always arrange in numerical order and then I write 1 thru 50 etc. on the top of each card when it is a big project. I always carefully measure each set of threads to be approx. 18″ long.
I might try to use the thread sleeves I use for my rayon thread for Brazilian embroidery. Each page has 16 sleeves, is made of clear acrylic/plastic, and has a place at the top for a label. The only thing missing on them are punched holes so they could be put into a three ring binder. But they fold into thirds easily and can be slipped into a page protector to go into the binder. I’ve never tried it for cotton threads, though, so I’m not sure how it would work. 🙂
I am working on a project with over 100 thread colors. I have used zip lock plastic bags especially made for thread skeins. Each one is numbered according to the DMC number, then put in numerical order on large snap open rings (4″). That system will fit all the criteria you listed, I believe. I love the idea of a family project. Have fun!
What I have done is this–take a skein of thread and put it in a sandwich bag with a sticky inside with the name and number of the thread. I then staple maybe 10-12 bags together on the side of the bag. You can then get right to the number you want and if you have thread left over you can put the pieces in the bag for future use on the project. I found this to be right for me. I am going to start a project with about 200 colors so that is what I am going to do. Hope this will help you. Maybe there is another method but I like this one as it works for me. The threads are in a bag where they should be and are kept clean. Hope you like my idea.
Good morning Mary
I am so pleased you are working on this subject and that you will come up with the right procedures.
Presently I am working on a large project and as I progress, the sorting and organizing of the threads is becoming a bit more manageable.
I use a wooden palette and I mark the holes with little tags from my pharmacist. In pencil, I add the colour number, and the symbol (not used in this project). For this project we were provided with four palettes of the DMC threads required. (109! I had not counted them before – I wish I had not!)
In the beginning I had the four palettes of colours in individual sandwich bags. This did not work well at all. I shopped at the dollar store for little plastic baskets; better,but not really ideal.
I set up the palette with the colours I think I will need for a certain area. They are mounted and numbered on the palette and way we go. After about three threaded needle exercises I decide I need another colour; then, that is not the right colour so I fumble in the baskets for more of the right colour. Keeping track of the colours used and where they are used is not a big issue here, thank goodness.
I have a ball of thread ends that grows as work progresses and I find more and more I use this; I extract the colour and thread the needle and way I go.
There has got to be a better way! With all the talent you have and you attract we should have a good procedure soon.
Please, before I finish this one.
Sharon
I have not done 200, but for a project that needed about 150 I divided the thread up by number, putting 4-6 skiens into zippered snack size bags. I also tuck in a piece of paper cut to a size just a bit smaller with the number, the symbol, and the area where it will be used first.
Then I arranged the bags in a plastic shoe box, with dividers for each hundred or so. Where there are excessive numbers within each divider I will add dividers within each hundred. I also had a slightly larger blank divider that I put in place of the bag when I removed one from the box to load my needle. When not in use, that divider “lived” at either the front or back of the box.
My embroidery box is a 2’x 2’x 3′ chest that stands nest to my recliner. Inside of this treasure chest, my floss is separated by type and by number (i.e. two compartmentalized containers hold just metallics, two variegated and four hold solids) with the numbers running from low to high/left to right/top to bottom.
The other containers hold the excess/duplicated/overflow/had a coupon/it was on sale/”I have a bunch of stuff you can have/ floss. 🙂
Trust me… this is the ONLY way to work and keep your mind in order.
Looking forward to following along on your adventure.
I often do large projects that use a great no. of threads. I do it this way. Like you, first I arrange them numerically. Then I haul out my trusty Pako’s. (Paco?- anyway thread organizers) I use these because I use multiple needles EXCEPT for blended threads. I put the symbol and the thread no. into the Pako. BTW, it occurs to me that,if you DON’T use multiple needles you could put all that into your computer and use a flash drive when you are working on your project. I cut all my threads the same legnth and hang them numerically on a large ring. You may need two rings. For blended threads, I store the symbol and the thread nos. on a strip of cardboard and put the blended needle together from the hanging rings as needed. I only use one needle – or at most two- for blended needles.
I do braid my threads because I find it easier to pull from a breaded thread but that’s just me. And all my braided threads have their numerical hang tags as well as what they are (DMC- Anchor, etc. on that tag, so it’s easy to find them on the ring.
I have not had a project with 200 threads however I have had many counted cross projects with up to 150 colours. I store my DMC wrapped onto cardboard spools and filed in number order in large plastic boxes made for this purpose. I have nearly every DMC and it takes 4 large containers to store them. When doing a new counted cross project I pull the threads and I write the symbol on the relative spool so I have two references when I search for a new colour. I keep all the thread for the project in a new plastic floss container. I try to put the spools back into the project box when I have finished, however I usually end up with spools all over the table which I have to put back in the box before they take over.
I use Loran project cards, regardless of project size. True, they only hold about 22 thread colours per card, and it’s not unusual to have several going for a project, but they do have good space for number and symbol (and yes, I very much prefer keeping the threads in numerical order!), and they also have a handy-dandy magnet at one end to hold your needle while you change threads. You can use the cards themselves to measure thread lengths. I handle blended threads by putting down the symbol with the two required colours right after the lowest numbered colour, and just store left-over lengths of the blend there.
I use Loran system also. I got the holder for the cards as well. It is were I keep my DMC floss. I have inherited my son cardboard spools and box but I love the Loran system.AWESOME! sooooo easy to find what you are looking for.
I use Loran, too. They used to make vinyl holders to store all of your floss, already pre-cut on cards. Mine fell apart a number of years ago so I made new ones out of fabric. I have four of them that hold all the DMC colors in order-it’s a pain to cut all new floss into usable lengths to store on the cards, but once it’s done it makes getting ready for a new project a breeze. I can’t wait to see what you’re making-I’ve never tackled anything so involved, perhaps it will inspire me to start a Heaven and Earth design.
Brenda, I have had several HAED (Heaven and earth designs) for several years. i’ve started one of them (The Toy Box) approximately 4 times. the problem i have with them is that they’re supposed to be stitched one over one on 25 ct fabric and they’re big at that. I absolutely cannot see to stitch on 25 ct. first i tried stitching it on 25 ct, didn’t work, then on 22 ct, then went to 18 count and that was ridiculously big too, I’d never be able to afford to frame it…lol… Then i tried eliminating some of the picture….you know like trees in the background and all the street in front of the store, etc., and that is confusing too….so i dream someday of figuring out how i’ll manage to actually get one of them done!
I use floss-A-Way bags placed on rings
Good luck on your enormous undertaking. Can’t wait to see it completed.
I would still use Flossaway bags….I label each bag with the symbol, number, brand, and color names if there is one. I save at least one floss label/ band in each bag.
In this case I would need more than one sorting ring…I place the bags on the rings in numerical order. I don’t usually save scraps consisting of more than one color, but you could create bags for those combos. (The large rings are much cheaper at office supply stores. They’re sold in quantiles of 10.)
I use the hooks..3m or Command, that can be removed without damaging any surface, on my floor lamp. One ring per hook.
I resort the floss afterwards because the bags don’t fit well in my floss storeage cabinet. To reuse the bags, I cover the old info with an adhesive blank address label.
I hope this helps someone.
Sally
Mary,
I have a few of these projects in progress. My method is to use the DMC Stichbow system. I put all of my floss in the Stitchbow pages in numerical order, and then I put them in a 3 ring binder. Cut lengths are wrapped around the middle of the Stitchbow where it has the part for the thread label. I am working on 2 Golden Kite patterns, and they have several blended threads as well. For those, I keep some floss bobbins handy. If I have leftovers of the 2 colors together, I wind them up on the bobbin, write the 2 color numbers on the bobbin, and put the bobbins on a ring. I don’t put the symbols on the Stitchbows, but there is room that you could put it on there if you wanted. I keep a pencil pouch in the 3 ring binder, and I put extra skeins, the floss bobbin ring, etc in there. The binder is easy to close up and portable. That’s my system!
I use Floss-A-Way bags…carefully labeled, and placed on a ring in numeric order. I do many projects which use lots of threads and this works well for me. I can cut lengths of thread and store them in the bags until I need them, or just leave the skeins intact and cut as I need.
I have two HAED designs on the go …so I organise mine by thread number on home made thread organizer cards. I printed out the thread symbols (enlarged them) and stuck them down on the card with sticky tape. I cut off lengths of thread at the start of the project and put them on the card. The rest of the skeins of thread are kept together in a see through ziploc baggy. Not sure if any of that makes sense 😀
I’m really looking forward to reading how you plan to organise yours!
Can I also just add that I think your work and tutorials are fantastic. I’m a counted thread stitcher more than surface stitcher but I love reading about everything you do and am seriously thinking of giving some of your fancy stitches a go 🙂
Thank you for sharing your knowledge and skills 🙂
Thanks, Thoeria! Yes, that makes sense. I’m glad you enjoy Needle ‘n Thread – and yes, DO give surface stitching a try! It’s so much fun! And you can always use them to add details and texture and so forth to counted work, as well.
The most threads I’ve worked with in a single project is 102, which is when I came up with the WPO (Working Project Organization) I’m about to describe:
For pretty much any ongoing embroidery, I use the empty trays from Oreo cookie packages (which you have to wash really well, unless you don’t mind your thread smelling like Oreos) to arrange floss cards (aka bobbins) in order by number, not by color group. To the top of each floss card I attach a sticky-note with the color number and stitch symbols, which means I can find them at a glance. When not in use, the trays stack nicely inside a simple clear, plastic shoe box, along with the pattern, scissors, needles, and whatever else I happen to be using. For me, it’s an efficient and tidy way to mind works in progress.
Hi, Liz – Oreo cookie trays pre-suppose eating Oreos, which sounds like a really good system, come to think of it. It increases the preliminary work, I suppose…twisting those cookies apart…dunking in milk… I don’t know if I could handle that kind of strenuous labor, but it might be worth trying! 🙂
Twisting Oreos apart and dunking them in milk limbers up your hands and fingers for long sessions of stitching.
😉
Dear Mary
I’m afraid I’ve never tried to organise 200 threads for a big project before, the most I’ve ever attempted was when I embroidered the Trish Burr’s Camellia Japonica with 37 threads which I thought was a lot. I wouldn’t know where to start to advice on organising such a big amount of floss. I agree with you that organising them in number order seems to be a logical way of doing it and the 5 points you have made are important. I can’t wait to see the design and I’ve not tried tent stitch either so looking forward to seeing your development on this project. thanks for sharing the threads and your advice on organising a large amount of floss, Good Luck.
Mary, I started a cross stitch project that uses a ton of colors and most are blended. I, too, sorted those colors by number and put the blended colors behind the first number; in other words, if you have color 1, then a blended color of colors 1 and 8, I put the blended color(s) behind the color 1. When I say behind, I wrapped ALL the colors on bobbins and have them in a divided plastic container designed for embroidery thread storage. The bobbins have room at the top for the label of the color numbers and symbol, which were provided by the company I purchased the pattern from. As an aside, if your design has mostly “confetti” stitches I would suggest you “park” your threads, I find it much easier and quicker than stopping constantly to end your threads.
Extreme Project………… 200 threads, good golly molly! Mary have you thought carefully about this project? Still I am eager to start seeing pics and reading about your progress. How much time do you estimate it will take? Good luck
Hi, Marianne – no doubt, it will take years. And years, probably. And maybe even more years! I probably didn’t think about it as carefully as I should have!
I put my floss on bobbins that I can label with office-folder stickers. You know the weensy rectangular white ones. They fit neatly on the bobbin and you can put two, one on each side. Then, after it is on bobbins, I stick it into a divided craft box about 9×12 (more or less) and organize the bobbins in the rows depending on the project. :-)I do it that way because the craft box fits in my grab-and-go box and I can use it on the road just as easily as at home.
Dear Mary,
I am so glad we are addressing this topic as it is one that has ‘needled’ me for years.
I read through all the comments so far and find that in the nearly 50 years that I have been doing cross stitch (and loving it) I have used quite nearly all of the methods suggested by your readers.
I am still not happy.
The one I started with and have continued with through all my experiments is the plastic bobbins which came with printed numbers (a plus as they don’t wear out) and placed in plastic boxes to hold them in numerical order. At one time I owned every color of DMC thread and had wound every bobbin with the thread. The boxes keep the thread organized, clean and available. However, the threads are now ‘kinked’ as I take them off the bobbin and that annoys me.
When I smock, I go to the trouble of ironing the threads before I use them. I have also run them through a damp paper towel before using them. Still a pain.
I have one other problem with this method. I am a sewist and I pay attention to the grain of the thread. (You have addressed this in the past.) It matters to me though I know it does not to everyone. Because it does to me, I test each 6 strand thread length before I cut and use it. I lay my threads in the same fashion at all times so that I know the direction of the grain and then I replace the unused thread back on the bobbin so that the thread is in the direction I want it to be for sewing when I use it again. (Yes, I know, get a life!)
However, I once saw a woman’s work perhaps 30 years ago and it was so extraordinary that I searched to find out how she did what she did. These were the tools I came up with and for those 50 years I have liked the look of my embroidery.
I just still don’t have an adequate storage system; so I am hoping someone does!
PS I have a son-in-law who is an engineer and an inventor and I have even enlisted his help in this. So far, nothing; but stand by.
Floss
Floss, thank you for saying that about not liking any of the results tried to date. I am with you and am back to thread drops for this large piece I am doing. My issue with the piece is not really having decided in advance which colors so I have several shades of many colors. I am NOT going to count them. I think I will use thread drops keeping shades together light to dark. Numbers don’t mean anything on this one; picking the right shade is the thing by eye. I hope Mary comes up with something wonderful! best, all, C
Mary….Largest number of threads I’ve worked with is about 30. I tried several ways of organizing and finally settled on putting each color in a small clear plastic snack bag. I labeled each with the color number and symbol. Then using a hole punch made a hole in the baggie and put them on a key ring holder that was easy to open. Worked pretty well.With 200 colors I would separate them into groups of 10-20 and put each group on a ring. I cut some thread in each color and threaded at least one needle which I put on the bag. When working with a few colors over a large area, I took them off the ring.
This may be as clear as mud…but I think you can get the idea.
I love your site and start every day with the latest post.
Lynne
I like using the small ziplock bags with the holes in the corner. I can put several skeins of floss/thread in each baggie as well as cut threads. It also keeps them in numeric order. Or, they can be grouped by motif, etc. The downside is that they are sort of bulky if it is a really large project.
I don’t think I’ve had 150 colors in any particular project, but I do a fair number of projects with blends so you end up with 100+ symbols.
If I’m doing a “small” project (20 colors or less), I make a floss card out of a cereal box or a cracker box and have it organized numerically. Or I just put the bobbins in a sandwich bag and wind the excess back onto the bobbin.
Larger projects I make a floss card (or 4), but I’ve found having it organized according to the project legend saves me time to find a particular symbol. I number the floss cards and draw on the project legend where each card starts/ends so I know what card to look on.
I tried making project cards in approx areas the symbol was used…took a lot of time figuring out where symbols were, and hassle when a symbol was used in separate distinct sections. I don’t recommend this way.
Meanwhile, I’ll have a baggie (or a plastic box currently) with the ‘project master’ bobbins/skeins which I periodically use to refill my project cards. If I know a certain color will be used a lot, I’ll cut 2-4 lengths to put on the cards so I don’t need to hunt for the bobbin/skein until much later.
I also use 2 bags for colors, 1 for colors currently in use and 1 for colors as of yet untouched, so I’m not digging through 80 skeins/bobbins, only 30 at a time. Although it usually ends up being 80 by the mid point of the project.
As soon as a color is finished, the bobbin returns to my master set. If it was a partially used skein (I don’t put colors on bobbins if I know I need more than 1 skein of; or more than my bobbin likely is holding currently), I’ve got a baggie for those that sit on top of the master set.
I also mark my working copy legend to remind me that various colors were returned in case I missed a stitch somewhere.
I use small baggies that are made for thread storage. The size of my bags are approximately 3×5 inches ( I didn’t measure them.) each bag has a punched hole and a white area to write down the color number and symbols if necessary. I thread each bag for my project, according to color number, onto a large ring that can be opened and flipped closed. This system works for me because I carry around only the threads needed for my project and cut thread lengths can be put back into the bags. This system also works when the occassional uncooperative skein that wants to explode into a mess of threads. Simply put it back into its bag and worry about it later. 🙂
i have stitched a project with almost this many threads. I used a box of regular mailing envelopes, not the full business size, but the smaller ones. They are not in front of me right now – maybe 3×5. In the upper right corner of the envelope I wrote the thread number. I stored them in numerical order in a plastic bin with a locking lid and a handle. It was simple to carry and the locking lid made sure I did not spill the threads.
I use Floss Away bags on rings. Each bag has a hole punched in the corner and can easily be moved from ring to ring. I often will have several rings and move bags as I finish in an area. There is also a place to write color # etc.
I like Thread Drops too, but prefer the bags for a long term project to keep the threads clean.
I’ve found my best option for any sized project is to use the Floss-Away bags on a large ring. If there appears to be too many for the ring, I use 2 rings. If using DMC or silks, I arrange the floss according to their numbers with lowest to highest in order. If using dyed floss I put them on the ring alphabetically. Any leftover pieces of floss go into the corresponding bag to be used when needed.
Looking forward to seeing what you decide to do.
Jan
I’m currently working on a portrait of my cousin and his fiance for their wedding, a 16-page pattern. First, I bought a plastic box, made for holding floss, specifically for the project. I taped the color chart to the inside lid. I bought tons of cardboard bobbins, and put the symbol and number for each color on it. Because I work in columns, I only take out the colors needed for the column I’m working on and leave the rest in the box.
I have never done anything quite that big but I will loosely wind all the floss on plastic cards, attach the sticker with the correct DMC number (I add an “A” or “C” to the number if it is Anchor or Cosmo) and store them in numerical order in those inexpensive floss/craft organizers you can get at Walmart, JoAnn’s, or Michaels (the plastic ones with little dividers that separate things ever five skeins or so and are usually right by the plastic floss cards and the sticker pack of numbers). When I use part of a thread, I just loosely wind the leftover on the plastic card. This works for me – costs nearly nothing and keeps my floss protected and in order. I am looking forward to hearing what you come up with!
Here’s what I have done for large projects (like Theresa Wentzler’s Peacock Tapestry): First I take the key code (symbol & floss number) and enlarge it on the copy machine until it is large enough that I can use a paper punch to make holes for each symbol. Paste the newly enlarged key onto something like a manilla envelope or light cardboard. Something stiff but still punchable. Luckily TW had also grouped colors together that were used in different sections, e.g. tree leaves, so I could also cut the long lists into smaller card sections. Since most of her colors are blended I found both skeins of floss, pulled out a matching lenght of each, pulled out a strand from each length (to be used in my needle), hitched the remaining strands of each length on my color card. The skeins were tossed back into a plastic zip bag. It would be 5 more lenths of use before I would need to retrieve the skeins again. You could always cut a second (or third) length if this color will be used a lot. I think I just had all my skeins in one large bag, but you could easily use multiple bags (floss ring?) to make it easier to find the whole skein again. But the important part was having small amounts of floss easily found on the enlarged key code card. If you don’t need an entire length of your blended threads then after stitching it is easy to hitch them back onto the card.
I’ve done several projects with a large number of threads including a lot of blended ones. After several failed attempts I settled on this:
I take a file folder (or two or three or…) and punch holes in one of the sides. I mark each hole with the thread number as well as the symbol on bottom of the hole so I can see it after the thread is added. This way I can pre-load the holes with my blended thread as well as the single color threads. When I’m stitching, I just flip the threads over the top edge so I can see the color/symbol. I use file folders because I can close them over the threads and keep the threads from getting tangled, knotted, dirty, etc. and they are easy to store when not in use. the threads are easily accessible and can also be replenished easily. And file folders are inexpensive and easy to find.
Pat L in SJ
I’ve done 90 colors . what I use is:
1. Your thread list sheet in a plastic sleeve. And I attach a small binder ring to hang it from my stand.
2 My threads go in floss away bags or any type of small plastic bag numerical(eg. DMC. The bags are on a large binder ring. With 200 I would use 2 rings.
For the specialty threads I would again put them in bags on a binder ring and put them in order of how they show on the thread list.You can hang something from each ring to identify which is the first and second ring.
I needlepoint a lot and the yarn I use comes in huge hanks, but I discovered the same process for DMC,silk, embroidery works great. I will be sending you a separate email with the photo of how I prepare the threads for my proyects, even when there is left over, the threads/yarns remain solidly held and never tangle.
My apologies for not explaining in my photo message, the following. The nice part of all this, besides not tangled threads, is the fact that one holds one thread at a time from the bottom of the braid and pulls. Only what you need is in your hands ready to begin your needle work, the rest of the braid is nice and tidy.
Hi, I remove the paper on the skeins and wrap them on plastic cards which I put the number of the color. Then I store those cards in a 15 x 18 x 3 (approximate)tackle box in numerical order. It came with dividers to help the cards not fall over.
Hello Mary!
I do lot of hand embroidery -needle painting . It involves lot of threads . I organise the threads a simple way in the following order
1. Choose all the colors .
2. I have a dairy in which I write down all the selected thread numbers which I do it for two reasons –(A) It is easier when I have to refer to a particular shade .
(B) I write down the number of the threads I use for calculating the cost .
3. Then I sort them and put each set into different transparent plastic covers with a paper slip indicating where these threads are to be used .
These three steps I do in one day . I donor like to linger on choosing colors . What comes first to my mind I stick to it . Otherwise I feel I will be forever choosing the threads colors and not doing the actual work !!! I know lot of people will think it is wrong ,but this works with me well .
That’s it .
By doing this , I find it easier and saves lot of time and frustration!
I have a similar long term work in progress.
Because I have my DMC threads on the trusty plastic bobbins in floss boxes, they are already in # order. I also use the flosses for other projects, so I did not want to just pull all the colors out of the boxes and have to go looking for what I need.
I made 11×3 inch long cards of poster board with half inch slits down both long sides about an inch apart. I then label each slit with the color # and coordinating symbol. I put these in the same order that they are listed on the pattern. Then I cut equal lengths of the flosses for that symbol and hold all 12 strands across the card in both slits. When I need that particular symbol I separate one strand from each color and mix it in the needle. If I have left over thread I just put it back with its symbol for next time its needed. Sometimes I’ll even leave the needle in if its a combo I have to go back to frequently.
Because this is a project that has been going on for about 2 years so far I store the cards in a shoebox type plastic bin and store my scroll frame in a pillow case.
Hmmm…I suddenly have the urge to pick up the project 🙂
I’ve not used this many threads….but saw this on a site where a man was doing 200+ colors and think I would also try it……create a long hard-padded pillow…..narrow and as long as needed. Along the bottom of the pillow is sewn washers that will hold the skein of thread. The info is attached to the top of the washer and the needle is parked in the stuffed pillow just above each flossed washer.
Then this long stuffed pillow can be sewn, tacked, or someway attached to the piece or the table or area where you are working. If you want to attach fabric to the opposite side of the washer side…..it may be rolled up and taken with you without disturbing the flosses or needles.
I’ve not tried this, but think it might be an excellent way of handling hundreds of colors in a neat and orderly manner
I keep my DMC cotton threads on large bobbins so the number is clearly visible. All other threads are kept in floss away bags. Easy to organize by color, number, name, etc.
For my cotton threads I just use the little cardboard bobbins. I have all the DMC cottons, some other brands of cottons as well. But with the cardboard bobbins I can store them in order, they don’t take up a lot of room and for a project I pull the colors I need and put them in a smaller floss box. The largest number of colors I’ve had to use was only 120 but this method worked fine. Plus I can wrap any leftover bits on the card as well.
The baggies: I’m not sure how people keep their thread from tangling when taking them in and out all the time. I’ve tried the project cards, some with slits, some with holes punched in. The long dangling tails of floss was messy for me.
Some people don’t like the dents in the flow when they near the end of the cardboard bobbin but it’s never been a problem for me. As I stitch, the little kinks in the thread never show up.
There is an organization system available at Nordic Needle called Annie’s Keepers. It fills the requirements listed, but the downside is the cost compared to the other methods. Well worth it for dedicated stitchers who use cut threads. I had to find another method for threads that I don’t want to cut and for that I wind a skein around a piece of Soft and Stable. It can hold as many yards as you need it to, won’t put kinks in the thread, is lightweight, and I staple the label right to it.
🙂 aha! Funny you should mention that!
200 is more than I have attempted, but I have done projects with around 100, including blended threads. First, they must be sorted & stored numerically! I use Floss Away bags, 20-30 on a ring, kept in rectangular baskets whose sides just a little shorter than the height of the bags. Anything that would hold the bags in place upright so the color numbers are easily seen would work. My baskets have handles that fold flat so they are super easy to move. Each floss # gets its own bag AND each blended combination gets its own bag. If #613 & #839 were blended, it would go directly behind the #613 bag. I cut strands of the blended threads to desired length, wind them around 3 fingers & insert in bag. I find they stay nicely & do not tangle. If only a few stitches are used, the loaded needle goes right back in the appropriate bag waiting for its next use. It is interesting to read other people’s solutions, and I am eager to see what your is. Also eager to get a better idea of your project.
I use my own little ‘kit’ system. I wined my colors on bobbins and put them in a little clear box with my project. The only issue is I’ve lost my box! LOL
I think STARK PANIC is a good response to 200 colors, plus blended needle colors!
LOL. For my bigger projects, I use the pre-punched cardboard cards and write the correct number and symbol on them. I like the one idea about cutting 60inch lengths, and doubling over with a knot for convenient cutting of threads as you use them – much better than pulling a thread out and putting it back in again!
I tend to like loop starts, so I’d double that over again, so I’m stitching with a length of 9-15 inches. (Most pre-cut thread in kits is 18 inches.)
But Mary, I have to ask. Considering all those blended needle threads, did you pick up a HAED designed by Teresa Wentzler? (Because that’s kind of a scary thought!)
-Monika in Mobile
Hi, Monika – The originally design was a painting of a Madonna & Child by a Spanish artist (named Vidal) from the late 1800’s / early 1900’s. I’ll talk more about it when I get to that whole “Start Stitching” point…
I’ve done several large projects, and here’s how I handle the threads:
Get all threads onto a large table or other large areas.
Separate different sizes floss and pearl cottons etc.
Gather a box of zip lock type bags.
By just looking at them divide the colors into color groups. Most colors are consecutive in number.This will break down the sorting time.
Put like numbers together and label them.(Ex.100-173 etc.)
Set up the Indemnification System.
I save heavy cardboard from Kleenex boxes,good quality cardboard etc.
Cut to desired size like 1 and 1/4 in. by 7 inches. From your stash make or buy a bag to hold your threads. Cut off an 18-21in of the thread. This will be the size you put into your holes. Punch about 10 holes down one side of your 7in cardboard, about 1/2in from edge. This is all to your own liking but this is how I do it.
On the other edge of the 7in cardboard write the number of the floss and draw the icon for that color. (EX. 1046 #,or 739 <).
You may need 10-20 bags depending on how big the project is.
Put the name of the project on the top of the card. EX
MY BATTERY DIED,CONT,
“Home Sweet Home”.
You should keep all Identification Cards together and labeled well so you can “find it fast”. This may seem like too much time sorting and labeling etc, but the better organized you are the more fun you will have stitching.
I have done probably 50 or more projects. From 1 color floss to over 80. Hope this method along with your own tips makes for “Happy Stitchin”.
I keep my thread in zip lock bags according to colors. Have done for years and it works well. Have used tool boxes as well as craft boxes. Both work well. Trays are useful for small items.
I love counted cross stitch and have made fairly involved stockings for my family. The stockings require at least 30 colors and sometimes up to fifty(far short of the 200 required by your project0. There used to be a system on the market the involved two 3 inch rings and little zip lock baggies, it’s no longer available. I have resorted to buying snack size zipper baggies punching holes in them and treading them on the ring in numerical order. I would still prefer a better option but have yet to find one. I hate winding the floss onto all those bobbins and they are quite unruly when you have very many.
I have a Theresa Wentzler fairy in the forest that is cross stitch, with about 120 colors. I ended up using small plastic zip bags (about 2″ x 3 1/2″) which you can find at a Hobby Lobby or similar store. They are useful for beads, etc. and they also seem to work well for precut lengths of thread, assuming you coil them loosely. On each bag I put a stick-on label with the symbol and the color number(s) of the threads. They all live in a big bowl, and I fish around and extract the ones I need for the particular section I am working on. Good luck!
I think 50-70 is about as high as I’ve ever gone, so I’m no help. Can’t wait to see what you come up with. I use the plastic-baggies-with-binder-ring method to organize ALL my DMC thread, but I find it a bit cumbersome.
You have to show us what the project IS. I’m dyin’ over here!
I also organize my embroidery threads by number but mark each skein with the pattern symbol using white Post-it tape. I wrap the tape around the skein over the larger label. It can be easily removed when the project is done. I use a fishing tackle box that has lots of slots in hinged trays that open up and out revealing all the threads needed for the project. The bottom of the box is handy for other items. When colored symbols are used I photo copy the page in color, cut out the symbols and apply them to the Post-it tape. I make fewer mistakes using this method because numbers sometimes scramble themselves while I am looking through the skeins (635 may become 653 in my thoughts). When the skeins becomes too small for the label collars, I wrap the remaining thread around a plastic thread card and label it with the number and symbol.
My thread collection has grown significantly since reading your blogs. I am always on the lookout for good storage boxes that keep things organized. Your blog and website has brought me many hours of learning and fun. Thanks so much!
What I do when I need to make a project card for a project with colored symbols is I just make sure I’ve always got a variety of (gel ink) pens.
So I always have a green, blue, black, and red on hand.
The downside is my attempt at drawing the symbols can be sadly lacking and not look much like the actual symbol.
I agree with you Mary. If you are working from a chart or by symbols, it would be easier to find what you are looking for with your threads in numerical order. However, normally I just have my threads in color hue order from white to yellow, etc. ie. rainbow.
The last time you asked this question it rolled around in my head forever. When I started using floss again this past year I knew I had to find an answer. I use 3×5 index cards, glue stick, hole punch, floss-a-way bags, felt tip marker & a large ring.
I fold the 3×5 index card in half. Using the glue stick glue both sides together. Blank side
out. Make a pile of them. I have some next to me at my computer. Using a hole punch…punch a hole at least 1/4 inch from the edge corner. I do it on both sides. I then pick a floss & pull it out & fold it to either 18 or 9 inches long. Loop it into one of the holes on the short side. Write the number on the card & put in the floss-a-way bags. If you have a pdf file of the chart symbols you can take a snapshot of the symbol, print & glue it to card. The extra hole is used to put the card on a ring either in the floss-a-way bag. Hope this helps you on your quest for the perfect filing system. This can also be used for fibers other than floss.
I have never used 200 colors, but I have done projects with close to 100. I organize my threads the same way I store them: in snack-size zipper bags and on rings. I have had every color of DMC floss for many years. I have 3 large rings on which I store all my floss bags. They are kept in a clear plastic box. I take out what I need for each project and keep them on smaller rings while I am using them; then they go back when I am done. Of course they are sorted by number! I confess I am a little surprised that people wouldn’t do that naturally.
I don’t pre-cut them to length, but you certainly could. The nice thing about using the bags is that you can keep leftover pieces right there. If you are using blended needles, you can just put each color back its own bag.
Granted, I have never organized 200 skeins of thread (omg! just the thought ) but I have done around 50. The method I use is thread cards organized by color and number and it works quite well.
Mary,
I use the floss away bags. Then I label my chart 1-200 or whatever is needed for the unique number of symbols. I will then put the one or two or three skeins, or whatever is required for each symbol, into the bags and store them on 2-3 large rings (the kind that hinge open) and keep them in numerical order.
This does mean that for colours that are used in more than one of the symbols I have to have more than one skein of floss but I find that worth it rather than putting bits back into the correct bag. I can also just dump the whole needle, with the floss still on the needle, into the bag.
This system also allows me to pull out a smaller subset of the bags when I am working on just one section of the piece.
I have done this for years now and find it the fastest and easiest way to stay organized.
Heather
while I was home on medical leave in February I organized all my threads. I put each one in a Ziplock snack baggie and labelled the bag. I then put them in numerical order in the pretty photo boxes Michael’s has (they were on sale because our local Michael’s was moving to a bigger location). Now when I have a project I just pull the bags and put them in a dedicated project box; once done they return to their original location. I stopped winding my threads because I didn’t like the kink that was created. It also was problematic if only 1 or 2 threads from the cut piece were used – I hate to waste thread. Also, some of my specialty threads now come on spools – so the system works for them as well. I did think about punching a hole in a corner and putting the bags on rings, but I have to say I like this system better and they are out of the sun.
I’d have to go along with the Floss Away bag votes. I like that the bags have a write-on area so you don’t have to deal with tape or labels or sticky notes. It’s fast to set up and fast to use so you don’t lose stitching time. It’s the best way I’ve found to do blends, also. I don’t use the rings; I have the Floss Away totes which hold the bags upright so you can read the labels easier. Even people who like the rings might want to use a box of some kind for 200 threads, though! I’ll be interested to see what method you’ve chosen, Mary.
I have always put my floss on a bobbin – with the number and filed them numerically in a floss box (now up to 19) when I am working on a project – I pull the floss needed, keep numerically in a smaller box, take a piece of notebook paper and write the numbers down with the symbol. Using a different needle for each color, I staple a piece of thin batting to the back of the paper. Whenever I need a new color, I have the symbol available with the color I need.
I’m doing a cross kit of 100 colours. The way the colours are laid out on the instructions means I loose a lot of time to searching for the correct colour. I will be changing the way this is set out before I return to the stitching as it has put me off it. I’ve had the kit since Christmas 1997, first pressie from my sister in law after her return from the states where she’d lived for 12 years. It took me till this year to brave doing it and I’m a seasoned stitcher, several weeks of trying to use it in its current form has meant I’ve not touched it for a month.
Good luck with your project and I will enjoy watching it develop.
Wow! 200 colors, That is ambitious. I too use the little plastic card bobbins and place them in a plastic thread organizer in numerical order. You would need more than one organizer, but that has always worked for me.
Hi Mary,
I store my DMC threads in the Iris Slim Project Cases so that they stay clean. For small projects I just lay them in side by side.
For large projects I take a piece of card stock which I cut long ways. so now it’s 11″ by 4 1/4″. I then punch a hole down the one side about 3/4 of an inch from the end and between each hole. The width between the stitches is dependent on the type and amount of thread.
I then write the thread number and the dye lot code above the punched hole. I then remove the threads from their packaging, fluff them up, and unfurl them so that they are longer in length. I then slip one end through the hole and pull the long end through this slipped end.
If you the length that you want to use is going to be consistent throughout the project, then open up the skein, cut through all of the threads, and using a slip knot, slide them through the punched hole.
As you separate threads, you just slide the looped end of what you haven’t used through the hole, loop through the slip and make sure that these pieces are lying on the top of the skein or slightly to the side so they are visually separate from the rest.
If I need more than one skein and if I cross over dye lots, I make sure to put the 2nd skein in a separate punched hole, noting the dye lot color.
Several of the punched cards will lay nicely in the Iris Slim Project cases and you can stack the cases.
Oh, I also print labels to stick to the top of the case which contain the name of the project and what threads are in the case.
I find my Iris Slim Project cases at Michael’s and I always wash them using hot sudsy water before using them.
I also use the Iris Slim or the regular Project cases to store the project. If it’s large, it gets put in a pillow case.
Hope this helps!
Cynthia M.
I am a bag lady and have been for years. The little “Floss Away” style work great to put them on a ring or two or even in a box. The only problem I have encountered with the bags is that the holes are in different places depending upon the company you can find making them whenever you need to buy more. But a small sniped X in the appropriate space takes care of that.
My method is simple. I keep all my floss in clear plastic snack size zipper bags. They have a hole punched in the top left corner (reinforced with clear tape). Using a black permanent marker I write the # on the bag. They are stored numerically in clear shoe boxes. When I need them for a project, I take them out and place them on a large binder ring, keeping them in numerical order. Small scissors can be placed on the ring for transportation. I add other bags for blending filaments, card of needles, etc. I don’t use pre-cut threads, but this method would work well for that as I store the left over short bits, etc in the same bag.
I haven’t done it, but it would make sense to me to use a 3×5 index card with a hole or 2 punched in it for the thread. Either write on the card or use clear tape to add the label. Then you could hole punch the other end (that the thread isn’t through) and attach them together in bunches of 20 or so.
I haven’t worked with 200 threads but I am just about finished working on the T.Wentlzer Woodland Angel stocking & was faced with the same dilemma (abt 100 threads/combos). Although I have a commercially purchased thread organizer, I found one of the best ways to organize my “working threads” was to use a block of Styrofoam. I covered it with grid paper with well marked LARGE grids. In each grid I wrote the symbol / thread # / stitch type if not just regular cross stitch(i.e., 1/2 stitch / blended w/ metallic thread, etc.) In each grid I inserted several of the appropriate threaded needles for each area of the design on which I was working. In other words, I didn’t prepare needles for the entire project, only for the “working area”. Preparing threads for stitching specific areas e.g., hands / faces in an organized fashion, required fewer needles “on the go”. Admittedly, this is not the most portable system; however having some type of box in which you can just plop your Styrofoam (needles / threads and all)made it very easy to just pick up my work and leave it off as necessary. I am by no means a professional stitcher like you, but I hope that you might find my suggestion useful.
I’m a beginner just messing with threads, so this may or may not apply. I use a bunch 3″ x 4″ cards cut from 3/16 inch craft foam with 1/4 inch slices on two sides opposite each other. I wrap the cut pieces of thread around the foam – one multi strand piece per pair of slots. The foam grips the thread without wearing the foam – so the cards are reusable indefinitely. The foam I bought was white and can be written on with a sharpie. Cards can be cut to any size. Decks of cards are easy to handle without threads coming loose. It works well with DMC embroidery floss.
I have never had a project with that many colors. When using precut thread – such as from a kit – I use Loran cards that have holes along the edge and a space for info about the thread. I also make these when needed with a hole punch and have bought some kits that come with a version of the card – in one case, nicely set up by the company. I take the leftover pieces to be used and put them back through the same hole separately or a separate hole if there is too much of that color to fit them in the original hole.
I use this system if there are a number of thread colors being used in self-designed project for the left over pieces waiting to be used. When using skeins, I just keep them all together.
I did see an interesting system someone else uses on the Stitching Village website. She has a tray with edges that stand up that she keeps her needles, pins, scissors, etc on. She then takes clip style clothespins and marks the top of one side of each with a color number and then wraps the floss around the clothespin. I think it is a great idea and may try it. Everything other than the fabric and hoop/frame is on the tray ready to go when one is stitching.
Welcome to the world of BAPS(Big A$$ Projects) Mary…lol.
1) I keep my floss on the plastic bobbins in a central box.
2) I pull the numbered flosses that I need and put them into a smaller plastic box in numeric order. I unwind a length of floss and cut off each strand as I use it.
3) For blended needles, I make a copy of the legend via printer and after I put the flosses needed to make the blended needle I run it through the paper next to it’s symbol until needed again.
Works well for me, but i’m sure you’ll come up with something that will work for you.
Wonderful ideas to sort by number. Does anyone sort by color? I usually like to look at all of one color to be able to pick just the right color.
I store my embroidery threads by color, but for specific projects I organize them by number. There’s something very satisfying about seeing all the shades of blues, greens, yellows, etc, all together, isn’t there?
I use the spring type clothespins; one for each number being used. I put the skein of floss into the clothespin, then place them on a clothes hanger. You will need several hangers but it has sure worked for me. I use a fine line marker and write the number of the floss on the clothespin.
I surely hopes this helps you.
Carolyn
The closest I’ve come to a large project with many colors was a kit with precut lengths 36″ long and came with two, hole punched cards. The cards were 3×5″ with 6 holes on each side. Since there were 43 colors used including 5 of which were blends, it meant using 2 colors per hole. They provided two lines to write your number for each hole.
Since the kit only provided a pile of thread with no identification, numbers had to be determined based on the number of threads available. I filled up the cards with what I picked up first. On the second go round I picked out sharply contrasting colors so as not to mix them up. So no numerical organization or color blocking used but I enjoyed the wild color riot of the random mix so I decided to just leave it.
The colors were labeled on the two short cards down the middle so it was easy enough to identify. I did a simple Lark’s head knot on the card and would remove thw whole color, separate one six strand floss, and then separate a couple single strands. I would cut it in half to 18″ lengths, unused strands were always tied back on to the card immediately, keeping the working strands and singles seperately tied in the color hole to be sure to use them next. Even the blends were kept separated until use since I didn’t have the hole space.
Since the original lengths were so long and there wasn’t enough space to precut in half I’d simply gather the threads and losely wind around the card. Everything ultimately was placed in a plastic zippered bag, which I recycled from the old packaging off a sheet set.(it even had pockets to hold my scissors that the advertising was tucked in.) It held everything including the hoop.
I do like the cards but in the future would precut the proper lengths would use only one color per hole and probably follow color blocking. I like people’s suggestions to enlarge the symbol/ number name key to be attached to the cards. And put the color card into its own baggie to help keep clean and minimize handling.
I have also used the baggie ring system which has it’s pluses but too much on a ring is a pain and ends up creating a lot of unnecessary slippery bulk that has to be fiddled with. It depends on how you’re using it I suppose.
I do like to keep a zen like attitude concerning the time spent extracting my working threads as all part of the meditative process, to be enjoyed in and of itself. I don’t have deadlines on my work so the message of relaxation is a learned result of doing stitchwork. A very good lesson to have when your life gets really hectic.
Im looking forward to seeing this project pan out for you. I don’t know how you manage to juggle all you do Mary, good thing you love it so. You’re a fortunate person to be able to have your work be your passion. Thanks for letting us come along for the ride. Stitch on!
200 threads? Not me. But lots of threads, yes. I keep my threads, by number in little plastic bags (except reels like Kreinik). The bags are filed in plastic boxes, like fishing lure boxes (I don’t fish, I am guessing that is why I found them in Sporting Goods). Different types of thread are in different sections or different boxes.
However, variegated threads are filed loosely by color family, as the colors are more important than their color numbers, since dye lots seem more important for them.
I can’t wait to see what Mary does!
Hi Mary,
I thought I would describe my system, but then realised that to use only words was too difficult, so I’ll send you an email containing photos.
Cheers
Irene
Hi Mary. I’ve never done anything this big so I’m intrigued !!!! What’s worked every time for me is to use Snack Size ziplock bags (very cheap) and those rings you find everywhere. I put threads in numerical order and then make up the bags. I write the color number and chart symbol on one end and poke the ring through the opposite side just beneath the zipper part. I finds this helps keep it from tearing through as I flip them around the ring. Yes you lose some time opening and closing all those bags. But the organization has saved me many times!!! I can’t wait for more details on your project.
Mary-
I use excel sheet and a Gnatt chart to chart projects.. like no kidding. I can send you my data if you would like please email me.
I have all the numbers listed in an excel spreadsheet along with the description, and where in the basic color wheel does it fall –
I also have a cross reference number in case I run out but may have it somewhere else by a different manufacture.
With the above data I can sort anything I want… and find colors that I may require.
Thread inventory:
I can keep track of that as well in excel – or a simple print out of a list of what I need.
Actual inventory
I only the threads I am working with for a project and put them in a clear plastic ‘project box’ with a lid.
Each thread is in a white small envelope (the one smaller that a letter size)
along the top left is the number
along the top right is the description
along the short side right I stitch with the thread so I can see it.
Tine consuming the first time – then a breeze and you can use labels for your thread envelops which makes it faster.
If you are a ‘winder’ slap the same table on the winding card for day to day work and keep the full skeins in the envelope.
Think manufacturing…
I will send you excel spread sheets if you nee them send me an email.
I didn’t have that many threads, but I did have a lot of blended colors. At the time, I was winding all my theads on cards and keeping them in a plastic container. I pulled out the threads I needed and put them in order in a new container. As I made a blended color, I make another card, added the symbol, and put them in the container. This project has four panels. I have done about half of one panel and haven’t touched it for over ten years.
In 1984 I took a class from Theresa Wentzler who designed the Peacock Tapestry this is her system which I have used and find successful for stitching with large numbers of threads plain or blended.
First organize the threads in numerical order, I used floss bags(snacks bags work if you can’t find floss bags)put the thread # on the bag and arrange them in numerical order, place them in order on a locking ring, for 200 hundred you may want more than 1 ring, you could used two or three. Purchase several packages of tapestry needles, Use a piece of fabric (decorator fabric
weight works best) across the top of a long piece of this fabric put a strip of making tape on the tape record each symbol that is on the stitching chart ( with that many threads you may need more than one fabric piece) as you thread up a needle to stitch a symbol on the chart use it, when you are finished with that park the needle still threaded under the the correct symbol, move on to the next symbol you wish to stitch and repeat this process as you work on the design. When you done stitch for the day or wish to move your stitching fold up the fabric with the parked needle and threads (I usually fold it in half lengthwise and then in thirds this this covers and holds down the tails of your parked threads, then I fold that into a compact size and store it away. It takes a lot of needles but works great. If you are stitching a lot with one symbol you can thread up several needles and park them all under the correct symbol which saves time later. Hope this is helpful. jeanie
It was only for about 110 colors, but I had a two-part system. First I laid out all the skeins in number order. Then I worked out roughly which symbols had similar colors (all the pinks or reds together, all the yellow-greens, all the darks, etc.) and I labelled floss cards–card stock with holes punched down the side. I drew the symbol and wrote the number(s) of the floss for that blend above the hole. I then cut a length of each required color and looped the cut floss through the hole. Once all the colors were “filled”, I gathered the skeins into manageable groups by number (200s, 300s, etc.) and tied each group into a little bundle with a slip knot. Then the bundles went into a large ziploc bag by number order. This way, when I ran out of thread on the punch card, I just had to find the right bundle, and out of 10-15 skeins the right number, to cut a new length.
Another advantage of the system was that I had enough tapestry needles to keep the various colors threaded. When a threaded needle was not needed in the stitching, I would secure it in the hitch keeping the cut thread on the thread card.
Hi Mary,
The largest number of threads I ever dealt with was about 125 & about 50 more just in the blends for a Teresa Wentzler piece.
I photo copied the legend cut it up and laid floss next to it so I could “see” what I was looking for. (3 pages) I used a binder with Stitchbow holders for full floss skeins in numerical order ( I only cut 1 thread of the skein at a time), then bobbin holder pages for blends. Each floss bobbin had the image and numbers taped to it. I had one floss colour on each side. I would blend 6 at a time and leave them in the center of the bobbin.
It took awhile to set up, and is much easier to see with a picture. But I don’t see a way to attach it.
I use similar systems all the time, and it seems to work for me. I completed both the Brilliant Plumage pieces.
Hope this gives you some ideas.
Hi Mary!
Organizing blended colors is really difficult question. For my experience (projects around 100+ colors) the best way is photo albums (1 or 2) with “spring”.
I try to insert pics by links.
https://photos.google.com/share/AF1QipOrQ9U37dywolaAsRzE836OopNwiRZlNFxDtPe2j6uH5RNBxWfcORzO6P76OrgvmQ?key=eHdBM0poX2s1T2tYa0VzNFE5RFdFQzlkbDhYbDN3
https://photos.google.com/share/AF1QipNzoTpuMhYK6jxBamzSSS2eO_ygGSqx8Zonyv07DB6yskNaq8LPnTn7lFMDeTNNgA?key=ek1UZlhKbWVHYVR2YlJJQjFDcnNJZVJZaHUwQ0NB
clear labeling with room for a symbol and color numbers – YES – you could use size of labels you like
accommodate pre-cut threads – YES – size doesn’t matter
space-efficient – YES – 100 threads – 1 album, 200 threads – 2 albums
neatly contained, closed up (to keep things clean), and even easily portable, so the project can be moved from spot to spot easily, or taken somewhere else entirely – YES, YES, YES, YES – the best method for these purposes
easy replacement of threads and rearrangement of threads if necessary – it depends ….
In the beginning of album I place solid colors and then blended. If thread is using in several symbols I keep it in one “the first pocket” and add it by request to other )))))
Sorry for my terrible English )))))
Thank you for your great job!
Best regards,
Anna
Anna, what a marvelous idea. I think maybe i’d use it only for the blended threads. keep cut lengths of each color and add a piece of felt as a needle keeper for needle that already has the two threads in it. i’m gonna try this one!!! much neater I think than the running threaded blended needles through paper and having them fall all over the place as I currently do….yeah, gonna try this!!! thanks!!!
I use snack bags. I can use a black permanent marker on it to label each one. Then I punch a hole in the corner and keep them in numerical order on a ring/s. This works great. Keeps them clean, organized, and easy to find. I buy the bags at the dollar store so when I am done I can throw the bags away if desired. And the whole thing is inexpensive and quick and easy to do!
I wind all the threads I buy onto those flat plastic card/bobbins and put the number on them and store them in those large A4 sized plastic thread organiser boxes, and when I have a huge project, I pull out the ones required, and I put these into a smaller A5 storage box, along with a pair of embroidery scissors and spare needle.
For smaller projects, I also have a large metal ring about three inches in diameter and thread the flat plastic bobbins onto that.
I have been using this system for years and find it to work very well. I buy 3″x4″ plastic zip lock bags on ebay (because that is the cheapest), I punch a hole in the upper left corner right below the zipper. I write on the front of the bag the thread type and ID# in large bold print with a sharpie. Than keeping the thread in ID# order I put them on a large ring. The ring size depends on the amount of plastic bags. I like this system because if you have pieces of thread you want to save they can go right into the bag. Also if you have other items like beads they can go into a bag. I keep everything for the needlework project on this ring. I also use a key tag the one that is paper with the metal outer band to label the threads with the project name because I often have a few rings set up. Hope this helps.
I like the small plastic zip-lock type bags especially made for floss. I put the number of the color on the outside of the bag, put the bags in numerical order, and depending on how many bags I have I put one of the large silver binding circles on 25 to 50 bags. You can also buy small white pieces of plastic with holes punched in them, write the series (I.e. 1-50) number on them and attach to each set so you can see at a glance which set you need. I also like this because I have a place for the cut but unused thread.
I have always wound my floss on bobbin cards with the number on them and
Keep them in plastic boxes in numerical order. I have extra empty boxes and
When I do a big project I use as many as I need to hold all threads, assuming
An extra large project will only be worked on at home. Michaels, A.C. Moore
And the like carry them. This always works well for me. Sûe in Bermuda
Mary,
I love big projects and have done some with lots of colors single and mixed. I have used poster board to make thread holders, make as many holes (and use as many cards) as it take for all the colors and put the symbol and thread colors beside each hole. Then put a length of either the single color or one length of each of the mixed color in each marked place. If you will only use a small amount of each thread, then it may be only one length of each color. When you are working the piece you will only have to search your cards, not through a whole stash of skeins for the correct thread color.
Since reading ‘The art of Chinese embroidery’ by Margaret Lee I have been using her system to organise threads for a project and I find it extremely useful. Threads stay clean and untangled,and the paper packets are easily stored in a box. With such a large number of threads I’d sort them by number and pull out the packets needed for a certain section and keep them nearby (probably in a jam jar)
I would use DMC’ Stitch Bows and put them in a notebook. The floss stays neater than rolling them on cards.
This will sound much more complicated than it is…
I use stitch bows. I even wrap perle cottons and ribbons on them. I keep them in the stitch bow pages and I keep the pages in a box so I can easily pull out them out. This allows me to put the skeins up next to each other without removing them. This is my permanent storage.
For the projects I pull the required stitch bows out of the pages and put them in a little stack of drawers that is meant to be used to store supplies on your desk (I can send a pic if you want, they can be purchased at target or Walmart for only a few dollars). They stack so you can use as many as you need to.
Now for the fun part…
I divide my stitching into smaller chunks. I use a small pencil box with a small sheet of styrofoam that fits in the box. When I begin a “chunk”, I place all the stitch bows needed in the box. The styrofoam has a grid on it. Each square has a masking tape label with the thread number on it. This is where I keep threaded needles. The box is big enough to keep a small pair of scissors, thread conditioner/beeswax, bead containers, seam ripper, etc. It all folds up quite nicely. When a “chunk” is finished, I put the consumables back in the project drawers and restock for the next “chunk”, changing the tape labels on the grid as needed.
Is that as clear as mud?
Another Sharyn with a “Y”? nice to meet ya! …lol
Nice to meet YOU! I can only assume that you are as fabulous as I…
I have been working on a giant Scarlet Quince counted cross stich with DMC thread and 28 ct Aida that has 200+ colors and mostly blended color symbols for the past few years. I have uncut skeins in ziploc bags organized by number. The I have a set of cardstock with holes punched out for cut 18″ lengths of unblended colors in numeric order. Finally I have a second set of cardstock for all the blended colors labeled with symbol and DMC numbers (also in numeric order going by the first color listed on the key for each symbol) where I put partially used lengths of blended colors. I also have gridded the entire project, and park my needles while I’m working so there are probably 30-50 needles threaded and hanging from the area I’m working on at one time to cut down on starting, stopping, and re-threading since there is tons of “confetti” stitching where there are barely 2 of the same symbols next to each other.
I have several HAEDs on the go, with 100+ colors in each. I make my own floss cards with heavy weight art paper, one page cut into 4 strips, holes punched down both long sides. I write the floss color next to each hole, draw the symbol next to that. Floss is unwound from the labels and made into a large loop, one cut, loop pushed through a hole, loose end pushed through the hole, larks head knot. One strand can easily be pulled out, remainder goes back into the hole above the rest. 2 or 3 cards go neatly into the zip loc bag along with chart, fabric, hoop, scissors and glasses, ready to go out the door.
When working on a huge project like that I would organize by color number and put in a ziplock bag w/ a label (i.e. #300-375) on it. Then I would have a working ziplock bag that has precut floss, small nail clippers for cutting floss, instructions, beeswax and needles, etc to be use for project. Inside the working ziplock bag would be a listing of floss numbers so that i can check off the one that i need to replace – from the larger bags – and also keep track of them if i run out. All of the materials would be placed in a separate tote. It is easy to transport and to keep together.
Mary,
200 colors will be a challenge.
I’ve used a variety of methods. My “core” tends to be large rings (3″). floss bobbins go on these in numerical order. Gentle Arts, Weeks, Caron (I punch an extra hole in the card) can go on rings, too. AVAS or Kreinik may go in bags on a ring, or in a box. Staples has some nice pencil holder boxes that have worked well for the spools.
The blended colors are tougher. I’d consider using something like the Loran project cards. Number blends by low/high, and list them in order?
If I have multiple skeins or spools, I may keep the extras together in a bag until needed.
You are right — organizing this in a way that makes sense to you can speed things along when stitching.
I’ll be curious to see what you choose.
I am doing eight pieces at once, by the same designer as the colours overlap. There are 257 colors of floss, all in bags, on rings (sorted by hundreds). I made an Excel spread sheet for each design and then merged. There are several colours that needed more than one skein, they are (sorted)in a plastic envelope. The piece is 33″ by 27″ so I made my own frame and trestles. It is on black 28 ct linen. I bought a package of 100 needles and thread the page before I start.
OOps! There are two sizable pieces and six bookmarks!
For most any project, large or small, I use plastic thread bobbins. I never precut my thread into lengths, sometimes I want a shorter or longer length, depending on the thread, type of thread and what type of stitch is being utilized. I cut the number off the thread skein and tape it to the bobbin. I most always use a different needle for each color and slide it behind the thread, next to the bobbin when not in use. For mixed colors, I use a piece of thin plastic with holes punched in it and tape or glue a piece of fabric to one side, opposite the holes. Pieces of the necessary threads can be attached using the punched holes and a needle for stitching can be parked in the fabric, near the hole for the threads. I use craft boxes for my bobbins, scissors, etc. Truefully, I don’t usually travel with a project that is large. Too much to take along and what if something gets misplaced or lost while in use.
Good Morning: I have tried many methods of keeping floss organized and it all ends up in a tangled mess for some reason. Anyway, a friend told me about Annie’s Keepers (http://www.annieskeepers.com/index.php)
I have been using the keepers, but just got the sliders for the current project I am doing…Crewel Twist from Hazel Blomkamp…she has 21 colors of floss. I must say that it is the best organization, for me, of so many colours. I precut the skeins to the right length attached them to the keepers, label the numbers, and inserted into the sliders. They are always in order, and I can take off 1 thread, or more from the keepers. Love it!
I use the bags. My stash is all in bags on rings, and I can quickly pull the colors I need for a given project. For projects with blended threads, I make a bag for each blend, pre-filling with 18″ cuts of each color, if I have the time.
No need to buy the special floss bags. Snack size backs work just as well–you just have to punch the holes in them. I find it is easier to do this if you hold a bit of scrap paper or card in them and punch through that as well. Otherwise, the plastic can tear. Some pre-punched bags have the holes in the margin (above the zip) and not in the bag portion, which means floss can’t leak out and tangle. However,I had a conservator tell me that floss needs to breathe, and mildew can happen in tightly sealed plastic, so I put my holes in the bag portion.
One instructor used blank business cards that she had pre-punched at office supply store. Hole at top for ring. Hole at bottom for thread (in class we added second hole for used/in-use threads as needed).
With great white space, there was room for color number and other notes. So the cards can go on a ring.. A rubber band can also be twisted around several cards for quick containment and travel.
The cards are heavier and studier than floss bobbins. I find plastic bobbins to be to slippery and occasionally rough/sharp edges that can affect floss.
I haven’t ever worked on a project with that many threads, but I have worked with numerous pieces with blended threads. I probably would keep the skeins in Floss-away baggies on a ring in numerical order. During a course I took many years ago, it was suggested that the blended threads be threaded up and placed in the edges of a foam-core board with the numbers and diagram code written on the strip. I think we used styrofoam egg cartons the first time and then switched to the flat foam core cut into strips so we were able to wrap the threaded-up floss around the 3″ wide strips when we put it away. Good luck with this latest adventure.
I have been working (on and off) on a HUGE project for the past 12 months (over 100 colours) and figure that I’ll probably be still working on it for at least another 3 -4 years. After trying a number of systems I’ve finally settled on using small ziplock plastic bags. I tape the symbol and thread number (cut from the supplied pattern sheets) onto the front of each bag and then punch a hole into the top corner of the bag. I then use metal “rings” to hold the bags in one place. When working on a particular part of the chart (e.g. page 1) I gather the bags that I need and place them together using either another ‘ring’ or a large clip. This seems to be working and really just requires a small amount of reorganising as I move from page to page. I’m onto page 3 at this stage…. only 33 pages to go!
Sorry to arrive late on this discussion . I have an old wooden Victorian butlers tray ,17″ X 24″ Lined with a couple of sheets of tissue paper . I just lay the skeins out on the tray .As for portability , I wouldn’t go far with a large project….but , say from my house out to sit and work in my summerhouse or the picnic table in the garden , then this is how I generally do it .
I have been doing embroidery for over thirty years or more and never taken the labels off my DMC Cotton skeins.I treat each one of them with total reverence , pulling gently forth the length I need , folding up and tucking back the remaining piece under the label .
The skeins of threads are beautiful to me all laid out ,the colours cheer me ( I wouldn,t dream of taking off the lovely labels and re winding them onto something else )and I relax and take my time picking out the one that I next need for my project.
My DMC cotton skeins collection are stored by colour blocks in clear plastic bags in a simple wooden needlework box beside my arm chair .
I set them by color, do NOT cut them and place each color in fold up sandwich bag, on the baf I write the name of project and color of thread with date I got/ started it. Then I place it in a clear box according to numbers on thread. If I go some place like a DR check up or test I take the threads needed. I also write same details into piece of paper and place inside the bag. With this many colors I would think it is best to write the numbers in a small jurnal and as I use the threads I pay attention if more needed to buy. Oh, when I travel with parts of the work i place the whole in a ziplock. Better safe then sory. I do not cut the thread for a simple reason use as you go and if the whole thread is not used it keep better, not tomention avoiding a ‘bird nest’ of a mess when they all cut.
I used heavyish sheets of paper and punched holes around the sides and lower edges, wrote the symbol and color number next to the holes. I cut the thread into about 18 inch lengths and tied the hanks of yarn through the holes with a half-hitch knot. Then I clipped the cards to my ott light’s pattern holding clip. It wasn’t actually that great of a system! So I will be looking for new ideas for next time.
Organizing. I’m a Virgo. I love organizing. For large numbers of colours I use my mom’s method. Take cereal boxes. Cut out long rectangles of cardboard. Along one side, cut into carboard about 1/2 of an inch. Along the other side, cut the same 1/2 of an inch directly across. From floss, cut your working lengths and put on cardboard with ends in the cuts to hold them. Write the floss number and/or symbol under the floss. You can also do your blended ones at the same time. Works for us.
I know this takes a lot of time but at least eventually I wrap them onto the larger plastic bobbins and keep them stored in a tackle box or one of the good scrap booking project boxes. As long as its deep enough. On the label that you put on the bobbin I put the company name (or initials), thread number, and its symbol. Sometimes, like a project that I’m working on now, I put the threads in baggies according to number. Like one bag is for all of the DMC 200 numbers, the next for 300 numbers and so forth. All of the baggies go into a box in numerical order. Then, as I use them I put them onto the bobbins. I will put the bobbins onto rings when I need them, like those for a certain section. Makes them easier to get to but easier to get dirty too, FYI
I’m currently working on a project with 185 different colors. I purchased my project thru scarlet quince so I gad the opportunity to also purchased premade labels, which are a god send. After sorting all the colors I placed them in a series of clear bags on different o rings. I’ve got the solid colors on one ring. Blended colors on another and duplicates in bags on the third ring. I’m using the needle needs stand which has two hooks I can hang my rings from. I park my needles right on the piece, at any given time I can have over ten needles actively working on a piece. I love, love, love to cross stitch. You start with a blank canvas and in a year or so you have a work of art for your home. Can hardly wait yo see your project. I may just join you. Maira
Hi, Mary,
Like this topic because I like thread, probably more than any other part of embroidery. I like using a plastic box with dividers. This system doesn’t allow for some of your “requirements”, but it has worked for me. I wrap the thread around a cardboard bobbin and write the name, manufacturer, color number, and symbol on the card. I also assign and attach a needle to every skein of thread. That cuts down on having to thread so many needles and allows me waste less thread.
The best part, though, is opening the lid and seeing all the colors. Sometimes I get stuck right there for a few seconds, enjoying the beauty.
I have a 1/2″ grid cooling rack, 18″x10″. It sits on a wooden frame for thread projects. The frame holds the rack 10 inches off the table so 18″ precut threads can hang over a rack wire and still be accessible. I have a 1″ cut of a fat, plastic straw through which I thread each thread color. On the straw piece, I write the color number with a permanent marker. The straw piece straddles the rack wire so no threads escape. When there are few threads left, I use a tiny clothes pin to hold them on a wire and stick the straw band onto the clothespin. The rack and frame holds 91 colors easily at a time. I have a second one if needed, though I have never gone that crazy/excited/precise. To move the thing, I can lift and carry it it all or just lift the rack right off the frame. The two are not attached, but the rack has four little feet that sit right over the framework. I could have asked my hubby to make the frame collapsible with four hinges, but I do not carry mine anywhere.
Hi Mary
I know you don’t like plastic, but I have all my threads wound on plastic bobbins which have the number marked on and that is how they are stored in “plastic” boxes which are marked on the outside e.g DMC 50-300, next box 301-500 etc. Silk boxes marked surprisingly by SILK THREAD nos: …..
I have a DMC colour chart I can use if I am selecting thread colours then I go easily to the box for that number. The plastic boxes are good to carry and keep threads clean.
Cut threads I wind back onto the bobbins and replace in box.
As a long-time cross-stitcher (don’t groan, there’s room for us, too), I have done pieces with loads of colors and lots of blended needles. You can use bobbins, where you wind your floss onto the bobbin and label it, or you can use the DMC stitchbow system, or you can use floss-away or snack size ziploc baggies. For projects where you have blended needles, I recommend baggies as then you can have baggies with both skeins of floss. Just my two cents.
I use the Floss Away bags for my threads (for 40 years now!), and keep them in numerical order. For a project, I put the bags on a ring, again in numerical order. If they are not DMC, I will put the symbol used on the pattern on the front of the bag.
Dear Mary
I’m just catching up on my newsletters and how I organise a lot of colours is to have a central stash for the particular project. I wind all skeins onto PLASTIC bobbins and arrange in numerical order in a large compartment box. I’ve done this for Teresa Wentzler’s Twelve Days of Christmas. Then in a smaller compartment box, I get all the colours I need for the Day I’m working on. When the central design is done, cols go back to central stash and then I get colours for the borders and beads. This is what works for me.
Regards, Jenni
I settled for cutting strips from a hard plastic notebook cover and punching holes in these strips. Then I printed out the numbers and symbols and glued them onto the plastic strips and then I put a lenght of precut floss in each hole, corresponding to the color and symbol. I then put each of these strips into one of those binders with plastic pockets (document file?). This holds all the charts and all the floss in one place and is perfectly portable. Then I put this file plus the fabric into a vinyl project pouch and cart the whole thing around with me wherever I go. Works for me!
My secret to organization floss for a wall hanging is: Picture This: copy the pattern using a light box; place floss on pattern copy, If I like what I see, write the floss number on copy. If I change floss colors, OK, cross out first number, add new number of floss. This idea has worked for me many years.
I did a project a few years ago that required over 120 different floss colors, and what I did was I used sandwich sized zip lock baggies, with 2 opposite thread colors in each bag. I used a felt tip permanent marker to notate the color #’s on each bag and then I used a whole punch on each bag on the top left corner (just below the zip), and put all the bags together on a large metal ring. I didn’t notate on the bags what the symbol was for each color; instead, I just used the chart to find the color I needed to work on, find the color in the bag, and then stitch using it. Any left over threads that were long enough to be used again, were placed inside the bag with that color. When the project was complete, I took inventory and was able to use some of the unused floss for future projects – doing the same process again.
I hope that helps. This was a cheap & easy way to organize, but it seemed to work for me.
I’ve done many large scale projects over the years. The latest system is sandwich sized ziploc bags with a full label put inside the upper corner which indicates DMC number, color description (in case I get messy so I can refile the skein), and pattern symbol. I then use a hole puncher and punch each bag with a single hole, underneath the ziploc part and in the same corner on each bag….opposite the label….then I file them numerically on a very large file ring, like a 4” one. If this is insufficient I will do a number of rings, clasped onto the primary, larger ring. I had previously used a jiffy marker on the front of each ziploc, but over time the writing wears off, plus the concern for grime on your project. I would also mention that I’ve used a giraffe for years to hold my work, on a frame. Make sure there is a swivel connection so you can access the back when it’s time finish stitches! Happy XX’ing!!!
I have yet to find a near-perfect solution, but so far, the Floss-away zip bags are best, on a ring, and in numerical order. I put the skein in the bag along with a bit of precut fiber around a cardboard bobbin. I number the bobbin. I am a slow and methodical stitcher and don’t mind looking up the pattern codes…I have been known to take and index card and draw the code and the write the number of the color next to it, that too goes in a floss-away bag. Also in the bags are scissors, wax, threader, nail file, seam ripper (yes, I know…) and extra needles. I might have more than one ring.