


Back to my adventures with Late Harvest, the embroidery kit by Hazel Blomkamp that I’ve been working on for quite a while now.
I don’t think I can emphasize too much how fun the embroidery on this design has been. Not only is there a ton of stitching variety in the piece, but there are elements and techniques that have proved relaxing, challenging, and exciting, all in one!
I’ve found myself anticipating the next step the whole time – always eager to stitch the next element, to try the next technique, to see the finished product. It’s like reading a really good book, where you can’t wait to get on to the next chapter!
Lately, since I finished the right half of the main design, I’ve been concentrating on the stumpwork elements. These are set up on a separate, small frame that’s very easy to hold and work on in my lap.
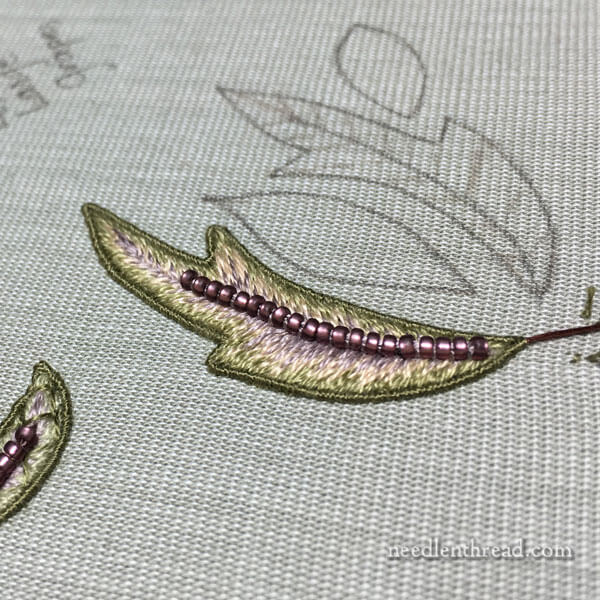
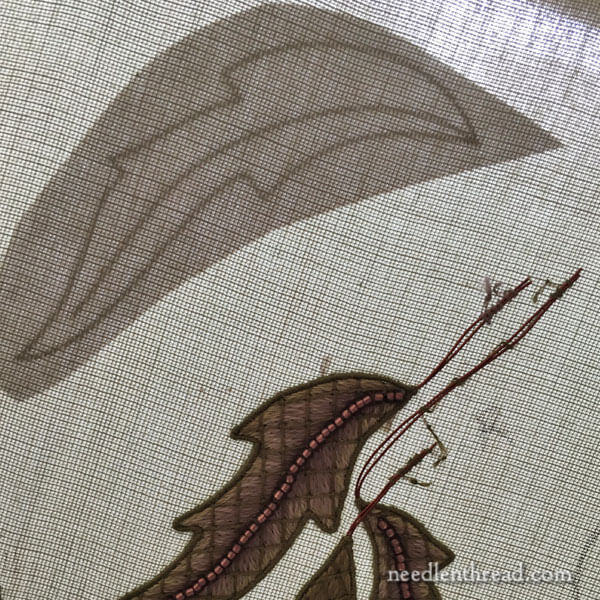
I love working all these stumpwork leaves! I think my favorite part of each of them is the wired outline. Stitching the simple overcasting on the wire (which is just working a tiny satin stitch to cover the wire) is mesmerizing, and I love watching the wire cover up with each tiny stitch.
When working some of the smaller stumpwork leaves one day recently, it suddenly struck me that some of my leaves looked really small, proportionately, compared to the photos of the finished piece in Hazel’s book, Crewel Intentions. Once the thought struck, I grew a bit anxious. What if I transferred the designs at the Wrong Size?!?
So I went back through the book and scoured the instructions. While there is no mention of enlarging the stumpwork elements before they are traced, I noticed that the “actual size” dimensions were given under the line drawings in the book.
And as I contemplated those actual sizes, I realized that, indeed, they seemed larger than the designs I had transferred onto my fabric.
So I wrote to Hazel to ask if there might be a discrepancy, and she affirmed that the designs in the book were reduced from the original size submitted to the publishers, and that she had just discovered this point recently, too. In fact, she’ll be publishing a print out of the correctly sized images on her own blog soon.
So, to fix the problem on my end, I decided to see how much of a difference there is between the specified size and the drawing. I needed to determine whether or not I should definitely stitch any of the elements over, or just leave them as is.
I decided to scan the drawings in the book, import them into Inkscape (a vector drawing program), trace them at the size printed in the book, and then enlarge them to the dimensions given in the book.
Now, enlargements of embroidery designs in a book can be done on a photocopier. Normally, though, books will give you a percentage to enlarge a pattern, so that you can just input that number into the photocopy machine, which then spits out the right-sized image. Without a percentage to enlarge the photocopy, you have to photocopy the image, guessing at the percentage increase, and testing different print outs until you get close to the correct size.
I figured tracing the design in a vector program and enlarging it to the correct dimensions would be a little more efficient.
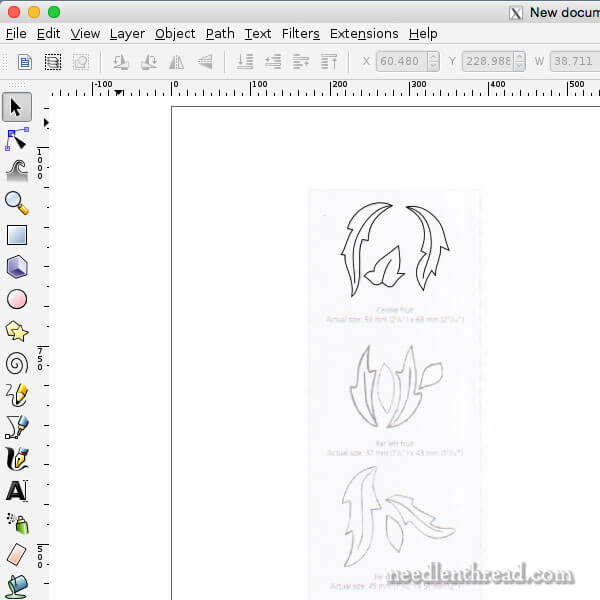
So, in the photo above, you can see a screen shot of the trace I made of the leaves that surround the central pomegranate in the main design of Late Harvest. The dark black lines on the top leaves are my tracing job. They’re traced right over the lines of the drawing in the book.
I grouped together the traced vector elements and locked the dimensions of the element so that, when enlarging, they would enlarge proportionately, length and width.
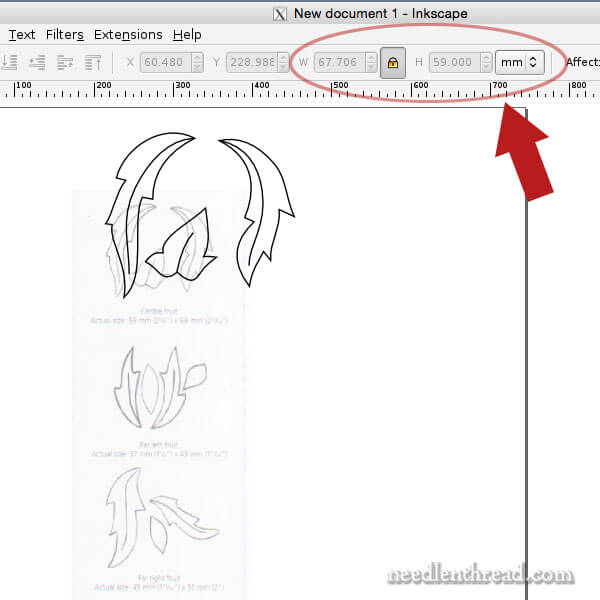
Then, I changed the height dimension to match the actual size indicated in the book. You can see hightlighted in the screen shot above where I changed the height to 59 mm. The element enlarged quite a bit – you can see the black vector lines very clearly in the photo, and behind them, you can see the original scan that I was tracing from.
Then I traced all the rest of the stumpwork design elements into vector drawings and enlarged them according to the actual size stated in the book.
I printed the elements out on a sheet of paper, making sure they printed at 100% so that there was no distortion in size
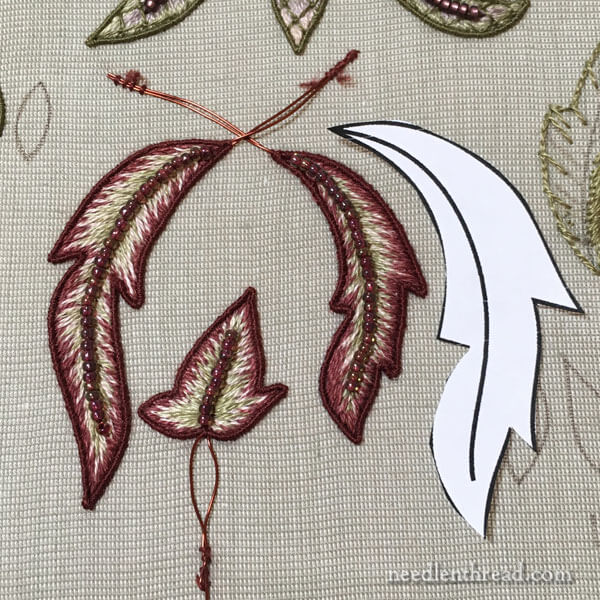
Then I cut out each element from the paper so that I could lay the cut pieces on my frame and compare the different sizes.
The biggest difference I found was in the leaves for the central pomegranate element. Printed at actual size, they are significantly larger than the leaves I originally traced and embroidered.
However, with all the other elements, there is only a marginal difference in size, and, in all cases, not enough of a difference to re-work the stumpwork elements I’ve already stitched.
But the leaves for the central pomegranate? They definitely need to be stitched again! And, in fact, I think that’s a good thing. I think those three leaves will look much better the second time around.
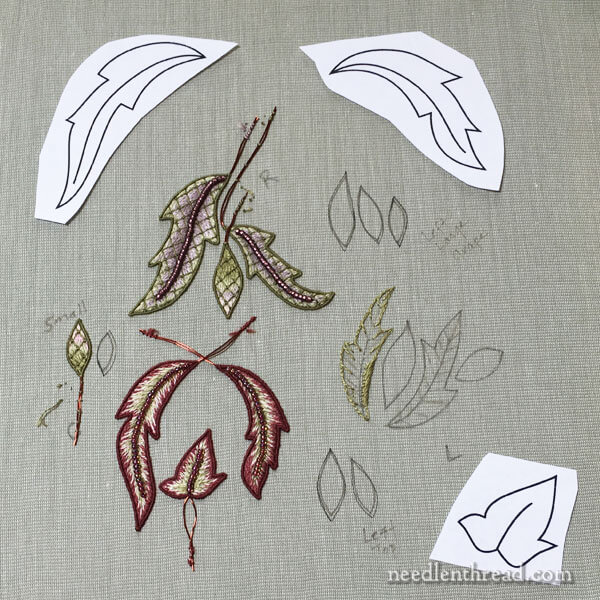
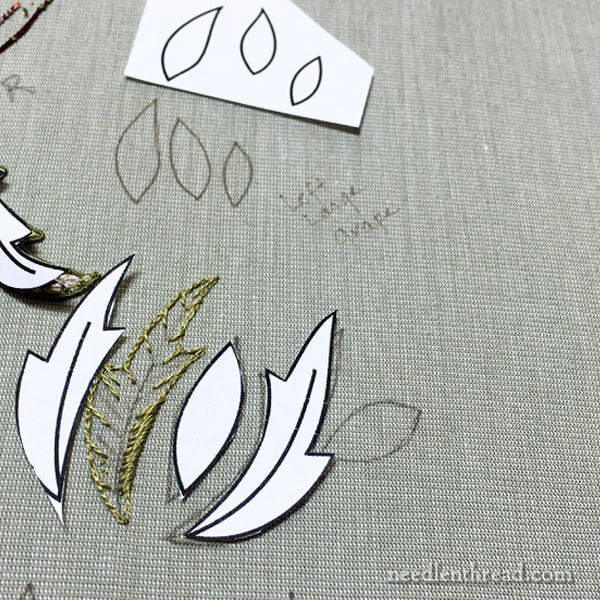
I was a little worried I wouldn’t have room on the original fabric for this group of elements, but by breaking the group up, I found they fit easily in blank spots on the original fabric.
I didn’t want to un-tack the fabric from the stretcher bar frames, so to trace the adjusted elements onto the fabric, this is what I did:
I turned the stretcher bar frame over and taped the pattern cut-outs to the back of the fabric.
Then I could hold the frame up to a light or a sunny window and trace the leaves easily.
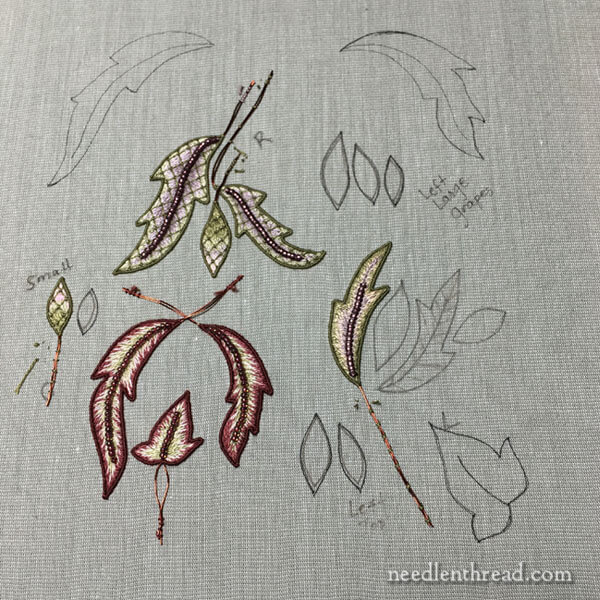
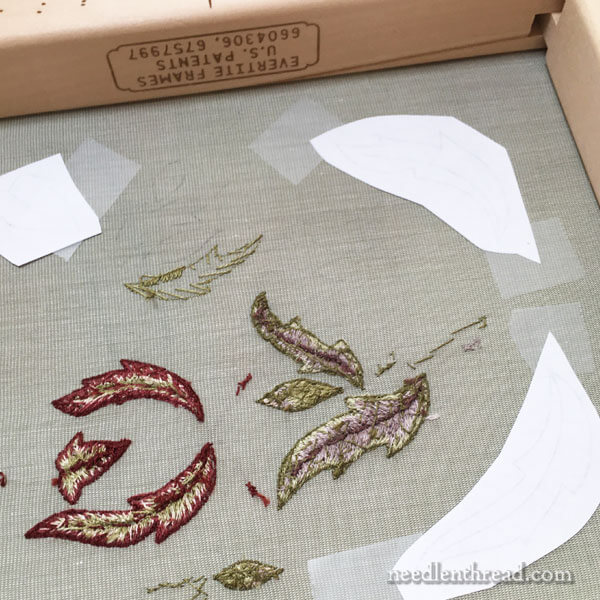
And here is my stumpwork fabric on the frame, with the adjusted elements traced on.
With the elements that are not stitched yet, I enlarged them slightly by just sketching outside the original lines with a micron pen.
Even though the design lines look a bit messy now, the embroidery will cover all those messy lines up just fine.
I’m excited to re-work the new, larger leaves. I think they’ll end up looking much better than my first attempt. Once all the stumpwork elements are finished, I’ll move on to the left half of Late Harvest!
SUCH a fun project!
Hi Mary,
I am sorry you did all that work and have to redo it. However, I think you are correct. Just think of those smaller leaves as practice pieces. The new size leaves will be perfect now.
Also, I plan on doing this design myself. I am glad I know about this now before I stitch it!
Thanks for the heads up on this.
Barbara in Texas
I’m interested to see you using Inkscape — I got it only recently (I used to use Illustrator but decided the cost wasn’t worth it for hobby purposes).
I need to delve into Inkscape more — it’s quite daunting to look at when one is used to the Illustrator tools/palette. Do you find them similar?
Always sending healing thoughts your way,
Sarah
Hi, Sarah – if you can use illustrator, you’ll find Inkscape easy, I think! There are also plenty of tutorials online. I find it easier than Illustrator, personally, but I use both, depending on what I’m doing.
Hi Mary, Aren’t you glad you discovered this prior to cutting out the leaves for attachment? Will you have enough thread and besds to do the additional stitching? I have enjoyed following your work on this project.
Hi Mary, sorry about the changes. But, the piece and your stitching are simply lovely.
Dear MaryWow I really impressed, what a great way to correct and transfer patterns. I’m glad you found out now rather then finish the piece and realise the sizes are wrong. It looks messy now but as you say it will all be covered up with the stitching. I’ve decided that I want to get into more stumpwork and I need to practice the various techniques. But I have other projects waiting which are nice but I would like to do samplers of stumpwork and the different embroidery techniques. Thanks for showing us how to correct mistakes I will certainly remember this technique.
Regards Anita Simmance
What a marvelous technology tutorial, Mary… as usual, you are an inspiring teacher – Salut!
I love your trouble-shooting posts. The way you spot things and figure them out and come to a conclusion/fix. Thanks for sharing this Mary – it was fascinating.
I agree — in all crafts mistakes are made. In quilting, I have a real problem with accurate cutting. It’s simply not possible to cut 1000 little bits the same exact size. Learning the wiggle room and the fixes was harder, because the shows never show you the bloopers — they show the perfection. I found the Fons and Porter DOES give me fixes and remedies…
Love the fixes!
I’d be writing the publisher. Seriously. That’s awful. What if you’d completed the whole thing, and then noticed? What a lot of wasted effort, time and materials, and it makes the author look bad with a poor product, when it wasn’t her fault. And wasn’t the kit for that a pretty high ticket item? Are they giving you more materials for free?
As a customer that’s the kind of thing that makes me not buy a particular line of products anymore. If I know a publishing house or magazine plays fast and loose with instructions, diagrams, etc, then they don’t deserve my business.
Hi, Leigh –
It’s not that unusual, for small errors to show up in books. This one is pretty minimal. I could just leave the leaves the size they are, and in the end, no one would notice it except me, unless they had something to compare it with.
The materials aren’t a problem. Hazel’s kits come with generous quantities, so I’m not worried about running low. If anything were to run low, it might be the beads, but I can always snip them off the original set of leaves, if I do run low. There’s plenty of wire and floss.
I’ve seen lots of embroidery books – from all kinds of publishing companies – and very very few are completely error free. I’m sure if this goes into reprint, this will be fixed, and in the meantime, I’m sure Hazel will publish the corrections on her site.
I suppose these just aren’t the types of things I get too upset about. The fix is easy, so it’s just a matter of going forward!
From Mary’s post, it sounds like the publisher for some reason changed the size of the leaves.
And I wouldn’t be so quick to judge one company, it could’ve been a true one in a billion error.
I’ve got cross stitch patterns that when they get published, the project key is missing a vital piece of information, or a symbol is missing (and/or misprinted).
Look at some authors, they get so involved in their work, they totally miss some necessary punctuation or grammar which would change the entire sentence/paragraph’s meaning.
If I’d had 3+ duds or major goof projects in a row, then I’d be calling the publisher to say their quality control section needs a major overhaul.
Your reaction to the error is much better than mine would have been, Mary!
The larger leaves will look a lot better, but do you have enough materials? That can be a problem, especially with kits. That Inkscape program looks intriguing, I’ll have to give it a try.
Lovely, stumpwork, Mary, and those initial leaves needn’t go to waste. You could use them in something else, I bet!
Wow Mary, that’s a really good work-around! I admit, I would have been pretty stumped by your stumpwork dilemma. 🙂 What a relief that the resized elements can be fitted in to the overall design. I am enjoying watching your progress through this embroidery. 🙂
good detective work spotting a problem AND then a solution!! all without the drama of throwing yourself off a bridge!! haha! you are SO sensible, Mary! Thanks for sharing!
Hi Mary,
I so appreciate that you posted this. I have the entire Late Harvest kit and have not started it yet. Had I come across this “snag” after completing as much of the stump work as you had, I don’t believe I would be as good natured about it as you are! When you are finished, will you be organizing all the posts as a
“step-by-step project” as you did with Hummigbird and the others? It is particularly helpful to find all the posts sequentially and in one place.
Many thanks for all you do!
Jodi
Mary your positive attitude is above and beyond. I have both of the crewel books and now will put a note on the front cover.
I do hope Hazel rewards you for your kindness, as a lot of people would have been upset had they not noticed.
You are a mentor to us all and set such positive examples.
Prayers for your health
Hugs
Linda
Hi Mary,
What a shame for Hazel, a lot of people will miss the correction until after they have started. You’re such a wizard with your needle and even if you had a few Grrrrrr moments, it doesn’t show 🙂
I loved seeing the back of your work, it also gave me some tuition – I am learning so much from you and your site.
With you in spirit, Trish
Hi, Mary,
Although you can think of the smaller leaves as just practice, what do you think about the possibility of making a smaller central figure, not necessarily from the original pattern, and use those smaller leaves as an embellishment? … Kind of a recycling, or re-purposing? …
OMG! I knew it! I had worried about this but when I looked at the book again it said “Actual Size” so I thought okay! But, no. sigh
Thank you for addressing this. I hope there is enough wire to redo. Since I’m not a computer whiz, or a scanner/printer whiz either, for that matter, I will go to Hazel’s blog and get the new leaves there. In a way, Mary, I’m glad you haven’t gotten as far as the left side yet; I was beginning to feel like I was hopelessly behind! So selfish of me! Again, thanks for being the brave one figuring all this out.
Hello Mary, In Australia there is an expression that would describe how I would feel if this happened to me when I was stitching something so complex and beautiful and came across the problem that you identified. That statement is “Oh,Bugger”.
As others have said, thank you so much for your inspirational embroidery, tuition and attitude to life.
Barbara
Queensland
Australia
I think I would have cried at having to repeat all that work. But then again, stitching is never a hardship is it.
Ouch! I know you’d said at the start that the leaves were tiny; what a pity it didn’t snag your attention enough to check then. Please find another project to use the leaves you’ve already worked; they are too pretty to waste. I’ll be putting a note in the front of my copies of Hazel’s books. Knowing from her blog how forthright Hazel can be, I’m sure the publisher’s ears are still ringing.
Hi Mary, thanks for the information. Do you know if this applies only to Late Harvest or to other/all projects in the book? And could you let us have the url for Hazel’s blog please? I did a Google search and came up with several websites for her. I looked at the blog (Rebellious Needlewoman) but there was nothing relevant there.
I don’t think she has posted it yet. I linked to her website above, and you’ll find her blog in her main menu.
Dear Mary –
Good catch! You have a really discerning eye and are so good with follow-up. How nice you discovered this before you had the project complete and assembled. 🙂 Plus you’re helping Hazel get the word out.
It’s such a beautiful design and sounds like a fun project to do. I look forward to the next installment!
Katrina
Very pretty and very interesting to follow along. Do you have plans for the smaller elements that you are restitching?
What good luck that you spotted this now, in time to correct it! But since this is a kit, will you have enough fiber and beads to stitch those elements all over again? Will you have to cut the beads away from the first leaves? If you’re able to leave those first leaves intact, I bet you could find a way to use them in another piece.
Thanks so much for showing us the details of how you adjusted the designs. A very helpful set of hints