


A long, long time ago – back when the idea of blogging for Ten Whole Years had never even crossed my mind – I started a project that would become an Old Friend.
It has withstood the test of time rather well, and I thought it would be fun to revisit it.
Maybe it will inspire you to take up some random embroidery project and just stitch your little heart out!
Because I’ll tell you this much: it may not be the most beautiful embroidery project in the world, it may not be the nicest finishing job, and it may be a bit on the bizarre side overall, but this project was downright fun.
And now and then, doing something Just Plain Fun with needle and thread is darned good therapy!
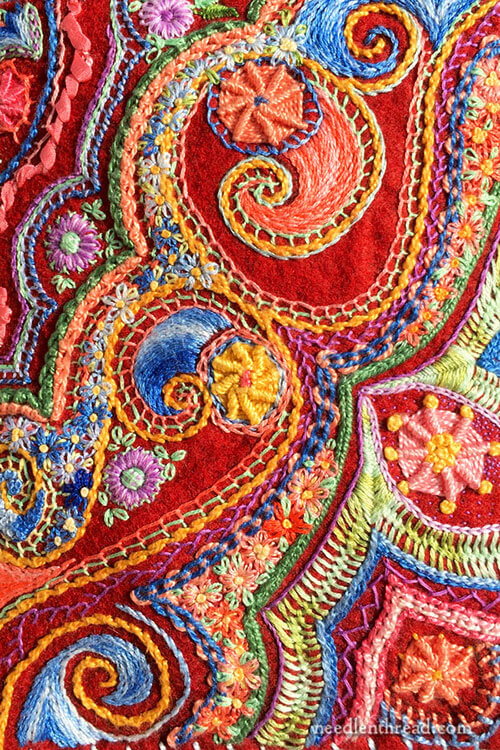
The project I’m talking about is this felt needle and tool book that began as a road trip project, that was worked with absolutely no plan in mind using a bag of random threads and a few scraps of felt, and that eventually ended up in my niece’s sewing stuff because she really liked it.
She still uses it to this very day whenever she’s sewing, and that makes me feel pretty happy!
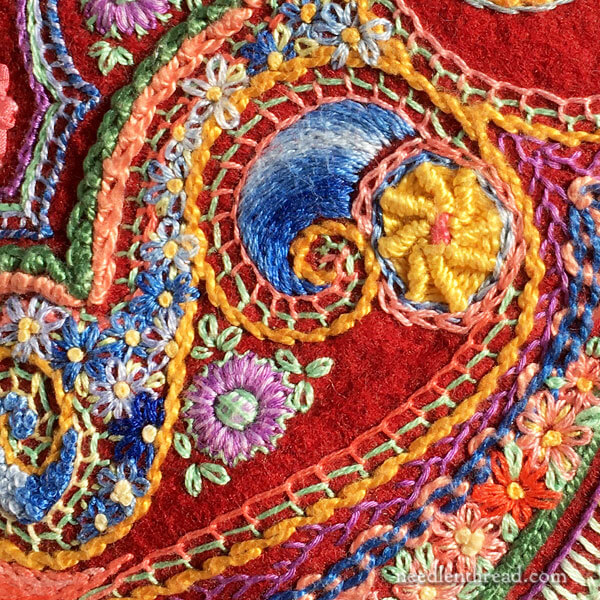
You can click on the photos to enlarge them, and when you do, you’ll see that Time has flattened the stitches a little bit, but overall, they’re still in ok shape.
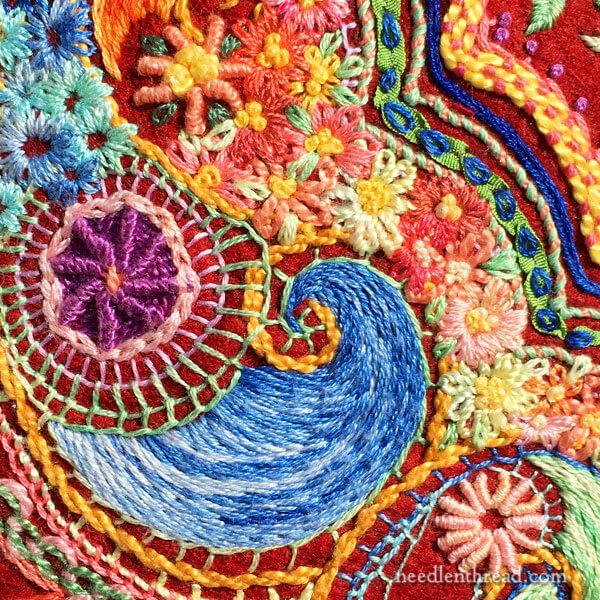
The threads I used on this piece were pulled randomly from a stash bag that had all kinds of cotton threads in it that no longer had tags on the skeins. Perle cotton in sizes 3, 5 and 12 figure in quite a bit, along with stranded embroidery floss, floche, and some scraps of silk ribbon here and there.
The stitches? Anything that came to mind!
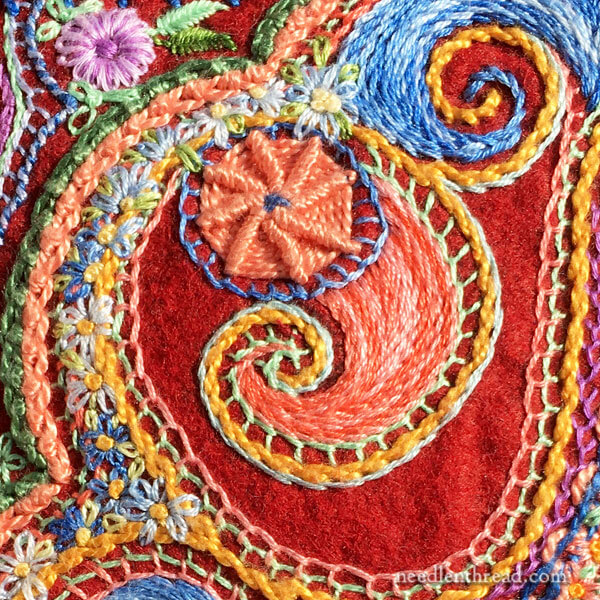
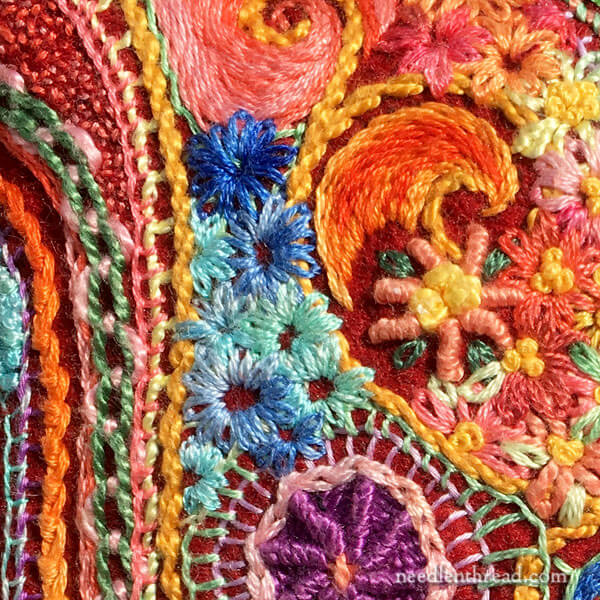
Stem stitch, chain stitch, buttonhole stitch, ribbed spider webs, daisy stitch, feather stitch, Palestrina stitch, Portuguese knotted stem stitch, whipped stitches… whatever happened to pop into my head once I finished one area and moved into the next.
I remember combining a lot of stitches and playing with stitches in general – overlapping some, whipping others, whipping parts of others, layering odd stitches. I really didn’t think long and hard about what stitches to use where, or how to use them.
The pattern? There was none! I started with a swirling line and went from there. Whatever developed, developed.
Now, when I look back on the piece, I think of all kinds of stitches I could still add to it. Maybe it’s time to work another one?
I have a feeling, though, if I worked another one, it would end up being a little more polished. A little more precise. A little more thought-out.
Would that be a good thing? Or a bad thing?
I think it would be ok. I think it would be the natural consequence of the passing of years and the learning of new things.
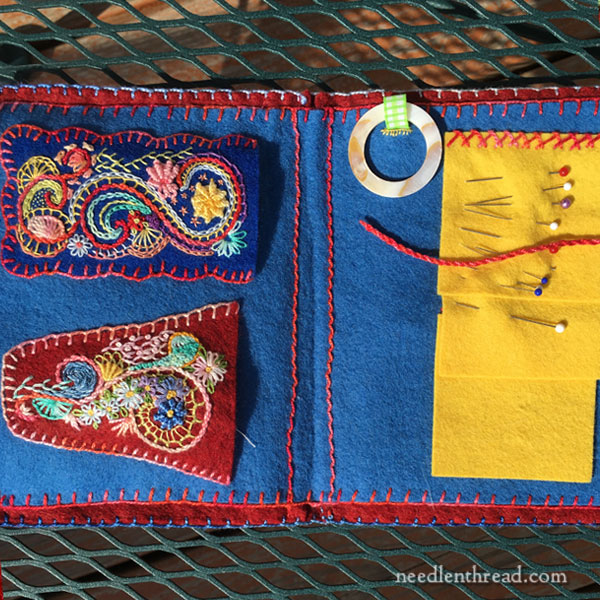
When I started the piece, I had vague plans for turning it into book cover of sorts.
I added two little pieces of felt to serve as scissor pockets, some felt flaps for needles and pins, and a mother-of-pearl ring to loop thread on.
I stitched up the sides with buttonhole stitch, but left the blue felt unattached to the red up the sides, to create two large pockets, into which my niece invariably stuffs things like spools of thread that she’s working with and the like. It works great for her!
You can read more about the finishing here.
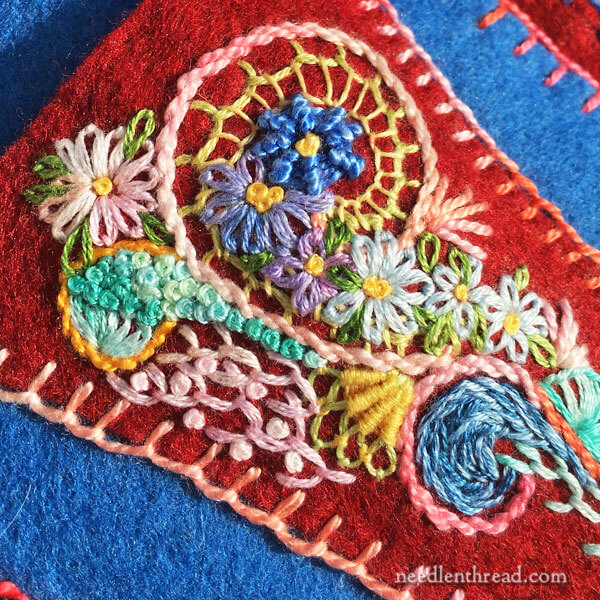
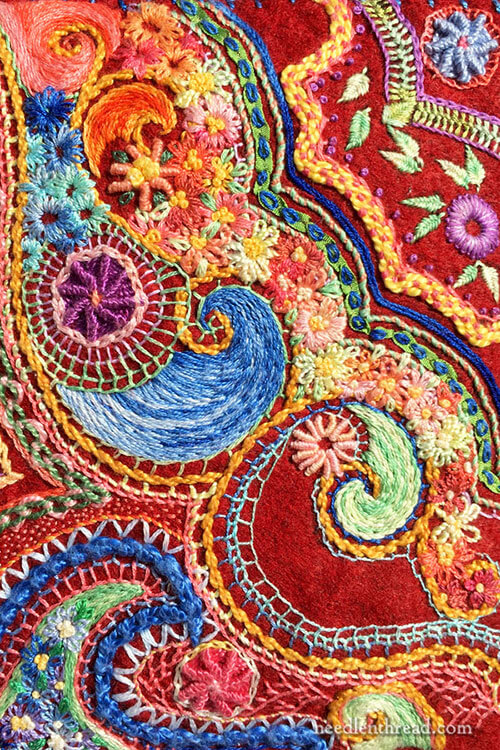
Even the inside little pieces were great fun to stitch! Completely random. No plan. Just whatever sort of fit the shape of the scrap of felt.
When I look up close at the book cover, I’m not all that impressed with the stitching. And I find a lot of blank areas where I hadn’t “finished” – centers of flowers that aren’t filled. Areas of seed stitch only half complete.
But that doesn’t matter to me at all! What matters is that the project was loads of fun and the needlebook has served my niece well and given her a lot of pleasure, too.
Planting Seeds
Strangely enough, working this project planted the seeds of a completely different project – my Stitch Sampler Alphabet.
When I finished the needlebook, I started thinking about working an alphabet “randomly,” with all sorts of stitches on all the letters. It took years for that project to actually materialize, and then two more years for it to turn into my Stitch Sampler Alphabet ebook. If you like the idea of random stitching, you’ll find a ton of really fun stitch combinations in that e-book, and you can apply them to all sorts of projects, not just the alphabet!
It’s fun to revisit old projects and to see them years later.
I can’t do that with many of projects because they are mostly given away, and to people far away. But there are a few that are still close to home, and now and then, I get a glimpse of them.
I think about the hours of work that went into them, the joy of stitching them, and the pleasure they still give to others.
And you know what? Every time I see them, it makes me happy!
I’m so grateful for the gift of hand embroidery, for this art that’s been passed down for centuries through all the folks who came before us and kept the art of hand embroidery alive.
I wonder if they knew how much pleasure they’d be bringing to generations after them?
Hello Mary,
Stitching randomly for fun is the apex of of stitching pleasure for me. I love the freedom, the uniqueness oft the results. I can never decide which sort of playing I like the best. Stitches or colour. This style of stitching makes great Day Timer covers and it is always easy to locate no matter where I last put it down. Pleasure with lack of worry afterwards.
Ann Bernard.
Thank you so much. I look forward to your articles each morning. I can’t begin to tell you how much I enjoy your cite and the emotion of joy it brings. Your article today was beautiful and I hope you know how much you bring to so many. Not only are you an extremely good stitcher, but from all I have seen since reading your articles, you are truly a wonderful person who brings beauty, inspiration, and joy to others. That is a rare gift to have and you use it well. Thank You for all you do.
Mary
P.S. I taught myself to embroidery when I was around 11 years old and have been stitching for almost 60 years. I can still learn new things and still be inspired. You do both for me.
This is a great project. Thanks for (re)featuring it as I do not remember it from earlier. What a great way to make use of small leftover pieces of fabric.
I was interested in why you stitched in the “spine”–and have a suggestion for anyone who emulates this great pouch on how to put that area to use. Use the spine to hold a marking pencil or thin ruler; stitch the spine to the width of a pencil or ruler, and leave one end open so you can slide the pencil or ruler in and out. I always want to have both items when I work and this would be a perfect place to stash one or the other.
I’d like to suggest making the needle book from wool felt. The craft felt often available in local stores is not wool, so the pins or needles will rust if left parked in it for a while. If you don’t have a source for wool felt, make it yourself by tossing small pieces of 100% wool fabric into your washing machine and running it through as many times as it takes to get the fabric as sturdy as you want it to be to hold your pins and needles.
I put such small pieces in recycled onion bags that can be knotted or basted closed; these are easy to spot in the washing machine–and they prevent the piece of wool from felting/attaching to other items in the washer. Take the felt out of the mesh bag while still wet, pat flat and let dry. THEN cut it to the desired size and shape for your needle book.
Ah, Mary, everything you embroider is so full of life. This piece is no exception, it is bursting with color, texture, movement, and joy! Thank you for sharing this piece!
Dear Mary
I remember the needlecase and what a lovely design, I’m glad your niece has made use of it and that she still uses it. It’s nice to look back on finished projects and like you I don’t have many as I make them for other people, but I always take photos of them for future reference although photos don’t do justice to the real thing and like you I always appreciate the gift of hand embroidery which has led me to other crafts but I always incorporate some form of hand embroidery which is a very diverse craft. Thanks for sharing with us your project of years gone by and what happened to it.
Regards Anita Simmance
I know exactly what you mean. I have given away so much of my work, including quilts that in general anyone walking into my house would have hardly known a crafter lives there. So other than for Project Linus quilts and the occasional gift, most of what I make these days will stay with me. Partly also keeping my stuff came about after one of the last big projects I did, over 40 hours of machine embroidery and the recipient glanced at it, said thank you and set it aside.
I made some small machine embroidery projects and gave them to my niece for a wedding present and for the first time in years I got a timely thank you note for a wedding present (last one I didn’t get a thank you note for 6 months!) that even spelled out what we had given her. Makes me so glad I made the effort.
I love your sampler and that is probably what I need to try to get back into the swing of things with hand embroidery — some project where mistakes or defects won’t show. How big is this sampler?
Ah ha I thought, yes, I’m going to make a needle book. The bright colours made me happy. So I’m going to dig out some bright colours and do some random stitching. Thank you for enticing me to stitch. Xx
I love, LOVE this kind of free form embroidery! It’s whimsical, and fun and there are always those little surprises. That said, I’m not comfortable doing this kind of work. I’m not a doodler, for one thing. My mind just goes blank when facing a plain piece of paper (or fabric). I could study the piece and make a pretty close facsimile. But I’m a pattern kind of gal. I need a road map. It’s why I have OnStar.
Maybe it’s the Virgo in me.
Thanks for this post. I am in the hospital a lot with my mil and was thinking I need a project that’s just fun! I’m working on a mill hill bead kit, but I need something else. Now just to get home and grab what I need. I may even have the beginning of a project that I can use.
A stitch doodle! I love those. This work has so much of your own style that we have come to recognize, and yes — the stitch sampler alphabet comes to mind. I used that for a project earlier this year that I just love. Thanks for that look back!
Put a pencil and paper nearby me and I start doodling. Always have! This looks like many of my doodles, only with needle and thread! So much fun!!
Mary –
This project has always been one of my favorite! I love the colors, the variety, the movement in the design.
I agree with Mary Daly–you bring joy and inspiration to all of us. I’m continually learning from you!
A beautiful reminder of the lovely things that can be made from small pieces. Of course it helps if the random embroider has a true artist’s eye – something you most definitely have. Thanks for including the link back to how you finished the needlebook – page duly noted for possible future reference.
Mary,
I just want to tell you how much I thoroughly enjoy your site. I stumbled onto it while doing some searches for crewel work, as I’ve decided to add some new methods of embroidery to my repetroire. What a fantastic site you have, so full of detailed information! The video tutuorials are superb, by far the best I’ve seen. And your range of topics covers every last tidbit. It’s rare to find such a wealth of information on one site, and presented in such an easy to find manner. The information, guidance and instructions are so easy to follow and clearly presented.
Thank you so much for sharing your wealth of knowledge and skills. Your creations are an inspiration and I know I will use your site repeatedly for years to come.
Sincerely
Kim Harris
Just love this post Mary and your parting comments on the joy that you still get from seeing your work, the hours put into them, and the joy that they bring to others, sits well in my heart too. I have done a couple of little calico bags – just big enough to put the current project in or carry some knitting or crochet – and even though they are cheep to make and even a little rough around the edges (sewing is not my strong point), I love them and the joy they have brought to others. Thank you for the re-inspiration. Blessings to you from NZ. Maria.
Hi Mary,
I’m about to start stitching on my first felt project. Can you tell me anything about the ‘feel’ of stitching on felt vs stitching on linen or aida cloth? I’m just a little nervy, because I’m not sure how easy or hard this will be.
Thanks so much,
Monika in Mobile
Hi, Monika – stitching on felt is quite easy. As long as you’re using wool felt, you’ve got a good ground to work on. Acrylic or craft felt is a little too chintzy to support embroidery, I think. So if you have wool felt, go with that. It’s very forgiving! And you don’t have to use a hoop – just don’t pull your stitches too tightly. You want them to lay on top of the fabric, not sink into it. You might practice a bit on a scrap if you have one, just to get the feel of it. I like using slightly heavier threads (perle cottons, or three strands of floss at a time) on felt, just because the stitches sit better with the heavier threads. Hope that helps!
Yes it does Mary, thank you!
I’ll have to watch that tension – I’m fairly even, but I tend to be a little tight. And yes, for this project I’m looking forward to using perle cottons! There’s this thing about pretty threads we share….
Thanks again!
-Monika in Mobile
Monika,
You can make your own wool felt–and have your choice of colors–by putting 100% wool yardage into your washing machine and agitating on hot with soap till the fabric is as thick as you like. Don’t use anything that says “Machine washable as that will not felt.
I check it during the “wash” cycle; if it isn’t felted enough, I reset the machine to run that cycle again. This saves both detergent and hot water.
Yardage can ruffle a bit at the edges during felting so baste it into a tube to keep the ruffles at bay. Use a slick “invisible thread” or even fishing line will hold your tube together in the machine and be easy to remove.
You could put the tube into a pillowcase you can close to keep the “lint” that sheds from the yardage from getting all over the machine. But don’t cram the yardage too tight or it will crease and felt to itself. Such creases will never come out.
When you have felted in the machine to your satisfaction, lay the yardage flat and square, pat it flatter, and let it dry. Some people put it into their driers but you cannot control the shape that way. Felt is more or less like clay–you can shape it when it is wet but not after it is dry.
If your dried felt is not as thick as you’d like, just repeat the agitation process. If the warp and weft in your fabric are still just woven and not actually securely felted, keep agitating. There is no set length of time to agitate as wools are all different.
The most important thing is to be sure you are using 100% wool, not a blend and not yardage that is labeled washable. It’s very easy so I hope you will give it a try. Have fun!
test
LOVE it! This would definitely be a family heirloom. I’m (eventually) doing prayer book embroidered covers for several of my friends and I know it will take a long time to finish them, but seeing your process and completion is inspiring. Thanks for sharing!
Dear Mary, I love your felt project and when I had finished the hummingbirds project I stitched my own version of the felt sewing case. I really enjoyed the stitching and incorporated some of the TAST stitches from Sharon Bogons website. I need to find a suitable thread ring for the inside. I used a flap with a button and a loop for closure which works well. I particularly love the cheeriness of your felt project. You are an inspiration to so many.
Love Jude
Dear Mary This is so lovely. Your paragraph about the blessing of embroidery being handed down is so true and evocative. I see that From 1st October to Feb 2017 Opus Anglicanum Exhibition at Victoria and Albert Museeum will be here in London. Thanks to you I wil go along with much excitement.
Every best wish and many thanks
Margaret.
my random stitches are caught on denim. Finding a pair of jeans offers another canvas. Most end up more feminine looking, thanks to my attraction to flowers and foliage, but occasionally bits of patterning go in that could be seen as more gender neutral. As an old farm girl, jeans are common wear, in fields and barns, so the flowers, trees, and lines of stitches simply add a touch of color. The great thing is that any piece can be picked up that has not been given away. It is soothing to watch an image in my mind turn into a portion on some blue jeans.
I am doing something similar at the moment and can relate to all you say. I absolutely love it as a piece of art. Thanks for sharing
this is my favorite thing you’ve made. It reminds me in look and how it progressed, of the seventies and how i would embroider my jeans lol…… just one thing leading into another…….
I love your work, it inspireds me, thank you
6 yrs. After your post, I stumble across your very cool stitchery. I learned embroidery in elementary school, likely for a Brownie project. Learned to sew, weave, make baskets and create 3D fiber art. Had good fortune to study with Mary Ruth Smith, at the U of Houston…many years ago. Paisley is my go to, so your work captured me. Thanks for the visual treat. Hope you are still enjoying fiber arts!
Thanks, Francine! I’m glad you enjoyed this! And yes, still enjoying fiber arts! 🙂
I am a newbie to embroidery. Your work is beautiful and inspiring.