


One of the questions that I’m asked frequently concerns embroidering on personal or household linens, where the back of the embroidery is not covered in any way when the piece is finished.
When embroidering kitchen towels or a table cloth or placemats, a guest towel, pillowcases, or handkerchief, the back of the embroidery is not normally covered in the finish work. It’s visible, and it is mostly likely going to be seen.
When the back of the embroidery is meant to be visible – even though it isn’t the primary side anyone looks at – we want the back to look as neat as possible. No, it doesn’t have to look just like the front. But it should at least be neat.
One place where you can really control the neatness on the back of embroidery is the beginning and end of any thread. If you pay attention to your starts and stops and make them as neat as possible, this goes a long way to a nice clean look on the back of the work.
Since two strands of floss are a frequently used weight of stranded cotton, I thought I’d show you how I like to start a thread when working on such pieces and stitching with two strands. It’s a super secure way to start threads and it will keep the starts of your threads extremely neat on the back of your work. I’ll also show you my favorite way to securely and neatly end a thread – but the focus here is really the start of the thread.
For beginners, the first thing to understand is that stranded cotton or “embroidery floss” – the typical 6-stranded DMC or Anchor (or other brands) of cotton – can be divided so that you can work stitches in various weights or thicknesses, using this one kind of floss.
If you want to see how 6-stranded floss stitches up in its various thicknesses, working with one, two, three, four, five, or all six strands, check out this article that illustrates the point.
Also, if you’re just starting out and learning about embroidery, you should know how to strip, or separate, embroidery floss. Normally, when stitching with less than 6 strands at a time, you individually remove one strand at a time from the bunch of six, and then put the number you want to use back together again before threading them into the needle. You can see how this is done in this tutorial on stripping embroidery floss.
To start your thread in this tidy way I’m explaining here, as long as you’re working with two (or any even number) strands of floss in the needle, the method is very simple!
Preparing the Thread for Stitching
Start by pulling out a length of floss from the skein that is double your normal stitching length.
Strip one strand of floss from the six.
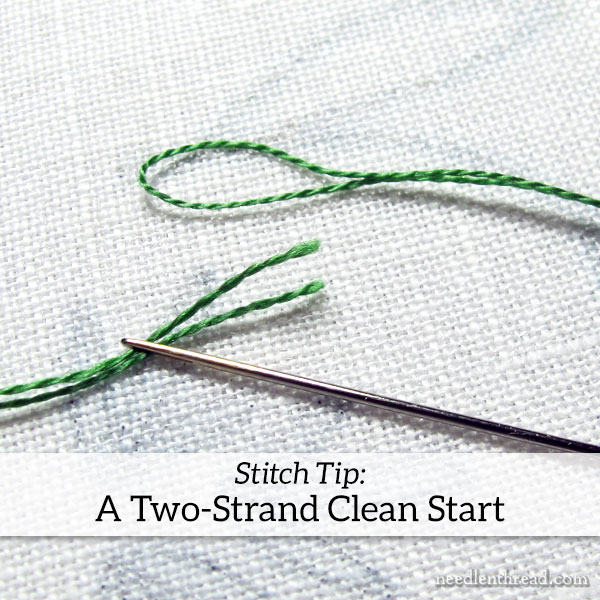
Fold the thread in half and then thread the two cut ends into the needle.

Bring your needle and thread up into the fabric where you want your first stitch to start.
Because there is no knot on the end of the thread, be careful not to pull through. Leave about half an inch of thread on the back of the fabric, as shown here:
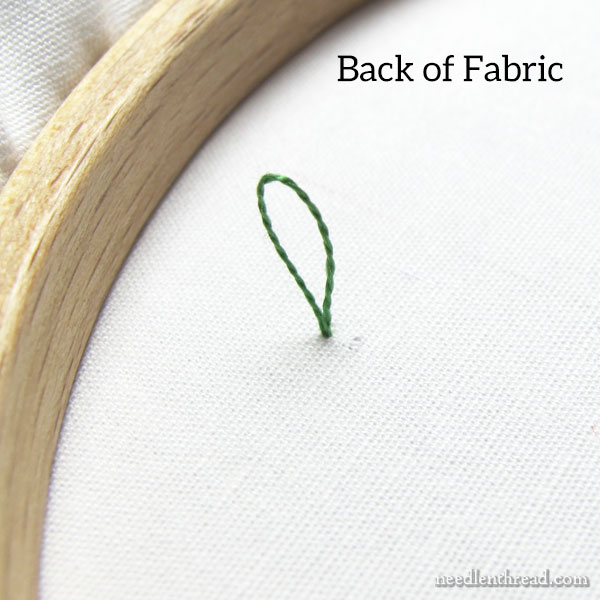
Because this is the folded end of the floss on the back of the fabric, the remaining thread will look like a little loop.
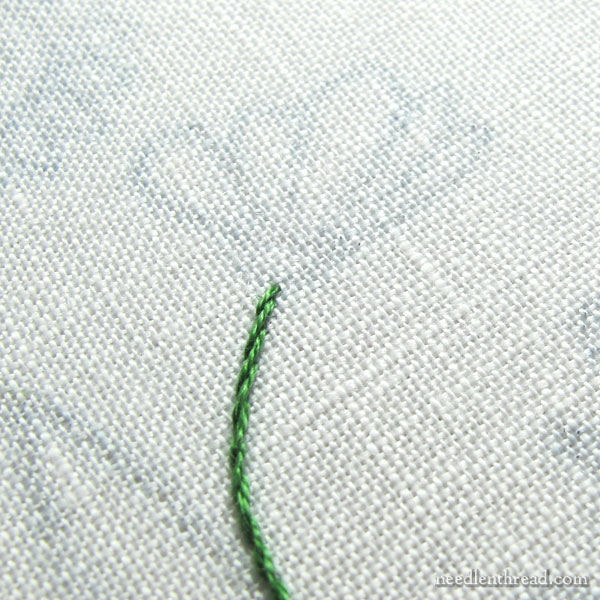
Take your first stitch forward along your design line, as shown above.
For this tutorial, I’m working a stem stitch line, but the principle holds true for any line stitch when working with an even number of strands of floss in the needle.
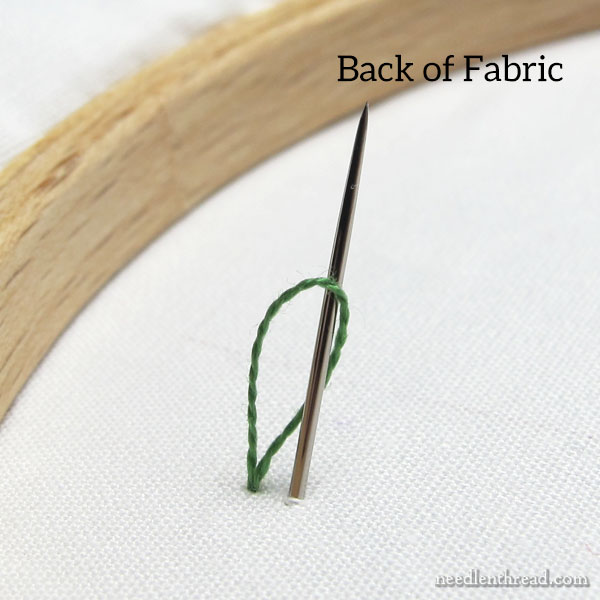
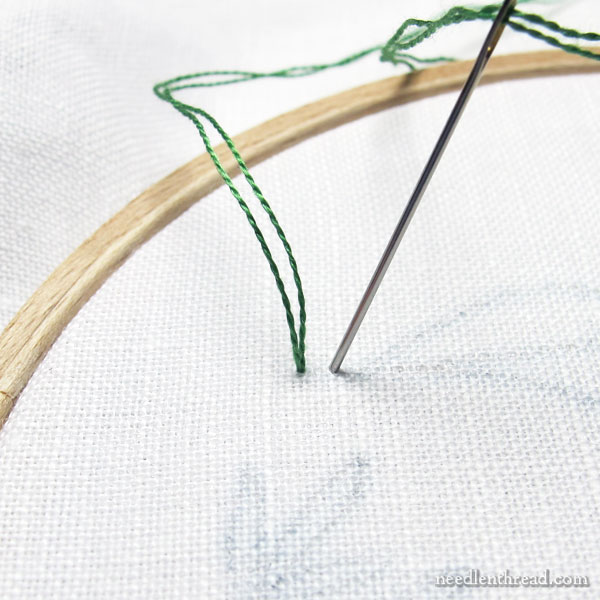
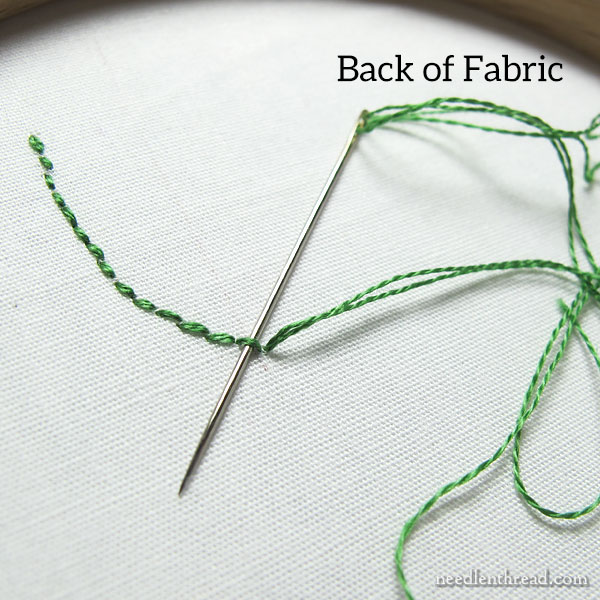
When you take your needle to the back of the fabric, pass the needle through the loop on the back of the fabric.
Then, gently pull on the stitch on the front of the fabric, so that the loop on the back tightens around the needle.
Pull the first stitch through from the front, through this tightened loop.
The thread is now secured around itself, and you’re ready to go forward, stitching the rest of the line.

On the front of the fabric, everything will look just like a regular stem stitch line underway.
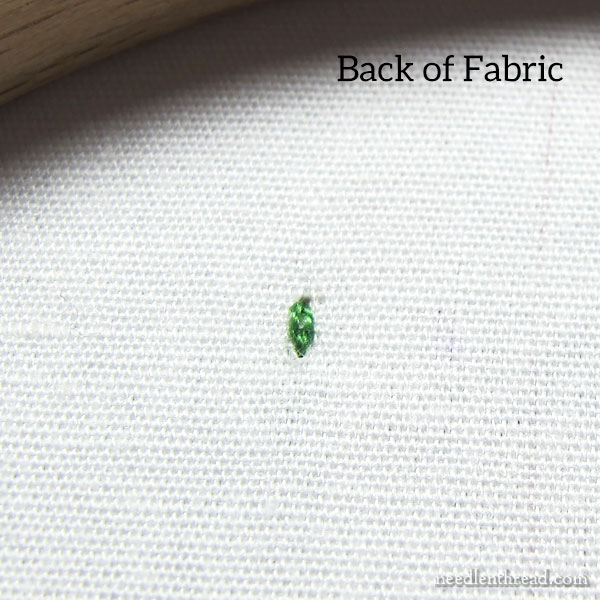
On the back of the fabric, the little starting hitch will look like a tiny chain stitch.
There are no loose ends and no tweakers sprouting forth from the back of the stitches. Hurray!
My favorite method of ending stitches on this type of work with exposed backs is to use tacking stitches in nearby area that will be covered with more embroidery.
So, as I come to the end of this line of stitches, you can see a little almost circular element at the top of the stem. This element, I plan to fill with other stitches, so I can use small anchor stitches worked inside that space to end the thread.
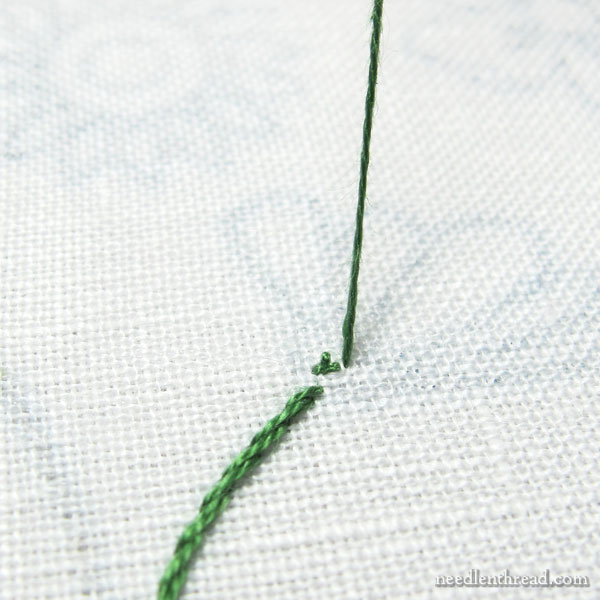
In the photo above, I’ve worked three tiny little stitches that converge at the same point, and I’ve brought the thread to the front of the fabric, close by those stitches.
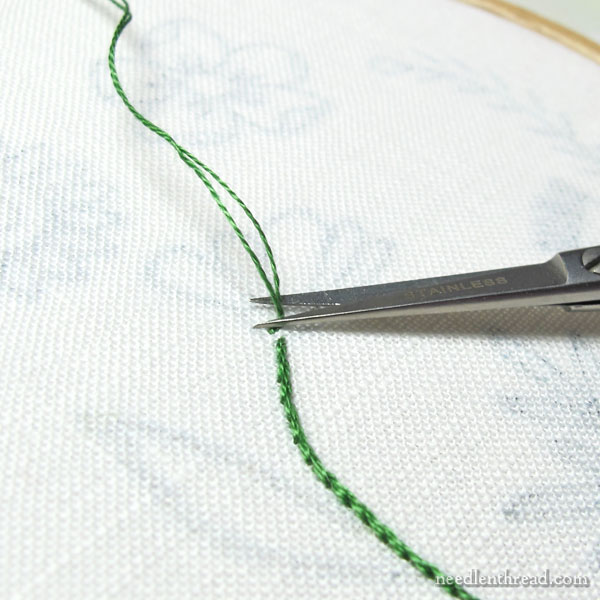
Pulling up on the working thread, I snip it off right next to the fabric, to end the thread.
Once I finish the embroidery, those little anchor stitches will be completely covered up.
If, however, you don’t have a space to work some tiny anchor stitches, you can turn the work over and neatly whip the working thread around the backs of the stitches, passing the needle under about five or so stitches, always passing the needle under in the same direction.
This is a neat and adequate way to end a line as well, but tacking stitches are less visible, so use them when possible, and when not, whip the backs of the stitches.
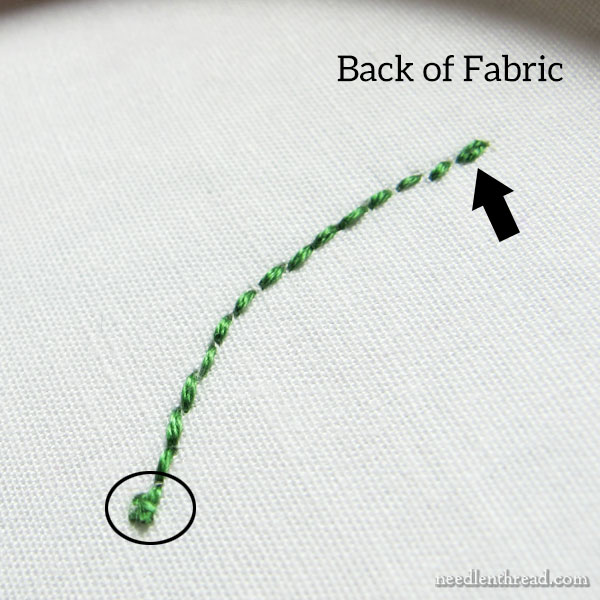
In the photo above, the arrow points to the start of the line, and the circle highlights the small area of anchor stitches, which will be covered with future embroidery.
And that, my friends, is a quick and easy way to create a neat, nearly invisible start when working with two strands (or any even number) of floss.
If you want to want to read more, you’ll find a list of tutorials for different ways start and end embroidery threads here, which is situated under Tips & Techniques, where you’ll find lots of other embroidery tips for beginners and beyond!
Hope your week’s off to a great start!
So simple and absolutely brilliant. How have I missed this all these years? Thank you!
Mary, that starting method is absolutely brilliant!! Thank you so much for sharing!
Thank you Mary for this perfectly timed tutorial. I have some dresser things to do, and had never seen this lovely way to start and stop! Just brilliant and lovely. Thank you so much for sharing!!
I often use a loop start — so convenient. However, I do mine with the loop on top — taking the thread down to begin with and leaving the loop on the surface, then bringing my needle up where you’d expect to finish the stitch, putting it through the loop, and then taking the thread to the back through the same place you brought the needle up (this is crucial). A very satisfying “snick” tells you the stitch is in place. You’ve made your first stitch and can continue along the rest of the stem stitch, for example. I find it easier because I don’t have to turn the work over. It works for any line or crossed stitch.
No matter how it’s done, though, it’s a very tidy way to start.
Yep, I’ve used it that way, too! I like starting from the back, though, because it works universally for any stitch. The loop on top only works for straight stitch starts, like backstitch, stem stitch and so forth. It doesn’t work, for example, for stitches like chain stitch.
Mary,
Very helpful information. I am planning on embroidering some kitchen towels and handkerchiefs and was wondering how I could make the back look presentable.
You can also loop start on the front of the fabric, taking the needle down, then up from the back wherever your first stitch needs to end, through the loop, then back down through the same hole. Leaves a perfect stitch on the front and a corresponding one on the back. : )
Yep, I’ve done it that way, too, Monique – but it doesn’t work universally for every kind of stitch, as the “backside loop” does. For example, it doesn’t work with a chain stitch. It has to be a straight stitch start, for it to work with the loop on top.
Dear Mary
Great tutorial and this is a great way to start and end your threads especially for projects that will show the back and so easy. I have used this method for the quiet book I am making for my Niece and it is a great method to use when starting stitching with two strands. Thanks for sharing such with us a great and useful tutorial and for the links and photos.
Regards Anita Simmance
Wow, thanks!
This technique only works for even-numbered threads.
I like working with three.
Any suggestions for that, Mary?
Yep – the links at the end of the article will take you to further tips on starting and ending threads. I use anchor stitches, and then stitch over them. There’s a photo tutorial for that.
I just learned the loop method last fall when I found a cross stitch pattern I wanted to do. It has been ages since I did any cross stitch so I was super rusty and started watching Flosstube channels via You Tube. Many of the stitchers have tutorials and I loved this technique when I first tried it. I also learned the Pin stitch which is great for an isolated stitch or a design with lots of different colors that only have 1 or a few stitches which they refer to as “confetti”. It’s a great way to avoid carrying threads in the back. I haven’t tried ending with the 3 little stitches but will in the future. I still love surface embroidery more because of the variety of stitches, I love satin stitch, lazy daisies, etc. but just doing a lot of x’s can get a bit boring.
Funny, I just recently discovered this method of starting a thread in some cross stitch tutorials, where they called it a “quilter’s knot”. Since then, I use it as often as I can, because it really is a neat and ever so easy start. The only bad thing about it is that it doesn’t work with an odd number of strands.
Mary, if you’re making something that will be laundered a lot, like kitchen towels or napkins, is it enough to simply whip stitch? Or is there a very secure way to end that isn’t that bulky knot?
And that loop back to begin? Wow, that’s brilliant! So simple, and so clean. You’re amazing!
Normally, yes. I’ve never had a problem with just whipping the backs of the stitches. You can always whip forward a few stitches, then back one, then forward again for extra security. With items meant to be laundered, usually there’s a little shrinkage that helps grip those threads into place. Still, I prefer to use anchor stitches wherever possible, because they don’t result in “tweakers” – those little thread ends that stick out. But occasionally, you might still have to whip a thread to end it.
Thanks so much! I mainly quilt, so I should have thought about shrinkage. Another D’oh! Moment.
I like loop starts when they are an option but I tend to do mine around a single thread of the fabric which will be covered by the first stitch – at least on counted thread pieces where the threads are easy to see. I might need to work around a couple or so threads in fine fabric to be sure of not tearing the fabric. It looks like a pin stitch on the front. For finishing work where the back will show, I often hide thread ends under stitches on the front if the stitch has plenty of coverage.
Wow. This is brilliant. Thank you. This will make my pieces look so much better.
Well now, this deserves the hurrah shout I use with my three little grandsons: Hot diggety dog! Thanks, Mary!
Linda
Aren’t you clever, Mary. I never thought of doing it that way and it makes the back of the piece so neat and tidy. I remember some of the first embroidery pieces I did when a teen….I never ended a color….if that color was used elsewhere, I just started the color elsewhere and never cut it…..looked like a colorful road to the next stitch. It was rather ugly but I kind of learned on my own so it was the best I could do. Where were you then Mary?
Fantastic!!
What a brilliant way to begin embroidering, even if you’re not concerned how the back looks… this little loop is ever so much smarter than a knot bulging somewhere! Thanks for constantly sensible and helpful tips!
I started use this method yeas ago but then was told that by folding thread in half the direction of the ‘two’ was reversed and this would affect the look f my work.
Any thoughts on that?
The twist of the thread doesn’t change, despite the direction. Although some people hold that cotton thread has a nap and should only be stitched in a certain direction (threading a certain end of the cut thread into the needle), this isn’t actually the case. Science proves otherwise, and the manufacturers say that it doesn’t matter which end of the thread you put in the needle.
Is there a method to doing a clean start when you need to use two strands that are different colors and not end up with four strands to stitch with, just two?
Not following this method, Linda. You’d probably just thread both strands in the needle and start and end your threads as you normally would, when working with two single strands in the needle at once.
I feel like I don’t understand how it doesn’t come out if you just do the back and forth anchor. And I don’t really understand how to do the anchor
Hi, Jane – In this case, you’re starting the thread by going through a loop which locks the thread onto your fabric. It helps to follow the instructions step by step, not just using the photos, but reading the text. In this example, you’re working with a thread that is folded in half, and the cut ends of the thread are in the eye of the needle. The loop that forms when you pull the thread through the fabric is formed by the folded thread. If you pass through this loop, it will lock the thread onto the fabric.